Our 100 year old house came with wall to wall carpeting everywhere except the kitchen and bathroom.
Actually there’s evidence there was once carpet in the kitchen too.
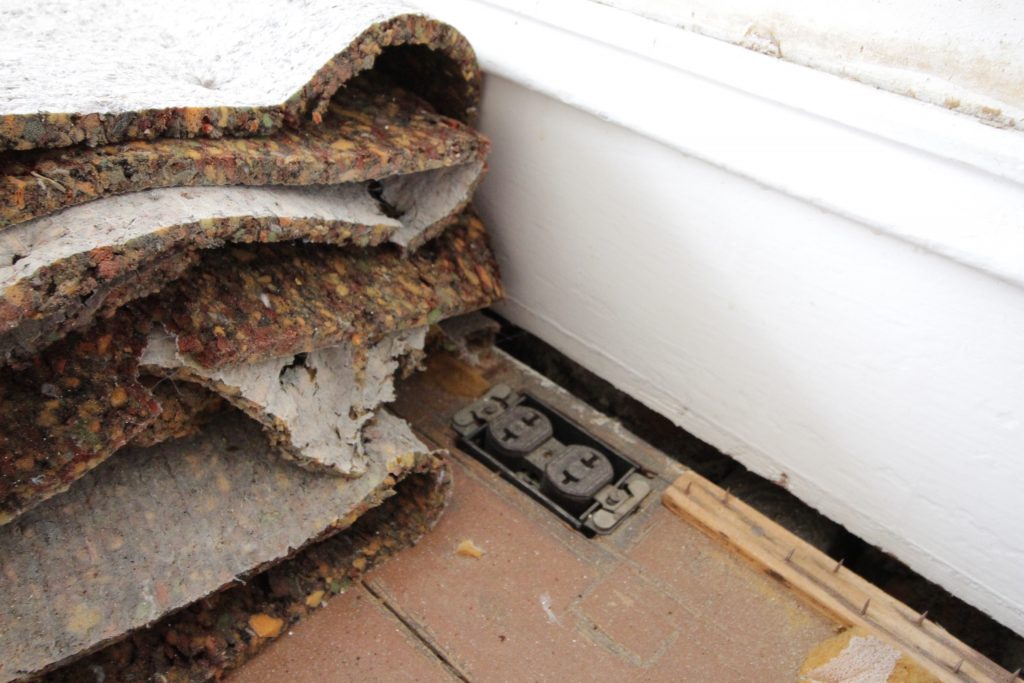
I ripped out all the carpet and found all sorts of things, like this very old outlet that had just been carpeted over at some point. I hope they had the common sense to disconnect the outlet first, but who knows. We put all new outlets in so now this thing can be safely removed.
The flooring under the carpet is indeed solid wood, and it’s in OK shape, but it’s really just 100 year old subfloor. At some point it was painted brown. It has been carpeted over many times and the carpet padding was a disintegrating sticky mess. It left behind at least 60 years worth of rotting wood tack strips, rusted nails, and gunked up staples.
The tack strips can be removed with a pry bar and some patience, but the carpet staples are trickier. For a while I was using a pair of normal pliers and then the plumber took pity on me and lent me a pair of end cut pliers. It makes the task much easier.
It’s worth mentioning that I have heard this particular tool called a “cross cutter,” “end cutter,” and “side cutter” by various people. End cutter looks the most correct to me, so I’m going to go with that one.
I also have a teeny tiny pry bar that I use for the ones that are really flush to the floor. It came in a 3 pack of adorable pry bars and they’ve been super handy during this whole process.
The first step is to find a nice line of staples to work on. I find it easiest to work in one small area at a time. Keep a handheld brush or broom handy so you can keep the area clean and see what you’re doing.
Sometimes there’s a ton of padding around the staple, to the point where you can’t even see which way it faces. Use the tiny pry bar to scrape away gunk until you can see your target. Then place the pliers over it and gently grab it. You don’t want to actually cut it, just grab it.
Then rock the pliers to the side in order to pull up the staple.
Voila!
Some staples need to be coaxed up a bit with the pry bar first, and a few staples were so stuck I actually had to get a pair of vice grips to get them out. But most of them come out pretty easily this way. It’s still not a quick process, but if you get into the swing of it there’s a nice sort of tedium. Keep sweeping up as you go, the little bits of carpet fuzz and staples get everywhere and if you don’t stay on top of it you won’t be able to see what you’re doing.
One thing about this process is that it’s pretty hard on your hands after a while. Take breaks and stretch out your wrists, no one wants to get carpal tunnel from staple removal!
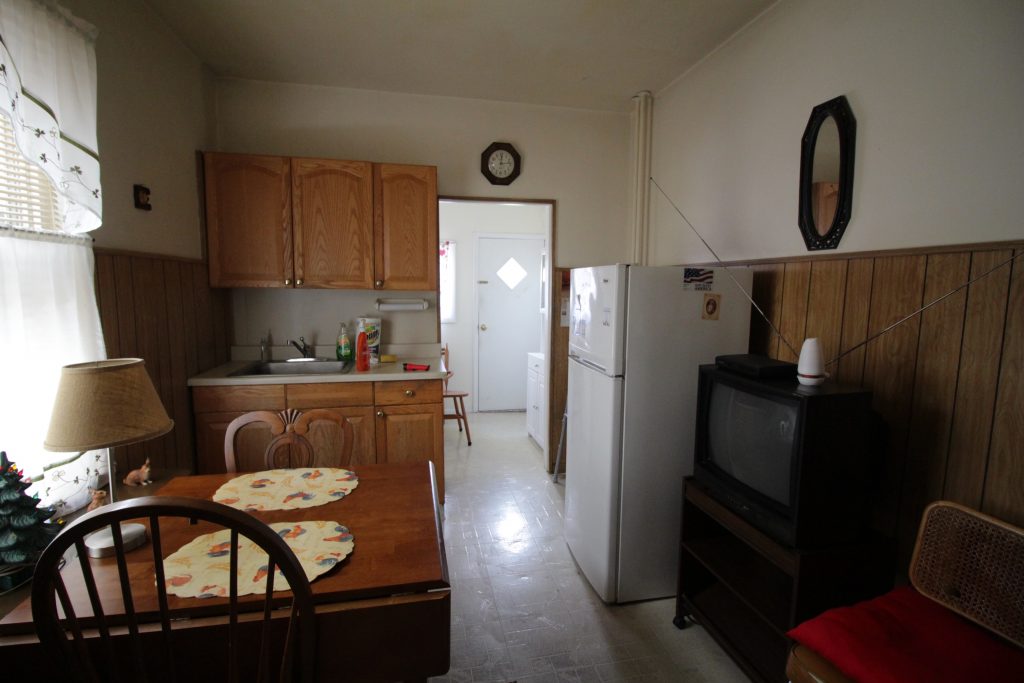
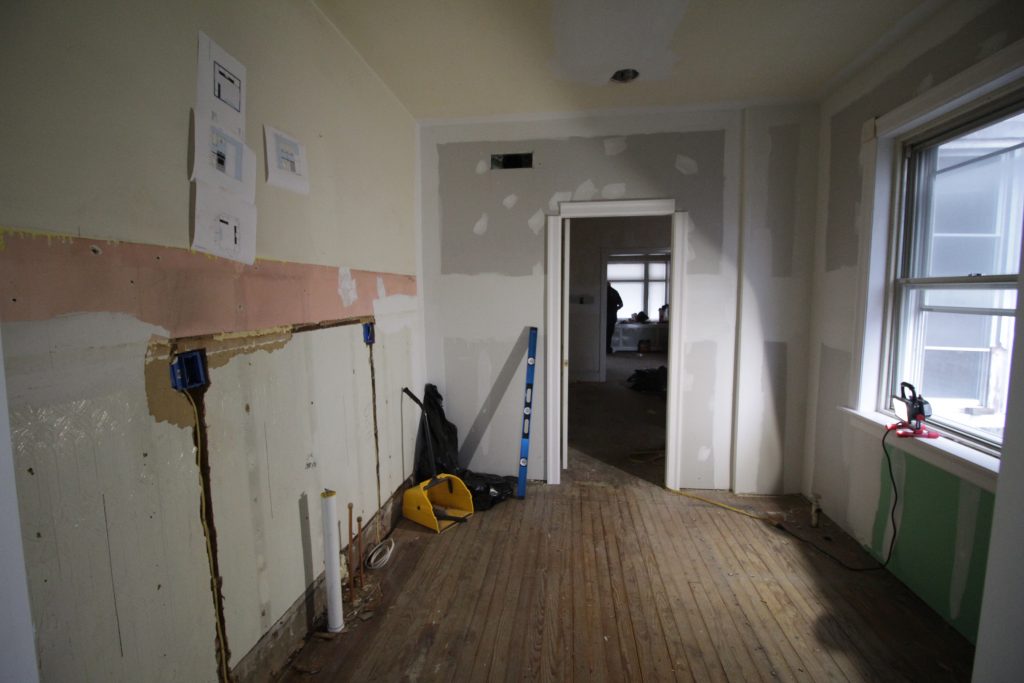
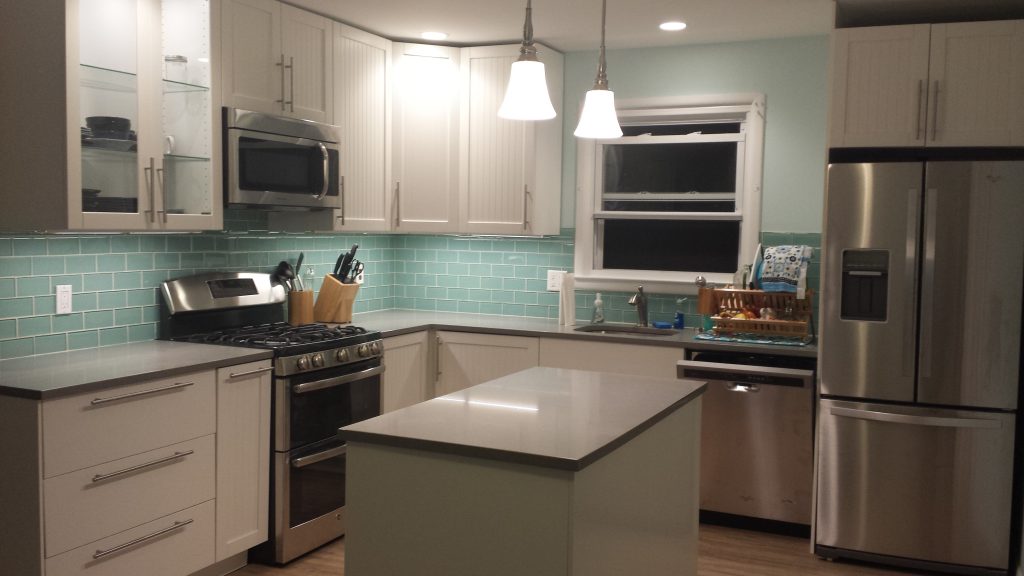
The photo below shows the old kitchen in the house I’m remodeling. It was taken from the doorway and shows pretty much the whole room. Notice anything missing?
That’s right, this kitchen lacks a stove. There actually is a stove, it’s in the room behind the kitchen on the same wall as the sink. This means that if you have a pot of hot something on the stove you have to carry it around the corner into another room. There’s no counter space next to the stove, so you’ve got nowhere to set things besides the stove itself. The paneling, flooring, and cabinets are all things I could live with; having the stove another room was not.
On one wall we’ve got a giant window and giant radiator taking up nearly all the space. On the other (next to where I’m standing taking the above photo) we’ve got a door to the basement, significantly cutting into where we can put things. The previous owners put the fridge in the middle of the room which I guess makes sort of a work triangle with the back room stove but… ugh.
The first major step was to move that doorway. I put it around the corner, in the dining room. This gives us more space in the kitchen as well as a small storage area behind the door at the top of the basement stairs.
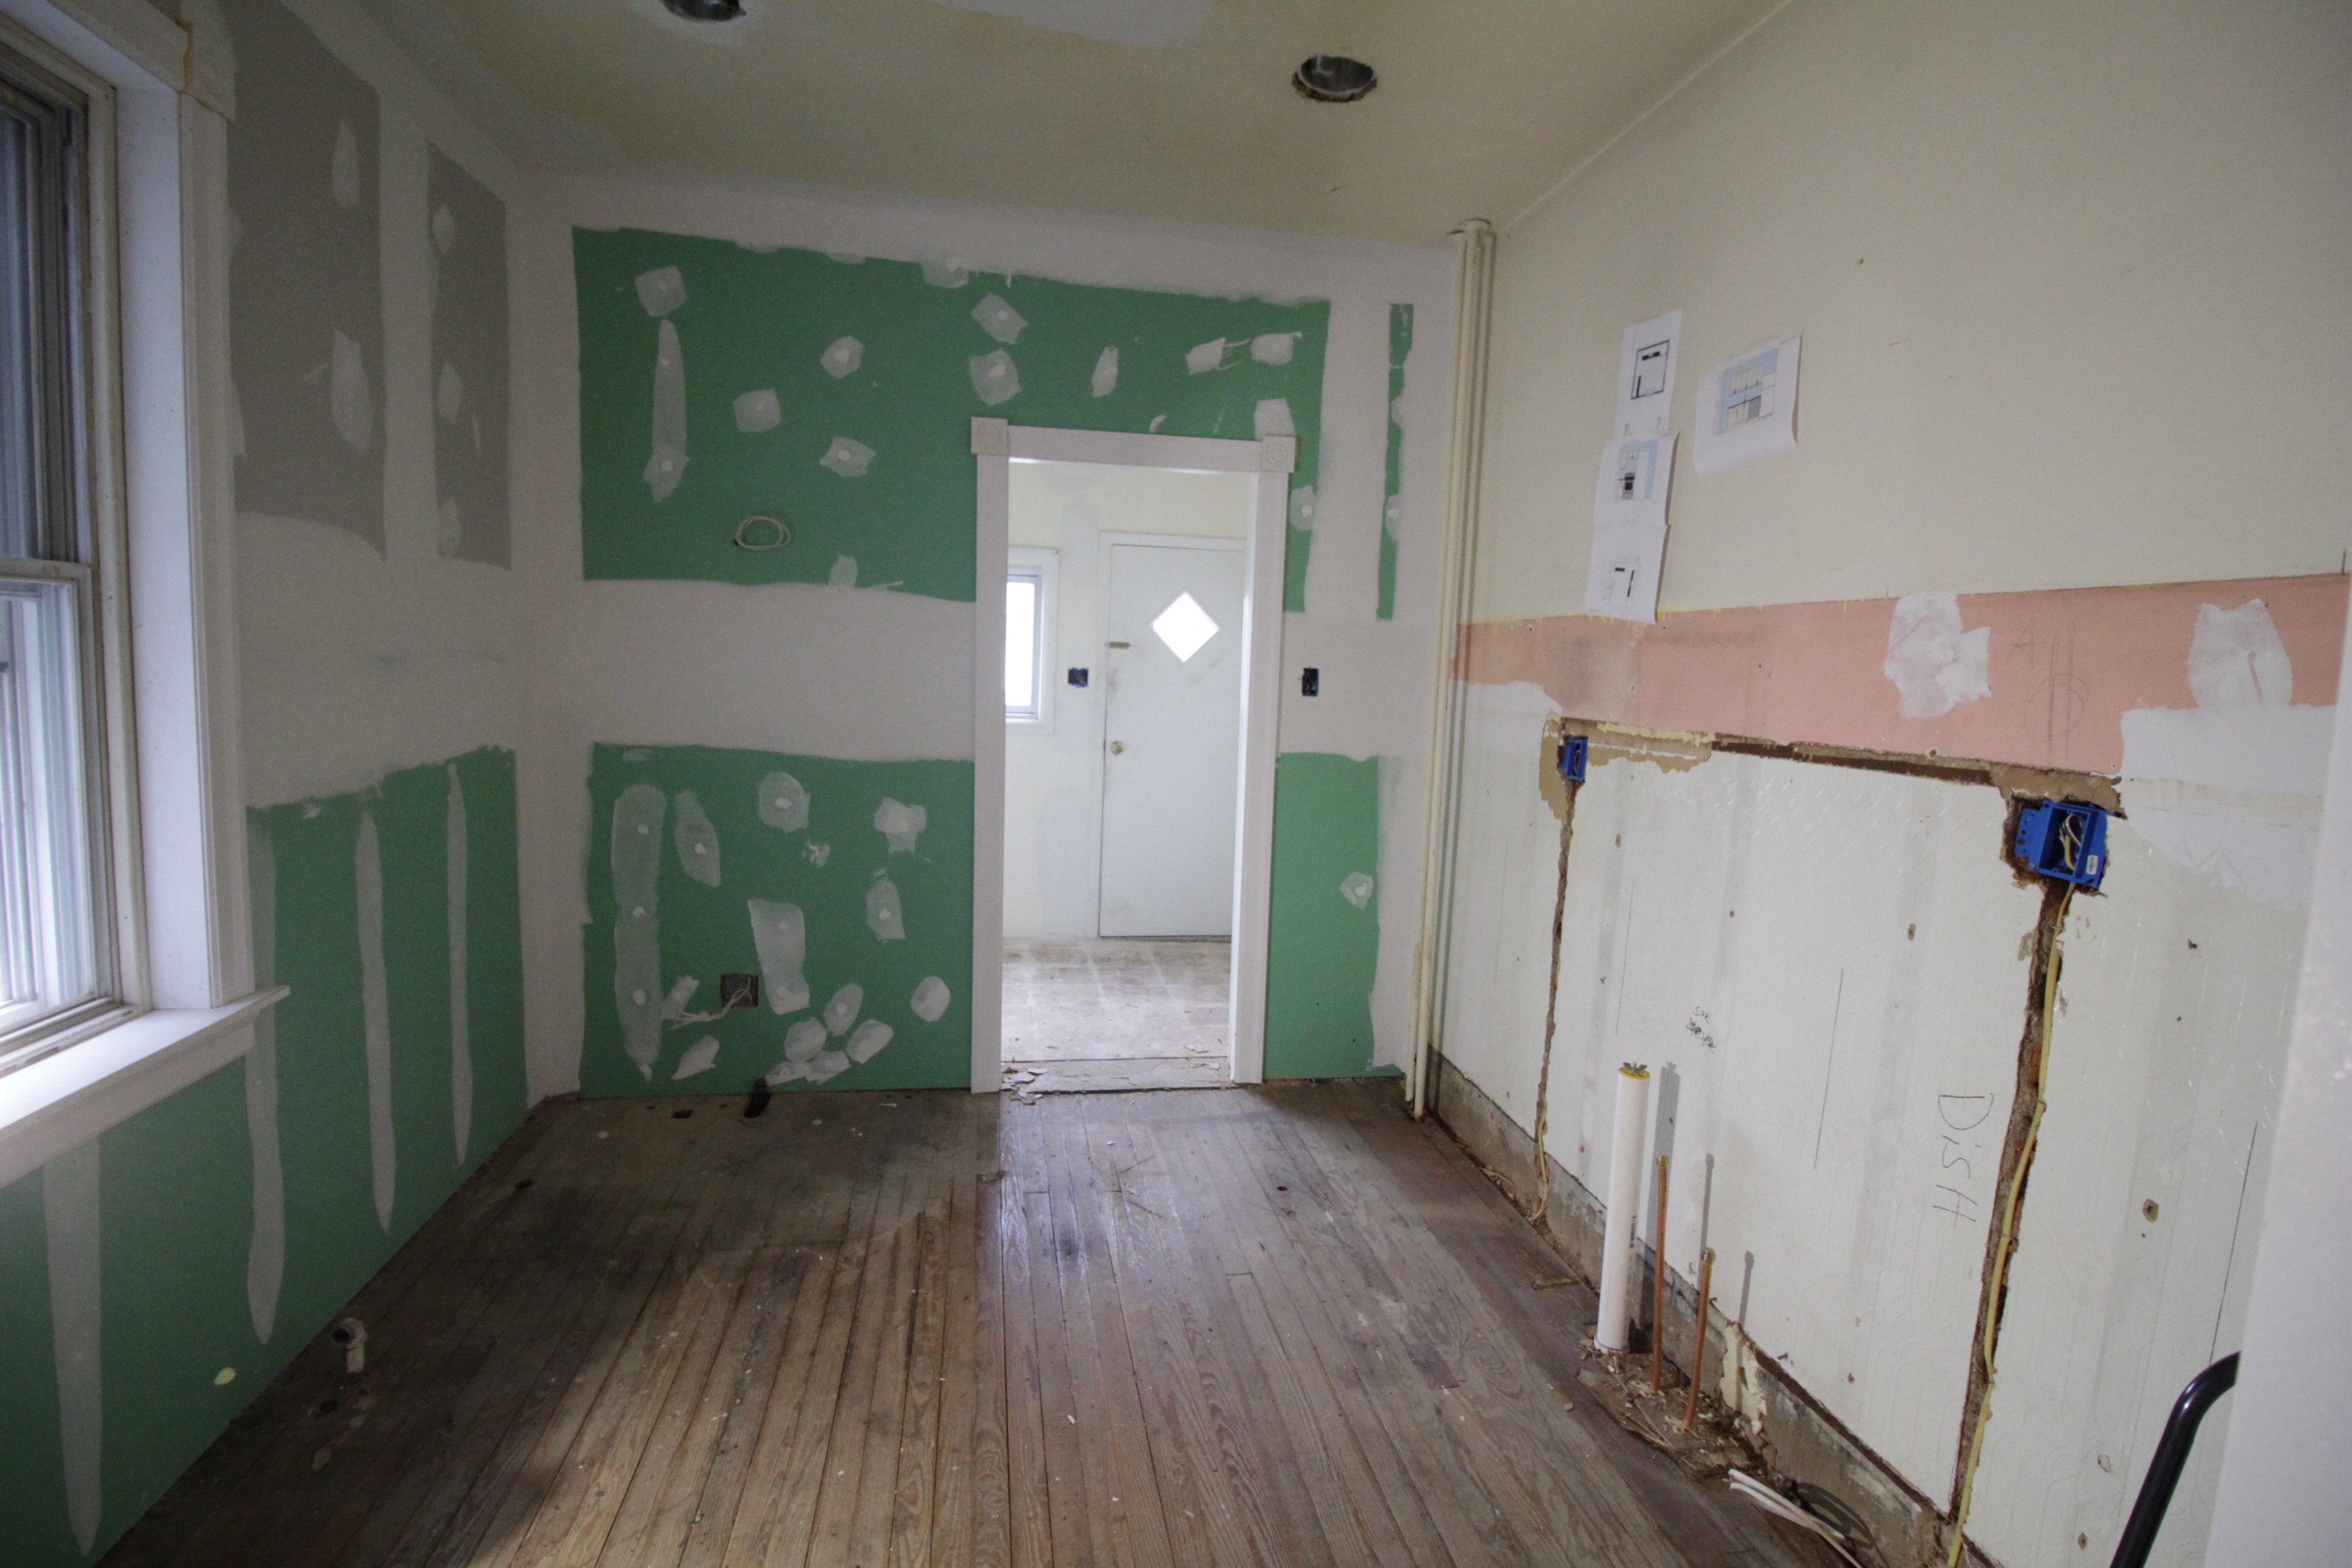
That hole above the new drywall is for the central air! We ended up hanging new sheetrock over this wall. Underneath the wood paneling it was in pretty rough shape. Before the wood paneling, which tore up the plaster with a million nails, someone had glued a faux tin textured… thing… and it wanted to take the plaster with it when it came down. Sheet rock over plaster isn’t my favorite thing in the world, but in this instance it was our best option.
With the doorway moved we installed a new prehung door and fit it with trim to match the rest of the house. On the left is the existing doorway to the kitchen with original trim, and on the right is the new door with new trim. The wide angle camera lens I used is doing some funny things with the perspective, the door looks much wider than it really is. In reality the space between the door and doorway is wider than the door itself.
The contractors removed the cabinets and moved the utilities. I was all excited to start putting it back together. And then I started looking at the flooring, which I was going to just floor over with click-lock vinyl. Specifically I looked at the spot where the cabinets had been to figure out what I was going to do about it.
Why yes, that IS carpet. The flooring here is more than half an inch thick, and that’s after I’d peeled up the first layer. There are at least 3 layers of flooring here and they’re all rotted / falling apart. The thought of putting even more thick flooring on top of that made me a bit ill. I made a somewhat hasty decision to take it all out.
All things considered this part wasn’t too bad. It took my dad and I about 3 hours, the last of which was just removing all the *&@$# nails from the floor. The hardest part was that it’s just really dark in there. The recessed lighting isn’t working yet, and with all the rain we’ve had there wasn’t much natural light coming in. My dad brought a small work light (sitting on the window sill) which helped… unless one of us was standing in front of it. “Hey where’d the light go?” “I’m a human eclipse!”
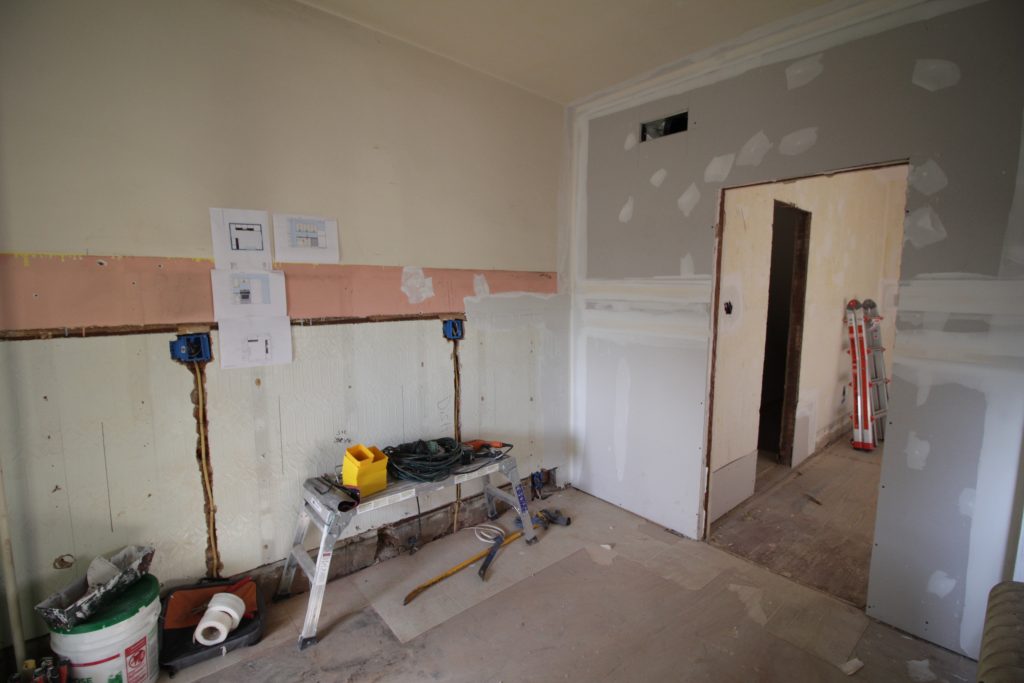
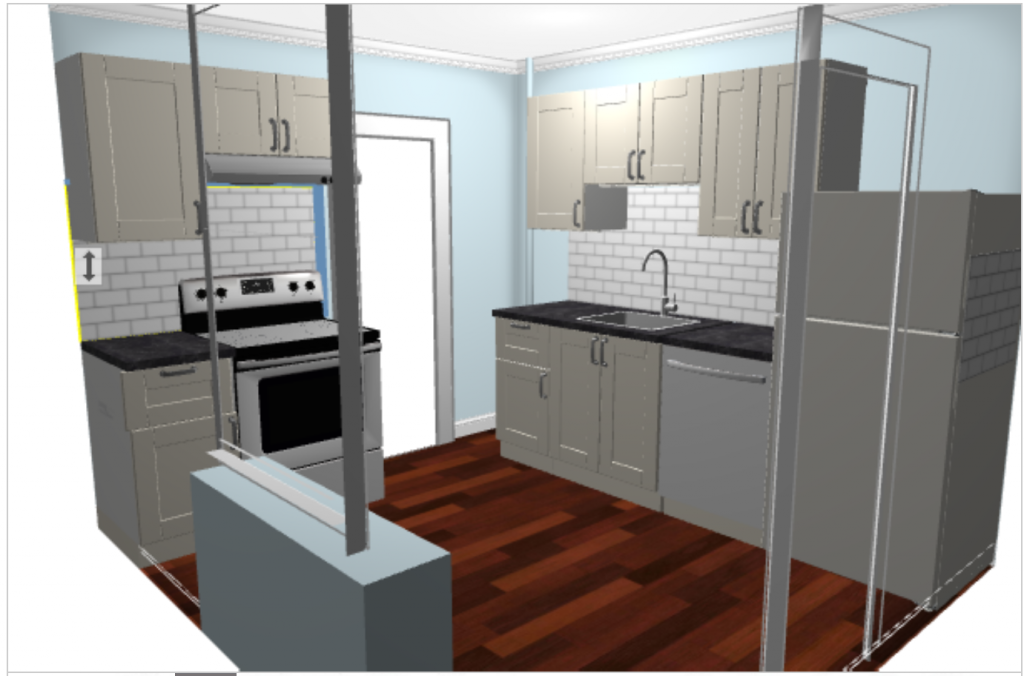
With the flooring out I think we officially have a blank slate with this kitchen. The next step is to finish and sand the walls. Then we put in the flooring and replace all the trim. Once the trim is in we can paint. Of course by “we” I really mean my contractor. I’m also having my contractor hang the mounting rails for the cabinets because the wall they’re going on is masonry and I don’t have any of the equipment needed. Then I can build and hang the cabinets myself.
I’m using Ikea SEKTION again, because it’s affordable and since I’ve used it before it’s a known quantity. I also like that it’s modular, meaning if a tenant destroys one of the doors I can pick up a replacement locally and install it with minimal hassle.
The layout isn’t perfect but I think it’s the best we’re going to do on the budget I have. Moving the radiator and resizing the window wasn’t an option for this project. The radiator pipes in the southwest corner keep me from taking the cabinets all the way into it. It’s a bit of an awkward space, but still not nearly as bad as having the range in a totally different room!
I still need to decide what I’m doing for the backsplash. The cabinets will be white and the counters I’m going with are a black and white textured granite called ‘white mist,’ which I’m hoping will be forgiving when it comes to hiding minor tenant damage. The floors will be a warm wood look vinyl plank.
I’m trying to find an affordable tile backsplash with some color in it but I don’t want it to feel completely dated in a few years. If anyone has suggestions I’m all ears!
Shopping for fixtures in the 100 year old house I’m renovating got me thinking about the lighting we chose for the shore house. When we started working on the house I hadn’t put any thought into lighting. It was only when I had an electrician over to disconnect the old lighting that I realized we were going to want more than just a flushmount fixture in the middle of the room.
The first thing we did was put in recessed lighting. Retrofitting can lights into the ceiling makes a mess of the drywall, and if I was going to do it again I would just rip out all the drywall and put up fresh sheetrock. It would have saved both the electrician and the painter a ton of time and been cheaper in the long run.
I also installed Ikea ANSULTA undercabinet lighting, which honestly I can’t recommend. We’ve have problems with the transformers humming very loudly, and every time the power goes out they get de-sync’d from the wireless power switch and I have to climb up on a ladder to re-sync them (the transformers are in the cabinet above the microwave). It’s a pain in the ass and we’ve really just stopped using them.
In the living room we have 4 more recessed lights and this table lamp. This lamp is special because it has an LIFX wifi multicolor bulb in it. The bulb is set up to change colors when my in-laws next door press a button to let us know they’re awake.
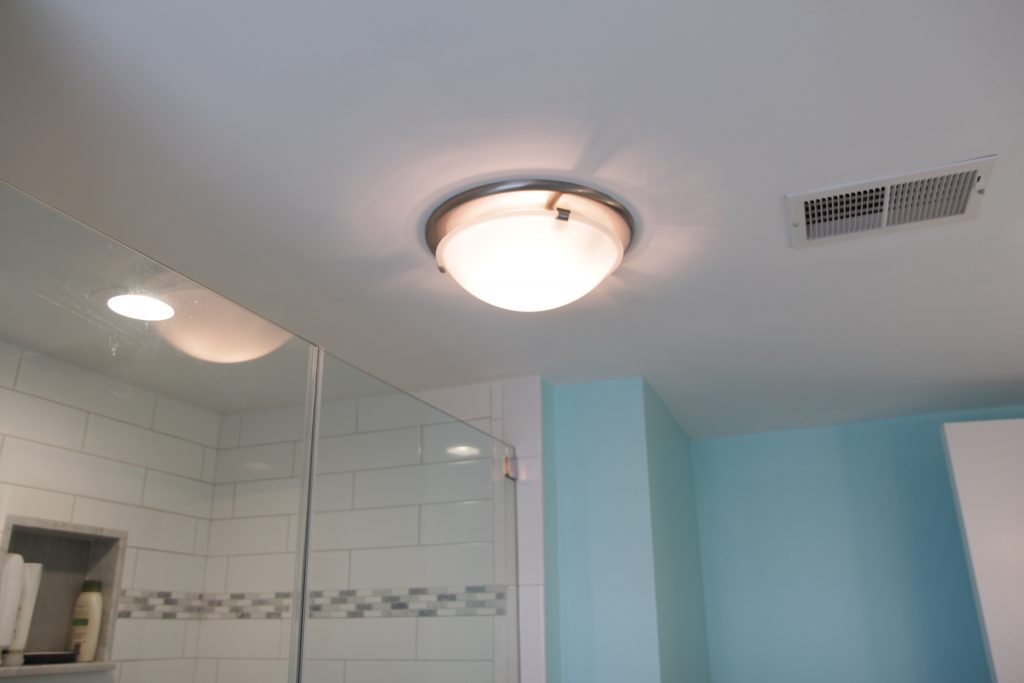
Moving on to the bathroom, the vanity has both recessed lights and side lights. I may have gone a little nuts on lighting in there. The side lights, Livex Lighting Aero 2 vanity lights, each take two bulbs.
There are actually TWO OTHER light fixtures in the bathroom: a recessed light in the shower and this combination light and exhaust fan in the middle of the room. You could do surgery in this bathroom it’s so well lit.
The last light I have to show off is a fun Ikea lamp we got for my daughter’s room. The white thing next to it is a noise machine, which I consider an absolutely essential item in a house that sleeps up to 14 people.
There are still a bunch of flushmount fixtures I’d like to replace some day, but right now I’m sort of OD’d on looking at lights so it will have to wait. I’m having trouble finding anything I really like; the ceilings upstairs are only 7 feet high and most of the low profile flush mount fixtures are no less ugly than what we’ve got in there now.
If you come across any nice looking low-profile flush mount lights be sure to let me know!
I use a Google Voice number for business and one thing I really miss is having a physical phone that literally rings. It sucks to miss important business calls because I left my phone in the car or on mute or otherwise can’t be trusted to keep track of the damned thing. My Voice number rings through to my cell, and I can pick it up via Google Hangouts if I happen to be sitting at my computer, but what I really wanted was an honest to god phone. And so I got one!
The phone I got is a vintage-style brand new boring old analog telephone. It will work with any landline, and if I had one of those I could just forward my Google Voice number there and call (ha!) it a day. But I don’t have a landline. So I set up my own little pbx phone system to connect the phone to the internet.
The basic process is to get an adapter to connect our phone to our home network and then set up some software to connect that network to Google Voice.
Installing the Analog Telephone Adapter
The analog telephone adapter (ATA) connects your dumb old phone to your network. I bought a Grandstream Handytone 701 off Amazon. The software isn’t quite as nice as the Linksys/Cisco that’s popular, but it was cheap and you really only have to deal with the software when you’re setting it up.
The ATA needs to be connected to both your phone (via a normal phone cord) and the internet (via an ethernet cable to your router). My house is wired for ethernet but you can also use a powerline ethernet adapter to bring your home network from wherever you keep your router to wherever you want your phone.
Once you hook it all up and lift the receiver you’ll get a dialtone! Magic! And then if you dial a number… nothing will happen! Great! The software in the ATA needs to be configured to use your Google Voice SIP trunk.
Getting Google Voice Set Up as an SIP Trunk
There are a bunch of different ways to get Google Voice to interface with a phone system, but by far the easiest option is to just pay Simonics $5 (one time). The benefit of using them is that it’s easy and cheap. The downside is if they ever go out of business or stop providing the service I will be out $5. After spending multiple hours trying to get Google Voice to authenticate on a traditional Asterisk server it’s a risk I’m willing to take. SIP is a voice over internet (VoIP) protocol.
If you are dead set on not spending $5, check the PBX In A Flash community forums for the latest on setting up Google Voice as a SIP Trunk.
Once that’s set up you can test it using any software SIP phone. I use X-Lite on my PC.
Configuring the Grandstream Handytone ATA for Google Voice via Simonics
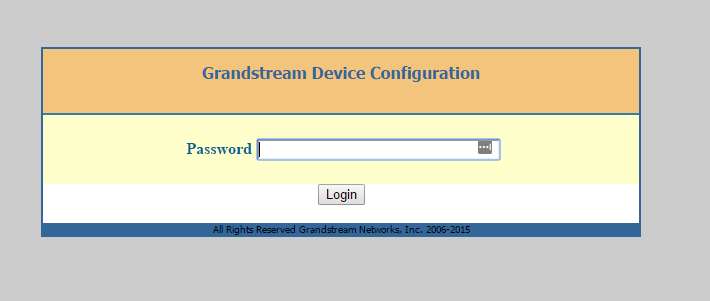
The next step is to find the IP address of the ATA. You do this by picking up the phone, pressing * * * and then pressing 0 2. A robot will read off the IP address to you. It’s sort of surreal honestly. After you pop that IP address into a web browser you’ll get a login page like this:
The default password is ‘admin’
Once you log in you can see we have a pretty ugly GUI. But we didn’t buy this thing for its incredible interface design. Once you’re logged in click the tab that says FXS port. In another browser window log in to Simonics and fill out the ATA settings with the following info:
Primary SIP Server: [Server (something like gvgw.simonics.com)]
SIP User ID: [SIP Login/prefix]
Authenticate ID: [SIP Login/prefix]
Authenticate Password: [SIP Password]
You can leave everything else blank. Make sure that your Google Voice Account status at Simonics says “Online” and you should be good to go. Hit “Apply” at the bottom of the page.
If all went well you should see “Registered” in the registration column for the FXS port.
Making it more fancy
If you like messing around with stuff you can set up an Asterisk server on a RaspberryPi and do all sorts of fun things like have it automatically go straight to voicemail at night, use different ring patterns for different numbers, set up an infuriating phone tree for people to argue with… the list goes on. For me though just having the stupid thing ring is all I really need.
Warning: this post contains major spoilers for Stranger Things season 1. If you do not want to know what happens in the series do not read any further!
The end of Stranger Things season 1 left a lot of unanswered questions, which is not surprising to anyone. Various websites have put together lists of questions which are all things obviously meant to be ambiguous. Let’s address a few of them before moving on:
Is El still alive?
Yes, obviously.
Is Beth Barb really dead?
Yes, obviously. She seemed pretty clearly dead from the moment she got pulled into the pool. Her character wasn’t particularly well developed. She exists only for the purpose of getting Nancy involved in the story. She’s not coming back.
Edit: see she is such a non-character that I got her name wrong.
Is Dr Brenner really dead?
First rule of Hollywood: if you don’t see the bad guy die on screen, he is not dead.
What’s with Will and the slugs and the upside-down?
Gee I guess we’ll have to wait ’til season 2 comes out to find out!
Ok, with those out of the way, here are some of my questions. And whether I think we’ll find the answers.
How is/was the Demagorgon moving between the normal world and Upside-Down? He’s obviously popping out in places without using the Big Ass Gate. Does he control openings like the one that idiot Nancy crawled into? Or do they just show up whenever someone cuts themselves? Odds of getting an answer next season: pretty high
Who is Mr Clark’s girlfriend and did she dump him after he interrupted their date to tell some kids how to make a saltwater tank? Odds of getting an answer: maybe
Did insurance cover the damages to Joyce’s house, or did they have to cover it out of pocket? If so, how? If she doesn’t have the cash for a new phone, she definitely doesn’t have the cash to repair the fire/hatchet/etc damage. Answer odds: low
Did Mike’s mom realize the hairs she found in the basement were from a wig? Answer odds: nil
Why on earth did Hopper think they’d be able to get into the lab the 2nd time around? Answer odds: medium. I think we’ll learn a lot more about Hop next season.
What happened to the other 2 Bad Men in the scene where Hopper comes to get the kids from the junkyard? Did he pop all 3 of them or what? Answer odds: nil
If the series makes it up to 1988 will there be Heathers and Beetlejuice references? Answer odds: slim
Does anyone else refer to Steve as Steve Holt? Answer odds: tell me in the comments!
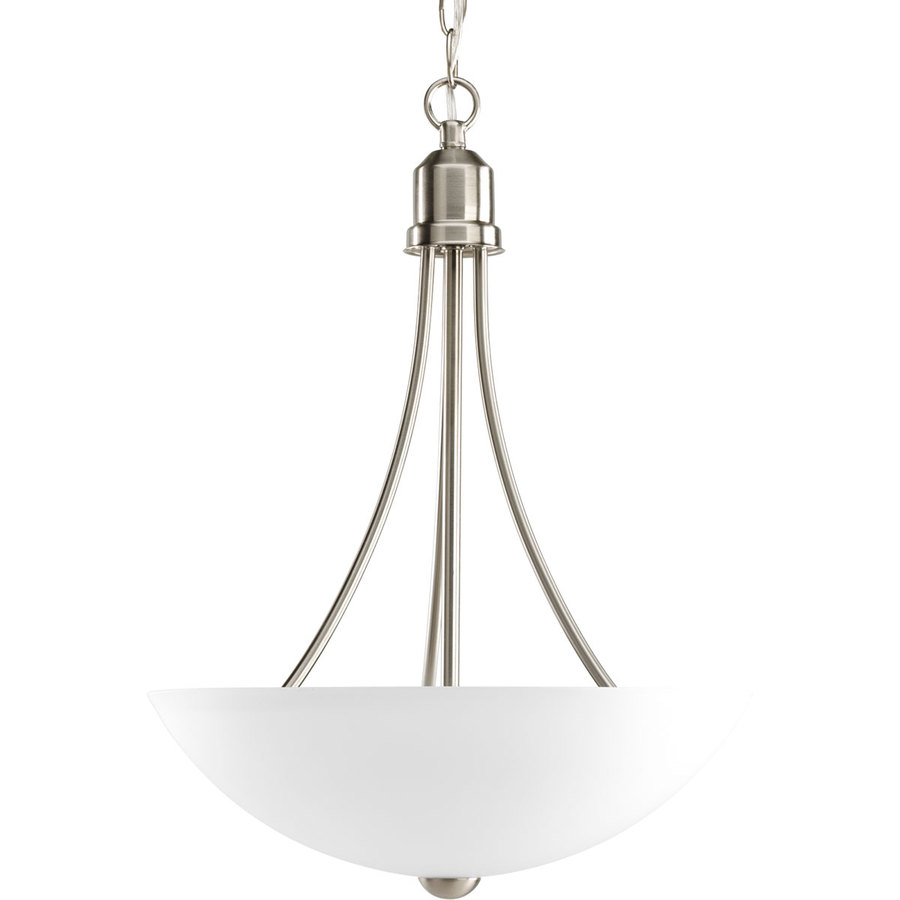
I’m remodeling a house and one of the things that desperately needs replacing is the light fixtures. They’re all 1970s attempts at 1920s styles, and not very good ones. Swapping out a dining room chandelier or other ceiling light is a great way to update a room with just a few hours of work. The options are nearly infinite, and unfortunately so are the prices. As cool as the Restoration Hardware catalog is not all of us are ready to spend next month’s entire paycheck on a lamp that looks like it was built by Howard Hughes. So I started looking into budget options. The lamp field really opens up around $150, and somehow everything that catches my eye is $300+ but there are some nice options to be found for less than a Benjamin if you know where to look.
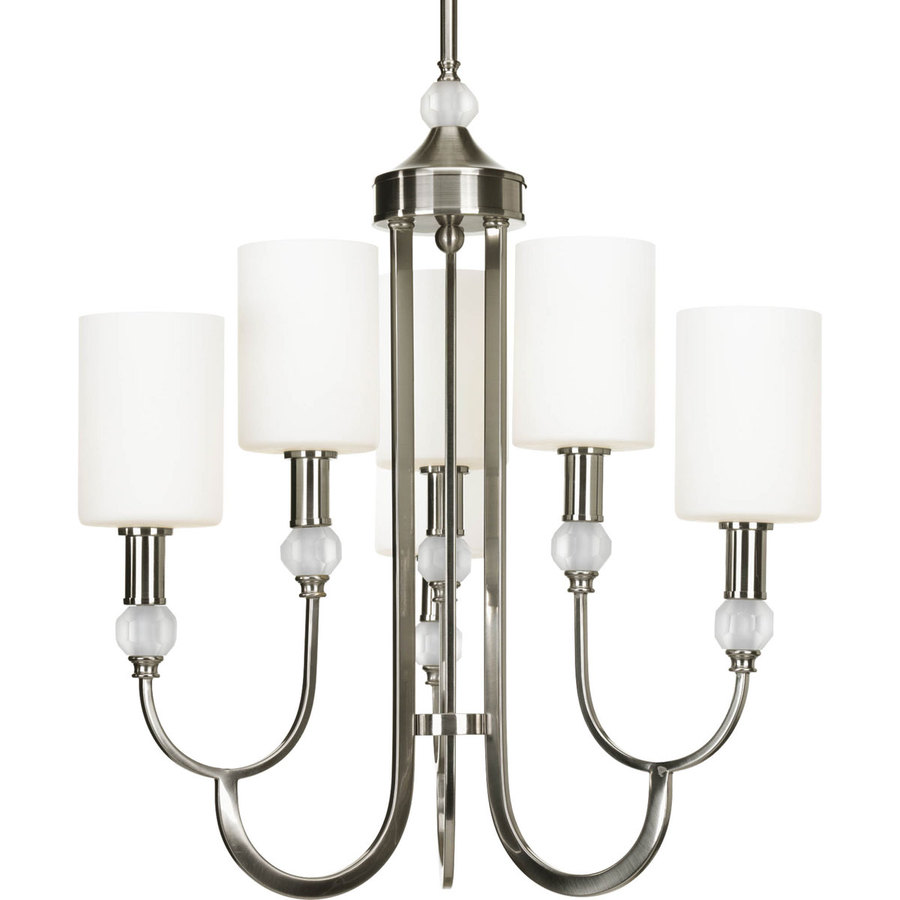
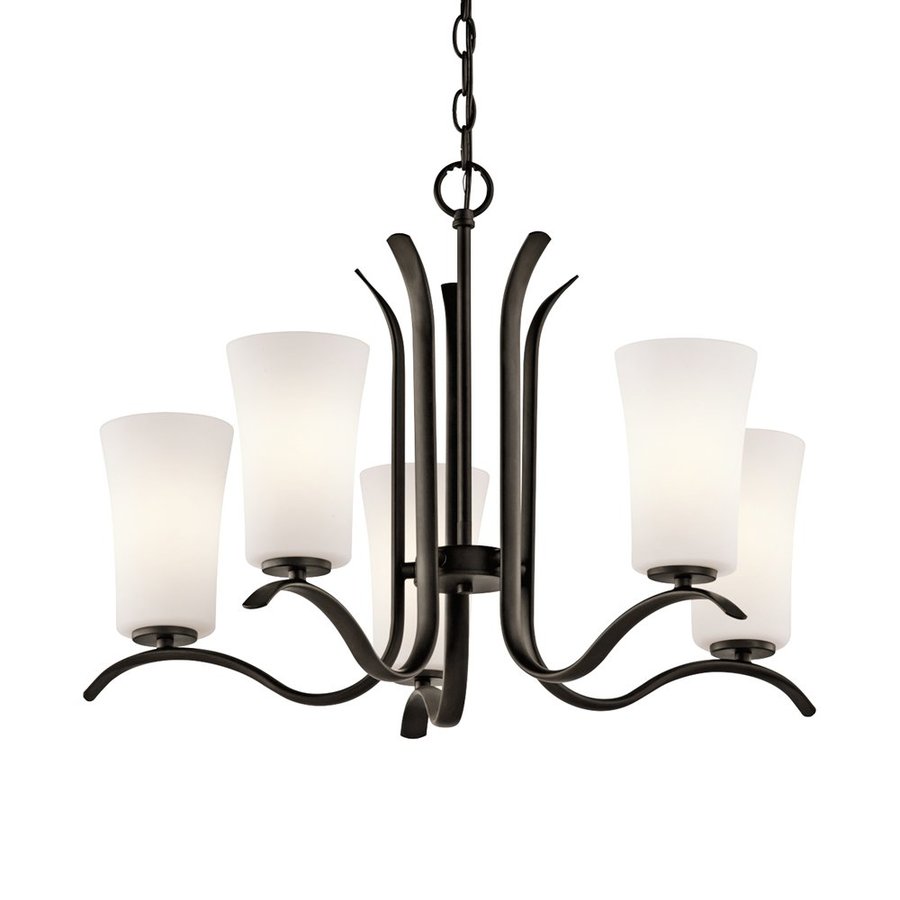
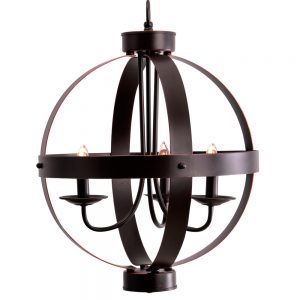
These pendant lamps and chandeliers each come in under $100, meaning you can get rid of that 1970s reproduction nightmare without breaking the bank.
First, some fairly tame options for when you want something more streamlined, but don’t want to hear your mother-in-law’s opinions on the lighting every time you host a dinner party.
If you’re feeling a little trendy (and why not when the lights are so affordable?) you could go for a drum light. Drum lights tend to look a little more casual than chandeliers, and if you hang them close to the ceiling they can be a little more subtle.
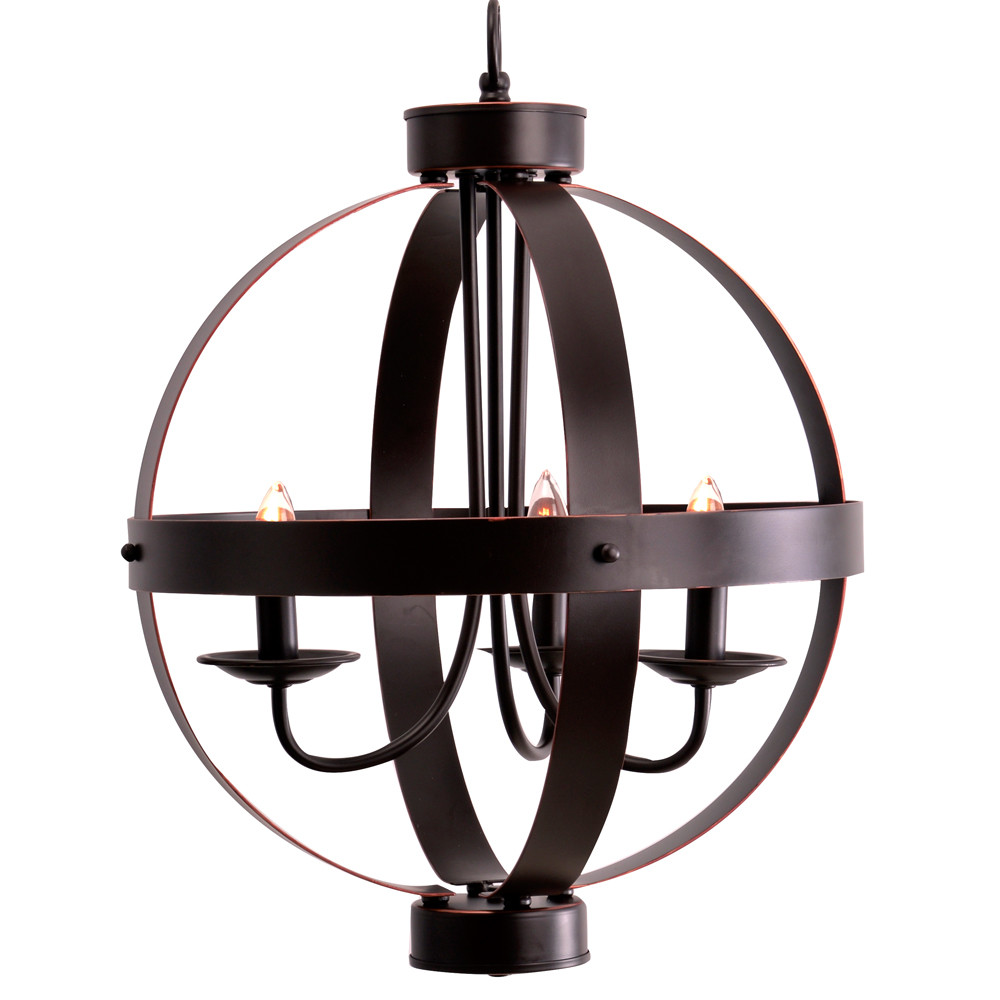
Or you can get a little weirder with these guys.
I know what you’re thinking on that last one… it looks a little cheesy, right? Ok maybe it is a little cheesy, but bear with me. When it’s lit up it looks nice!
And last but certainly not least there’s this chandelier, which I included because it’s called Khaleesi. I think it looks a bit like a metal octopus, which is admittedly not my thing, but they got me on the name. Well done, marketing team!
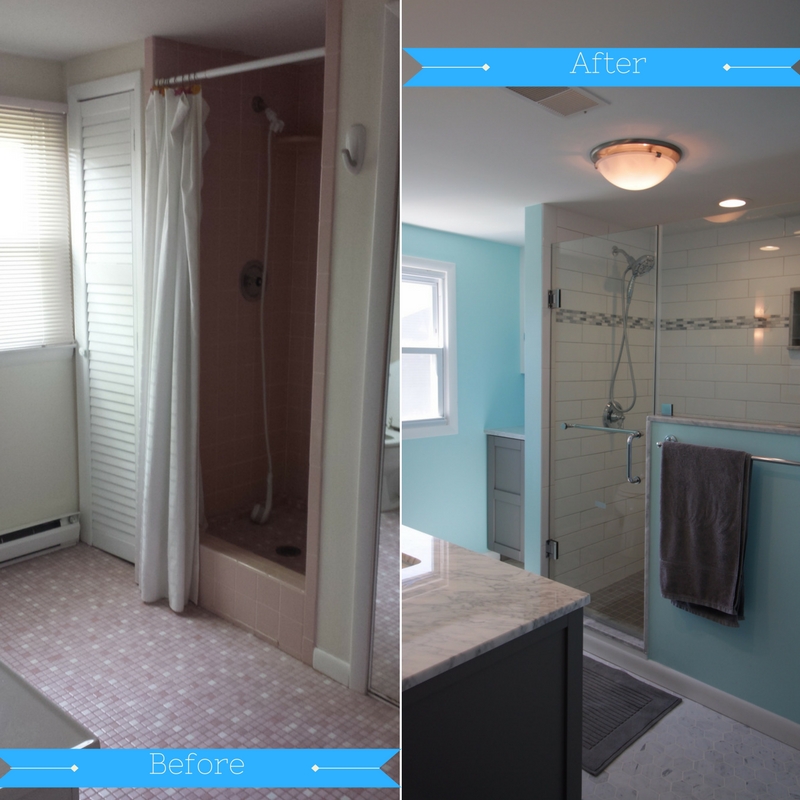
At long last, the bathroom remodel is complete! Ok, it was actually done a while ago, but we’ve been too busy enjoying it to do a full writeup.
Gone is the pink tile, the awkward (and dangerous!) shower, the useless closet.
Yes, our bathroom has come a long way from the pink leaky horror show we started with. New flooring, new shower, new toilet, new vanity… pretty much the only thing that stayed the same was the towels and the window.
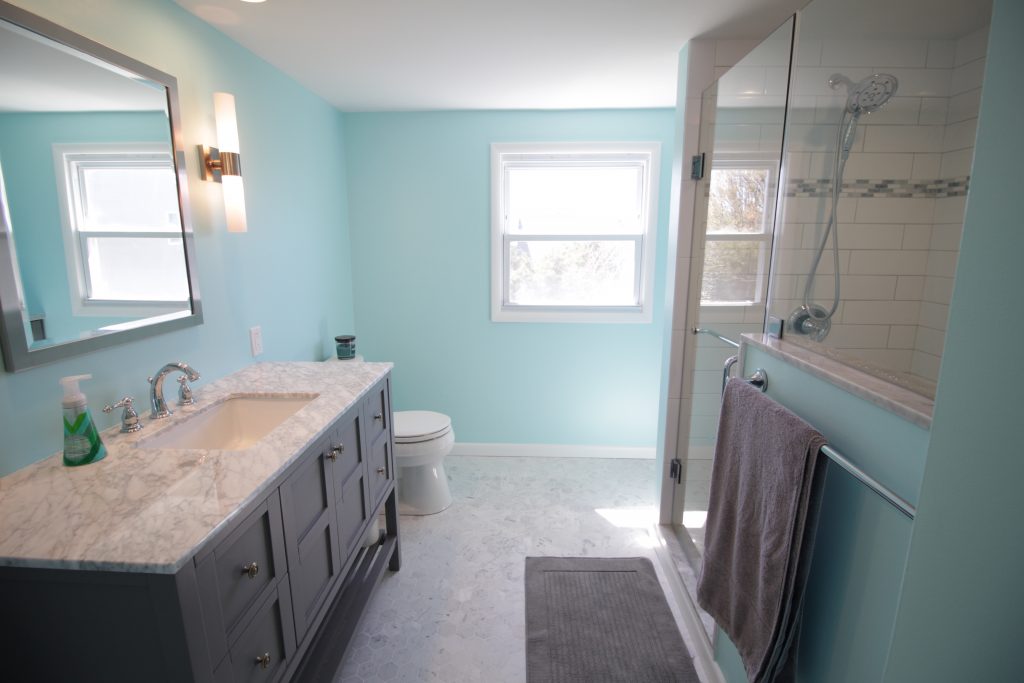
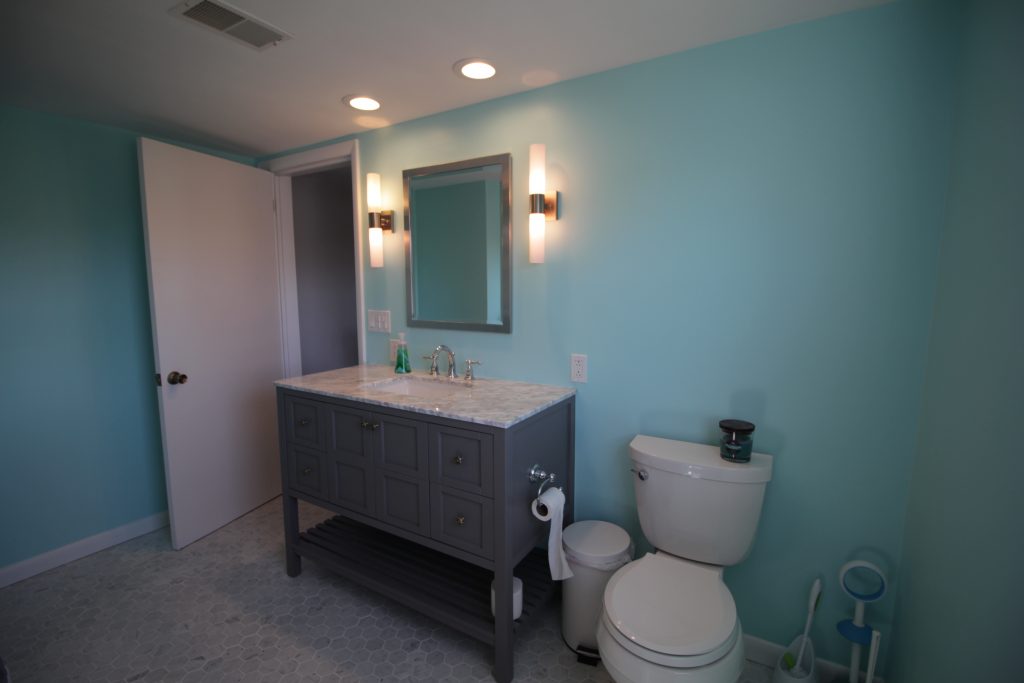
There is now a ton of LIGHT in the bathroom! From all angles! And the sun! It’s a downright cheery place now. And the sad awkward medicine cabinet has been replaced with a mirror (we didn’t really use it for storage anyway). The vanity has tons of storage space for any doodads left behind.
See that light? That light is a bathroom fan. Before we had no bathroom fan and friends, let me tell you, it is LIFE CHANGING. Now this room is all GO FORTH AND POOP. DO NOT BE ASHAMED, THE FAN WILL TAKE THE ODORS AWAY.
Seriously I did not understand how critically necessary bathroom fans were until we had to survive without one. It also does a great job of whisking the damp shower air out of the house, preventing mold and other nastiness.
The open shelf on the vanity makes a great place to store surplus toilet paper. And the open-ended toilet paper holder leaves NO EXCUSES for not changing out a fresh roll. It’s so easy! The trash can is right there!
What was once an awkward closet is now a cabinet and open shelves. Guests no longer have to guess which closet has the towels, they’re right out in plain sight. Along with the first aid kit.
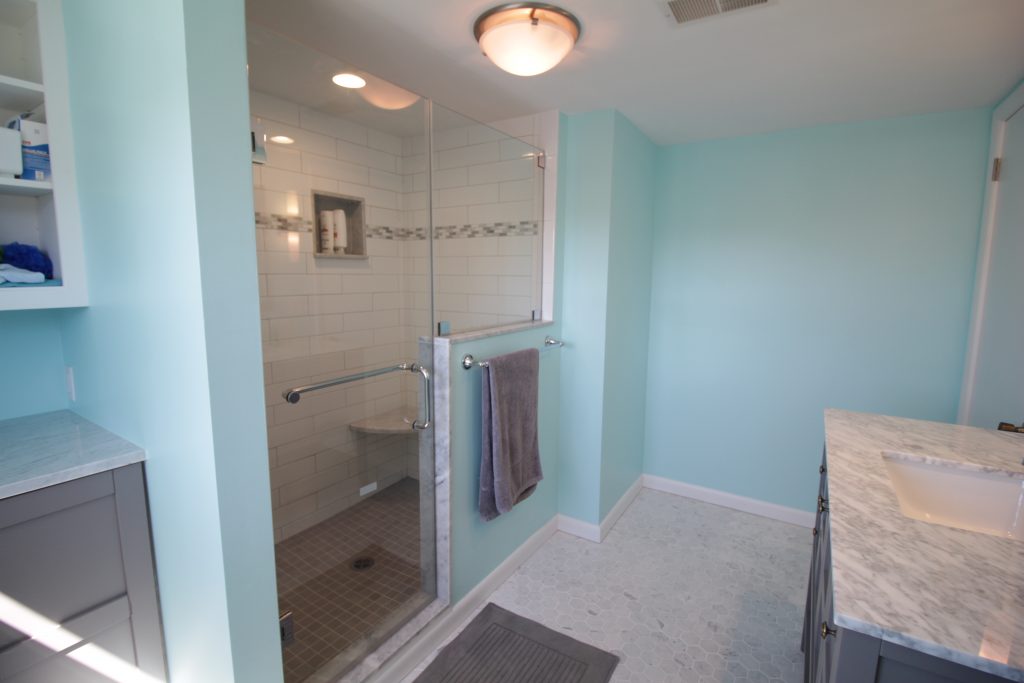
We totally removed closet #2 in favor of a spacious walk-in shower with a seat. Perfect for hosing off the kids after a day at the beach.
The seat is opposite a detachable shower head. It’s supported by a hidden iron bracket that gives it a neat floating effect. Two niches in the shower mean no collection of random bath items on the floor.
We still need to get some artwork to go over the toilet, it’s looking a little bare. But mostly we are very excited to have a shower that does not dump water onto the room below.
“Are Gigi and Pop Pop awake yet?” -My 3 year old, every 5 minutes, all morning
We have a shore house that is next door to that of my in-laws (who are called Gigi and Pop Pop by my preschooler). This is wonderful for a myriad of reasons, and from the moment the kiddo wakes up she has exactly one thing on her mind: “when can I go next door to Gigi and Pop Pop’s?”
A simple solution for answering this question would be some sort of visual signal, like opening the blinds or a little flag or something. Unfortunately we don’t have any windows on the side of the houses that face each other, so I decided to rig up the most technologically complicated solution possible.
Amazon Dash button with custom label
Before we continue: if you’d like to emulate this solution but aren’t particularly technical, don’t have a fancy router, or just don’t want to spend a day+ dicking around with things, I suggest just buying a LIFX wifi bulb and a flic button. You can use IFTTT to link them, for a total of $75 and an hour of your time. If you want to spend the better part of a day cursing at things just because you can, or you’re just looking for something to do with your RaspberryPi, read on!
Amazon’s Dash button is meant for you to reorder toilet paper. At $5 it’s also an extremely cheap wifi button. Of course, pressing it does just one thing, and that thing costs you money, but with a little bit of effort we can hijack those requests for our own devious purposes. Sorry Amazon. I might feel bad if I didn’t already spend thousands of dollars a year with you.
Most of the work was already done for me in this reddit thread. The first step is to set up a server to handle traffic from the button. I’m using a RaspberryPi running Raspbian (which I already had). Python was already installed with the OS, but I had to add a few more tools to get where I want.
First, I installed pip to make installing the other python libraries brain-dead.
Then I installed lifxlan, a library for controlling LIFX lightbulbs locally, and scapy, a packet sniffing library.
I set up the Dash using the Amazon app, giving it my network credentials, and then closed the app when it asked me to pick an item to purchase. It complained that my progress wouldn’t be saved, which was fine.
When you press the button the Dash will connect to your LAN. If you’re quick you can probably find its MAC address in the client list on your router (Status > LAN > Active Clients on DD-WRT). I’m not so I used Ted Benson’s python script to find the MAC address.
Of course when the button is pressed it also phones home to Amazon, and then Amazon sends a notification to my phone reminding me to pick something to buy. While this doesn’t trigger a purchase, it’s still annoying. At first I just blocked the button from WAN access using a MAC address filter on my router. But then it stayed on longer, draining the battery. In order to save the non-replaceable battery life I set up a DNS entry on my router that redirects all of the requests to the button’s home server (parker-gateway-na.amazon.com) to my RaspberryPi. The easiest way to do this in DD-WRT is to add the following lines to the startup script (under Administration > Console)
Now the Dash button connects to the LAN, sends a request to my RaspberryPi (which is ignored), and then shuts down.
Tying it all together
Using more of Ted Benson’s code we listen for the ARP packet the button sends when it connects and use that to trigger a LIFX event. In my case I have a specific light bulb I want to turn blue so I figured out that bulb’s MAC address and then filter the list of bulbs against that. The lifxlan library in its current form doesn’t let you select a single bulb very easily, and if I can brush up on my python I may look into forking/extending it to do so.
I also have my script set to leave the bulb on/blue when it’s done, because I want it to stay that way until I manually reset it, but obviously you might want to read the initial bulb settings and reset them when you’re done blinking.
Making a cute label
I whipped up a really quick sticker to cover the button, printed it on sticker paper and and cut it out with an xacto knife. Download it here if you’re so inclined.
Last week I tried out CookSmarts meal planning. This week I’m going more full service with Blue Apron, a meal-in-a-box service that provides ready-to-cook recipes and ingredients. We go the 2-meals-4-servings option, which retails for $69.92. We used a coupon for a free trial week.
Thanks to an aggressive marketing campaign there are literally hundreds of Blue Apron “unboxing” posts and videos, so we can skip past most of that (google it if you’re interested). One thing that did drive me nuts was pulling out items that I already have in my kitchen. Garlic, baby spinach, oranges, honey, red wine vinegar… all those things are already in my fridge/pantry threatening to rot. The real kicker was the recipe that came with a chipotle pepper in adobo sauce, since I have a TON of those leftover from last week’s meals.
On the flip side I was excited to try out the samosa recipe, because searching the entire city for samosa wrappers would have taken me the better part of a day and probably still failed. Last time I tried to find an Indian grocery store I ended up at a bodega that sold mostly cigarettes (thanks, Google).
Meal 1: English Pea and Potato Samosas
I made this recipe on Monday, and things got off to a rocky start.
“Shell the peas,” they said. “It’ll be fun,” they said.
Look, I’m not saying that freshly shelled peas aren’t better than frozen peas, I’m sure they are. So I bristled at the instruction, cursed when peas escaped and went flying across the room, but ultimately ended up with a thing of nice plump peas. I made the chutney, cooked the spinach, prepared the samosa filling, and by this point over an hour had passed. I’d told my 3 year old she could help with the samosas, and she kept very impatiently asking “why is it taking so long?” I also managed to dirty approximately every single bowl and utensil in the kitchen during the prep process.
Every step seemed to take longer than the last, and when the samosas / cauliflower were finally in the oven I thought “why did I make the chutney first? I could have just made it while everything baked.” But then I looked at the giant pile of dishes in the sink and spent the 15 minutes cleaning up instead.
An hour and forty-five minutes after I started we were finally ready to sit down and eat.
Cauliflower, samosas, and chutney
The samosas look pretty good, but were pretty bland. I should have added more salt/pepper. The chutney was great, the cauliflower was OK. What really bugs me though is how little protein is in this meal. You get a little from the peas, and some more in the cauliflower, but not much. The serving sizes are small and about half and hour after dinner I was raiding the fridge because I was still hungry.
After dinner I was exhausted from nearly two hours of cooking and cleaning. I collapsed into a heap with the baby (who of course was hungry by this point) while Chris did the rest of the dishes.
Meal 2: Oven-Roasted Chicken and Mixed Mushrooms
Thankfully this meal went a lot more smoothly than the first. From start to finish it took one hour and 10 minutes, which includes 10 minutes of downtime while things roasted (used to clean the prep dishes and utensils).
The chicken came out crispy and the orange “salad” paired well with it. The collards were OK. Our local grocery store doesn’t have much in the way of “fancy” mushrooms so it was nice to try some varieties besides white button. I’m not sure it’s a recipe I’d make again though. Once again I left the table feeling a little hungry. Mostly I was relieved that cooking Tuesday’s dinner wasn’t another 2 hour marathon.
The rest of the week will be filled with leftovers and an ad-hoc meal made by throwing all of last week’s leftover ingredients on some chicken.
For the Blue Apron part of this week we’re at 2 hours 50 minutes and $70 for 2 meals, versus last week’s 5 hours and $60 for 3 meals. I knew Blue Apron would come out more expensive, since most of what they’re selling is convenience, but I didn’t expect the two to come so close in time-per-meal. I also felt like the CookSmarts recipes were much better.
Originally I’d planned to try a bunch of different meal-kit services, but this week was irritating enough that I might just skip the others. I know many people love Blue Apron, friends of mine swear by it, and maybe this was just an off week for them. But based on this week I just don’t think Blue Apron is a good fit for us. I am willing to exchange the convenience of delivered food for more flexibility in my meals. One of the biggest headaches of Blue Apron is the week lead time needed to change or cancel your meals. I don’t always know what I’m doing a week in advance. Mostly though I was just really frustrated with the time-to-deliciousness ratio. It wasn’t any cheaper than ordering takeout, but it was considerably more labor intensive. Not only that but I left both meals feeling hungry.
I have been cooking the same 5 or so recipes for literally years now. As a result I am very tired of them. And as a mother to a new baby, I am very tired in general. As such, we’ve been eating a lot of takeout. It’s incredibly delicious, but also starting to seriously get in the way of my efforts to get back into shape. So I’m rededicating myself to cooking on the regular.
This week I tried out CookSmarts, a weekly meal planning service which provides you with up to 4 recipes per week and automatically generates a shopping list based on the number of people you’re cooking for. The service is $8/month, but they offer a free trial (no credit card required, thankfully).
The free trial gives you unlimited-time access to 3 different weekly menus.
Each week you mark which recipes you’d like to cook. Any dependencies (sauces or sides from one recipe that are reused in another) are noted. I only have time to cook 3 nights a week, so I chose the Maple Dijon Crusted Salmon, Adobo Honey Chicken Kebabs, and Turkey Meatball Lettuce Cups this week.
Each recipe gives you dietary options such as gluten free, paleo, and vegan. Although we eat most anything, I often need to cook gluten-free for friends or family so I chose the gluten-free options.
The grocery store run
The grocery list provided by CookSmarts is well organized. Thankfully I had a lot of the stuff needed on hand, apparently I am the type of person who has 5 different varieties of vinegar lying around. I had to go to two different grocery stores for the rest of it. Perhaps “had to” is an exaggeration. A lot of the less common ingredients like almond meal are way more expensive at my local grocery store. Going to Trader Joe’s on a Monday afternoon was a somewhat harrowing experience, but I survived. There was a whole incident wherein I thought I needed ghee, but Trader Joe’s was out, but then I realized I didn’t really need it (that was for the Paleo version of the recipe), and then I was lazy-shamed by my friends for not making my own ghee. In the end my mom got me some ghee from a different Trader Joe’s. Cool story, I know.
My grocery bill for these 3 meals was $57.25, excluding the stuff I already had, and it took me 2 hours and 15 minutes to gather everything. The most expensive item on the list was the salmon, and my costs were a little lower than they might have been because I had a bunch of ground turkey in the freezer already.
Meal 1: Honey Dijon Crusted Salmon
I made this meal first because fish smells kinda weird to me even when it’s fresh, and I didn’t want it hanging around my fridge any longer than necessary. The recipe includes videos with tips on preparing food, and I learned that you are supposed to wash and dry fish before cooking. Now I know. Sorry, anyone who’s ever had salmon at my house in the past.
The salmon was pretty easy, and gets slathered with a tasty mixture of honey, dijon mustard, and almond meal (or breadcrumbs if you’re glutenous, which is different than gluttonous). It was paired with a baby spinach / apple / mandarin / pecan salad. Please note that it is not possible to buy mandarin oranges in quantities of less than 1,000, and everyone in my house will be enjoying tiny oranges for the rest of the month.
Also my husband is not that into salad (though he will eat it if I serve it because he’s not an asshole). So I packed up half the salad into a jar (yeah, Pinterest!) for lunch. What I did not realize at the time was that salad was about to become a major theme in my life.
Maple dijon salmon and spinach / apple / mandarin salad. Next time I’ll use a real camera, I promise.
The whole meal was delicious. A+ would eat again. It took me about 45 minutes to prep and cook, start to finish.
Meal #2: Turkey Meatballs
Turkey meatballs with quinoa and salad
This meal I made for six people, and took over to my sister-in-law’s so I could earn brownie points while drinking her wine. I cooked the quinoa in the rice cooker, made the meatballs in the morning, and then made the salad while the meatballs were cooking. I greatly overestimated how much salad would be consumed, and thus will be eating leftover salad for the rest of the week.
The big time suck with this recipe was the adobo sauce (seen in the little dish on the left). It’s used for both this recipe and the chicken kebabs, and they suggest you make it the weekend before. Since I didn’t go grocery shopping until Monday I got to make it Tuesday afternoon. It’s one of those irritating things where you only need a few teaspoons of adobo, but you can only buy it in a 8 oz can with some chipotle peppers. So after making the sauce I had spend time packaging the leftover peppers into ice cube trays for freezing / later use. Which is to say I’ll probably throw them out in 6 months when I’ve completely forgotten about them.
All the recipes have you make salad dressing from scratch, which is great and easy, but I’ll probably skip it next time. I have approximately 20 bottles of store bought salad dressing already. They go well with my 5 kinds of vinegar.
The sauce and the meatballs were delicious, my 3 year old even ate the salad (or at least she was willing to pick out and eat the apples / celery), and I got some great sister-in-law points from it. I spent a total of 1 and a half hours cooking on Tuesday, not counting the time it took to pack everything up to travel.
Meal #3: Chicken Kebabs
I swear next time I cook something I’ll get out an actual camera.
This meal was really easy and straightforward, mostly because I’d already made the quinoa and adobo sauce on Tuesday. It took 10 minutes in the morning to start the marinade. Grilling the chicken was quick, once Chris spent 2 hours cleaning the grill from its winter sadness. Rather than make a new salad I just ate some of the salad leftover from Meal 2.
Total time, including the morning marinating, was 30 minutes.
Sixty bucks and 5 hours is not terrible for 3 meals / 14 servings. I’m sure over time I’ll get a lot faster at grocery shopping (Chris usually does it), and not all weeks will require a trip to the minor circle of hell that is Trader Joe’s in the suburbs. It’s still a pretty significant time commitment. Out of curiosity I priced out what the same or similar ingredients would have cost on AmazonFresh. It came to $69.43, or $12.18 more (not including the $300 annual Amazon Prime Fresh membership). FreshDirect would have been around $78.
One of the advertised benefits of box-of-food services like Blue Apron or Plated is that there’s no unused food to go bad, and I can see the appeal. Dry goods like almond meal or shelf stable ingredients like maple syrup are no big deal leftover. But I’ve got a bunch of green onions, half a head of lettuce, half-bags of both baby spinach and spring mix, a giant pile of mandarin oranges, and some celery all waiting to rot if I don’t think of something to do with them soon.
Overall though I’m really happy with the meal plan, and signed up for the paid version (which unlocks the entire archives as well as new plans each week). Next week I’m giving Blue Apron a try, and I’m interested to see how it stacks up in terms of time, cost, and taste.