New Construction Townhome

Wiring the House for Ethernet

The biggest part of setting up our home network was wiring the house for ethernet. There were two basic phases: running the wire through the walls, and then terminating/testing each wire to make sure it was set up correctly. We hired a family friend who is an electrician to run the wires, and then terminated/tested them ourselves. We installed a total of 34 lines across 4 different floors, all coming into the closet under the staircase.

Cat6 Basement

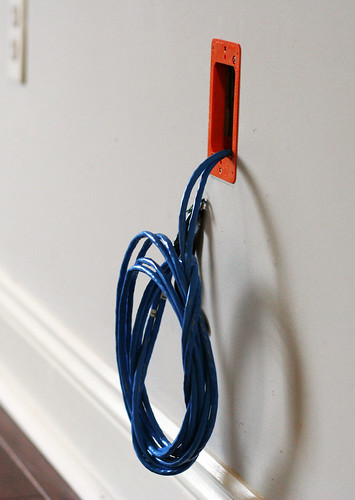
Running the wires proved to be a bigger challenge than expected due to the fact that all of our walls were filled with insulation. A number of access holes had to be cut in the drywall in order to access everything. Four separate boxes of Cat 6 ethernet cable were used, so that multiple lines could be run to the same location at once. The free end from each spool was taped into a small bundle and a long metal wire with a hook was run from the target location (say, the bedroom), through the walls, and into the basement where it was attached to the end of the cat 6 bundle. Then the wire was pulled back up through the walls, bringing the cat 6 cable along with it.

Cat6 wall
Wires coming into our home office. The orange ring gives the faceplate something to screw into.

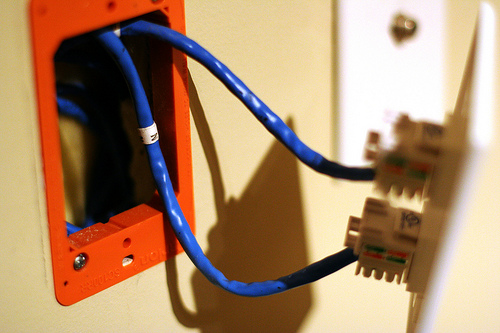
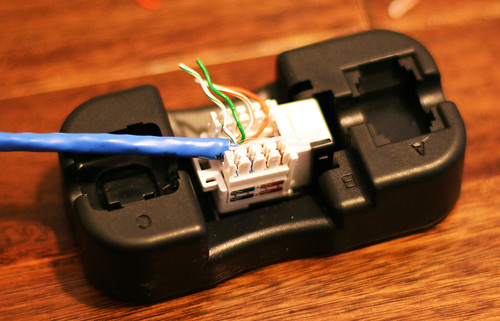
Each location in our house got either 2 or 4 wires, depending on how many devices we planned to put in that area. For every location in the house we needed either two or four RJ45 keystone jacks (one for each wire) and a faceplate with an appropriate number of holes. Keystone jacks are available in two basic formats: the standard kind which require a punch-down tool to terminate the wires and a “tool free” type which includes little caps which punch the wires down automatically. I personally prefer the standard jacks.

Cat6 Keystone
The near side of this jack (white) has been punched down, the far side is still waiting to be done. Each strand of the blue cat 6 cable goes into its own slot on the jack. Color codes on the side tell you where to put each wire. Monoprice included a handy little holder (black) to place the jack in while punching it down.
The two keystone jacks have been pushed into the faceplate, which is waiting to be screwed into the wall.

The opposite ends of the cables, which are bundled in the basement closet, get a slightly different treatment. Instead of going into individual jacks, they’re terminated in a patch panel. We used two 24 port patch panels, placing 16 connections on one and 18 on the other. We’ll be mounting these in our server rack, but if you’re going for a minimalist build there are inexpensive wall-mount brackets.

Cat6 PanelEmpty
Two patch panels, one face up and one face down. The black thing on the right is a rack-mount power strip.

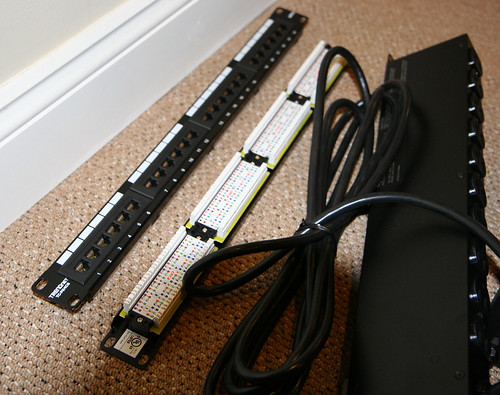
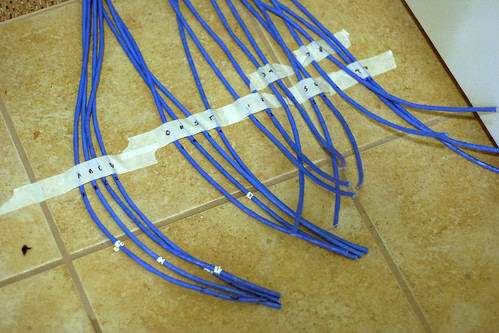
Each wire was marked with a small letter or number at both ends. To keep everything in order and save my sanity, I used masking tape to temporarily keep the wires in alphabetical/numerical order.

Cat6 Sorted

Cat6 PanelBeck
18 cables have been punched down into the back of the patch panel.

Each jack in the patch panel is then patched into one of our network switches (which are each in turn plugged into the router) with a 6″ cable. Why not just go directly from the wall to the network switch? The patch panel gives you flexibility to change the network around later by moving the 6″ patch cables rather than tangling up the spaghetti coming out of the walls. Additionally, punching the wires down into the back of the patch panel is considerably faster than crimping a male RJ-45 connector onto the end of each drop.

Patch Cables

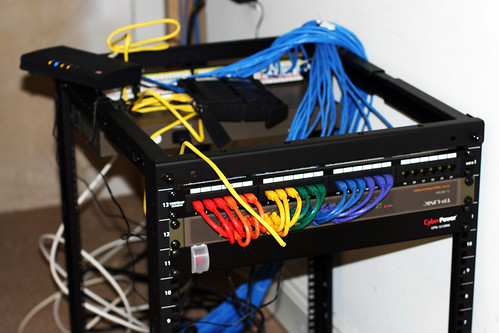
I briefly considered crimping my own patch cables from the leftover cat 6 cable, but then I remembered that crimping cable ends sucks and a 6″ patch cable costs all of $0.55. The photo above shows half our network cables, the other half are mounted on the back of the rack. I still need to install stress relief for the blue the cables and mount the router + modem nicely somewhere.

The server and switches are all connected to the LAN ports on the router. Our cable modem connection goes into the WAN port. Now the server and anything else on the LAN can see the outside world.

Overall it was a pretty massive project: it took three people a week to get all the wires in place and then another day and a half for my dad and I to button it all up. The next step is to configure the router for the advanced management options we want, as well as configure the wireless access points to provide “seamless” coverage throughout the house. The media server also needs considerable set up, right now it’s just a fresh Linux box with a giant hard drive. I’ll cover the software side of things in part 3 of Our Over-engineered Home Network.

This is part 2 of 3 posts about our home network.
Part 1: Our Overkill Home Network
Part 3: Coming soon 

New Construction Townhome, Organization

Color coordinated packing labels

We’re less than a week from moving day, and while packing I came across some shipping labels I’ve had for years. I decided to use them to make color coordinated packing labels.

Sheets of packing labels

The nice thing about the labels is I can write detailed information about what’s in each box. This gets important towards the end of packing when completely unrelated items start ending up together.

IMG_5860

Since we got the boxes from friends who had recently moved, they’ve already got various rooms and contents written on the side. The labels make it easy to tell at a glance where each box goes without having to cross out all the previous markings.

IMG_5862

The labels I used were Staples White Shipping Labels, which come 6 to a sheet. They’re compatible with Avery 5164 labels and Avery 8164 labels. I’ve uploaded the Photoshop template file should anyone wish to make their own. There are 5 different colors for the labels, just hide / show the appropriate layer group. Click here to download the PSD template.
The font used is Walkway Bold, which you can download for free.

New Construction Townhome, Organization

Page-A-Day Chore Calendar

One of the scariest things about moving to a bigger place is how much more space we’ll have to accumulate stuff. To a real estate agent, big bedrooms and walk-in closets are a selling point, but to me they’re caves threatening to fill with dust dragons and piles of things forgotten. Honestly, I’m not very good at keeping our apartment clean as it is. If we’re going to move into the house without Chris killing me, I need to level up my tidiness skills.

It turns out I’m not alone. Offbeat Home helpfully published an keeping your place organized little by little, using daily chore checklists from A Slob Comes Clean. But I decided the checklists were kind of boring looking, and in my usual spirit of over-engineering I came up with this:

I put "fight off headcold" on my to-do list for today.

I took the base of last year’s page-a-day calendar (my mom gets me one every year for Christmas), and designed a chore calendar to fit it. Each page features 7 “every day” tasks at the bottom, e.g. checking the trash cans to see if they’re full (and emptying them if they are). At the top left is a more major chore (like vacuuming) that needs to be done on a weekly basis. In the middle there are four blank lines for the day’s to-do list which I can write in. And lastly, if there’s a special event that day, such as a birthday, it’s shown below the to-do list.

Sample Page

I designed the pages in Photoshop and then wrote a program using ruby/ImageMagick to dynamically create a page for each day. The daily chores are always the same, but the weekly ones rotate through the week. Within the generator program I plugged in a list of important dates to populate the special events area. Finally, the program lays out the pages two-up on Letter sized paper so I can print them out, cut them, and assemble them into a pad.

To start with I’m just printing a week at a time, so I can tweak things in the design as I go. I used hot glue to bind the pages, but I plan on picking up some padding compound next time I’m in SoHo. I’ve heard rubber cement can work as well.

I’m only on day two of using it, so it’s too early to tell if this is something I can stick with, or yet another failed attempt to be less of a slob. One thing I’m noticing already is that chores take a lot less time when you do them regularly. Also, I still really hate folding clothes.