Gaming, Hacking, Programming

Animating build progress on a Minecraft server

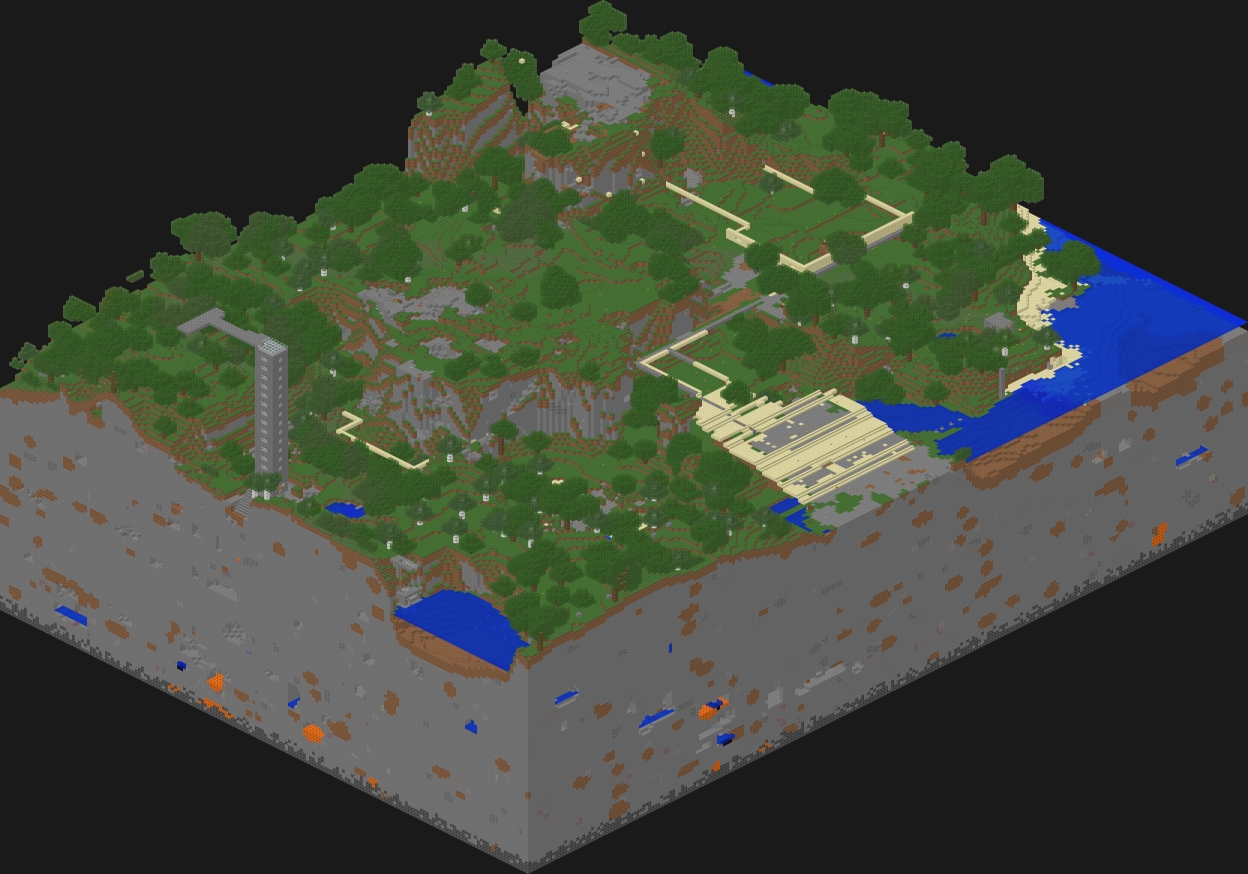
My Minecraft server is seeing some use again, and I decided to build a life size model of the Philadelphia Museum of Art. I also thought it would be cool to have an animated gif of the build progress as things go.

2014-10-15

Configuring Overviewer

We use Minecraft Overviewer to generate Google-maps style views of our world for the web. I created a config file limiting the render area to the coordinates around the building

worlds["Main"] = "/minecraft/Minecraft/world"

renders["normalrender"] = {
        "world": "Main",
        "title": "Overworld",
        "dimension": "overworld",
        "crop" : (200, -90, 420, 70),
}
outputdir="/minecraft/renders/museum"

Compositing the tiles
I found a script for making composites from google map data, originally written for use with Overviewer, but it was pretty far out of date and written for a different version of python than what I’ve got installed. I used it as a jumping off point for writing my own composite script.

#!/usr/bin/env python

import Image, ImageChops

import os, fnmatch
import os.path
import re

import sys

CHUNK_SIZE = 384

def trim(im):
    bg = Image.new(im.mode, im.size, im.getpixel((0,0)))
    diff = ImageChops.difference(im, bg)
    diff = ImageChops.add(diff, diff, 2.0, -100)
    bbox = diff.getbbox()
    if bbox:
        return im.crop(bbox)

def find_files(directory, pattern):
    regex = re.compile(pattern)
    for root, dirs, files in os.walk(directory):
        for basename in files:
            if regex.match(basename):
                filename = os.path.join(root, basename)
                yield filename

def getAllFiles(srcdir):
  return find_files(srcdir,  "[0-9]+.png")

def getCoordinates(f):
  return map(lambda x: int(x), re.findall(r'[0-9-]+', f))

def getX(c):
  return {
    0: 0,
    1: 1,
    2: 0,
    3: 1,
  }[c]

def getY(c):
  return {
    0:0,
    1:0,
    2:1,
    3:1,
  }[c]

if len(sys.argv) != 4:
  print "Usage:", sys.argv[0], "<source directory (Dir)> <output file> <zoom level>"
  sys.exit(1)

sourceDirectory = sys.argv[1]
zoomLevel = int(sys.argv[3])
outputName = sys.argv[2]

width = (2**zoomLevel)  * CHUNK_SIZE
height = (2**zoomLevel)  * CHUNK_SIZE
print "Width:", width, "Height:", height

output = Image.new("RGBA", (width, height))

for f in getAllFiles(sourceDirectory):
  coords = getCoordinates(f)
  if len(coords) == zoomLevel:
    chunk = Image.open(os.path.join(sourceDirectory, f))
    #print chunk
    xbin = ""
    ybin = ""
    for c in coords:
      xbin = xbin + str(getX(c))
      ybin = ybin + str(getY(c))
    y = int(ybin,2)
    x = int(xbin,2)
    output.paste(chunk, (x*CHUNK_SIZE, y*CHUNK_SIZE))

print "Map merged, saving..."

output = trim(output)

if outputName[-3:] == "jpg" or outputName[-4:] == "jpeg":
  output.save(outputName, quality=100)
else:
  try:
    output.save(outputName, quality=85, progressive=True, optimize=True)
  except:
    print "Error saving with progressive=True and optimize=True, trying normally..."
    output.save(outputName, quality=85)

print "Done!"

This generates a daily snapshot and puts it in a web-accessible folder. I can then make a gif of all the images in that folder with ImageMagick’s convert utility
convert -delay 80 -loop 0 *jpg animated.gif

Checking for modifications
Originally I ran the script once daily on a cron, but later decided to run the world generator every half hour and only generate an image if there’s something new to see.

#!/bin/bash

rendersecs=$(expr `date +%s` - `stat -c %Y /minecraft/renders/museum/normalrender/3/`)
snapsecs=$(expr `date +%s` - `stat -c %Y /minecraft/renders/museum/last-snapshot`)
if [ "$rendersecs" -lt "$snapsecs" ]; then
  echo "Render was modified $rendersecs secs ago. Last snapshot $snapsecs secondds ago. Updating snapshot."
  /minecraft/renders/merge.py /minecraft/renders/museum /var/www/html/museum/$(date +\%Y-\%m-\%d-\%H\%M).jpg 3
  touch -m /minecraft/renders/museum/last-snapshot
  convert -delay 40 -loop 0 /var/www/html/museum/*jpg /var/www/html/museum/animated.gif
fi

Setting up cron tasks
I put two new jobs in my crontab file: one to generate the terrain and one to run my shell script. I give Overviewer a bit of a head start in case it has a lot of work to do.

*/30 *  * * *  overviewer.py --conifg=/minecraft/overviewer-museum.conf
10,40 *  * * *  /minecraft/update-museum.sh
Programming

Extracting + Graphing Wii Fit data

In preparation to tinker with the miCoach data, I started with some better-travelled exercise bits: WiiFit body test data. Starting with Jansen Price’s excellent blog post on the subject, I slowly worked through the data and wrote a python script to interpret the binaries and save them to a CSV. By using the excellent flot javascript library, I was able to generate the nice graph above. There was a lot of trial and error, but here’s an overview of the process:

  1. Copy Wii save game data to the SD card. This is done from Wii Options > Data Management > Save Data > Wii
  2. Find the save game data on the card. It’s in something like ‘private/wii/title/RFPE’, although different regions may have slightly different codes. RFPE is the code for WiiFit Plus. Copy the WiiFit data.bin file from the SD card to your local machine.
  3. Decrypt data.bin. This is explained pretty well here. To create the keys I ended up creating text files with the hex string for each and then using “xxd -r -p sd_iv_hex sd_iv” et al to save a binary version. If you’re getting “MD5 mismatch” errors, you probably saved the keys incorrectly. If you aren’t sure, check the file size. They should be 16 bytes each.
  4. Run the decrypted RPHealth.dat through a parser (I wrote one in Python for this)
  5. Run the CSV through your favorite graph generation library. I use flot because Google Charts don’t handle dates very well.

Thanks to Jansen’s handy chart of which bits are where, writing the parser was pretty easy. This isn’t the most elegant code I’ve ever written, but it gets the job done:

import struct
import string
import csv

mii = 0
#we know that each record is 0x9271 bytes long
record_length = 0x9281

record_start = 0

#path to WiiFit data file
infile = 'RPHealth.dat'

FH = open(infile, 'rb');

## It loops through 7 profiles, because I happen to know I have 7.
## A better approach would be to go to the end of the file, of course.
while (mii < 7):

    #go to the start of the current record
    FH.seek(record_start)

    #read the first 30 bytes (header + name)
    line = FH.read(30)

    #for some reason names are stored as N a m e instead of Name.
    #Throw away the header any extranous spaces
    data = struct.unpack("i",line)
        #bit shift to get the month, day, and year. Could also get time if you wanted.
        year = data[0] >> 20 & 0x7ff
        month = data[0] >> 16 & 0xf
        day = data[0] >> 11 & 0x1f

        #break the loop if the date comes back 0
        if(year == 0): break

        #format the date into something humans like to read
        date = str(int(year)) + '-' + str(int(month)+1) + '-' + str(int(day))

        #the next three sets of 2 byte data represent weight, BMI, and balance
        line = FH.read(17)
        data = struct.unpack(">3H",line[0:6])

        recordWriter.writerow([date] + [data[0]] + [data[1]] + [data[2]])

    #now that we're done with the record, advance to the start of the next one
    record_start = record_start + record_length

    mii = mii+1

You can download a copy of it here.

Programming

Tutorial: Writing a TCP server in Python

During the last 12 hours of the hackathon I decided to write a TCP server for an old project I want to finally finish. I decided to write it in Python, mostly because my friend Adam likes Python and Adam would inevitably be the one answering my questions when I got stuck. I should mention that prior to yesterday evening I knew nothing about socket programing. And I only had a vague idea of what threading was.

Since not everyone has friends like Adam, I’m writing up my findings in a tutorial.

Note: A bug in my CSS is causing the code blocks to show up extra wide. I’ll fix it once I’m back home from the hackathon

Understanding Sockets

First, I’m going to assume you understand that this is not a tutorial about writing an HTTP server. Instead this server will take connections from clients and keep them open to pass data back and forth until one side decides to close the connection. By keeping the connection open we eliminate the need to constantly poll the server for updates.

Socket Programming HOWTO provides a broad overview of sockets and is a good starting place.

Python’s Socket Library

Luckily python has an easy to use library. Like other libraries, we import it with thusly:

from socket import *

Many of the socket methods you’ll use are pretty self explanatory:
socket.listen() – listens for incoming connections
socket.accept() – accepts an incoming connection
socket.recv() – returns incoming data as a string
socket.send() – sends data to client socket*
socket.close() – closes the socket

*in this context the ‘client socket’ can be on either the server or client side. When a client connects to a server, the server creates a new client socket on its end. The two clients, one on each end, communicate with each other while the server socket remains open for incoming connections. This becomes more clear as you work with socket connections.

Writing the server
First thing’s first, we need to establish our server socket:

##server.py
from socket import *      #import the socket library

##let's set up some constants
HOST = ''    #we are the host
PORT = 29876    #arbitrary port not currently in use
ADDR = (HOST,PORT)    #we need a tuple for the address
BUFSIZE = 4096    #reasonably sized buffer for data

## now we create a new socket object (serv)
## see the python docs for more information on the socket types/flags
serv = socket( AF_INET,SOCK_STREAM)    

##bind our socket to the address
serv.bind((ADDR))    #the double parens are to create a tuple with one element
serv.listen(5)    #5 is the maximum number of queued connections we'll allow

So now we have a server that’s listening for a connection. Or at least we did until the script reached the end and terminated, but we’ll get to that in a bit. Let’s leave our server hanging and jump to our client software.

Creating the client
Start a new python script for the client. We’ll need many of the same constants from the server, but our host will be ‘localhost’. For now we’ll be running both the server and the client on the same machine.

##client.py
from socket import *

HOST = 'localhost'
PORT = 29876    #our port from before
ADDR = (HOST,PORT)
BUFSIZE = buy online levitra cialis viagra 4096

cli = socket( AF_INET,SOCK_STREAM)
cli.connect((ADDR))

Notice that we’re creating another socket object on this end but instead of binding and listening, we’re using the connect() method to connect to our server.

So what happens if we run our server and then run our client? Well, not much. While our server starts to listen, it then hits the end of the script. We need it to instead wait until it accepts a connection and then do something with that connection.
socket.accept() does just that, and returns two things: a new client socket and the address bound to the socket on the other end. Once we have that, we can send data!

Continuing on server.py:

serv = socket( AF_INET,SOCK_STREAM)    
 
##bind our socket to the address
serv.bind((ADDR))    #the double parens are to create a tuple with one element
serv.listen(5)    #5 is the maximum number of queued connections we'll allow
print 'listening...'

conn,addr = serv.accept() #accept the connection
print '...connected!'
conn.send('TEST')

conn.close()

The last step is to jump back over to our client and tell our client to expect to receive data:

cli = socket( AF_INET,SOCK_STREAM)
cli.connect((ADDR))

data = cli.recv(BUFSIZE)
print data

cli.close()

Now when you run your server it will wait until a client connects. Once you run your client it will connect and receive a short message (the word “TEST” in this case) and print it to the screen. If you wanted to you could have the client send a response, using the same send() and recv() methods (but reversed).

Make sure you close() your connections when you’re done using them. If you don’t close things nicely they have a nasty habit of staying bound/connected until you forcibly kill the python process. This can be a real pain when you’re debugging.

By itself this isn’t particularly useful, especially considering we can only handle one connection at a time and exit once it’s closed. By adding a few while loops and some threading we can make this into something much more valuable. As it is, I’m pretty wiped from the hackathon, so the threading tutorial will have to wait until another day.

lased, SDXF Documentation

Tinysaur Display

Tinysaur Kit Display

I’m helping my friend Sara at the Squidfire Holiday Market in Baltimore, Maryland on Sunday. She suggested I bring some Tinysaurs, and so I made a display to neatly hold the Tinysaur kits.

I generated the pattern with a python script I wrote, using the sdxf library.

If you’d like to make your own, the DXF files are up on Thingiverse, or you can grab the python scripts and make one to your own dimensions. I cut it on the laser, but there’s no reason it couldn’t be cut on a scroll saw.

first, second, success

Here you can see my first attempt, second attempt, and final. The first two were in cardboard, fantastic for prototyping.

Once all this craft show stuff is over I will probably make a few available in my Etsy shop in case folks who do craft shows are interested in one.

Programming

Adam Mayer explains pointers to art students

I don’t have a background in CS. In fact I got my degree in Crafts. Yes, you can get a degree in Crafts. And I have one.

Most of my programming skills are self-taught, which is fine most of the time but occasionally gets me into trouble. Recently I learned about pointers the hard way, and to help clarify things my friend Adam broke it down into art school terms for me. It was so hilarious (and helpful) that I’m reposting it here.

You’re telling me you went through art school without once discussing referers and referents? WHAT KIND OF PUNK-ASS ART SCHOOL DID YOU GO TO? Let me break it down to you in art-school terms, then:

In python, you can think of all variables as pointers. All they do is point to objects. When you say:
>> constructivism = 6
You can think of this as creating an “integer object” with a value of 6. Constructivism is not itself 6 (which is to say, constructivism is not “6” in the way that brutalist materialism might be “6”). Instead, constructivism is a variable which points to this newly created
integer object with a value of 6. If you were to say:
>> constructivism = []
or
>> constructivism = Socket()
then you’ll be creating an new empty list object, or a new socket object, and then constructivism will point to that instead.

That’s all pretty simple. Then there’s this:
>> futurism = constructivism
Now, constructivism is already a pointer to something else. Futurism, however, will not point to constructivism itself: instead it will point to whatever constructivism points too, much like in 1991 Saatchi did not point at Damien Hirst, but whatever Damien Hirst was pointing at at the time; in this instance a dead shark. Note that while Damien Hirst went on to point at other things, Saatchi is still pointing at the dead shark. So:
>> hirst = Shark( dead=True )
Hirst is now pointing at a dead shark.
>> saatchi = hirst
Saatchi is now pointing at the same dead shark. Now,
>> hirst = Skull( bling=True )
Hirst is now pointing at a blinged-out skull, but Saatchi is still stuck on the shark.

When two variables are pointing at the same thing, they both see any changes made to that thing over time. So, for example, look at the following code:

>> # note that hirst does not make the shark himself, but calls a constructor
>> hirst = Shark( dead=True )
>> saatchi = hirst
>> print hirst.living
False

Both Hirst and Saatchi are referring to the same dead shark. But, later:

>> # Saatchi uses his money to bring the shark back to life
>> saatchi.ressurect()
>> print saatchi.living
True
>> print hirst.living
True

However, let’s move on:
>> hirst = Skull() # Hirst has moved on to other dumb shit
>> # What doth life?
>> print hirst.living
AttributeError: Skull has no attribute 'living'

… because hirst now points to a skull, and not the shark.

I could go on, but I’m impatient to see what google ads start popping up for this thread.

-a
(Actually, you probably really need to hear about scoping, but I’ll do that in terms of objectification and the male gaze.)

Programming, SDXF Documentation

Python library for generating DXF files

I’ve gotten a little frustrated with the limitations of using Processing to generate PDFs for laser cutting. Primarily, there’s no support for “hairline” thickness lines, which add an extra step to getting things ready to lase, and there’s no way to separate lines into different layers so it can be hard to work with the file later if you want to raster etch some lines and vector cut others.

Adam suggested looking into a DXF library someone had written for Python. Indeed, there is a very nice library. Unfortunately the original documentation for it seems to have gone missing.

I’ve started documenting the library, it’s called SDXF and is pretty thorough. I don’t know Python, or DXF, but so I’m picking up both as I go along.