Crafting

Wilcom Hatch’s Auto-Digitizer

I definitely want to learn to digitize my own files for embroidery. The prohibitive cost of the software ($1000+) means I probably won’t be doing so any time soon, but Wilcom has a new package called Hatch which I downloaded a 30 day trial of. It’s a full featured digitizer with a (theoretically) easier to use interface. So I’m playing around with it and today I gave the auto-digitizer a spin.

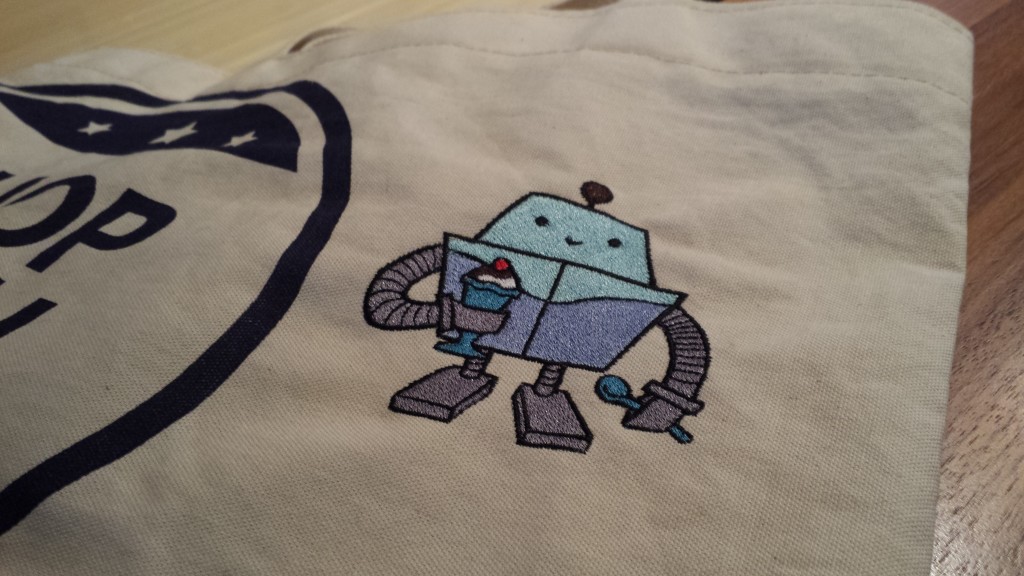
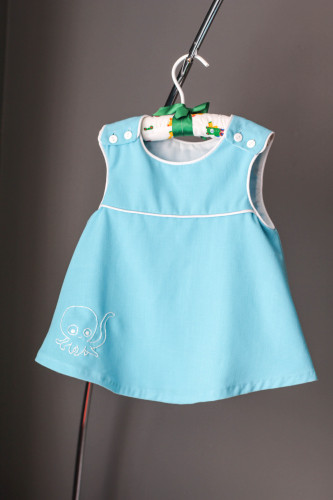
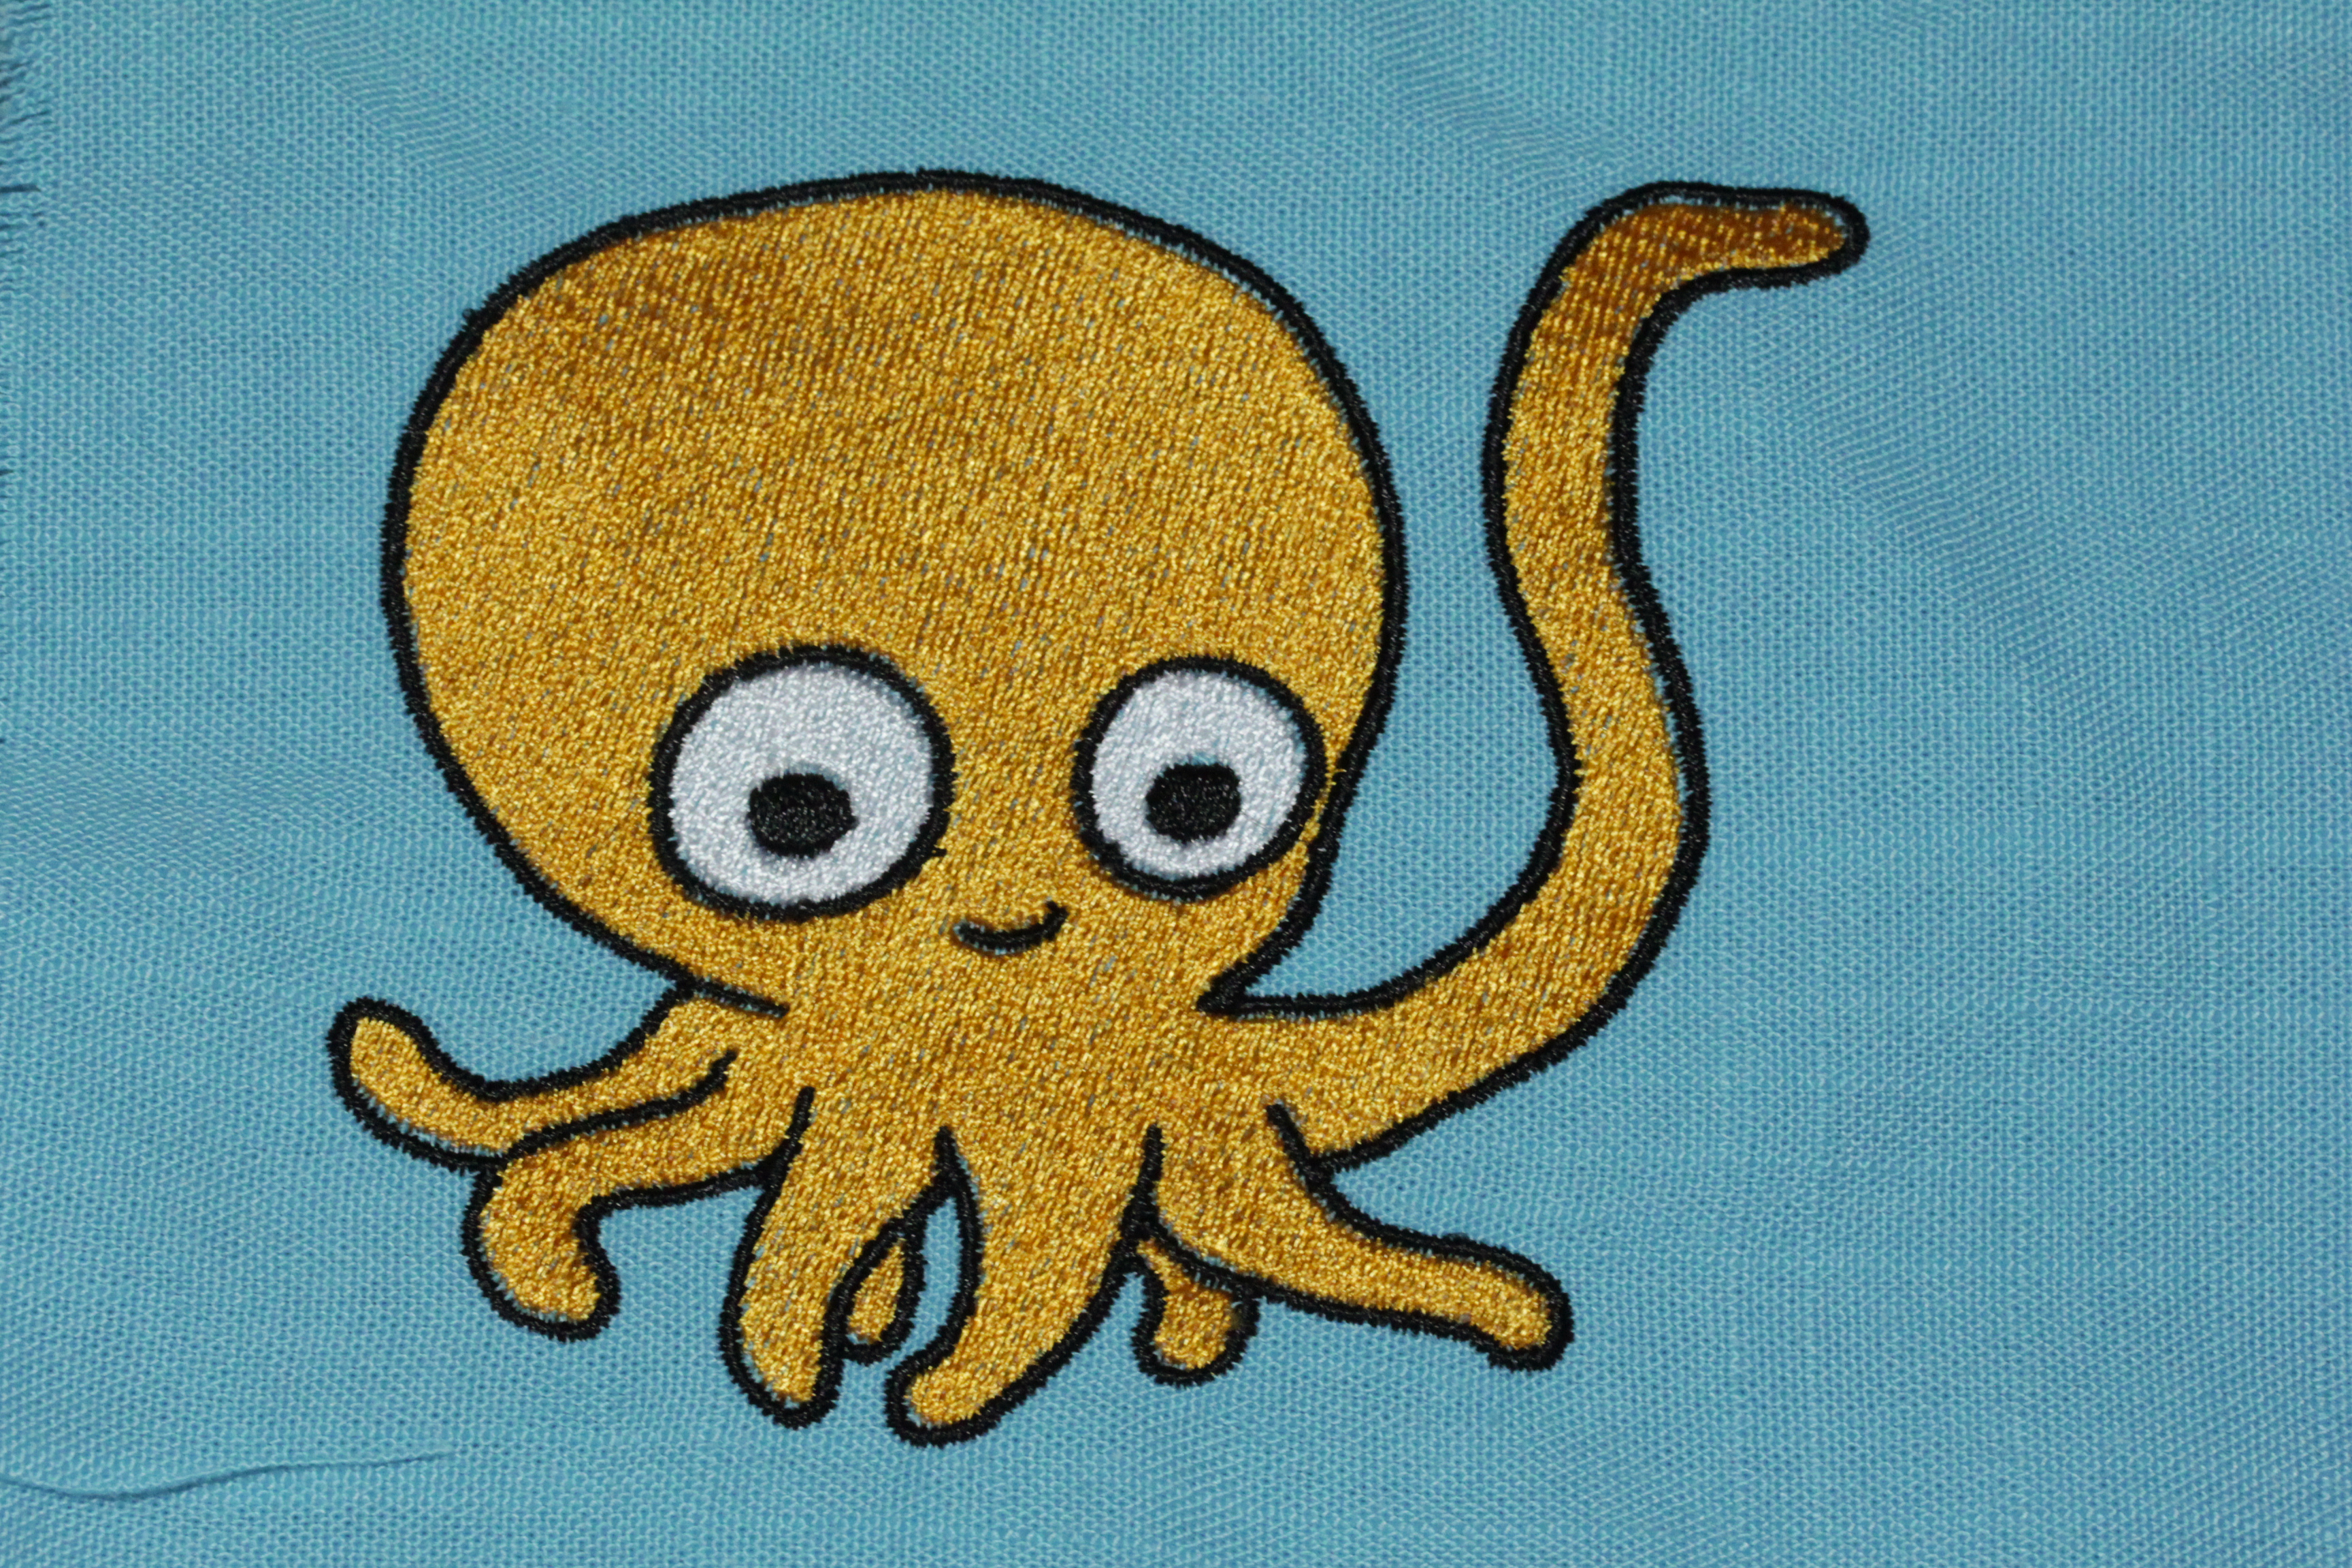
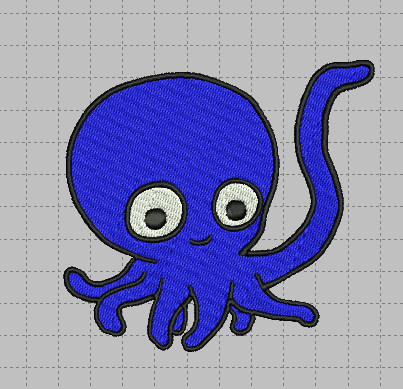
I used this adorable octopus, which Chris designed for hand embroidery on a dress I made a few years ago.

octopus


I ran it through the auto-digitizer, setting a blue fill for the body and white fill for the eyeballs. Everything else is satin stitch. I tweaked the fill angles a bit and reordered some of the objects  for easier to cut jump stitches, but otherwise left it as-is. Wilcom thinks it will look very nice! There are a little over 14,000 stitches. So it will take about 40 minutes to stitch out, not counting the time it takes me to rethread the machine between colors.

The stitch preview generated by Hatch

I stitched it out on some “linen look” cotton fabric using medium weight tear away stabilizer.

What a happy octopus!

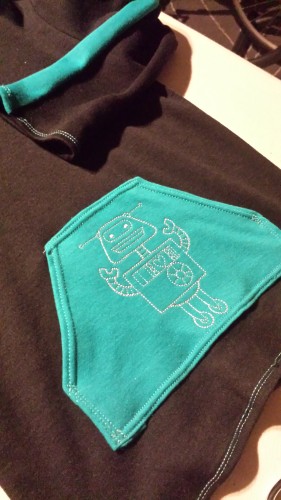
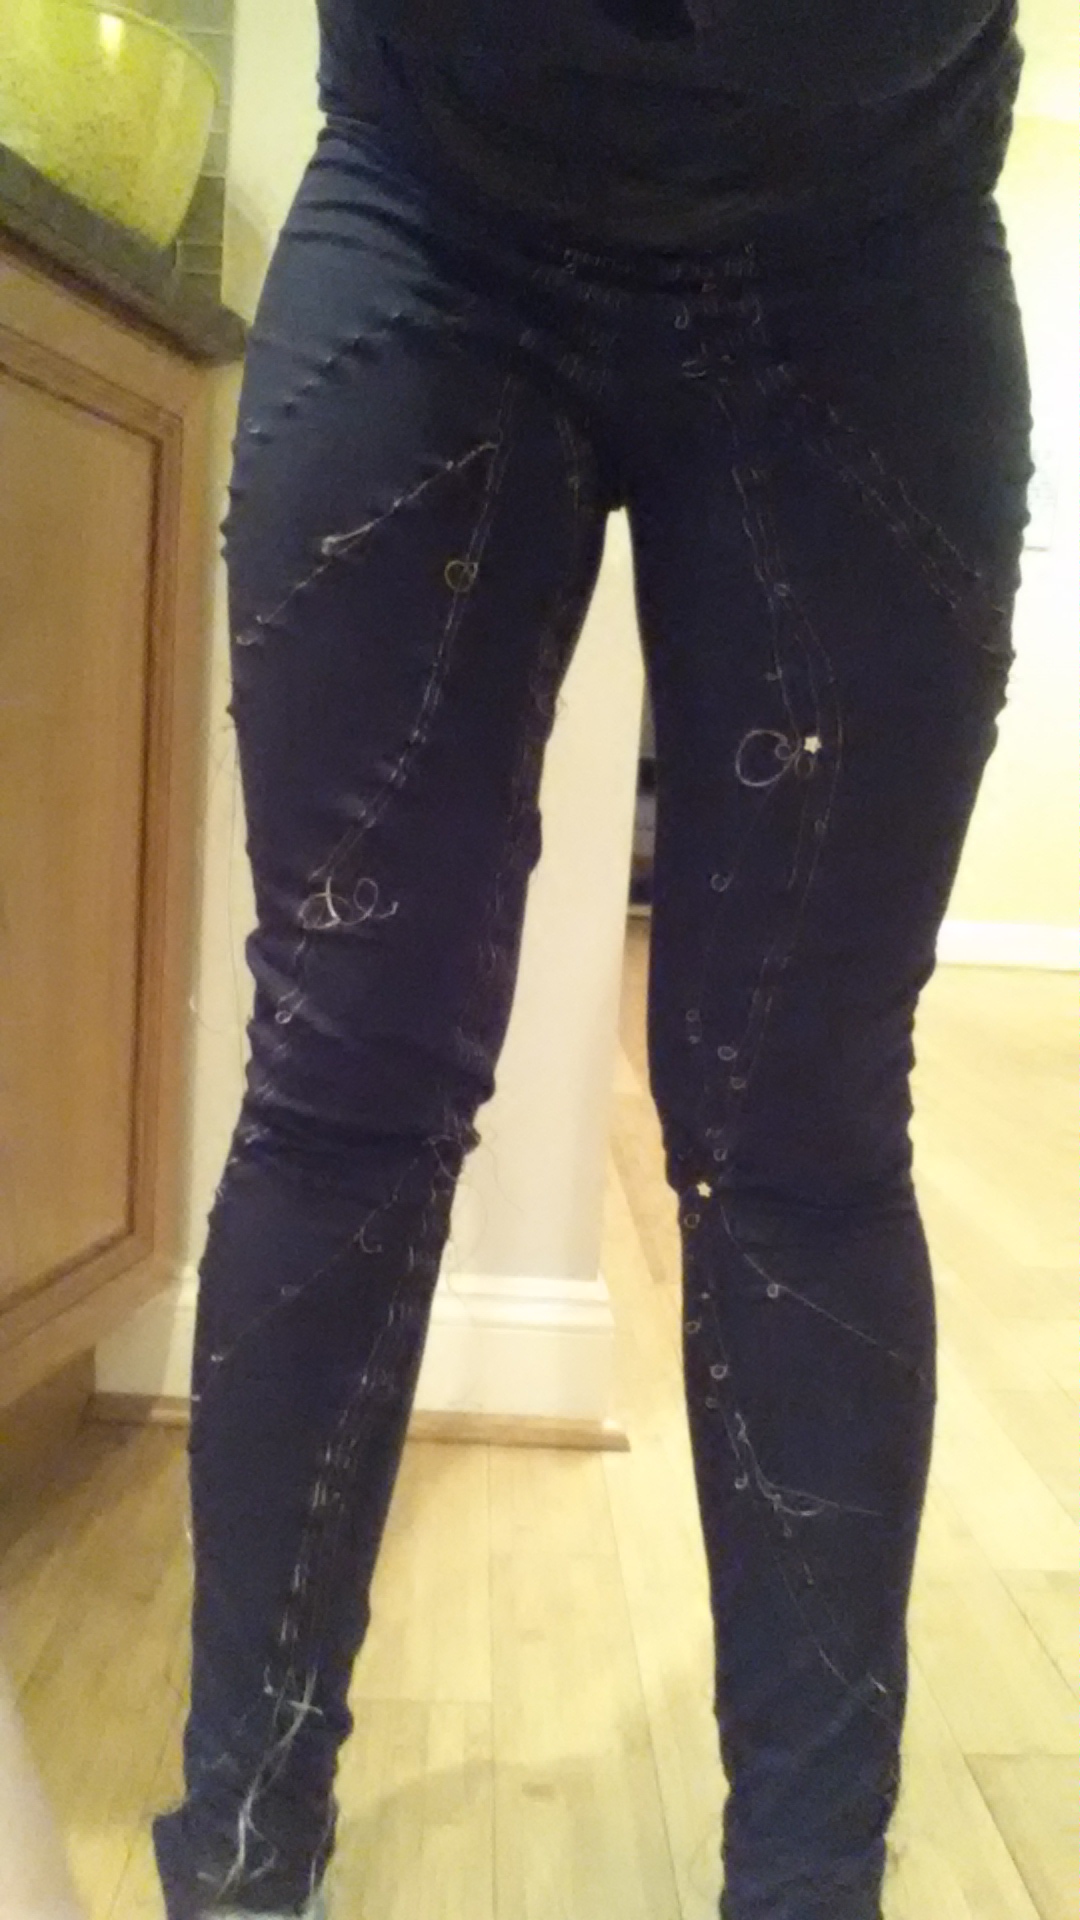
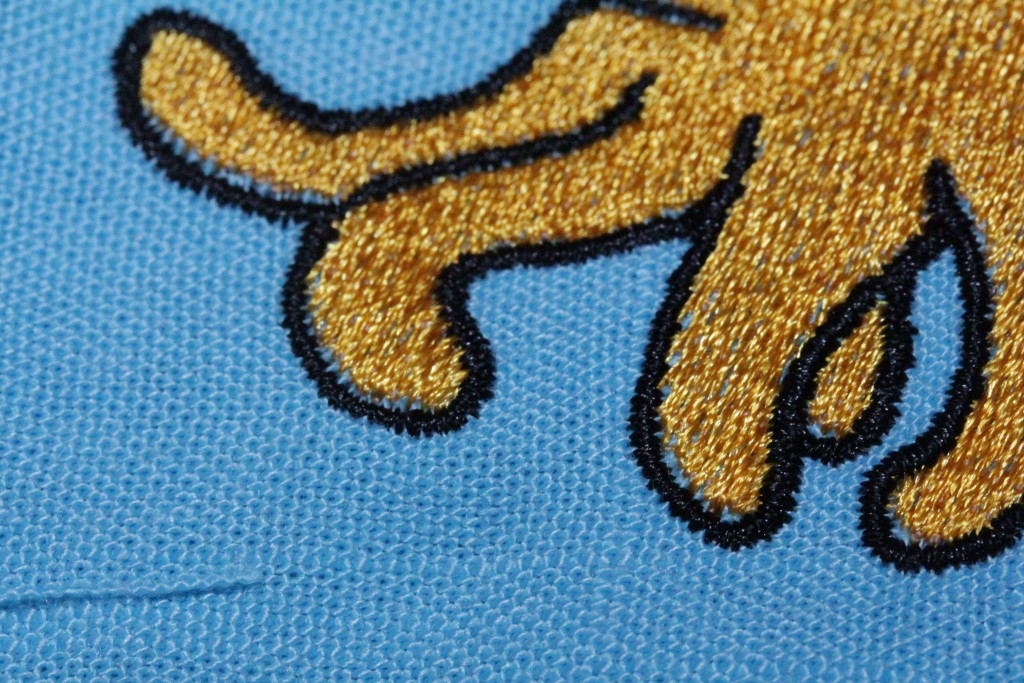
Aside from the jump stitch I couldn’t quite get at with my scissors, there’s noticible pulling at the top of the head and the bottom of the legs.

Top of the head
Top of the head
Bottom of the tentacles

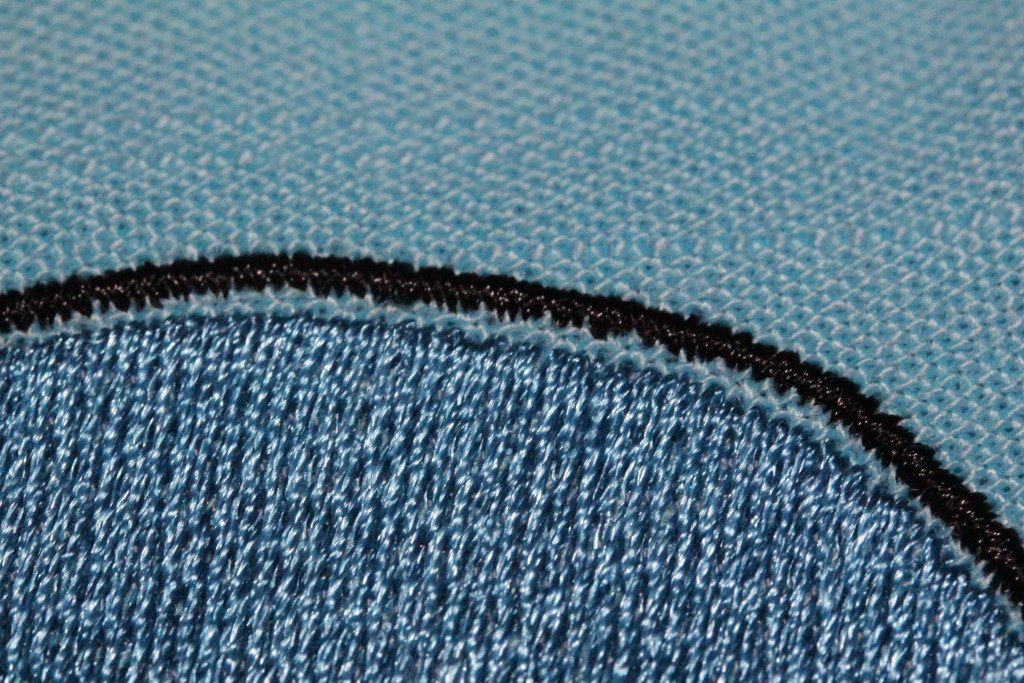
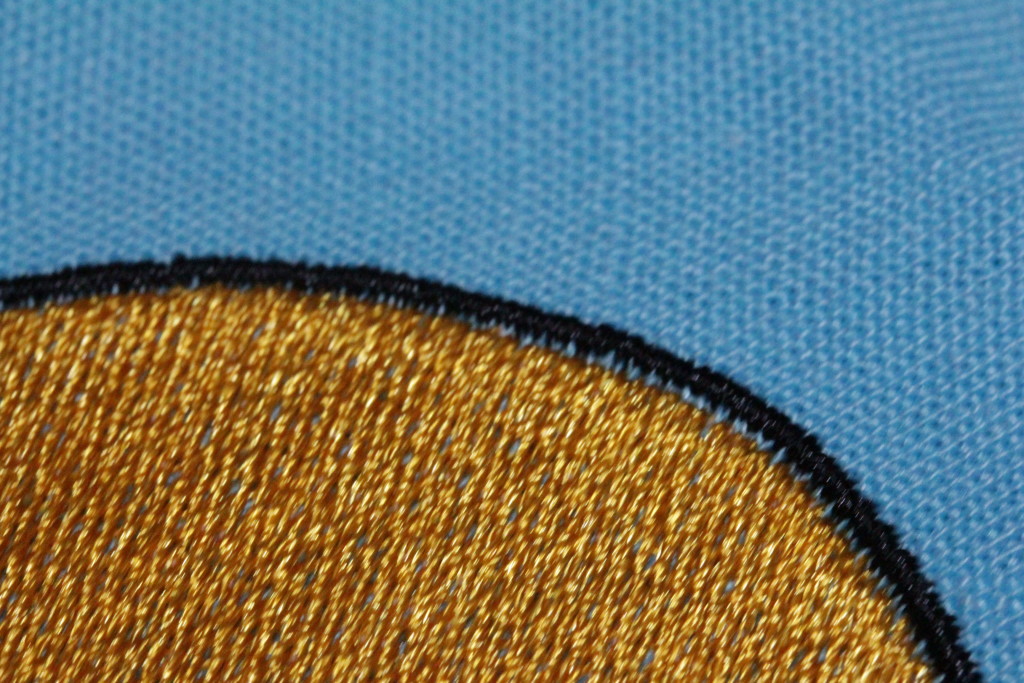
There’s also some around the eyes. This is not entirely unexpected, the stitches tend to pull in, leaving a gap and the vertical edges of the stitches.

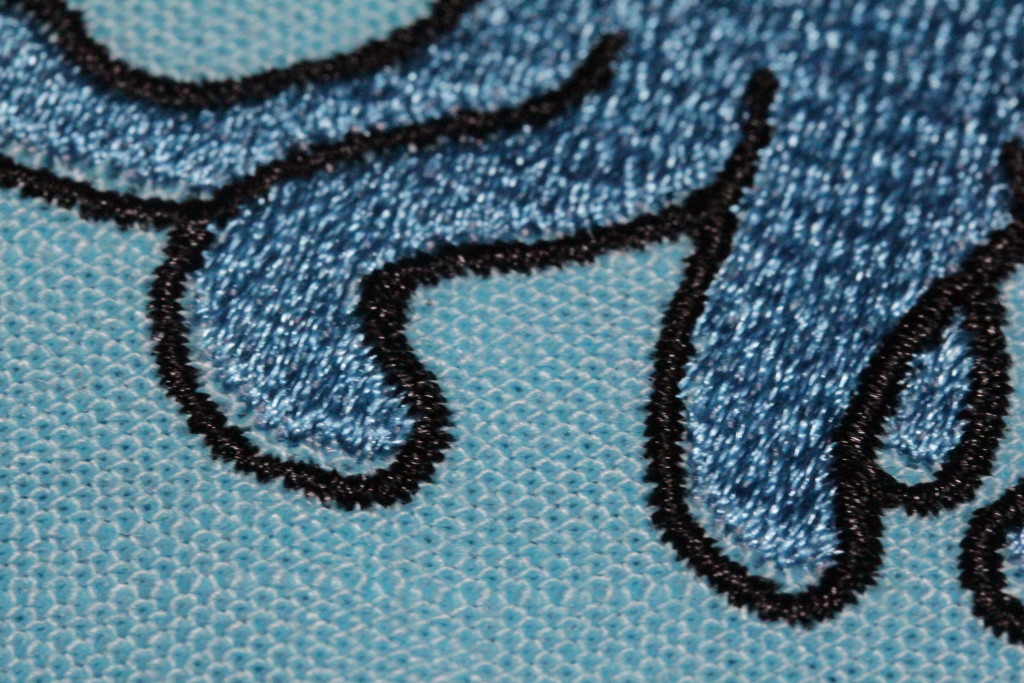
I measured the gap at the top with my calipers (0.045 inches) at tried to compensate accordingly by reshaping the objects in Hatch. Then I eyeballed the other gaps and adjusted them too. I stitched out the pattern again, this time with contrasting thread so it’s easier to see how things line up.

Still cute!
Still cute!

This one came out better, but I was too conservative with my compensation. There are still visible gaps between the outline and the fill.

IMG_2816
Top of the head
IMG_2817
Tentacles
Eyes and Mouth
Eyes and Mouth

I think with the 3rd round of revisions I’ll get it right, but this has definitely confirmed my skepticism of folks selling purely auto-stitched designs without a sample sew-out to show. A lot of the designs on Etsy have just the computer generated preview, and I suspect many of them have never been tested in the real world. I’m going to play with Hatch a little more to get a feel for manual digitizing, but for complicated or important designs I’m going to continue sending them out to professional human digitizers.

Crafting

Things I have learned in 4 days of owning a Brother SE400

2016-03-12 12.21.16

Last week I ordered a $300 embroidery machine off of Amazon. Fully acknowledging that most embroidery machines are $1000+, and that a good sewing machine starts around $300, I set my expectations accordingly. I knew it wasn’t going to be a great machine, but I also didn’t want to spend much more until I’m sure that machine embroidery is for me. Here’s what I’ve learned:

Cheap machines are a tensioning nightmare

Actually I already knew that, but the Brother SE400 reminded me how true it is. The tension on the Brother SE400 is fiddly. It’ll start skipping stitches, then I’ll rethread it, and it will sew just fine. Or it dislikes the bobbin for some reason. I can get it working, but every time I rethread it (more on that in a minute) I have to cross my fingers that it’s happy. Maybe I’m spoiled by my all-mechanical Janome, but I’m not to keen on the mysticism required to get the thing tensioned properly.

I really want a multi-needle machine

With a single needle machine every color change means rethreading. And on the SE400 every rethreading is an opportunity to make it angry. Plus occasionally I just screw up. I find myself loath to do designs with more than 5 or so colors because I don’t want to sit there changing them out every 5 minutes. If I was planning on doing any sort of production work a multi-needle machine would be a must.

The 4×4 work area is too small

The advice given in almost every “how to pick a machine” article is “get the biggest work area you can afford,” and it’s true. Even if you only want to embroider small stuff. Why? Because the 4×4 work area means you have to get your hoop placement just right, and on many items that’s a real big pain in the arse. It also means re-hooping if you want to place multiple designs on a garment.

The touchscreen LCD kind of sucks

When you’re stitching out a design it can show you the color info (handy if you’ve got a 10+ color design) or the stitch count, but not both, and switching between the two requires multiple button presses. Which wouldn’t be so bad except the touch registration on my machine is slightly off. This means that when I go to step back one stitch I often end up stepping forward an entire color (those two buttons are adjacent). I’ve learned always to write down the stitch count before touching anything.

A hoodie I made for my nephew

Getting your own designs into the machine is easy… if they’re digitized

To download new designs you just plug the machine into your computer’s USB port and it presents itself as an external drive to drag / drop PES or DST files onto. Great! Seriously, this could have been way more painful and I was glad it was so easy.

That said, it turns out that digitizing files (going from a bitmap or vector to stitches) is a hobby in and of itself. Digitizing software is expensive (hundreds or thousands of dollars), and learning to do it takes practice. There’s auto-digitizing software available, but I haven’t heard many positive things about the quality of stitch outs produced.  The conventional wisdom of the internet is to pay a professional to digitize your files if you don’t want to invest the time and money to do it yourself.

The good news is that pro digitization is cheap, generally $10-15 for a simple design. I found someone on Etsy who turned it around in a couple of days.

Despite its flaws, it’s still a fun machine

It won’t win any awards but it’s not a bad machine, and very fairly priced.

I made a hoodie for my nephew and the embroidery on it is completely adorable. I put my husband’s business logo on an old tote bag and he was stoked. And I’m learning a lot about the basics of machine embroidery. Which stabilizers to use with which fabrics, getting practice hooping things correctly, it’s all a learning process that will translate well to whatever machine I eventually upgrade to.


The use cases where I’d suggest buying a Brother SE400 are admittedly minimal. If you’re at all serious about embroidery, save up for something with a larger work area. While it does dual duty as a sewing machine, it’s not a particularly good one so if you primarily want a sewing machine I’d suggest putting the $300 towards a nice basic machine. I figure in 6 months when I have a really solid idea of what I want in a machine I’ll trade it in towards something fancier. Until then, expect to find it whirring in the background while I work.

Crafting

DIY Mickey Mouse Costume

Copy of How to

My daughter announced she wanted to be Mickey Mouse for halloween. My first instinct was to just buy a premade costume from one of those stores that pop up every year around Halloween. Unfortunately Mickey Mouse isn’t nearly as popular as Elsa or Ana, and the options for costumes were pretty pathetic. The ones I found online didn’t look like they’d last more than a few hours. So I managed to cobble together a costume with a minimum of sewing/effort.

Made this costume in about an hour, links to pattern in post


The black leggings and top are just normal clothes she already had. The mickey mouse ears, yellow shoes, and white gloves were purchased on Amazon. The shorts I made myself.

The shorts took about an hour, not counting the first pair I made from a DIY pattern which did not fit AT ALL. So I sprung for a real toddler shorts pattern from Made. I figure I can use it to make other shorts for her down the line, since the clothing companies refuse to make girls’ shorts with a reasonable length inseam.

Same brand, same size, boys vs girls.

The Mickey shorts are just the basic short pattern, and I used some red polar fleece I have had approximately forever. Since the polar fleece is so thick I didn’t double-fold the hem like the instructions say, which also gave them a little more rise (if you look at pictures of Mickey he’s got some super high waisted shorts).

Before sewing up the side seams I appliqued two felt ovals to the front. I didn’t get too fancy, I just put my normal sewing machine on a short length zigzag stitch and went around the ovals.

My only complaint about the evening is how many people said she was Minnie Mouse. Yes, I know Minnie is the girl mouse. But Minnie looks TOTALLY DIFFERENT than Mickey! She has a polka dot dress, pink heels, and a bow. My kid had none of those things! Get it together people!

I’m not sure if I’m proud of myself for not buying anything to make the shorts, or ashamed that I have so much fabric in my stash that I could make them without a trip to the store. But I did manage to use up the last of that red fleece! One stashed fabric down, approximately 300 to go!

Speaking of quantifying one’s stash, I started organizing and cataloging my yarn stash. I made it through about 1/3 of the collection and I’m up to 45 skeins of yarn. And I’ve been really good about working through my yarn stash this year! I implemented a one-in-two-out policy and have knit down 30 balls of yarn so far. So what I’m saying is, it could be worse. Much worse.

Crafting

Toddler shirts as far as the eye can see

Last month I decided it was finally time to learn to use the serger I’ve been borrowing from a friend. Toddler shirts are a great starting point because they’re simple, cheap, and still have a few challenging elements.

I made all of these these using the Titchy Threads Rowan Tee pattern, which can be purchased online and printed on a home printer. The pattern includes a bunch of different sleeve and neckline options that you can mix and match.

The first one I did, below, I used my normal sewing machine and a zigzag stitch. It came out great.

This is her "Cheese" face
Shirt #1, long sleeve with shoulder stripe. This is her “Cheese” face

Next was a short sleeved shirt with stripes. I tried to match up the stripes at the shoulder but completely misunderstood how the sleeves attached. So they don’t line up after all. Oh well.

Rowan tee sewn by Kellbot
Tee shirt #2, this time with short sleeves and no shoulder stripe

The third one I made from a thrifted shirt. While serging the sleeve to the body, I managed to bunch up the fabric and some of the body fabric got caught in the knife. It’s not super noticeable, but still frustrating.

Shirt #3 from a thrifted adult tee. I didn't even attempt to line up the pattern.
Shirt #3 from a thrifted adult tee. I didn’t even attempt to line up the pattern.

My final shirt was a hooded long sleeve with a kangaroo pouch. The shirt itself went great, but I had a lot of trouble sewing the curves of the hood. It shifted around and came out off center. Next time I’ll baste it in place first.

Shirt #4 with the hood up

I’m really glad I took the time to get used to the serger. The knife was super intimidating at first, and I still leave it down sometimes, but I love not having to trim my seams afterwards. I even started using the serger to finish the seam allowance of stuff I do on my sewing machine. The toddler loves  her new shirts so I’m sure I’ll be making a bunch more soon.

Crafting, Family

Princess Bubblegum Hat

The toddler is Princess Bubblegum for Halloween this year, and I got a BMO dress off of Think Geek. For the record, Princess Bubblegum is pretty much the only princess I’ll ever allow.13bubblegum

I used a pink dress she already had in her closet, and made a quit hat with some fleece I’ve had in my closet for years, so the costume cost zero additional dollars, which is my favorite amount.

The base pattern for the hat is this earflap hat pattern, I just extended the ears to be longer and added a panel in the back. I freehanded the crown (which is a separate, removable piece) and stuffed the top of it with bits of scraps so it would stand up. I hand sewed the “jewel” on afterwards, but if I did it again I’d probably do it before sewing it together. The whole project is a little slapdash (and turned out a bit too small because I didn’t measure properly) but not bad for a quick costume.

IMG_2053

IMG_2059

Crafting

Some sewing projects

I’ve done a little bit of sewing lately, nothing too crazy but a few new projects.

We got a wagon seat from my parents, it was my mom’s in college, and are using it for a toy box. It’s so nice to have all the toddler toys away. The cushion for it was a little sad so I made a new one using foam and fabric from Joann’s. The foam is pretty pricey normally but I was able to use a 40% off coupon. I even sewed a zipper in the back! There are still a few items that don’t fit in it, but it’s a great improvement over the pile of toys we had before.

2014-05-27 07.50.08

Next I made a baby onesie out of one of my old T-shirts. The pattern claims it’s a 6 month size, but I think I printed it wrong because it looks like it would fit my two year old. The design is on the back and I used some scrap black knit fabric for the binding. I’m borrowing a friend’s serger and still getting the hang of using it.

Onesies

I ordered a bunch of spandex to make running/circus tights, but now that it’s getting hot my desire to sew long pants is waning. Also my desire to serge compound curves in stretch material is approximately zero regardless of the weather.

The onesie pattern came from here and for the cushion I used the zipper tutorial here.

Crafting, Hacking

Project Blinkenpants

Inspired by my friends’ work with the Brooklyn Ballet I decided to make some blinky pants for my student performance with the Philadelphia School of Circus Arts. The idea was to create pants that “twinkled” in time with movement.

Costumes for aerial silks have some very specific requirements. Outfits must be skin tight as any loose fabric can get easily caught. They need to be made of fairly strong fabric to withstand the silks (which are really nylon) rubbing against them. And of course I need a full range of movement, nothing stiff or restricting.

Running Leggings
Test pants, with stripes!

My first attempt was to hand-sew conductive thread into a pair of store bought running tights. This failed for three reasons:

  • The conductive thread, sewing with a running stitch, kept shorting out when I sweat
  • Having an electrical short across your leg means you’re being mildly electrocuted
  • Because the thread doesn’t stretch at all three of my lines snapped the first time I tried to climb and invert

The next idea was to machine stitch the conductive thread in a zig-zag. Since I only have a standard free-arm sewing machine this meant I would have to make my own pants from scratch.

After 2 different patterns and 5 different pairs of test tights I had something I liked the fabric and fit of. I went with Fehr Trade’s PB Jam Leggings and JoAnn Fabrics’ Sew Classic Spandex. The PB Jam pattern runs a little small compared to what I’m used to, I’m a US size 6 and I found the XS size was the best fit for me.

The best way I found to deal with the conductive thread was to couch it to the pants fabric using a zigzag stitch. I sewed the side seams of each pant leg and then drew on all the traces. One by one I very tediously sewed the conductive thread onto the pants, leaving a long tail at each end for hand sewing the electrical components in place.

The circuit itself is very basic. There is a PWM twinkle sequence which starts off a new twinkle every half-second. For the sake of simplicity I only wired up one axis of the accelerometer, and tried to trigger a twinkle every time it detected movement. Unfortunately I never really got it working right, it was always too sensitive or not sensitive enough. I ended up pulling it out of the design. One less thing to deal with.

2014-04-22 17.13.33

There were a few spots where it was impossible not to cross wires. Since conductive thread isn’t insulated I had to use a small scrap of fabric to make a little bridge for the wire to safely cross over.

Once I had the leads roughed in I stitched the front, back, and leg inseams. I confess I didn’t hem the bottoms, but I should have. From there I began the joyously tedious task of sewing in the LEDs and Lilypad. Each connection was secured with a lot of Fray-Check.

2014-04-22 22.03.34

2014-04-24 14.29.29The LilyPad Arduino is sewn to the inside of the waistline, front and center, along with the power board. This was a poor choice of placement, because I can’t actually reach it with a leotard on over it. Turning on my pants was not a graceful endeavor. The whole thing is powered by a tiny 300 mAh battery which I just tucked into my underwear.

The first time I tried on the pants it was obvious they were extremely prone to shorting out. I took fabric paint to the most obvious offenders, scotch taped down a few more spots, but ultimately had to accept that without completely insulating the wires it was just going to be part of the game. Future versions of these tights will use flexible insulated wire rather than conductive thread. Either that or casing the conductive thread inside some bias tape piping.

Because of the hard life these pants would lead I needed to wear a pair of footless tights on top of them. This protected them (sort of) against abrasion from the silks.

Here’s a video of the pants with some maroon tights worn over them.

Despite the tendency to short out, they held up pretty well in performance. Not perfect, but enough that people could get the idea.

Below is a video of my act, the music is a mashup by PomDeter.

Overall I’m pretty happy with how they turned out, but looking forward to improving upon the design in the next version.

Crafting

Making Toddler Clothes

I put my new sewing machine through its paces making some clothes for Bitmap. I like making toddler clothes a lot better than making adult clothes, because all the pieces of fabric are so small! No wrestling many yards of fabric on my floor, and I can make a dress with 1/2 yard of fabric.

Toddler Dress

The first thing I made is a jumper using the free Vivienne pattern from BurdaStyle. I used a washable Linen blend and added white piping. I am now obessed with piping and will add it to all of Bitmap’s clothing. If you’ve never tried it before there’s a great tutorial here.

This dress was the first time I’ve ever used the buttonhole setting and it takes some practice. Do not look too closely at the button holes,  please. The octopus was hand embroidered, RevolvingDork designed it after I requested a “cute octopus.”

Overall I’m happy with it, though I will probably practice a bit more with the buttonholer before sewing my next dress.

I also made a quick circle skirt to wear over onesies. It’s a good use for fabric scraps. You could probably even use a fat quarter if it’s for a small enough baby. Detailed instructions, including how to get a nice hem, can be found here.

2013-08-12 08.45.08

Crafting

New Sewing Machine

I picked up a new sewing machine from shopgoodwill.com. It was sort of an accident. A friend linked to a knitting machine for sale (cheap!) and I noticed they have a ton of old sewing machines. Most of them are junk but a few are just solid old machines in need of love.

I have two other machines in addition to the one I just purchased, the younger of which is approaching 70. Both work flawlessly. But every now and then I have a need for a zig-zag stitch, and neither machine can do that.

The photo of the machine from the listing

While poking around the Goodwill website I saw a Janome My Excel 4023 for sale. It’s description merely said “works.” I couldn’t find much information about the particular model but I figured for under $50 it was worth a gamble. Even the low end Janome machines are made with metal frames (and then covered in plastic for aesthetics), so as long as the machine was in decent shape it would suit my limited needs.

A Janome JR1012 in a clear plastic case so you can see the metal frame inside

$37 later the machine was mine. Goodwill of Indiana did a thorough job packing it up, and sent it along with a scrap of cloth, spool of thread, and full bobbin loaded up and ready to go. I plugged it in, turned it on, and realized I had no idea what half the knobs did. The machine didn’t come with a manual and I couldn’t find one online. So I did the unthinkable: I contacted Janome customer support. 15 minutes later, a PDF instruction manual landed in my inbox. Magic!

Some less than scrupulous companies are selling digital copies of the PDF, despite it being freely available from Janome. If you are looking for a copy you can download the Janome My Excel 4023 for free.

It’s an all-mechanical machine. Each of the 24 stitch patterns has a little metal disc with grooves for the needle positioning. I did a test swatch of each pattern on some scrap felt.

A swatch of all the different stitch patterns on the machine.

After a quick cleaning everything looks to be in good shape. The My Excel line was made in the 90s, so I’m guessing this machine is 15 years old, and is in incredible shape given that. It barely looks used and could probably use a professional once-over, but for $37 I feel like I got a really good deal.