Crafting

Making school valentines on my crafty robot

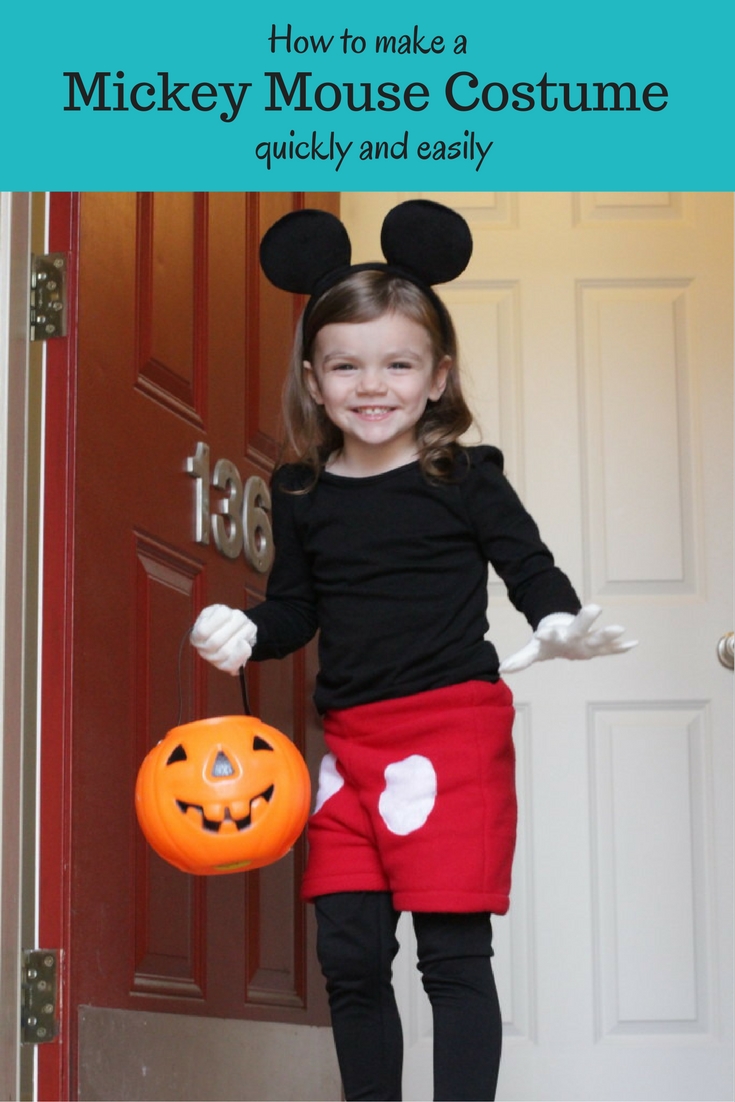
For Christmas I got myself a crafting robot. It’s a Silhouette Cameo, which is basically an ink jet printer with a knife where the ink ought to be. It’s a pretty neat bit of crafty hardware!

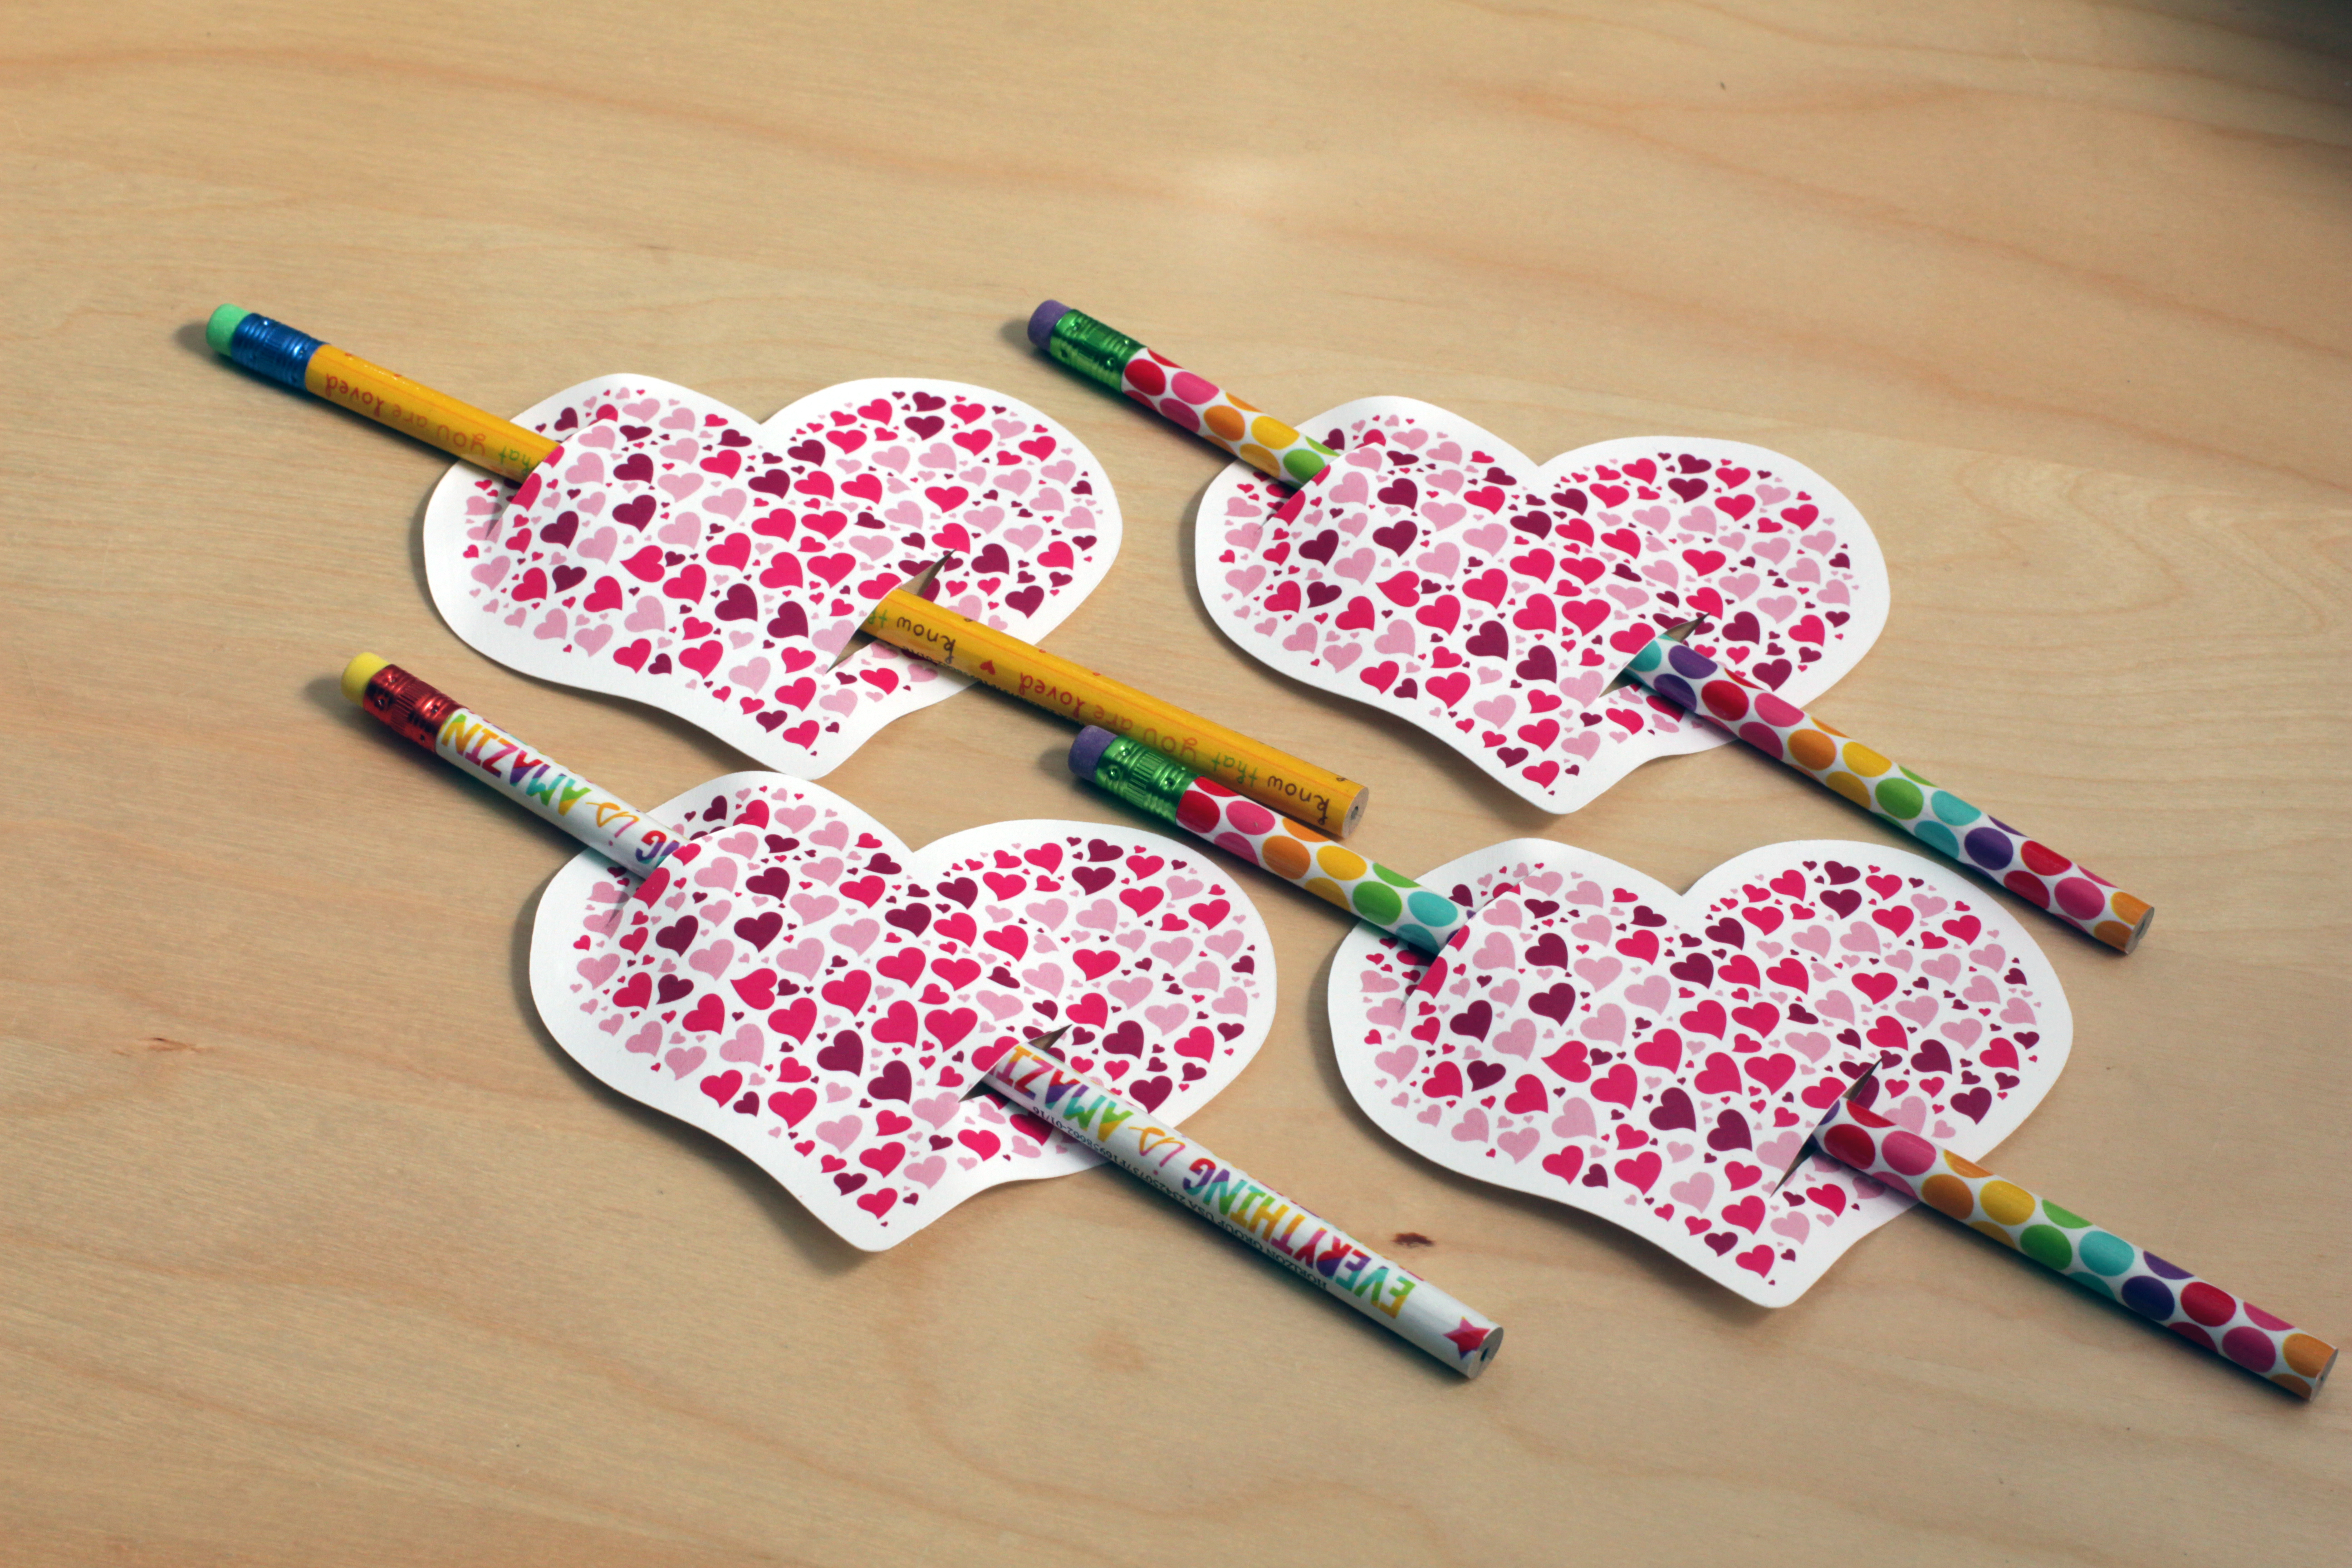
Like all good parents I started thinking about valentines for my kid’s class approximately 12 hours before her class party. Like all good craft hoarders I had a couple packs of festive pencils leftover from kiddo’s birthday party goodie bags, so I decided to make some pencil-holder valentines on the Silhouette Cameo . These were super quick to whip up and a great option for when you want it to look like you care (but you don’t).

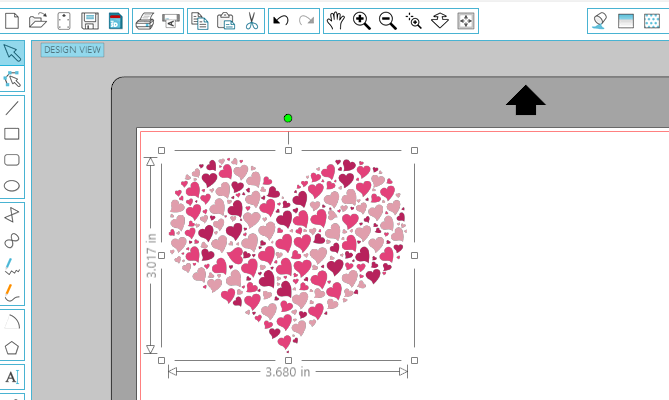
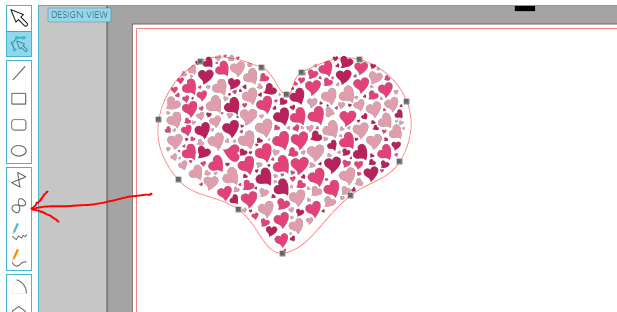
The first step, and the one that took the longest, was finding a picture of a heart that was sufficiently cute. I got mine from OpenClipArt. I imported it into Silhouette Design Studio and resized it to be about 3″ tall.

Resize by selecting the image and dragging the handles

Next I drew a rough outline of the heard with the “Draw a curve shape” tool.

The tool icon kind of looks like the infinity symbol

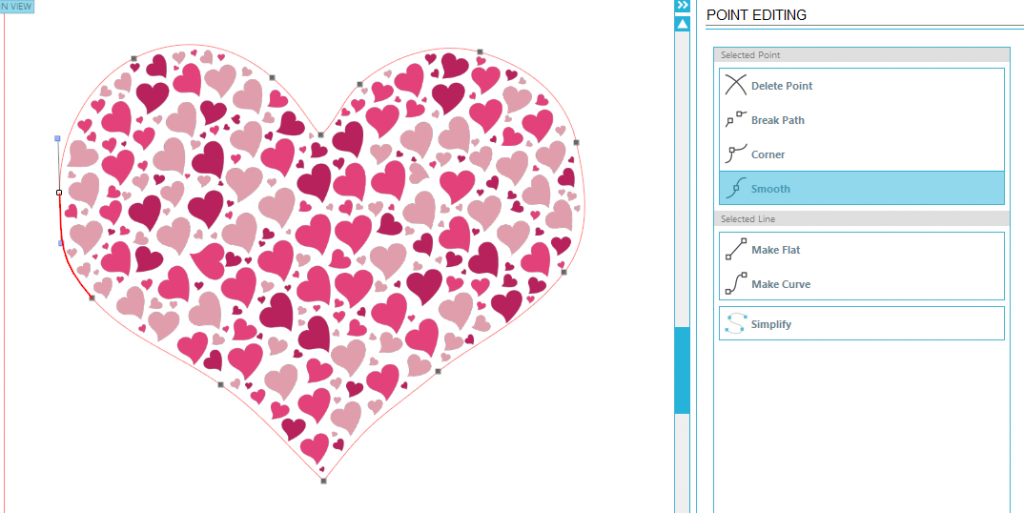
Then I cleaned up the shape with the point editing tool (2nd icon from the top of the toolbar)

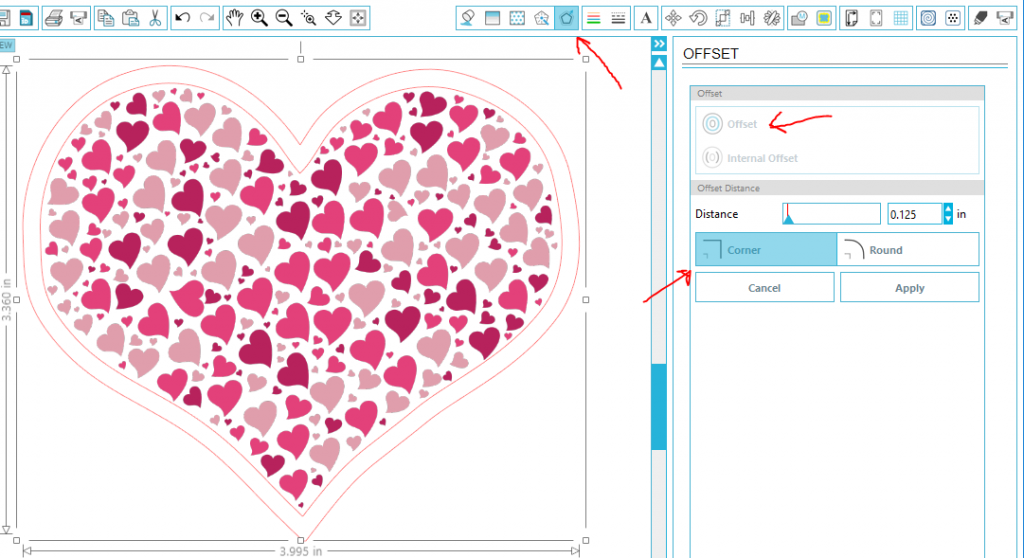
I have the heart a 1/8″ border by using the offset tool. I like borders like this because it hides any minor issues with registration. In general the Cameo is great with registration, but when you’re running a classroom’s worth of valentines it’s easy to get lazy.

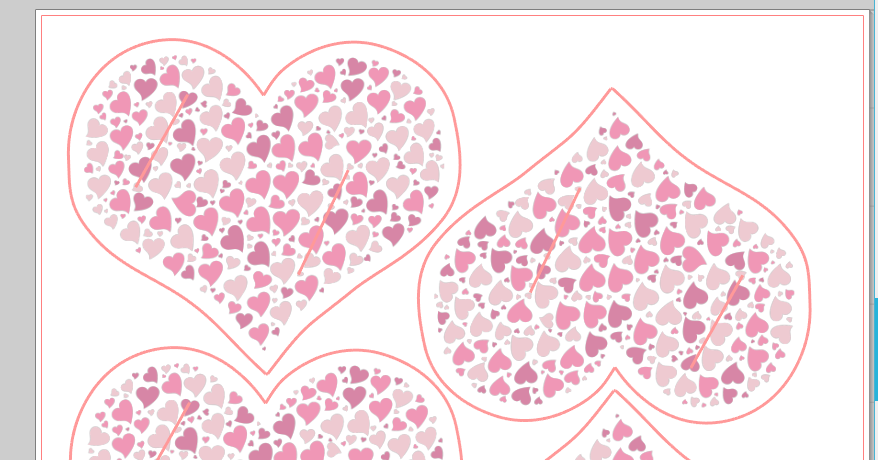
The last step of the design was to remove the inner cut line (the original curve line I drew) and add a few slits for the pencil. Make sure these are at least an inch wide or you’ll have trouble getting the pencil through and have to widen them by hand with an xacto knife. Ask me how I know this.

I was able to fit 6 of each heart per page by flipping half of them upside down.

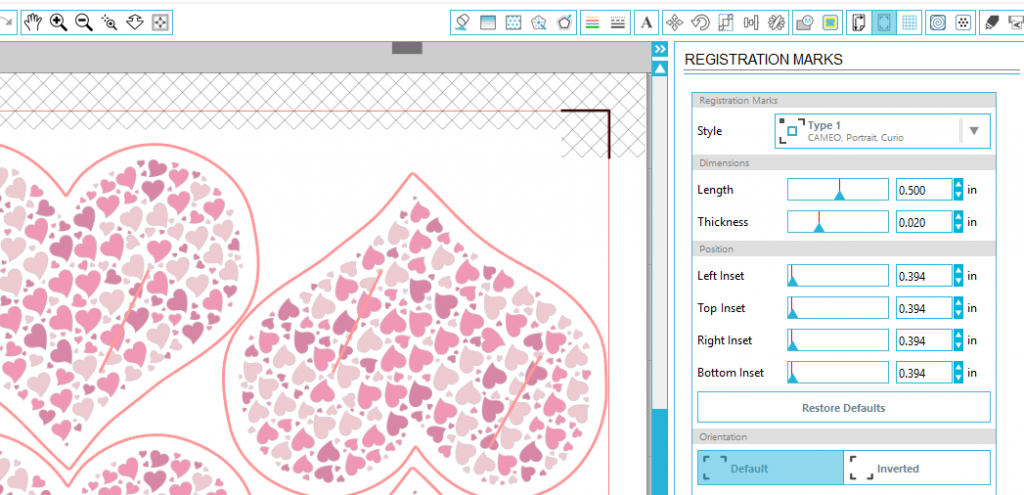
Before printing I had to nudge the hearts around a bit to make sure nothing was outside the registration area (red border) or within the registration margins (hatched area). The size of this area is determined by how close your printer can print to the edge of the page.

After printing the sheets on my laser printer cutting them on the Cameo was pretty straightforward. I used the default cardstock setting and the automatic blade. My daughter addressed / decorated the backs and I pushed the pencils through the slits.

Don’t feel like doing all that work? Feel free to download the Silhouette file and print out these right now!

1916 Row Home, Crafting

Rhinebeck and other Knitting Things

Guys I have a secret… I have another blog. One dedicated specifically to knitting. I started it last year meaning for it to be a site for aggregating knitting news and information, but didn’t have the time to put into it. The idea was that it would be sort of like a long-form Pinterest board to save knitting stuff I care about. Now it’s just sort of my awkward spot for writing about my own knitting. I haven’t figure out exactly how I plan to approach having two separate places for stuff. For a while at least I’ll probably cross post things here. Like this post about my trip up to Rhinebeck, NY for the annual Sheep and Wool festival. Spoiler alert: I bought some yarn.

http://balderstash.com/2016/11/29/notes-from-a-successful-rhinebeck-weekend/

I’ve been doing a ton of knitting, so at least for the next few months there will probably be a fair amount of activity there. I do have a bunch of stuff to post here about the house I’m working on, but I’m waiting until that whole project is wrapped up to share more. Mostly because I haven’t had a chance to get any decent photos lately. Between work, kids, the house, and my husband’s ice cream shop it’s easy to let stuff fall through the cracks. But in case you’re waiting with bated breath, here’s a crappy cell phone shot of the kitchen!


2016-11-17-15-59-12

Crafting

Wilcom Hatch’s Auto-Digitizer

I definitely want to learn to digitize my own files for embroidery. The prohibitive cost of the software ($1000+) means I probably won’t be doing so any time soon, but Wilcom has a new package called Hatch which I downloaded a 30 day trial of. It’s a full featured digitizer with a (theoretically) easier to use interface. So I’m playing around with it and today I gave the auto-digitizer a spin.

I used this adorable octopus, which Chris designed for hand embroidery on a dress I made a few years ago.

octopus


I ran it through the auto-digitizer, setting a blue fill for the body and white fill for the eyeballs. Everything else is satin stitch. I tweaked the fill angles a bit and reordered some of the objects  for easier to cut jump stitches, but otherwise left it as-is. Wilcom thinks it will look very nice! There are a little over 14,000 stitches. So it will take about 40 minutes to stitch out, not counting the time it takes me to rethread the machine between colors.

The stitch preview generated by Hatch

I stitched it out on some “linen look” cotton fabric using medium weight tear away stabilizer.

What a happy octopus!

Aside from the jump stitch I couldn’t quite get at with my scissors, there’s noticible pulling at the top of the head and the bottom of the legs.

Top of the head
Top of the head
Bottom of the tentacles

There’s also some around the eyes. This is not entirely unexpected, the stitches tend to pull in, leaving a gap and the vertical edges of the stitches.

I measured the gap at the top with my calipers (0.045 inches) at tried to compensate accordingly by reshaping the objects in Hatch. Then I eyeballed the other gaps and adjusted them too. I stitched out the pattern again, this time with contrasting thread so it’s easier to see how things line up.

Still cute!
Still cute!

This one came out better, but I was too conservative with my compensation. There are still visible gaps between the outline and the fill.

IMG_2816
Top of the head
IMG_2817
Tentacles
Eyes and Mouth
Eyes and Mouth

I think with the 3rd round of revisions I’ll get it right, but this has definitely confirmed my skepticism of folks selling purely auto-stitched designs without a sample sew-out to show. A lot of the designs on Etsy have just the computer generated preview, and I suspect many of them have never been tested in the real world. I’m going to play with Hatch a little more to get a feel for manual digitizing, but for complicated or important designs I’m going to continue sending them out to professional human digitizers.

Crafting

Things I have learned in 4 days of owning a Brother SE400

2016-03-12 12.21.16

Last week I ordered a $300 embroidery machine off of Amazon. Fully acknowledging that most embroidery machines are $1000+, and that a good sewing machine starts around $300, I set my expectations accordingly. I knew it wasn’t going to be a great machine, but I also didn’t want to spend much more until I’m sure that machine embroidery is for me. Here’s what I’ve learned:

Cheap machines are a tensioning nightmare

Actually I already knew that, but the Brother SE400 reminded me how true it is. The tension on the Brother SE400 is fiddly. It’ll start skipping stitches, then I’ll rethread it, and it will sew just fine. Or it dislikes the bobbin for some reason. I can get it working, but every time I rethread it (more on that in a minute) I have to cross my fingers that it’s happy. Maybe I’m spoiled by my all-mechanical Janome, but I’m not to keen on the mysticism required to get the thing tensioned properly.

I really want a multi-needle machine

With a single needle machine every color change means rethreading. And on the SE400 every rethreading is an opportunity to make it angry. Plus occasionally I just screw up. I find myself loath to do designs with more than 5 or so colors because I don’t want to sit there changing them out every 5 minutes. If I was planning on doing any sort of production work a multi-needle machine would be a must.

The 4×4 work area is too small

The advice given in almost every “how to pick a machine” article is “get the biggest work area you can afford,” and it’s true. Even if you only want to embroider small stuff. Why? Because the 4×4 work area means you have to get your hoop placement just right, and on many items that’s a real big pain in the arse. It also means re-hooping if you want to place multiple designs on a garment.

The touchscreen LCD kind of sucks

When you’re stitching out a design it can show you the color info (handy if you’ve got a 10+ color design) or the stitch count, but not both, and switching between the two requires multiple button presses. Which wouldn’t be so bad except the touch registration on my machine is slightly off. This means that when I go to step back one stitch I often end up stepping forward an entire color (those two buttons are adjacent). I’ve learned always to write down the stitch count before touching anything.

A hoodie I made for my nephew

Getting your own designs into the machine is easy… if they’re digitized

To download new designs you just plug the machine into your computer’s USB port and it presents itself as an external drive to drag / drop PES or DST files onto. Great! Seriously, this could have been way more painful and I was glad it was so easy.

That said, it turns out that digitizing files (going from a bitmap or vector to stitches) is a hobby in and of itself. Digitizing software is expensive (hundreds or thousands of dollars), and learning to do it takes practice. There’s auto-digitizing software available, but I haven’t heard many positive things about the quality of stitch outs produced.  The conventional wisdom of the internet is to pay a professional to digitize your files if you don’t want to invest the time and money to do it yourself.

The good news is that pro digitization is cheap, generally $10-15 for a simple design. I found someone on Etsy who turned it around in a couple of days.

Despite its flaws, it’s still a fun machine

It won’t win any awards but it’s not a bad machine, and very fairly priced.

I made a hoodie for my nephew and the embroidery on it is completely adorable. I put my husband’s business logo on an old tote bag and he was stoked. And I’m learning a lot about the basics of machine embroidery. Which stabilizers to use with which fabrics, getting practice hooping things correctly, it’s all a learning process that will translate well to whatever machine I eventually upgrade to.


The use cases where I’d suggest buying a Brother SE400 are admittedly minimal. If you’re at all serious about embroidery, save up for something with a larger work area. While it does dual duty as a sewing machine, it’s not a particularly good one so if you primarily want a sewing machine I’d suggest putting the $300 towards a nice basic machine. I figure in 6 months when I have a really solid idea of what I want in a machine I’ll trade it in towards something fancier. Until then, expect to find it whirring in the background while I work.

Crafting

Stabilizer Tests on Muslin

Did a few tests on my Brother SE400. Right now I have 3 different stabilizers: tear-away, cut-away, and wash-away. I ran some test designs using the tear away and cut away on muslin, without adhesive spray.

The designs I chose are from Urban Threads, and have a mixture of fill, satin, and straight stitches.

Sew out on heavy weight cutaway stabilizer
On tear-away stabilizer


The differences between the two stitch outs aren’t huge, but the cut-away stabilizer is definitely a little cleaner.

Stabilizer-BunnyHead
Note the top of the bunny’s head, which is decidedly wobblier
The intersection of the two designs has a little more push out on the tearaway
The intersection of the two designs has a little more shifting on the tearaway

There’s considerably more shifting on the tearaway, and I’m not sure how much of that is my poor hooping. I find it really hard to get the fabric taut without distorting it.

The next set of tests I run will use adhesive to secure the fabric to the stabilizer. The downside of the adhesive is that it creates a gummy mess if you aren’t careful.

Crafting

State of the Stash 2016

Guys I might definitely have a yarn problem.

I know it’s nothing compared to some of the people on Ravelry, but that’s like merely not being the drunkest person at an Eagles game. It’s just not high of a bar.

My goal for 2015 was to knit 50 balls of yarn and maintain a “one in two out” rule, and I’m happy to say that I pulled it off! I used 50 balls, gave away 12, and “only” purchased 30. Some of the more fun projects for the year included a “yarn topiary,” a christening dress for the new baby, a sweater for the 3 year old, and a big shiny Clapotis shawl.

I’ve got 10 projects on the needles. A couple of them just need minor finishing I haven’t gotten around to. One is a giant bedspread which will maybe be done sometime before my preschooler goes to college. The others are in various states of boredom or inconvenience (it’s hard to fit a bedspread in a tote bag and take it on the train).

I spent the last two evenings organizing my Ravelry stash (an online database of yarn which you can annotate with quantities, colors, etc) and tallied up just how much I have. I went by weight rather than yardage because it is much, much easier to measure.

I have 28.6 Pounds of yarn. 13 kilograms.

Back of the envelope math has that spread over 170 balls in 140 different brands/colorways.

My goal for 2016 is to reduce my total stash by 25%, which is a pretty tall order. It requires knitting through 2,500 grams of existing yarn plus anything I buy new. A lot of my focus will be on using up single skeins and odd balls of weird fibers that can’t easily be incorporated into other projects. Some types of yarn are just better to have lying around than others. I forsee a lot of tiny clothes and plush toys on the project list for the year.

Yarn Used

1692 grams so far

Yarn Purchased

650 grams so far

Net Change

1042 grams
Crafting

DIY Mickey Mouse Costume

Copy of How to

My daughter announced she wanted to be Mickey Mouse for halloween. My first instinct was to just buy a premade costume from one of those stores that pop up every year around Halloween. Unfortunately Mickey Mouse isn’t nearly as popular as Elsa or Ana, and the options for costumes were pretty pathetic. The ones I found online didn’t look like they’d last more than a few hours. So I managed to cobble together a costume with a minimum of sewing/effort.

Made this costume in about an hour, links to pattern in post


The black leggings and top are just normal clothes she already had. The mickey mouse ears, yellow shoes, and white gloves were purchased on Amazon. The shorts I made myself.

The shorts took about an hour, not counting the first pair I made from a DIY pattern which did not fit AT ALL. So I sprung for a real toddler shorts pattern from Made. I figure I can use it to make other shorts for her down the line, since the clothing companies refuse to make girls’ shorts with a reasonable length inseam.

Same brand, same size, boys vs girls.

The Mickey shorts are just the basic short pattern, and I used some red polar fleece I have had approximately forever. Since the polar fleece is so thick I didn’t double-fold the hem like the instructions say, which also gave them a little more rise (if you look at pictures of Mickey he’s got some super high waisted shorts).

Before sewing up the side seams I appliqued two felt ovals to the front. I didn’t get too fancy, I just put my normal sewing machine on a short length zigzag stitch and went around the ovals.

My only complaint about the evening is how many people said she was Minnie Mouse. Yes, I know Minnie is the girl mouse. But Minnie looks TOTALLY DIFFERENT than Mickey! She has a polka dot dress, pink heels, and a bow. My kid had none of those things! Get it together people!

I’m not sure if I’m proud of myself for not buying anything to make the shorts, or ashamed that I have so much fabric in my stash that I could make them without a trip to the store. But I did manage to use up the last of that red fleece! One stashed fabric down, approximately 300 to go!

Speaking of quantifying one’s stash, I started organizing and cataloging my yarn stash. I made it through about 1/3 of the collection and I’m up to 45 skeins of yarn. And I’ve been really good about working through my yarn stash this year! I implemented a one-in-two-out policy and have knit down 30 balls of yarn so far. So what I’m saying is, it could be worse. Much worse.

Crafting

Let’s Talk About Coloring Books

This week has been sort of irritating. Nothing has gone wrong, but few things have gone as planned. So yesterday when I saw that Secret Garden: An Inky Treasure Hunt was back in stock AND available for same-day Amazon Prime… I impulse bought it along with a set of Prismacolor pencils. Yeah.

coloring

Adult coloring books (which is not risque in any way although I’m sure there are some NSFW coloring books too) are a huge Thing right now. We did an article on them for Offbeat Home and then NPR and every other major media outlet in the world also was like GEE, COLORING IS FUN.

Originally I bought a brand new pack of Crayola colored pencils, and then I found out that they were kind of not awesome. Were Crayola colored pencils always this shitty? I felt like half of them had really weak color saturation. I rummaged around and found a half-empty box of Prismacolors leftover from college, and then decided that I’m an Adult and it’s time for an Upgrade. I gave the Crayolas to my 3 year old. She loves them, please don’t tell her they’re really just my cast-offs.

My hunt for Prismacolor pencils was initially thrown off by the fact that they have updated their packaging sometime since 2002. Yes, 13 years later I was still looking for this box:

prismacolors

To me this is what Prismacolors come in. A cardboard box with a radial arrangement of pencils. That is the way the world is, and it is good. But apparently they’ve innovated sometime in the last decade, and now NOT ONLY to they have different packaging, but they have two separate lines. A “scholar” line which is less expensive and has a slightly harder pigment core. The price difference is significant ($30 for a set of 60 Scholar pencils, $60 for a set of 72 not-scholar pencils) so I went with the scholar ones. And put the fancy ones on my Christmas list.

Then I stumbled upon someone who is truly insane; a woman who used one of the Secret Garden illustrations as an embroidery design.

secret-garden-embroidery-328

I have a profound love of tedious art projects, but this is just nuts. And gorgeous. And nuts. And her website is FULL of tutorial information if you’re insane enough to want to try it yourself.

I also found out that my favorite pens, which I plan on using for at least a few of the pages in the coloring book, are available in a 36 color pack. This is even more exciting than the 20 color pack I already own.

71EEwSy4eRL._SL1200_


So yeah. If you need me I’ll be in the kitchen, coloring. And not sharing my fancy pencils OR my coloring book with my 3 year old. Whatever she has plenty of her own coloring books.

Crafting

Toddler shirts as far as the eye can see

Last month I decided it was finally time to learn to use the serger I’ve been borrowing from a friend. Toddler shirts are a great starting point because they’re simple, cheap, and still have a few challenging elements.

I made all of these these using the Titchy Threads Rowan Tee pattern, which can be purchased online and printed on a home printer. The pattern includes a bunch of different sleeve and neckline options that you can mix and match.

The first one I did, below, I used my normal sewing machine and a zigzag stitch. It came out great.

This is her "Cheese" face
Shirt #1, long sleeve with shoulder stripe. This is her “Cheese” face

Next was a short sleeved shirt with stripes. I tried to match up the stripes at the shoulder but completely misunderstood how the sleeves attached. So they don’t line up after all. Oh well.

Rowan tee sewn by Kellbot
Tee shirt #2, this time with short sleeves and no shoulder stripe

The third one I made from a thrifted shirt. While serging the sleeve to the body, I managed to bunch up the fabric and some of the body fabric got caught in the knife. It’s not super noticeable, but still frustrating.

Shirt #3 from a thrifted adult tee. I didn't even attempt to line up the pattern.
Shirt #3 from a thrifted adult tee. I didn’t even attempt to line up the pattern.

My final shirt was a hooded long sleeve with a kangaroo pouch. The shirt itself went great, but I had a lot of trouble sewing the curves of the hood. It shifted around and came out off center. Next time I’ll baste it in place first.

Shirt #4 with the hood up

I’m really glad I took the time to get used to the serger. The knife was super intimidating at first, and I still leave it down sometimes, but I love not having to trim my seams afterwards. I even started using the serger to finish the seam allowance of stuff I do on my sewing machine. The toddler loves  her new shirts so I’m sure I’ll be making a bunch more soon.

Crafting

Stash Knitdown 2015

Depending on who you ask I either have a lot of yarn, or a totally reasonable amount of yarn. I have enough yarn to take up 6 “cubes” of an Ikea Expedit bookshelf. Like many knitters I have been slowly accumulating yarn over the years and it’s time to work on actually knitting what’s in my collection instead of buying more every time I see a pattern I like.2014-04-26 13.34.38

For 2015 I’m following “one in two out” meaning I have to knit TWO balls of yarn for each ball I buy. This goal has a nice bonus of getting me started early on my Christmas knitting. The downside is I can’t share many pictures of the stuff I’m making. I’ll use this post to keep track of my progress throughout the year. I’m hoping to use up 50 balls of yarn from my stash!

Progress: 50 of 50 balls used up, 12 skeins given away, 30 skeins purchased.

Completed projects:

2014-01-11 14.50.37
Christmas Present #1. This yarn was leftover from a hat I made for Chris in 2013. I used up one complete ball and about half of the 2nd. 1 ball used
Christmas Present #2. I got this yarn in high school. I am 30. It's time to use it. I've got two balls of it and I've picked a pattern that will hopefully use them both.
Christmas Present #2. I got this yarn in high school. I am 30. It’s time to use it. I’ve got two balls of it and I’ve picked a pattern that will hopefully use them both. 3 balls used
Christmas Present #3: 4 balls used up.
Winter Hat:  New yarn purchase! 4 balls used up.
z
Machine Knit Gloves. The blue was a random ball in my stash, and the grey was something I got for another since-abandoned project. 1 ball used.
Christmas Project #3. This is a super ambitious colorwork project. 3
Christmas Project #3. I got a bunch of this yarn in different colors for colorwork. 1 ball used.
No photo yet: Christmas Project #4 I don't have a photo of the yarn, it's yarn that I reclaimed from a thrift store sweater.  4 balls used so far.
Ripple scarf. Reclaimed yarn from another project. 4 balls used.
Christmas Project #5. 1 ball used.
Dish Towel. Some dish cotton that I don’t think I ever actually had plans for. 1 ball used.
Coin purses. I've had this ball of ribbon yarn I never knew what to do with and finally settled on coin purses. 1 ball used.
Coin purses. I’ve had this ball of ribbon yarn I never knew what to do with and finally settled on coin purses. 1 ball used.
Cardigan for Leona
Cardigan for Leona. Matches one I made myself a couple years ago. 2 balls used.
Clapotis Shawl. This is literally one of the most popular patterns in the world. 1 ball.

No photo yet: Cotton Throw
I’d meant to use this yarn for a dress before realizing that worsted weight cotton is a terrible choice for a garment. 15 used.

Cable knit sweater for my nephew. 1 ball used.
Cable knit sweater for my nephew. 2 balls used.

No photo yet: Magz Bias Scarf. 1 ball used.

No photo yet: Christening Dress. 2 balls used.

In progress projects:

Ripple bedspread. Leona is due to upgrade from a crib to a bed, and I plan to make her this to celebrate. 5 used so far

2015-08-23 21.58.24
Pom Poms. It turns out making pom poms is an excellent preschooler activity. I used up some odds n’ ends!   5 balls used so far.