Hacking, Programming

WordPress Post Inserts Are Super Slow

Logging another one of my “weird wordpress problems” here.

We use a plugin called Buddypress Private Checklist to offer wedding to-do lists to our members on the Offbeat Bride Tribe. It was written many years ago by our old developer, and I’ve been vaguely maintaining it in our open source plugin repo on git. But it was a hack when it was written (old dev’s words, not mine!) and we’ve grown a lot over the years. It’s in need of a major upgrade, and the first item on my docket was the fact that it takes forever to load the initial default tasks into a to-do list.

The initial task loader takes a CSV full of default tasks and inserts them as posts into the Worpdress database. We have 124 tasks and it was taking five minutes. I expect a loop of 124 inserts to be a little slow, but five minutes is insane.

The posts, which are a custom post type, also use custom taxonomies to organize them. When I disabled the taxonomy inserts, done with wp_set_object_terms(), everything ran quickly. When I tried the plugin on a fresh install it ran quickly even with the taxonomy information. Disabling all plugins and going to the default theme didn’t change anything. I finally put together a test page that just looped through a bunch of post and taxonomy inserts, and watched it with Query Monitor.

After every new taxonomy term is inserted, wordpress runs wp_update_term_count(). On something the size of a personal blog this is not a big deal. On a community with 40,000 posts and 900 tags, this takes maybe half a second. Doing that 124 times takes forever. Thankfully there is a way to disable this excessive recounting, wp_defer_term_counting().

function insert_many_posts(){
  wp_defer_term_counting(true);
  $tasks = get_default_tasks(); 
  for ($tasks as $task){
     $post = array(
       'post_title' => $task[content],
       'post_author' => $current_user->ID,
       'post_content' => '',
       'post_type' => 'bpc_default_task',
       'post_status' => 'publish'
     );
     $task_id = wp_insert_post( $post );

     if ( $task[category] )
        //Make sure we're passing an int as the term so it isn't mistaken for a slug
        wp_set_object_terms( $task_id, array( intval( $category ) ), 'bpc_category' );
  }
}

Now the whole loop takes about 10 seconds. Hooray!

Gaming, Hacking, Programming

Animating build progress on a Minecraft server

My Minecraft server is seeing some use again, and I decided to build a life size model of the Philadelphia Museum of Art. I also thought it would be cool to have an animated gif of the build progress as things go.

2014-10-15

Configuring Overviewer

We use Minecraft Overviewer to generate Google-maps style views of our world for the web. I created a config file limiting the render area to the coordinates around the building

worlds["Main"] = "/minecraft/Minecraft/world"

renders["normalrender"] = {
        "world": "Main",
        "title": "Overworld",
        "dimension": "overworld",
        "crop" : (200, -90, 420, 70),
}
outputdir="/minecraft/renders/museum"

Compositing the tiles
I found a script for making composites from google map data, originally written for use with Overviewer, but it was pretty far out of date and written for a different version of python than what I’ve got installed. I used it as a jumping off point for writing my own composite script.

#!/usr/bin/env python

import Image, ImageChops

import os, fnmatch
import os.path
import re

import sys

CHUNK_SIZE = 384

def trim(im):
    bg = Image.new(im.mode, im.size, im.getpixel((0,0)))
    diff = ImageChops.difference(im, bg)
    diff = ImageChops.add(diff, diff, 2.0, -100)
    bbox = diff.getbbox()
    if bbox:
        return im.crop(bbox)

def find_files(directory, pattern):
    regex = re.compile(pattern)
    for root, dirs, files in os.walk(directory):
        for basename in files:
            if regex.match(basename):
                filename = os.path.join(root, basename)
                yield filename

def getAllFiles(srcdir):
  return find_files(srcdir,  "[0-9]+.png")

def getCoordinates(f):
  return map(lambda x: int(x), re.findall(r'[0-9-]+', f))

def getX(c):
  return {
    0: 0,
    1: 1,
    2: 0,
    3: 1,
  }[c]

def getY(c):
  return {
    0:0,
    1:0,
    2:1,
    3:1,
  }[c]

if len(sys.argv) != 4:
  print "Usage:", sys.argv[0], "<source directory (Dir)> <output file> <zoom level>"
  sys.exit(1)

sourceDirectory = sys.argv[1]
zoomLevel = int(sys.argv[3])
outputName = sys.argv[2]

width = (2**zoomLevel)  * CHUNK_SIZE
height = (2**zoomLevel)  * CHUNK_SIZE
print "Width:", width, "Height:", height

output = Image.new("RGBA", (width, height))

for f in getAllFiles(sourceDirectory):
  coords = getCoordinates(f)
  if len(coords) == zoomLevel:
    chunk = Image.open(os.path.join(sourceDirectory, f))
    #print chunk
    xbin = ""
    ybin = ""
    for c in coords:
      xbin = xbin + str(getX(c))
      ybin = ybin + str(getY(c))
    y = int(ybin,2)
    x = int(xbin,2)
    output.paste(chunk, (x*CHUNK_SIZE, y*CHUNK_SIZE))

print "Map merged, saving..."

output = trim(output)

if outputName[-3:] == "jpg" or outputName[-4:] == "jpeg":
  output.save(outputName, quality=100)
else:
  try:
    output.save(outputName, quality=85, progressive=True, optimize=True)
  except:
    print "Error saving with progressive=True and optimize=True, trying normally..."
    output.save(outputName, quality=85)

print "Done!"

This generates a daily snapshot and puts it in a web-accessible folder. I can then make a gif of all the images in that folder with ImageMagick’s convert utility
convert -delay 80 -loop 0 *jpg animated.gif

Checking for modifications
Originally I ran the script once daily on a cron, but later decided to run the world generator every half hour and only generate an image if there’s something new to see.

#!/bin/bash

rendersecs=$(expr `date +%s` - `stat -c %Y /minecraft/renders/museum/normalrender/3/`)
snapsecs=$(expr `date +%s` - `stat -c %Y /minecraft/renders/museum/last-snapshot`)
if [ "$rendersecs" -lt "$snapsecs" ]; then
  echo "Render was modified $rendersecs secs ago. Last snapshot $snapsecs secondds ago. Updating snapshot."
  /minecraft/renders/merge.py /minecraft/renders/museum /var/www/html/museum/$(date +\%Y-\%m-\%d-\%H\%M).jpg 3
  touch -m /minecraft/renders/museum/last-snapshot
  convert -delay 40 -loop 0 /var/www/html/museum/*jpg /var/www/html/museum/animated.gif
fi

Setting up cron tasks
I put two new jobs in my crontab file: one to generate the terrain and one to run my shell script. I give Overviewer a bit of a head start in case it has a lot of work to do.

*/30 *  * * *  overviewer.py --conifg=/minecraft/overviewer-museum.conf
10,40 *  * * *  /minecraft/update-museum.sh
Hacking, Programming

SSH Woes with Vagrant, Windows, and AWS

Dumping this here in case anyone has a similar problem.

I was trying to use Vagrant to spin up dev boxes on aws. Every time I got to the rysnc part of my day, I got the error “Warning: Unprotected Private Key File, this private key will be ignored.”

I googled a bunch and got a lot of really unhelpful answers, mostly dealing with UNIX-like environments. I also tried messing with the Windows file permissions. Fail all around. Here’s how I finally solved it:

Step 1: Install Cygwin Terminal. Find private key and look at it

$ ls -la
drwxrwx---+ 1 kellb_000      None      0 Jun 25 12:51 .
drwxrwx---+ 1 Administrators SYSTEM    0 Jun 25 13:11 ..
-rw-rw----+ 1 kellb_000      None   1696 Jun 25 12:50 Vagrant.pem

Step 2: Chmod file to something more restrictive.

$ chmod 400 Vagrant.pem
$ ls -la
drwxrwx---+ 1 kellb_000      None      0 Jun 25 12:51 .
drwxrwx---+ 1 Administrators SYSTEM    0 Jun 25 13:11 ..
-r--r-----+ 1 kellb_000      None   1696 Jun 25 12:50 Vagrant.pem

Gee that’s odd, that gave it 440, not the 400 I asked for. Oh, hm, it doesn’t have a group. That’s odd. Let’s give it one and try again.

$ chgrp SYSTEM Vagrant.pem
$ chmod 400 Vagrant.pem
drwxrwx---+ 1 kellb_000      None      0 Jun 25 12:51 .
drwxrwx---+ 1 Administrators SYSTEM    0 Jun 25 13:11 ..
-r--------+ 1 kellb_000      SYSTEM 1696 Jun 25 12:50 Vagrant.pem

Much better. I then tried bringing up the vagrant box, and success! At least, until it failed for entirely unrelated reasons. Hooray.

Programming, Software

Bit Depth Problems with RMagick / ImageMagick

I just spent the entire afternoon debugging a problem I couldn’t find elsewhere, so I’m documenting it in the off chance someone else runs into the evil thing.

I’m composing some images on the fly using ImageMagick via RMagic. It grabs one file, floods the image with a given color, and layers another on top of it. Locally, it works great, and gives me “body parts” like this one:

Unfortunately, when I push the code to Heroku, it starts going through a goth phase and filling everything in with BLACK LIKE SOUL:
I spent a very, very long time trying to suss this one out, checking out everything from opacity to gem versions. Finally, I checked the ImageMagick version (Magick::Magick_version).
Local: “ImageMagick 6.6.7-1 2011-02-08 Q8 http://www.imagemagick.org”
Heroku: “ImageMagick 6.6.0-4 2010-06-01 Q16 http://www.imagemagick.org”

Ok, so Heroku’s is a bit older. But that’s not the critical issue. The bigger problem is the Q16, which is reporting the quantum depth. I don’t understand nearly enough about image processing to talk about what that really means. But long story short, it means my images had different default bit depths and it was causing everything to blow up. Or something.

I was able to fix it by changing how I instantiated the Pixel for the fill. Before, I was using

fill_image.colorize(1,1,1,Magick::Pixel.new(r,g,b))

where r, g, and b are integers between 0 and 255.

Conveniently, RMagick has added a from_color method to Pixel, which lets you define a pixel based on a color name. I passed in a hex value, and everything magic(k)ally works normally again:

color = '#ababab'
fill_color = Magick::Pixel.from_color(color.upcase)
fill_image = fill_image.colorize(1,1,1,fill_color)

I wish I understood a few more of the particulars about what is really going on here. But for the time being I need to move on to finishing this up. Any insight is welcome in the comments.

Programming, Software

LEGO plans, now with better rendering

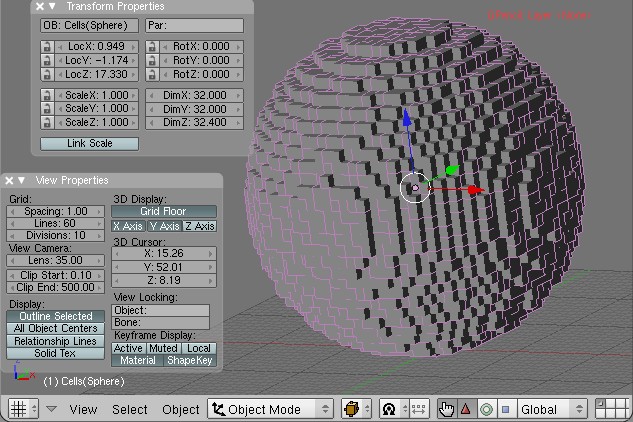
You may remember the “Legoizer” script I’ve been working on for Blender. It uses an existing script and one I’ve created to generate “layers” of LEGO patterns for building.

I got a lot of great suggestions on my last entry for how to automate the process of taking a screenshot, but sadly when it came down to implementing them things didn’t go so well. Luckily Angelo from Abandon Hope Games was kind enough to take the time to help me get the environmentals in Blender set up just right for rendering a “pattern slice.”

Step 0: Start with an object made of objects
The AddCells script uses DupliVerts to create an object made of references to another object. We’ll get to that in a minute, but first, let’s assume you have an object:

Step 1: Set up the camera
We want the camera to be facing down and rendering orthographic(all lines parallel) rather than perspective.

Make sure you’re in Object Mode and select the camera.
Press Alt+G and then Alt+R (confirming the dialogs) to return it to the origin.
Hit F9 to get into the Editing panel
Click the button labeled Orthographic in the Camera tab

Press 1 on your number pad to get a side view of the scene. Click the blue transform handle of your camera and move it up along the Z axis so it is well above your object.
Press 0 on your number pad and you should see a rectangular bounding box around your object (or perhaps around nothing) which represents the are which the camera sees.
Scroll the “lens” option right above the Orthographic button to zoom in/out so your

If you do a test render now with F12, you’ll probably see a badly lit (perhaps almost all black) render of your object from the top down.

Step 2: Set up the lighting

Select the existing light in your scene and press x on your keyboard to delete it.
Press space bar to bring up a dialog, and go to Add > Lamp > Sun
It doesn’t matter where the lamp is, as long as it’s facing down (which it is by default).

Step 3: Configure your materials

I mentioned earlier that our object was made up of DupliVerts.
These aren’t “real” objects, which is why I had such trouble applying materials to them. You need to apply the material to the reference object, which is generally somewhere in the middle of it. I usually do this by switching to the Outliner menu and finding the source cube manually.

Once we have our source object selected, hit F5 to bring up the Shading panel and click Add New under Links and Pipeline.
Pick a new color for your object. This will be the color of the lines in your final rendered image, so pick something that contrasts with your background color (which defaults to blue).
Click the Wire button under Links and Pipeline

Your object in the viewport should take on the color you’ve selected. If if doesn’t, you probably didn’t select the correct source object.

Hit F12 to render. Viola!

Now that we have our environment set up the way we want, rendering via script is easy. I’ve updated the script source (now on gist) to call Render when it’s done slicing and save the file to my hard drive.

This all works great, but of course there’s a new problem. Since we want to iterate over the entire object, I need to “reset” it back to being whole again. While I’ve saved an undo point I don’t think you can call that point via the API. In the current iteration of the script I save the vectors of each vertex before deleting it and then call verts.extend to add them back. This works great except…

The vectors for the verticies are transformed to be in the selected object’s local space, which is necessary for “layer 1” to be the first layer of the object and so forth. Unfortunately I haven’t yet figured out how to transform those verticies back. So when I run the script it dutifully reassembles my sphere originating from the center of the object. So there’s still some work to be done there.

Yaaaay... oh.

Programming, Software

Faking Blog Integration With XMLRPC and Ruby

I’m rebuilding indiecraftshows.com in RoR, but the blog will stay on WordPress. The rails app will be hosted on Heroku, and the blog will stay where it is at NearlyFreeSpeech.net. There’s one catch: I want the latest blog post to appear on the home page, which is part of the rails app.

To do this I’m using ruby’s included XMLRPC library to grab the latest post from WordPress and shove it into a YAML file named with the date and post ID. This happens in a cron job run daily. Since I only care about showing the most recent post, I don’t bother to check to see if there are other posts I don’t have.

I created a really simple object called (creatively) BlogPost, and chucked it in with the rest of my models in app/models. Note that BlogPost doesn’t inherit from ActiveRecord.

require 'xmlrpc/client'

class BlogPost
  def self.latest
    Dir.chdir(Rails.root.join('blog'))
    post_files = Dir["*.yaml"]
    most_recent_file = post_files.sort.last
    YAML::load(File.open(most_recent_file))
  end

  def self.fetch
    server = XMLRPC::Client.new2('http://www.kellbot.com/xmlrpc.php')

    blog_post = result = server.call("metaWeblog.getRecentPosts",1,YOUR USERNAME HERE,YOUR PASSWORD HERE,1)
    File.open(Rails.root.join('blog',"#{blog_post[0]["dateCreated"].to_time.to_i}-#{blog_post[0]["postid"]}.yaml"),'w') do |io|
      #we only want the published ones
      YAML.dump(blog_post[0], io) if blog_post[0]["post_status"] == "publish"
    end
  end
end

When the home page is called, the controller grabs the most recent yaml file (by name, not by time of creation, since WordPress allows you to lie about time). I just use the XMLRPC object as-is, but if I wanted to I could get fancy and do some post-processing to make it a little more friendly.

Programming, Software

Fixed: WordPress MU Uploaded Image Display Issues

Just a quick fix for something I couldn’t discount cialis without prescription find earlier:

If you’re on shared hosting which has PHP’s safe_mode enabled, you may run into problems with uploading images. Specifically, you can upload images just fine (assuming you’ve configured uploads correctly) but can’t see uploaded files. This is the case on NearlyFreeSpeech.Net (where my sites are hosted), and probably a few other hosts as well.

WordPress MU uses some .htaccess & PHP tomfoolery to obfuscate the real file path (among other things). Because safe_mode checks to see if the UID/GUIDs match on file_exists(), the script that fetches the images will fail and return a 404. Which is to say, the owner/group of the uploaded file is web/web (or whatever your server’s web user is), but since I manually uploaded the WPMU files originally, those are me/me. Since me != web, it failed. WordPress took this to mean the file was absent and returned 404.

On NearlyFreeSpeech, adding wp-content/blogs.php to the ‘web’ group was all it needed.

Programming

Extracting + Graphing Wii Fit data

In preparation to tinker with the miCoach data, I started with some better-travelled exercise bits: WiiFit body test data. Starting with Jansen Price’s excellent blog post on the subject, I slowly worked through the data and wrote a python script to interpret the binaries and save them to a CSV. By using the excellent flot javascript library, I was able to generate the nice graph above. There was a lot of trial and error, but here’s an overview of the process:

  1. Copy Wii save game data to the SD card. This is done from Wii Options > Data Management > Save Data > Wii
  2. Find the save game data on the card. It’s in something like ‘private/wii/title/RFPE’, although different regions may have slightly different codes. RFPE is the code for WiiFit Plus. Copy the WiiFit data.bin file from the SD card to your local machine.
  3. Decrypt data.bin. This is explained pretty well here. To create the keys I ended up creating text files with the hex string for each and then using “xxd -r -p sd_iv_hex sd_iv” et al to save a binary version. If you’re getting “MD5 mismatch” errors, you probably saved the keys incorrectly. If you aren’t sure, check the file size. They should be 16 bytes each.
  4. Run the decrypted RPHealth.dat through a parser (I wrote one in Python for this)
  5. Run the CSV through your favorite graph generation library. I use flot because Google Charts don’t handle dates very well.

Thanks to Jansen’s handy chart of which bits are where, writing the parser was pretty easy. This isn’t the most elegant code I’ve ever written, but it gets the job done:

import struct
import string
import csv

mii = 0
#we know that each record is 0x9271 bytes long
record_length = 0x9281

record_start = 0

#path to WiiFit data file
infile = 'RPHealth.dat'

FH = open(infile, 'rb');

## It loops through 7 profiles, because I happen to know I have 7.
## A better approach would be to go to the end of the file, of course.
while (mii < 7):

    #go to the start of the current record
    FH.seek(record_start)

    #read the first 30 bytes (header + name)
    line = FH.read(30)

    #for some reason names are stored as N a m e instead of Name.
    #Throw away the header any extranous spaces
    data = struct.unpack("i",line)
        #bit shift to get the month, day, and year. Could also get time if you wanted.
        year = data[0] >> 20 & 0x7ff
        month = data[0] >> 16 & 0xf
        day = data[0] >> 11 & 0x1f

        #break the loop if the date comes back 0
        if(year == 0): break

        #format the date into something humans like to read
        date = str(int(year)) + '-' + str(int(month)+1) + '-' + str(int(day))

        #the next three sets of 2 byte data represent weight, BMI, and balance
        line = FH.read(17)
        data = struct.unpack(">3H",line[0:6])

        recordWriter.writerow([date] + [data[0]] + [data[1]] + [data[2]])

    #now that we're done with the record, advance to the start of the next one
    record_start = record_start + record_length

    mii = mii+1

You can download a copy of it here.

Programming, Software

Importing Data from Magento to PrestaShop

Today I gave up on Magento. It’s a powerful piece of software but it’s still pretty rough around the edges, and the UI and architecture makes it a pain to dive in and debug if something goes wrong. It’s built on Zend, so someone who has spent more time with Zend than I have would probably have an easier go of it.

Anyway, I’m moving over to PrestaShop, and don’t want to lose all my customer and order information. Since I managed to trash my Magento installation, I’m migrating the data over manually via an exciting series of MySQL queries. I’m posting them here in case anyone else needs them.

This data is then imported into PrestaShop using the built in import tool. They have a fairly easy to use interface for assigning columns in the CSV to various PrestaShop information (name, address, etc).

Getting the customer’s ID, name, and email address:

SELECT DISTINCT ce.entity_id AS b, email, 'default_password', (

SELECT value
FROM customer_entity_varchar
WHERE attribute_id =7
AND customer_entity_varchar.entity_id = b
) AS l_name, (

SELECT value
FROM customer_entity_varchar
WHERE attribute_id =5
AND customer_entity_varchar.entity_id = b
) AS f_name, 1
FROM `customer_entity` AS ce
JOIN customer_entity_varchar AS cev ON ce.entity_id = cev.entity_id
WHERE 1

You’ll notice I select the string ‘default_password’. This is just to generate a column of dummy password data. I haven’t thought of any creative ways to migrate the password data, and instead am just resetting it. The downside is that users will have to request a new password in order to log in. You should not use default_password as the actual string, for reasons I hope are obvious.

Get the address books:

SELECT DISTINCT 'Home', cae.entity_id AS b, 

(select email from customer_entity where entity_id = parent_id) as email,

 (
SELECT code
FROM customer_address_entity_int as mm1 join directory_country_region as mm2 on mm1.value = mm2.region_id
WHERE mm1.attribute_id =27
AND mm1.entity_id = b
) AS state,
(
SELECT value
FROM customer_address_entity_varchar
WHERE attribute_id =25
AND entity_id = b
) AS country,
(
SELECT value
FROM customer_address_entity_varchar
WHERE attribute_id =24
AND entity_id = b
) AS city,
(
SELECT value
FROM customer_address_entity_varchar
WHERE attribute_id =18
AND entity_id = b
) AS f_name,
(
SELECT value
FROM customer_address_entity_varchar
WHERE attribute_id =20
AND entity_id = b
) AS l_name,
(SELECT value
FROM customer_address_entity_text
WHERE attribute_id =23
AND entity_id = b
) AS addre1,
(SELECT value
FROM customer_address_entity_varchar
WHERE attribute_id =28
AND entity_id = b
) AS postcode

FROM `customer_address_entity` AS cae
JOIN customer_address_entity_varchar AS caev ON cae.entity_id = caev.entity_id
WHERE 1 

Getting the order data over is another beast, one which I’ll tackle another day. There’s a convenient importer for products, but unfortunately the individual order data will have to be migrated painfully via SQL.

Programming

Tutorial: Writing a TCP server in Python

During the last 12 hours of the hackathon I decided to write a TCP server for an old project I want to finally finish. I decided to write it in Python, mostly because my friend Adam likes Python and Adam would inevitably be the one answering my questions when I got stuck. I should mention that prior to yesterday evening I knew nothing about socket programing. And I only had a vague idea of what threading was.

Since not everyone has friends like Adam, I’m writing up my findings in a tutorial.

Note: A bug in my CSS is causing the code blocks to show up extra wide. I’ll fix it once I’m back home from the hackathon

Understanding Sockets

First, I’m going to assume you understand that this is not a tutorial about writing an HTTP server. Instead this server will take connections from clients and keep them open to pass data back and forth until one side decides to close the connection. By keeping the connection open we eliminate the need to constantly poll the server for updates.

Socket Programming HOWTO provides a broad overview of sockets and is a good starting place.

Python’s Socket Library

Luckily python has an easy to use library. Like other libraries, we import it with thusly:

from socket import *

Many of the socket methods you’ll use are pretty self explanatory:
socket.listen() – listens for incoming connections
socket.accept() – accepts an incoming connection
socket.recv() – returns incoming data as a string
socket.send() – sends data to client socket*
socket.close() – closes the socket

*in this context the ‘client socket’ can be on either the server or client side. When a client connects to a server, the server creates a new client socket on its end. The two clients, one on each end, communicate with each other while the server socket remains open for incoming connections. This becomes more clear as you work with socket connections.

Writing the server
First thing’s first, we need to establish our server socket:

##server.py
from socket import *      #import the socket library

##let's set up some constants
HOST = ''    #we are the host
PORT = 29876    #arbitrary port not currently in use
ADDR = (HOST,PORT)    #we need a tuple for the address
BUFSIZE = 4096    #reasonably sized buffer for data

## now we create a new socket object (serv)
## see the python docs for more information on the socket types/flags
serv = socket( AF_INET,SOCK_STREAM)    

##bind our socket to the address
serv.bind((ADDR))    #the double parens are to create a tuple with one element
serv.listen(5)    #5 is the maximum number of queued connections we'll allow

So now we have a server that’s listening for a connection. Or at least we did until the script reached the end and terminated, but we’ll get to that in a bit. Let’s leave our server hanging and jump to our client software.

Creating the client
Start a new python script for the client. We’ll need many of the same constants from the server, but our host will be ‘localhost’. For now we’ll be running both the server and the client on the same machine.

##client.py
from socket import *

HOST = 'localhost'
PORT = 29876    #our port from before
ADDR = (HOST,PORT)
BUFSIZE = buy online levitra cialis viagra 4096

cli = socket( AF_INET,SOCK_STREAM)
cli.connect((ADDR))

Notice that we’re creating another socket object on this end but instead of binding and listening, we’re using the connect() method to connect to our server.

So what happens if we run our server and then run our client? Well, not much. While our server starts to listen, it then hits the end of the script. We need it to instead wait until it accepts a connection and then do something with that connection.
socket.accept() does just that, and returns two things: a new client socket and the address bound to the socket on the other end. Once we have that, we can send data!

Continuing on server.py:

serv = socket( AF_INET,SOCK_STREAM)    
 
##bind our socket to the address
serv.bind((ADDR))    #the double parens are to create a tuple with one element
serv.listen(5)    #5 is the maximum number of queued connections we'll allow
print 'listening...'

conn,addr = serv.accept() #accept the connection
print '...connected!'
conn.send('TEST')

conn.close()

The last step is to jump back over to our client and tell our client to expect to receive data:

cli = socket( AF_INET,SOCK_STREAM)
cli.connect((ADDR))

data = cli.recv(BUFSIZE)
print data

cli.close()

Now when you run your server it will wait until a client connects. Once you run your client it will connect and receive a short message (the word “TEST” in this case) and print it to the screen. If you wanted to you could have the client send a response, using the same send() and recv() methods (but reversed).

Make sure you close() your connections when you’re done using them. If you don’t close things nicely they have a nasty habit of staying bound/connected until you forcibly kill the python process. This can be a real pain when you’re debugging.

By itself this isn’t particularly useful, especially considering we can only handle one connection at a time and exit once it’s closed. By adding a few while loops and some threading we can make this into something much more valuable. As it is, I’m pretty wiped from the hackathon, so the threading tutorial will have to wait until another day.