Crafting, lased, LEGO

Meta Lego Storage

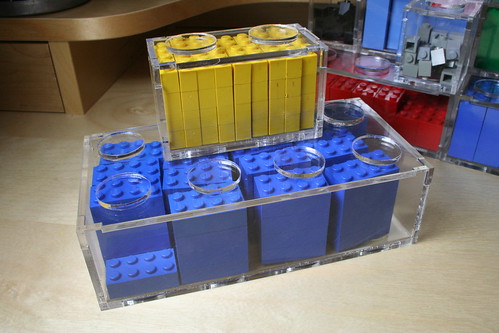
In need of a way to organize and store my Lego obsession, I made a bunch of acrylic boxes which not only hold Legos, but also stack and interlock similarly:

Each brick box holds 64+ of the same-shape piece. So the 1×1 box will hold 64 1×1 bricks, and the 2×2 holds 64 2×2 bricks. The larger ones hold a few more due to how the sizing works out. The 1×1 box is 40mm per side (external dimensions).

I posted the patterns on Thingiverse should anyone wish to make their own. No,  I’m not going to make and sell them. They’re time consuming to make, and plus I’m pretty sure Lego would sue me. If you don’t have access to a laser cutter, I’d suggest using a service like Ponoko.

The patterns were generated in OpenSCAD using the following code. Change “rows” and “cols” to get the lego size you desire. By the way, I’m teaching a class on OpenSCAD in Brooklyn next weekend!

fundamental_unit = 0.8;
thickness =3;
h_pitch = 10;
v_pitch = 12;
tform = 5;
knob = fundamental_unit*h_pitch*tform;
module side(rows){
	lwidth = rows*fundamental_unit*h_pitch*tform;
	lheight = v_pitch*fundamental_unit*tform;
	difference() {

		square(size=[lwidth, lheight]);
		translate(v=[10,0,0]) square(size=[lwidth-20,thickness]);
		translate(v=[10,lheight-thickness,0]) square(size=[lwidth-20,thickness]);
		square(size=[thickness, 10]);
		translate(v=[0,lheight-10]) square(size=[thickness, 10]);
	translate(v=[lwidth-thickness,10]) square(size=[thickness, lheight-20]);
	}
}
module top(rows,cols,holes){
	lwidth = rows*fundamental_unit*h_pitch*tform;
	llength = cols*fundamental_unit*h_pitch*tform;
	difference(){
		square(size=[lwidth,llength]);
		square(size=[thickness,10]);
		square(size=[10,thickness]);
		translate(v=[lwidth,0,0]) square(size=[-thickness,10]);
		translate(v=[lwidth,0,0]) square(size=[-10,thickness]);
		translate(v=[lwidth,llength]) square(size=[-10,-thickness]);
		translate(v=[lwidth,llength]) square(size=[-thickness,-10]);
		translate(v=[0,llength]) square(size=[10,-thickness]);
		translate(v=[0,llength]) square(size=[thickness,-10]);
		if(holes==true){
			for (i = [1:cols]){
				for (j=[1:rows]){
				translate(v=[j*knob-knob/2,i*knob-(fundamental_unit*h_pitch*tform)/2,0]) circle(r=fundamental_unit*6*tform/2);
				}
			}
		}
	}
}

rows = 2;
cols = 4;

h_spacing =  rows*fundamental_unit*h_pitch*tform+10;
l_spacing =  cols*fundamental_unit*h_pitch*tform+10;
v_spacing = fundamental_unit*v_pitch*tform+10;

side(rows);
translate(v=[ rows*fundamental_unit*h_pitch*tform+10,0,0]) side(rows);
translate(v=[0,v_spacing]) side(cols);
translate(v=[ cols*fundamental_unit*h_pitch*tform+10,v_spacing]) side(cols);
translate(v=[0,2*v_spacing]) top(rows,cols,true);
translate(v=[ rows*fundamental_unit*h_pitch*tform+10,2*v_spacing]) top(rows,cols,false);

In the next batch I’m going to make the nubs a little smaller than the holes. They work now, but it’s a bit fiddly getting everything to line up just so. A little more forgiveness would be nice. Also, OpenSCAD does strange things with circles. Rather than simply write a circle in the DXF, it represents it as a bunch of line segments. I’m not sure if there’s a way around this, but it’s marginally irritating.

You can download a .dxf for a few different box sizes on Thingiverse.
I’ve also created a Flickr Collection for my various Lego stuff.

Meta Lego

LEGO

More Legos From 3D Meshes

Mushroom Thingy

I’ve been doing more Lego building from models. This time I made sort of an abstract mushroom tree forest thing. More photos are available on Flickr.

Here’s the original model (left) and the resulting cubeified model after running it through AddCells (right):

I realized of course that with everything grey, it was very difficult to determine which bricks of which color were needed where. So I un-joined the primitives in the original model and ran AddCells on each one individually. I used different colored “cell” blocks for each one, and the resulting models kept the color:

Each peice needed to be moved a little bit so that all the blocks lined up, but other than that it worked pretty well.

Because each piece is separate, I couldn’t use the hide tool to “slice” each layer. But I did find out something interesting: each “cube” in the new models is actually a vertex. I honestly don’t understand a ton about how that’s pulled off, but basically instead of being a point on a line, each vertex represents another object, the source cube.

In order to slice up the model, I wrote a script to delete all but a given layer, with layer 1 being the bottom layer, up to however many layers of cubes are in the model.


import Blender, BPyMessages, BPyMesh
from Blender import Scene, Mesh, NMesh, Window, sys, Group, Object, Draw
from Blender.Mathutils import \
	Matrix, Vector, ProjectVecs, AngleBetweenVecs, TranslationMatrix

def trimToLayer(selected,layerNumber, blockHeight,offset):
        toDelete= []

        mesh = selected.getData(mesh=1)
        tmesh = NMesh.GetRawFromObject(selected.name)
        tmesh.transform(selected.matrix)
        #Delete verticies above the current layer
        for v in tmesh.verts:
            if v.co[2] > blockHeight*layer:
                toDelete.append(v.index)
        if layerNumber > 1:
                #Delete verticies below the current layer
                for v in tmesh.verts:
                    if v.co[2] < blockHeight*layer-1:
                        toDelete.append(v.index)        
        toDelete = list(set(toDelete))

        mesh.verts.delete(toDelete)
        Window.Redraw()

##################3
if __name__ == "__main__":
    selection = Object.GetSelected();

    layer = Draw.PupIntInput("Layer",1,0,100)
    Blender.SaveUndoState('Kill Everything')  
    print "\nTrimming First Layer"
    for s in selection:
	bbox = s.getBoundBox(1)
	print bbox[0][2]
	trimToLayer(s,layer,1.2,bbox[0][2])


There are a couple problems with the script: primarily, I couldn’t find a way to get the software to save a screenshot (ctrl+F3 normally). Because of this, I couldn’t loop through the whole thing at once, I had to go through one layer at a time, running the script, hitting ctrl+f3, saving the image, lather rinse repeat. It was tedious, though not as tedious as manually cutting up each layer. But almost.

The resulting MRI-like were used to build the model. The exact placement of which bricks and where is left as an excercise to the reader. A few layers (from the bottom, middle, and towards the top) are shown below.

This is my first attempt at a Blender script, and admittedly one of my first times using blender, so any feedback on how to streamline this process would be appreciated.

LEGO

From Polygons to Voxels to LEGO: A Utah Teapot

It was only after hours of searching that I finally came up with what I was looking for: a way to take a polygon mesh (OBJ or similar) and convert it into a blueprint for building LEGO sculptures.

Don’t get me wrong, there are tons of tools out there for LEGO CAD. But strangely none of them mention being able to go from a mesh to a LEGO layout. It’s surprising, since it seems like such a natural fit. The rise of 3D printers has rejuvinated interest in voxels, voulmetric pixels, and as evidenced by all the LEGO sculpture artists we seem to be in a golden age of LEGO.

Armed with Blender and a giant LEGO collection, I set out to get the computer to do the hard work for me. I used Blender, graph paper, a pencil, and of course lots of LEGOs.

Step 1: Voxelizing a Utah teapot

Let me preface this by saying that the Blender UI is not for the faint of heart. I took classes on Rhino and 3DSMax in college, and thought to myself “how different could it be?” The answer: very. If you’re new to blender, don’t fear the manual. You’re going to need it, particularly the parts on installing/using python scripts.

To voxelize the teapot I used a script called Add Cells which covers the surface of any object with any other object. First I imported the teapot, and scaled it up a bit. Then I created my “fundamental unit” of LEGO. LEGOs have an aspect ratio of 6:5, so I created a 1×1 LEGO, a 0.6×0.5×0.5 rectangular prism in Blender.

Selecting both the teapot and my 1×1 lego I ran the Add Cells script (go to the Scripts menu –> Add -> Cells). I chose the Teapot for my object to be voxelized and the 1×1 LEGO as my voxel model.

Tada! A blocky teapot!

Step 2: Graphing each layer on paper

In order to make the build process easier, I went through layer by layer and drew a map of each layer on graph paper. This way when building with LEGOs I could shade in with a pencil each voxel I’d built. It sounds redundant, but when things all start looking the same after a few minutes and something isn’t lining up, it’s very helpful.

To see one layer at a time in Blender I went into Sculpture Mode, side view, and used ctrl+shift+right mouse to select and hide all but the layer I wanted to see. Then I switched to Top view and copied the layer onto my graph paper. By the end I had a sheet of paper full of wobbly circular outlines.

Step 3: Building it with LEGOs!

The completed model uses 244 LEGOs, many of which are tiny 1×1 and 1×2 bricks. The model is hollow, but the walls need to be fairly thick to be able to support the top. As it is I probably should have made things a little thicker; putting the last two layers on was a delicate operation.

I built each layer sequentially. There were a few overhang pieces near the bottom which I had to append to the layer above them, since they couldn’t anchor to anything below.

Overall the project took about 4 hours, with a break in the middle for breakfast, church, etc.

Total LEGO count for the project was 244 individual bricks, distributed thusly:

  • 44 2×3 Bricks
  • 46 2×2 Bricks
  • 58 2×4 Bricks
  • 27 1×2 Bricks
  • 17 1×3 Bricks
  • 8 1×4 Bricks
  • 8 2×2 L shaped Bricks
  • 33 1×1 Bricks
  • 1 2×8 Brick
  • 1 2×6 Brick
  • 1 1×8 Brick