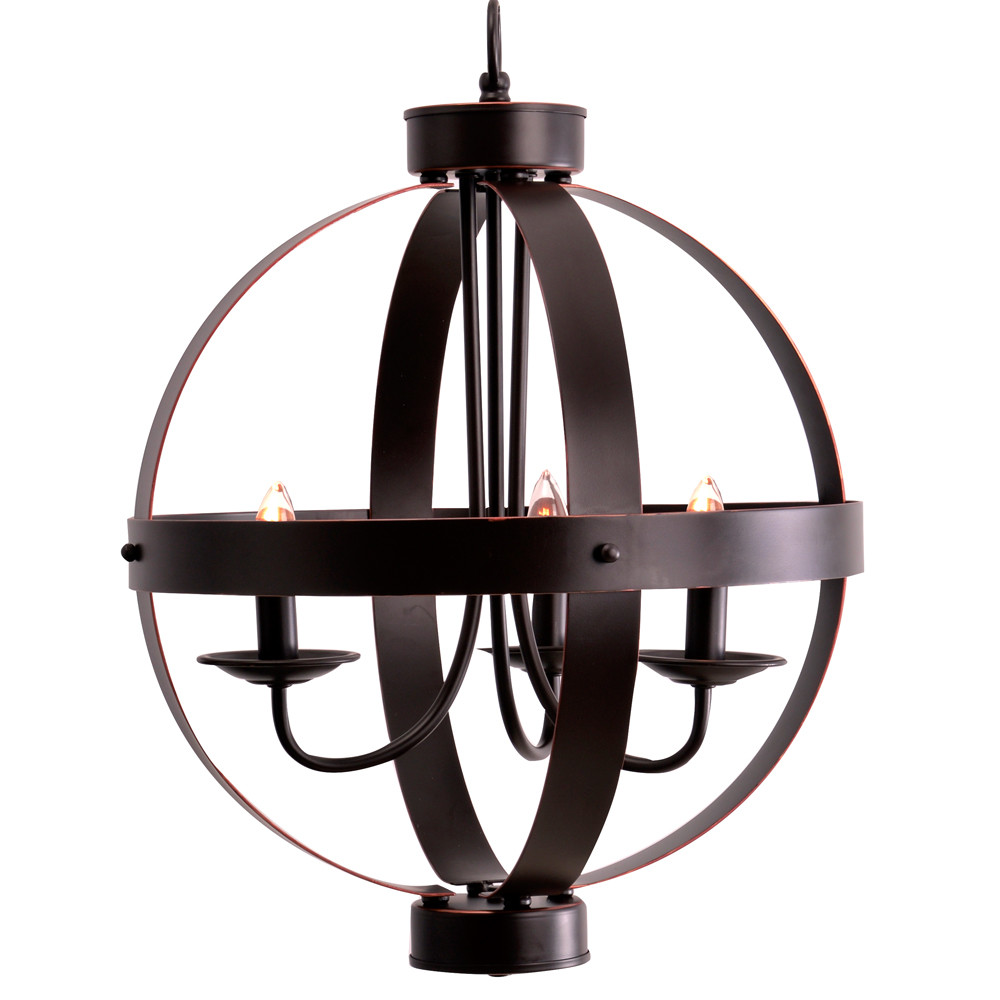
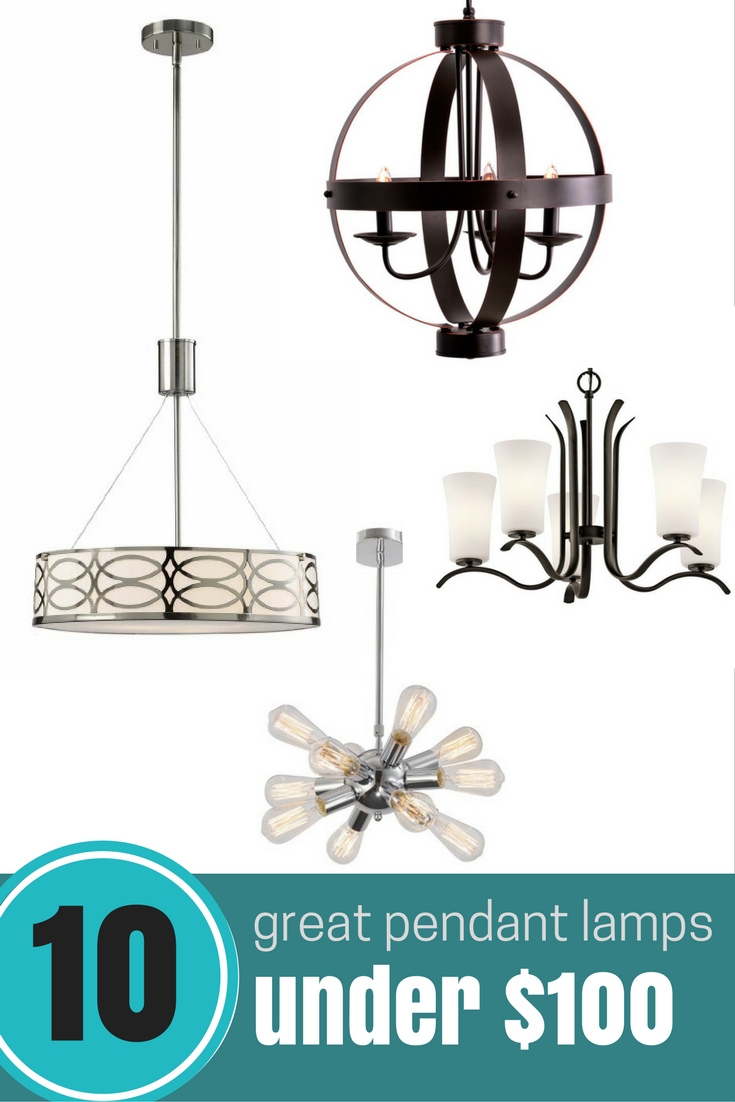
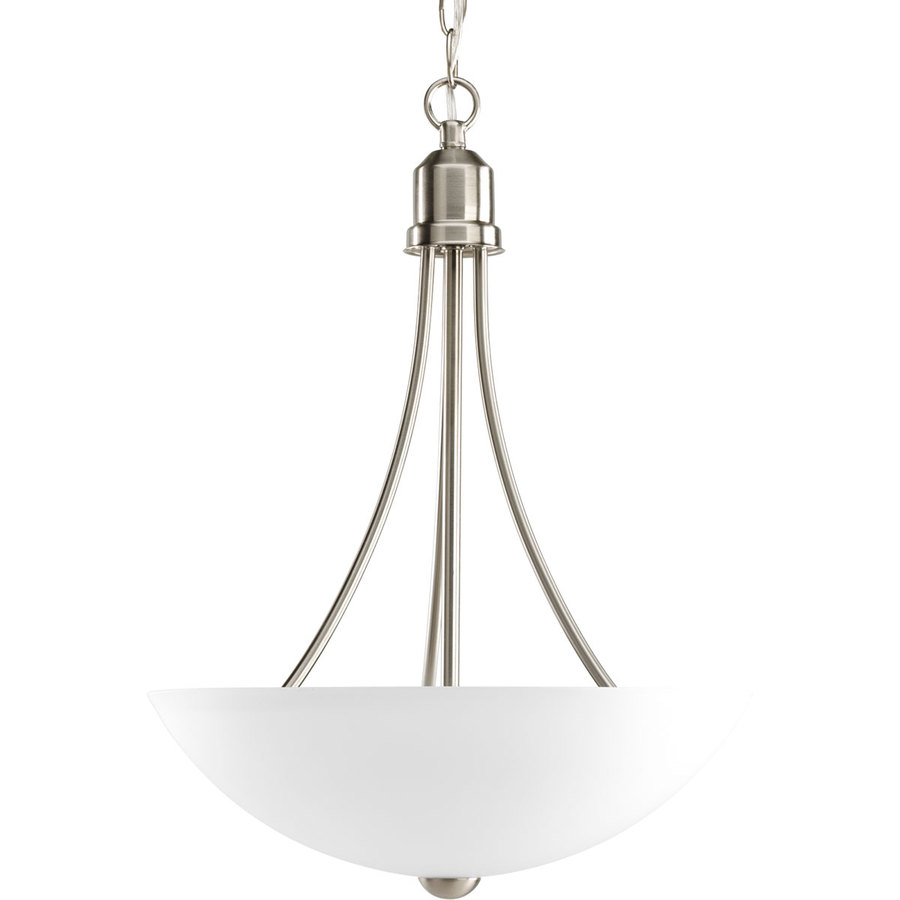
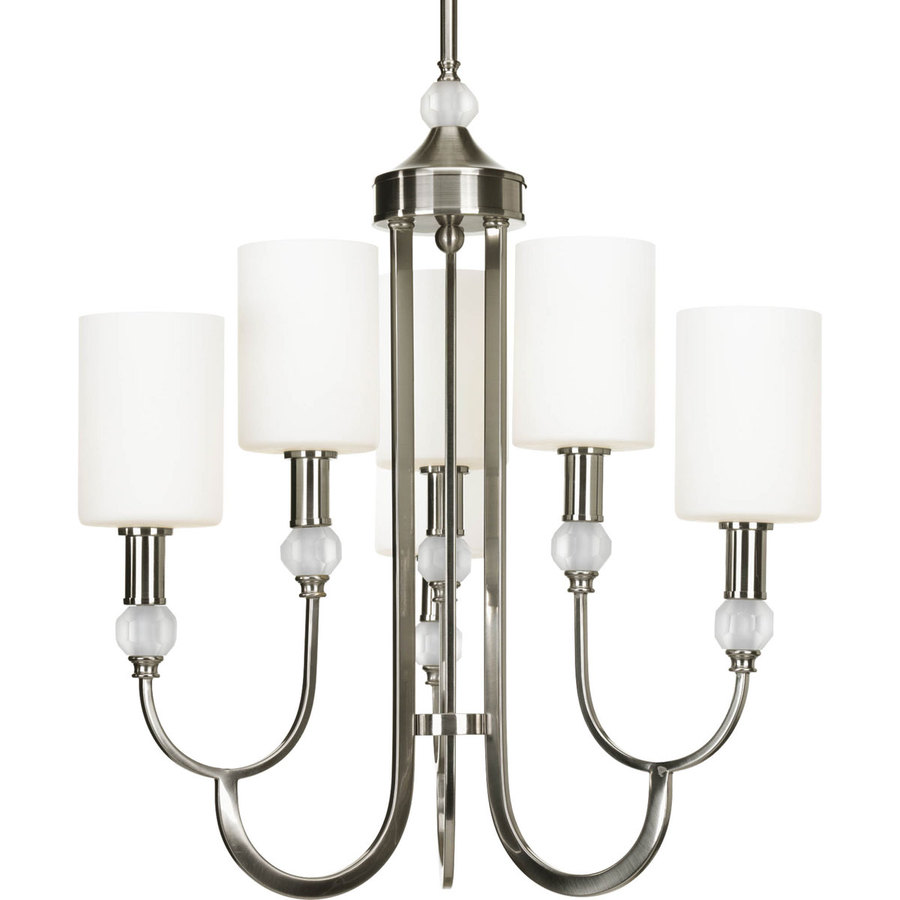
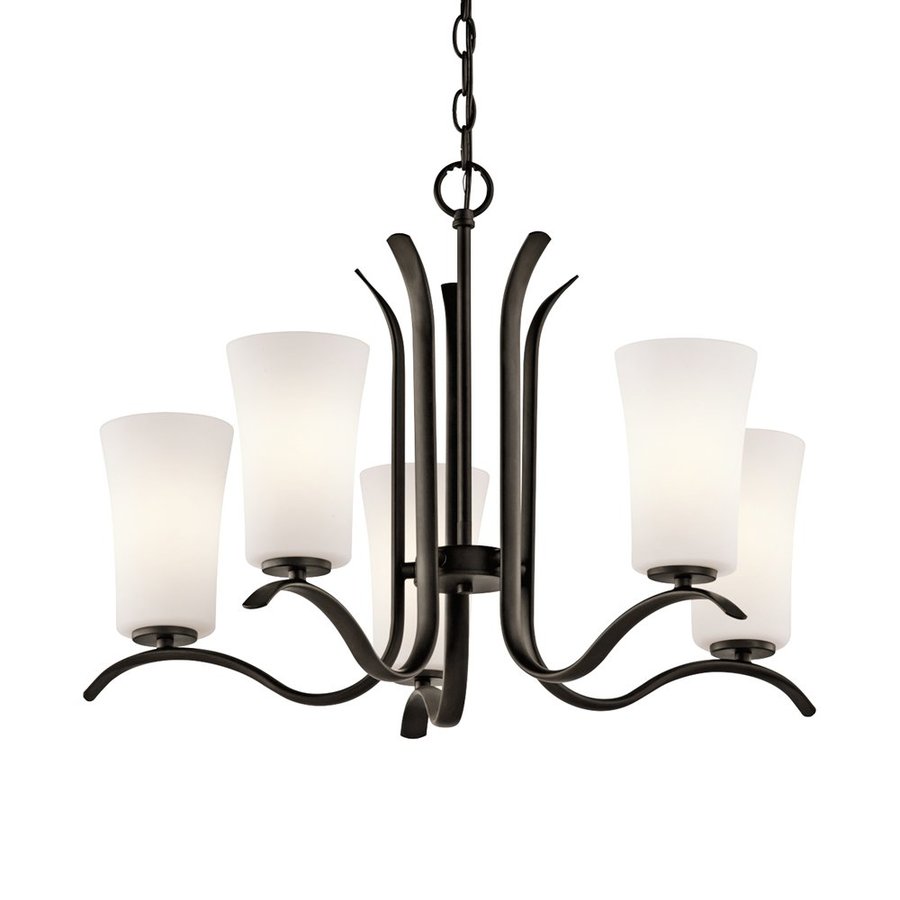
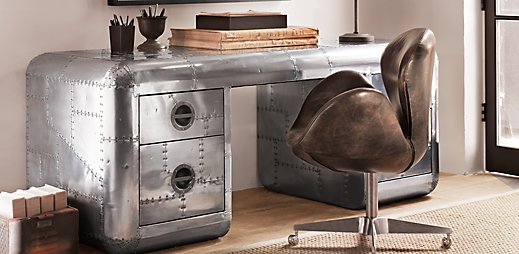
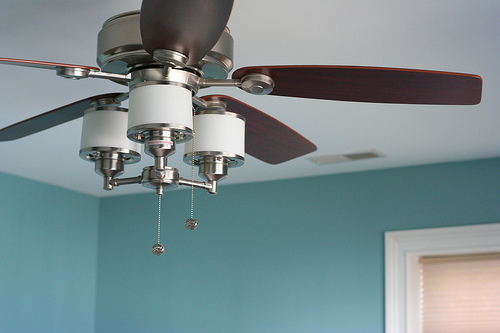
I’m remodeling a house and one of the things that desperately needs replacing is the light fixtures. They’re all 1970s attempts at 1920s styles, and not very good ones. Swapping out a dining room chandelier or other ceiling light is a great way to update a room with just a few hours of work. The options are nearly infinite, and unfortunately so are the prices. As cool as the Restoration Hardware catalog is not all of us are ready to spend next month’s entire paycheck on a lamp that looks like it was built by Howard Hughes. So I started looking into budget options. The lamp field really opens up around $150, and somehow everything that catches my eye is $300+ but there are some nice options to be found for less than a Benjamin if you know where to look.
These pendant lamps and chandeliers each come in under $100, meaning you can get rid of that 1970s reproduction nightmare without breaking the bank.
First, some fairly tame options for when you want something more streamlined, but don’t want to hear your mother-in-law’s opinions on the lighting every time you host a dinner party.
If you’re feeling a little trendy (and why not when the lights are so affordable?) you could go for a drum light. Drum lights tend to look a little more casual than chandeliers, and if you hang them close to the ceiling they can be a little more subtle.
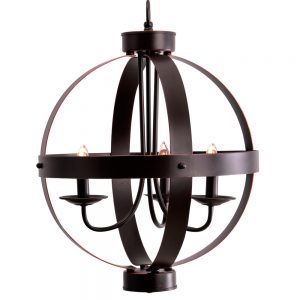
Or you can get a little weirder with these guys.
I know what you’re thinking on that last one… it looks a little cheesy, right? Ok maybe it is a little cheesy, but bear with me. When it’s lit up it looks nice!
And last but certainly not least there’s this chandelier, which I included because it’s called Khaleesi. I think it looks a bit like a metal octopus, which is admittedly not my thing, but they got me on the name. Well done, marketing team!
We’re filling the shore house with family for Labor Day weekend and it’s finally starting to look like a house! We still have to do a massive cleaning, and a huge trip to the recycling center, but things are starting to come together. I know I say that a lot but it’s really true this time!
Master Bedroom
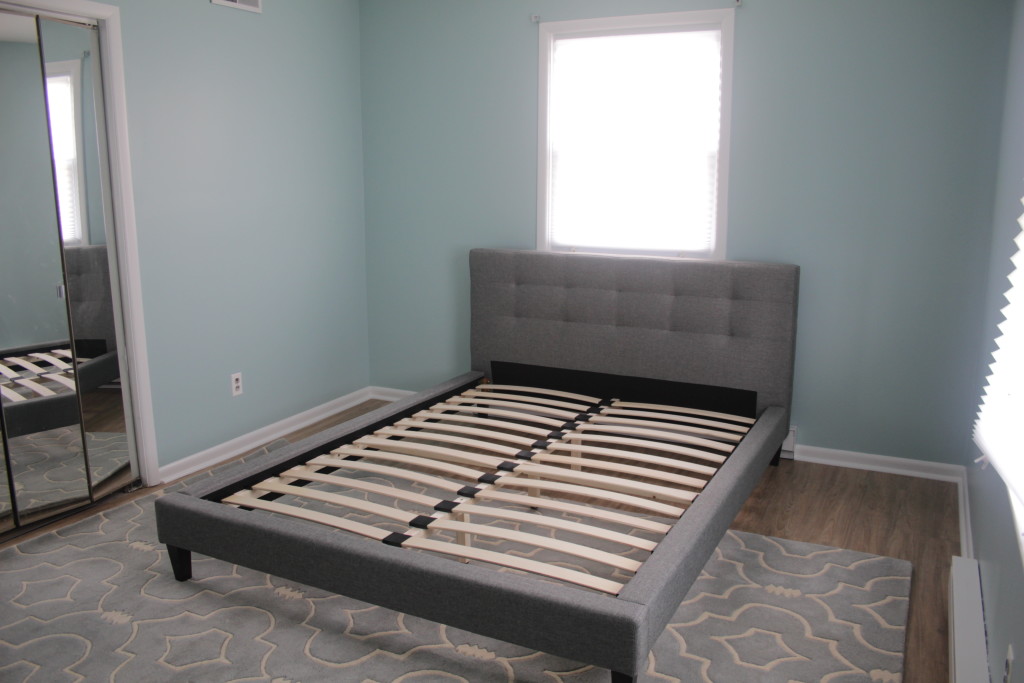
The master bedroom is looking good. I’m not keeping the mirrored closet doors forever, but there’s a bed! And a carpet! I still need to get curtains, and I’m running into some decision fatigue. There’s so much blue in the room (both the rug and bed have a slight blue tint to them) that I’m thinking beige. Boring old beige.
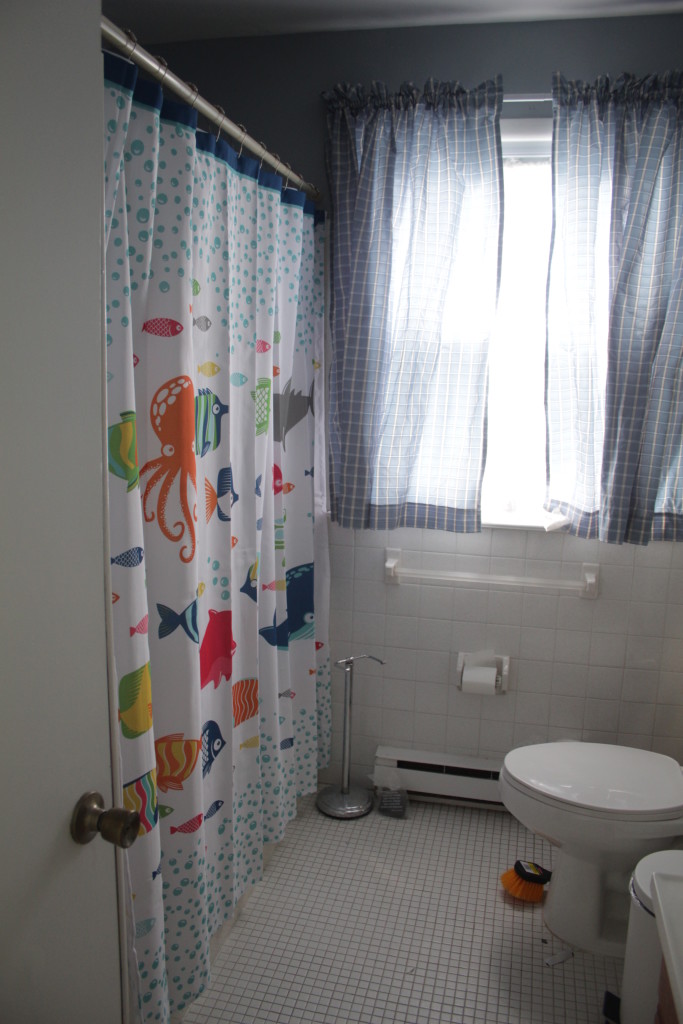
Shower is ready to use!
The bathroom still needs a thorough cleaning, but the shower has been re-coated and re-caulked and we got a festive new shower curtain from Target. The last step in here is to replace the shower head with the hand shower we got, but it’s totally a usable shower right now!
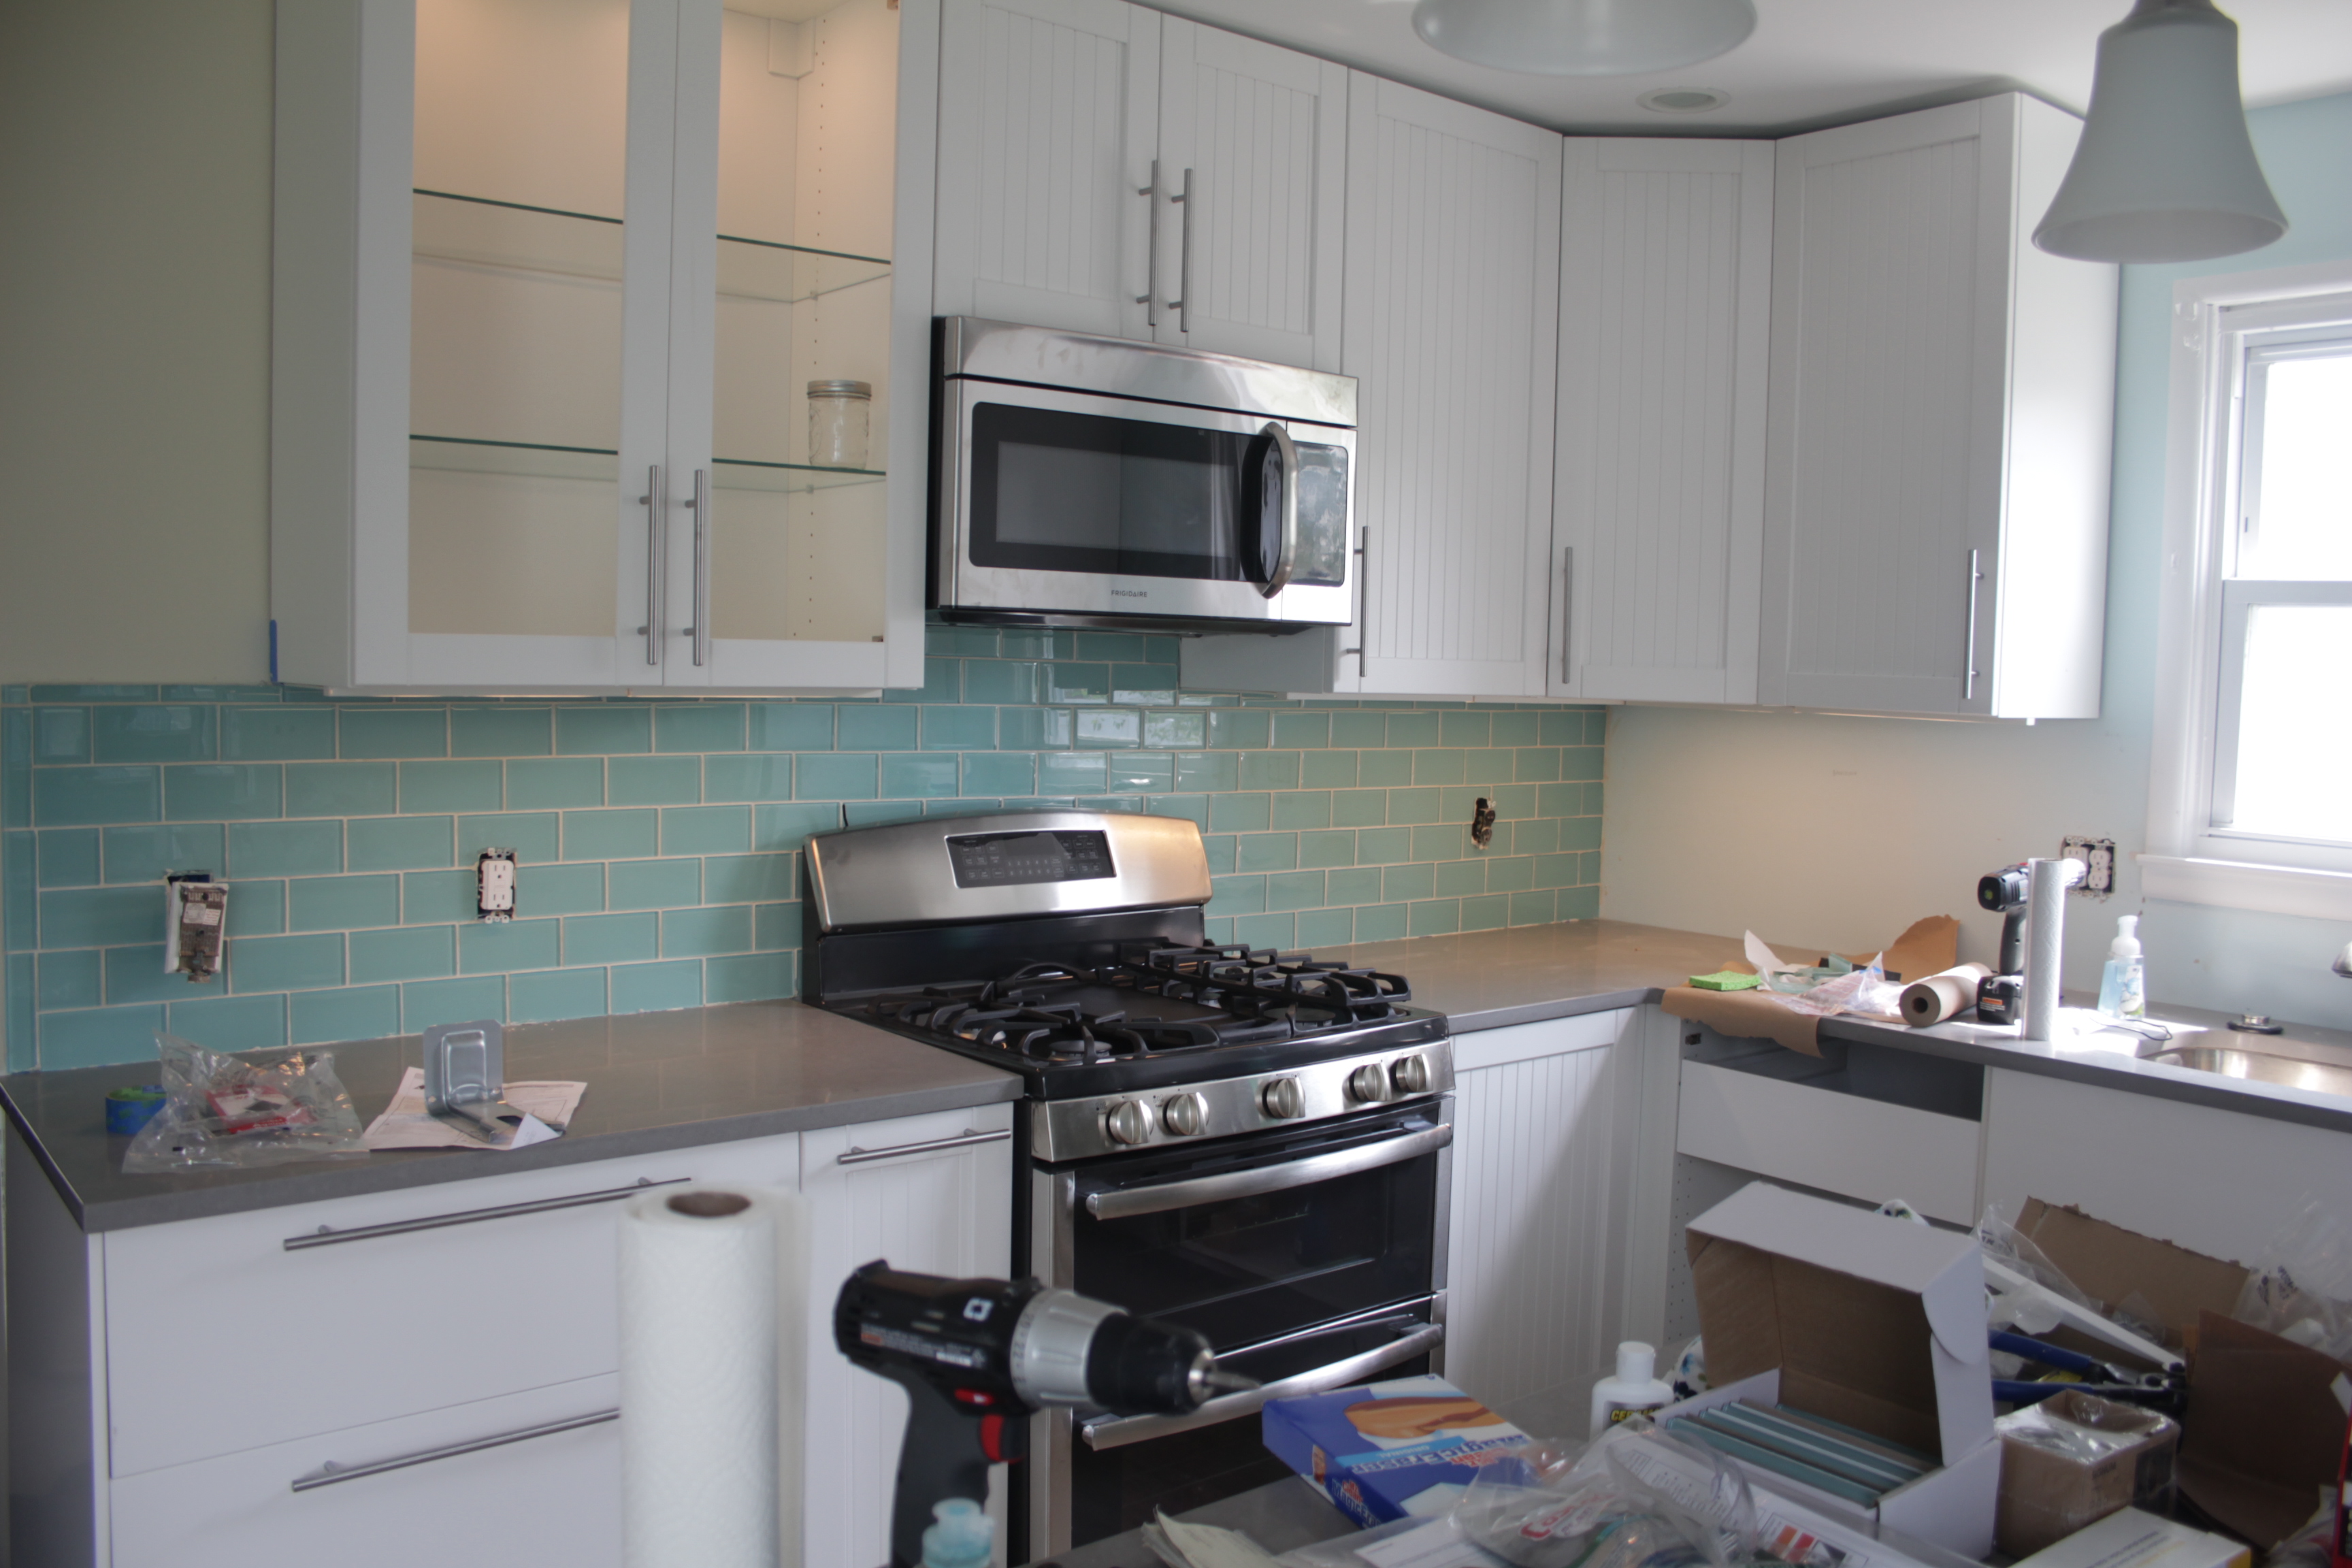
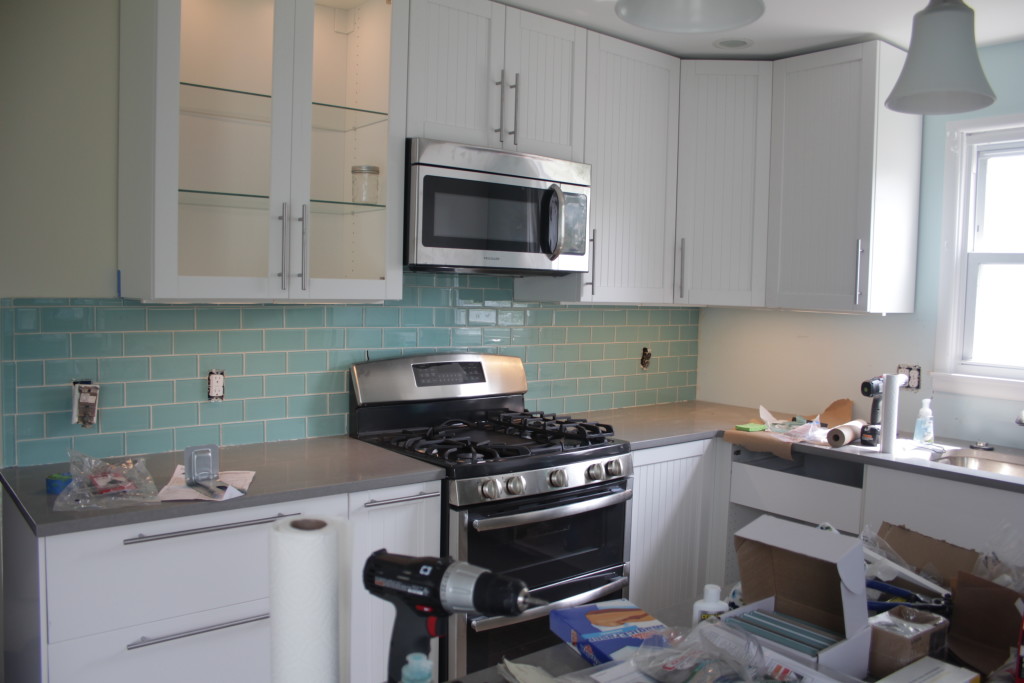
Kitchen, with half the backsplash and a working stove!
We did one wall of backsplash tile. I would have loved to do both but it took two of us a solid 7 hours to do just the one wall! It looks OK but not perfect. I learned a lot in the process, and I still need to caulk where it meets the counter top. The oven is also hooked up and working, as is the dishwasher, so aside from needing to clean up all the construction debris we have a working kitchen!
You guys you guys it’s finally here… the moment I’ve been waiting for… when I can stop “camping out” in a half-finished home and start actually making it into a space for guests and friends and us. I’ve been doing what I can here and there in the rooms that are finished, but now it’s finally time to pull the trigger and order some of the larger items I’ve been eyeing up. I’ve been haunting the local thrift store for months and coming up dry, but managed to snag some good end-of-season clearance prices on stuff online and at the big box stores (Target, Lowes, Ikea).
Instead of cleaning my office like I said I would, I put together mood boards for the rooms! Aren’t I just the pinnacle of responsibility?
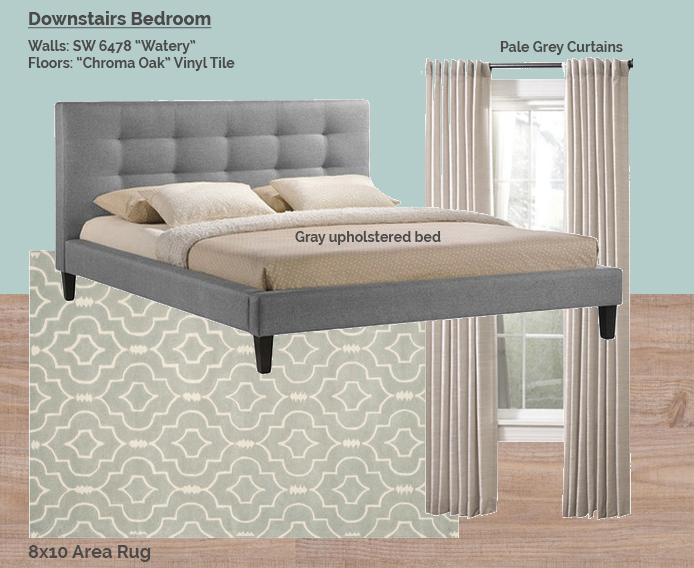
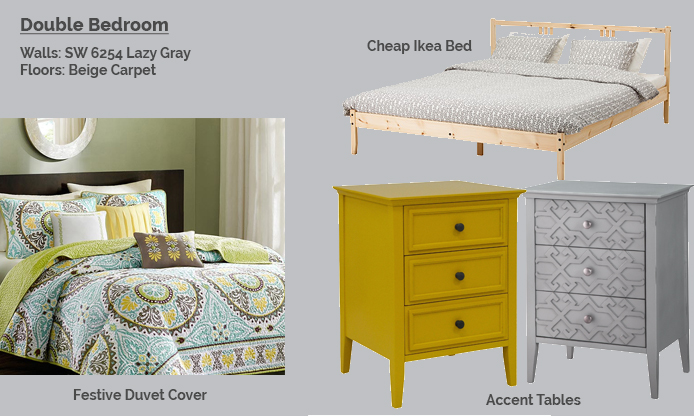
Room #1: Downstairs big bedroom
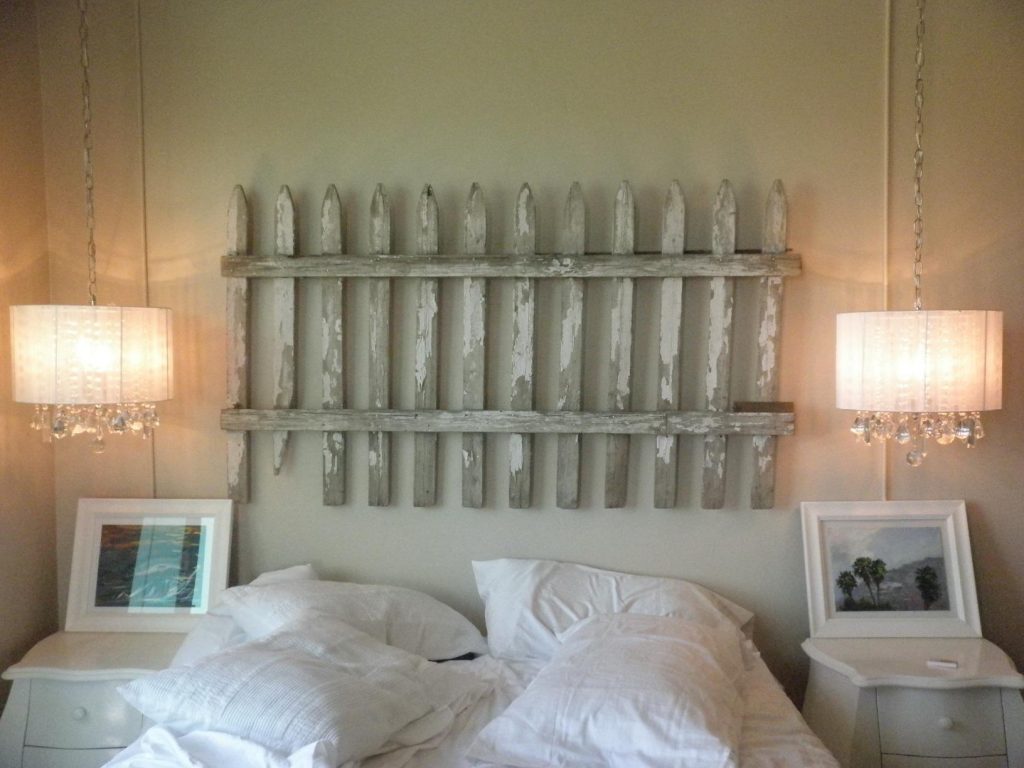
The master bedroom (for lack of a better term, it’s the biggest) gets a lot of natural light so I tried to keep the colors a little calmer in there. It’s a good sized room and I’d like to eventually get a couple chairs as well. I’m still in the market for some inexpensive bedside tables for that room.. and lighting! It’s one of the few rooms that doesn’t have any wired-in lights. It also has these super-90s mirrored accordion doors on the closet. I hate the mirror doors but I haven’t seen anything else I like much better. Current plan is to hang curtains across the closet opening instead. I haven’t decided if those will be the same color as the window curtains, or slightly different.
5 bucks says those mirror doors are still there a year from now because I haven’t made up my mind. Also I guess I’ll have to get some sort of comforter or duvet cover for this room, it gets pretty cold downstairs if you crank the AC enough to cool the upstairs (thanks, crappy duct layout).
Lazyweb, bring me: lighting, closet door/curtain ideas, bedside table, and comforter ideas for this room!
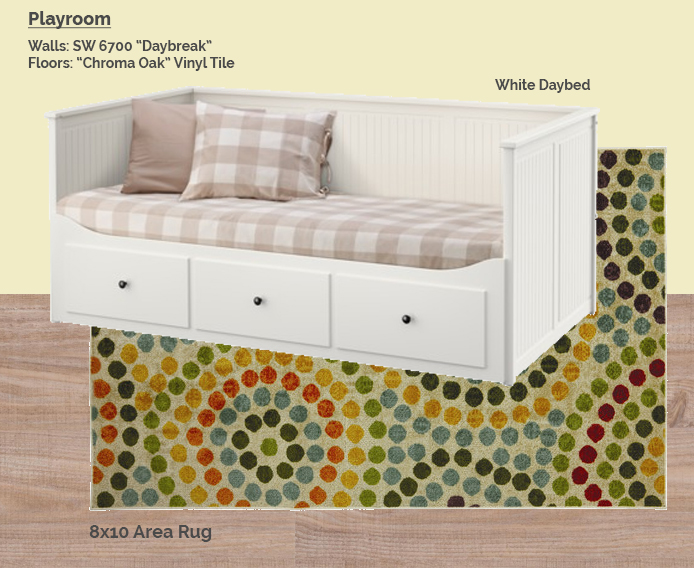
Bedroom #2 aka the “Playroom”
I’ve been calling the 2nd downstairs bedroom the “playroom” but it’s really more like “a bedroom where we will store all the toys so they don’t clutter up my living room. We picked out a fun rug and a daybed which pulls out into a double AND has storage. Anyone who has been to Ikea in the last decade probably recognizes it. Beyond that… I got nothing. We’ll need toy storage (though it does have a small closet) and lighting, but it’s not a very big room so I’m trying to keep things fairly compact/modular.
Lazyweb, bring me: child-friendly lighting, toy storage
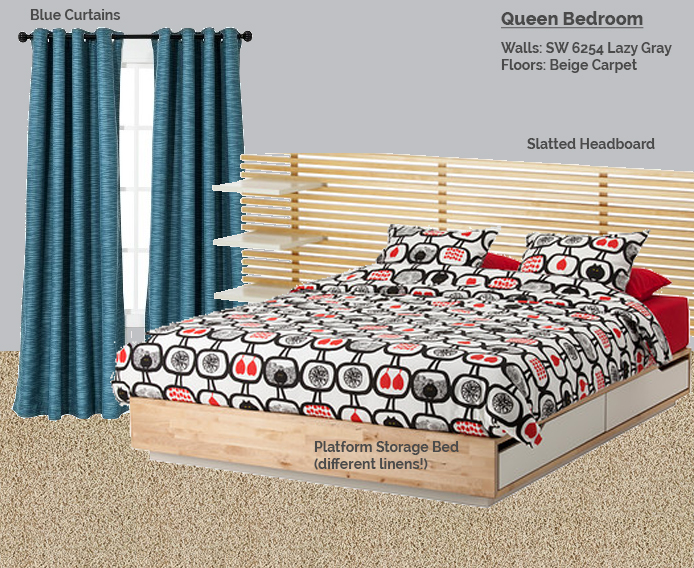
Bedroom #3. It has a queen bed!
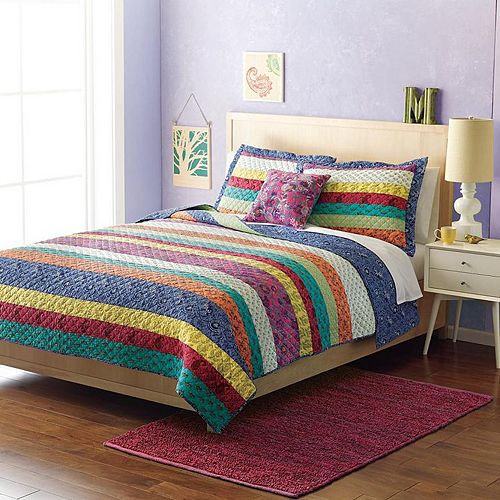
As we move upstairs you will quickly see my design ideas get far less… cohesive. Also I start referring to the rooms by the size of the bed in them. The “Queen room” has an Ikea bed that again many folks will recognize, some Target curtains and not a lot else. I did get a quilt for this room, which looked SUPER CUTE in the store and SUPER CUTE when I washed it and KIND OF MEH when I put it next to the curtains. Urp. Here’s a photo from the Kohl’s website:
Also while I really like the Ikea bed itself (solid wood! storage!), the white melamine drawer fronts kind of kill the look. Looking at the assembly directions they’re really simply constructed. It’s basically a board with a groove in the bottom and some holes on the sides. I feel pretty confident I could create new drawer fronts in a nicer wood (and with handles instead of the weird 80s cutouts) some day down the line. Who wants to take another $5 bet on whether I ever actually do that?
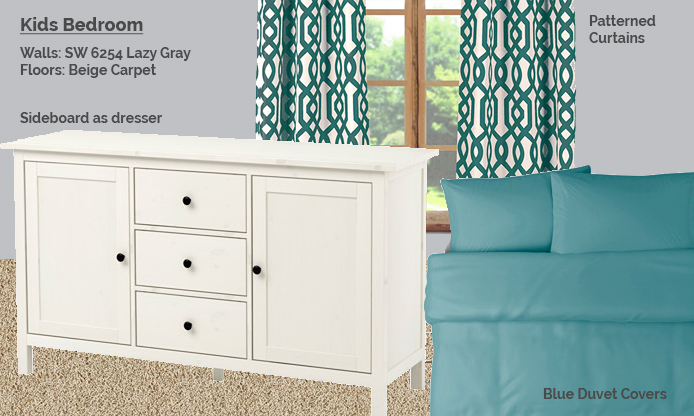
Bedroom #4. For kids!
The kids’ bedroom is actually pretty close to being done. I initially had some crazy plans for bed nooks, and I still might do that someday, but for the time being I’m gonna content myself with just two beds hanging out. There are two twin beds against the wall (visible here), one of which has a pull out trundle underneath it. The other has storage. While we don’t need a ton of storage in this room, I’m looking at getting a sideboard to use as a dresser since there’s no closet in that room. There’s a ceiling light in there but I’ll probably put one on the sideboard as well.
Lazyweb, bring me a kid-friendly lamp!
Bedroom #5 has no plan. No plan at all.
When it comes to the 5th bedroom there is no plan. Only Zuul. This is the room that my husband and I have been staying in during construction, and therefore it has items based on what was necessary for us to sleep. It has an Ikea bed from 2009 which we migrated down from elsewhere, a duvet cover I think is cute, two accent tables I got on impluse because they were cute AND ON SALE, and that’s about it. There is no plan for this room, other than to someday replace the bed with something that isn’t awful (the one we have is actually the older version of the one pictured, and it’s really weirdly low to the ground). I’m not even sure if I want the accent tables in that room, or if I want to abduct them for elsewhere. Also the duvet.
Not shown: beige curtains that were purchased exclusively for their light-blocking properties, and a roller shade that is really difficult to operate.
Lazyweb, how much of this room should I cannibalize for other rooms?
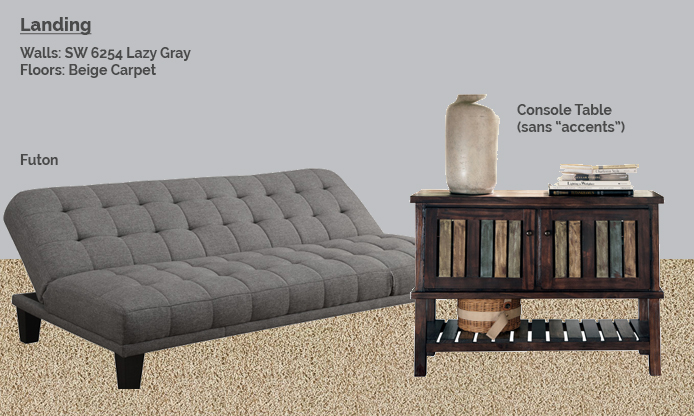
You guys, I am getting kind of tired of photoshopping together all these items of furniture, but there’s only one left so I’ll saunter on. No, it’s not the living room. I have no idea what the plan is for the living room. Right now it has a sectional my husband has owned since before we got together, and since there’s a place to park my butt I’m pretty much done for now. No, the last “room” is the landing at the top of the stairs, which we’re totally sticking a futon in just like the previous owners did.
Someday a TV will go here. Right after I have some outlets added.
The idea is that the kids can all pile onto the futon and play video games while the adults have distinguished conversation in the living room. Just kidding, the kids will pile onto the futon and play video games upstairs because they haven’t yet learned to hold their own against the adults playing Super Smash Bros downstairs.
And that, my friends, is the current decorating plan. Clearly some of the rooms are more thought out than others. Also, putting together these mood boards (which is a totally normal thing to do on a Wedesnday night, right?) has made me absolutely hate the carpet upstairs. And downstairs. And all carpet. Can you put an area rug on top of carpet? Is that legit?
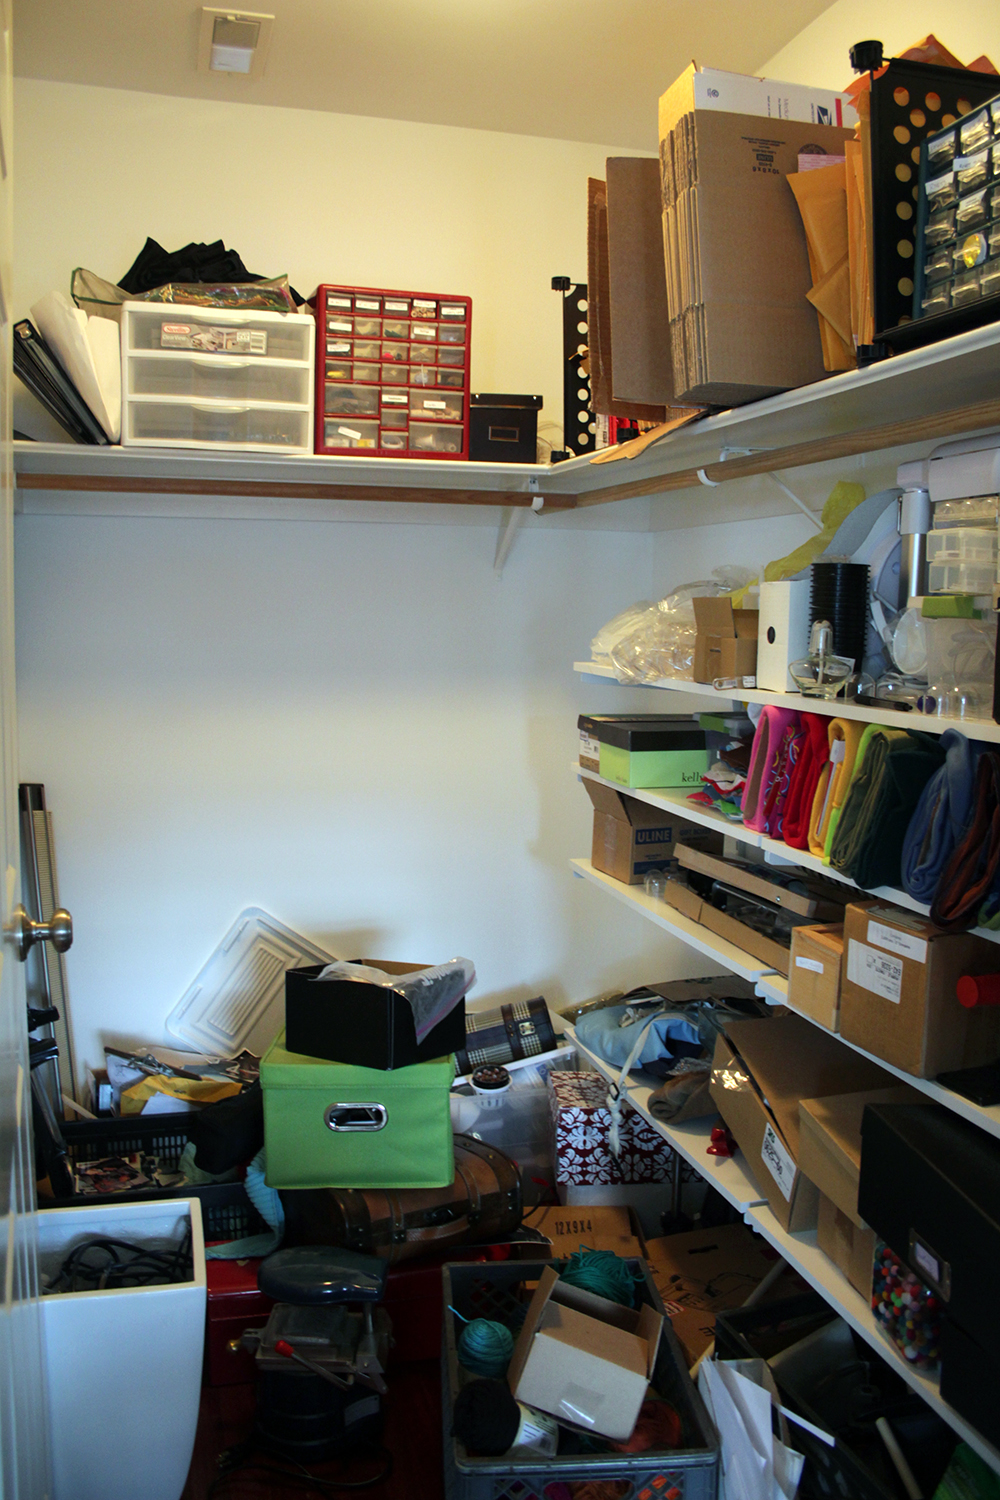
“Organize my office closet” has been on my to-do list for a long time. This week was the week.
Not shown: piles of boxes outside the closet
I have some cheap Ikea standards and brackets (on the right) which absolutely had to go. They wobble and are a pain to deal with. And I needed shelving on the back. And the wrap-around top shelf and clothing rod weren’t helping matters.
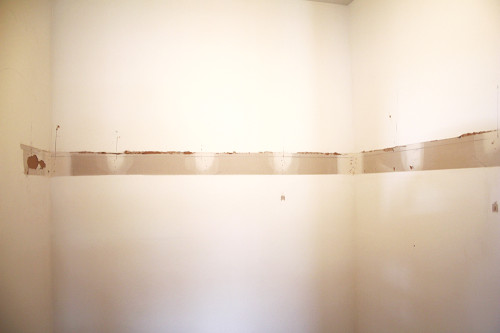
The Ikea stuff came out easily enough (save for the drywall anchors… ugh). But the wrap around shelf was another story. It turned out it had been nailed in all the way around. And there were many coats of paint on the shelves so the nails were near impossible to find, let alone dig out. So I got out a prybar and started pulling the stuff down.
At one point, with a sickening ripping sound, it became clear that some of the drywall was coming along for the ride. It turns out not only was the shelving nailed to itself and the wall, it was also caulked and glued in place. And so a great deal of drywall came down with it. The horizontal stripe below is the totally unpainted drywall, with a scar on the left and all along the top from the caulking.
Please excuse the bad lighting in my closet.
To make things more awesome, all this caulking, nailing, and gluing had been done on unsealed drywall so there was absolutely nothing to keep it from taking giant chunks out of my wall.
Well that sucks.
I got a self-adhesive mesh patch to go over the worst spot (shown above) and a big tub of joint compound. The first coat is drying now. In all honesty I’m not being a perfectionist about it – it’s a closet. I used a 8″ wide putty knife to smooth the edges of the layers, and only plan on sanding after the final layer. Most of the closet should be OK with two, except for the huge gash which will need at least 3.
I hadn’t originally intended to paint the closet, because it’s a closet, but now I’ve got to prime and paint at least the patches. And it’s a small enough room that I can probably handle painting the whole thing. And while I’m at it, I’ll change the color to something nice, like the blue we used in the guest room:
We had our first free weekend in a while so we took some time to tackle stuff around the house.
First, we cleaned out the garage and washed the car! I don’t have a picture of that, because I am a bad blogger. Also, I was busy washing the car. Immediately after we finished washing it, a pop up thunderstorm drenched everything in water and we were very happy to have a garage.
Then we did our part for the economy and bought every household item imagineable from three different stores. Frames from Michaels, window blinds from Lowes, and everything else in the world from Target. Including this salad bowl, which we’re using to hold our surplus of tomatoes from this week’s CSA harvest.
If we get another 6 lbs of tomatoes this week, it’s going to make pasta sauce.
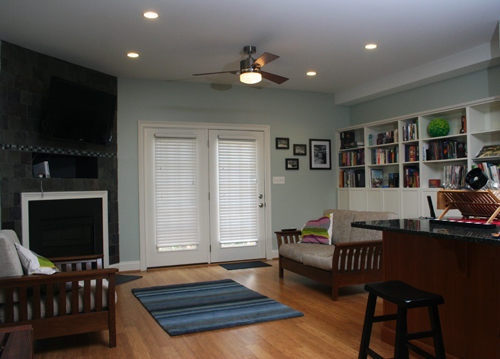
Then we hung blinds over the back faux-french doors. I call them faux-french because they look like french doors, but the “door” on the left is actually completely fixed in place. This was more of an ordeal that we expected, because the doors are hollow metal. But we made it work.
It’s surprising how much of an effect they have on the room. It feels much more like its own space now, rather than an auxiliary space between the kitchen and back yard. We also hung some photos up. After a decade each of living in apartments where we couldn’t really hang things on the walls (or were too lazy to) we’re finally putting up artwork. We even went through the trouble of having mats cut for some of the odd-shaped pieces! The next few weeks will be spent figuring out where everything goes. The reading room was the easiest because it only has one small section of wall.
We also spent some time working on the baby’s room, which is at least half done now. The big accomplishment was getting a room darkening shade up, so maybe one of these days she’ll be willing to sleep in past 6am. We can only hope.
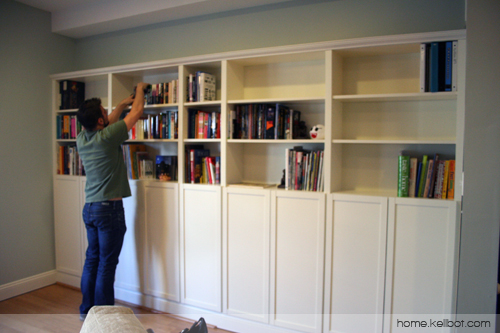
RevolvingDork and I have completed our first DIY home improvement project together: built in bookcases for our living room. It was only a little nerve wracking to coordinate on a project where neither of us really knew what we were doing.
We used Billy Bookcases, closely following the example from Centsational Girl’s blog. After trying a few different combinations we went with four full-width and one half-width bookcase. In between each bookcase is a strip of 1 11/16th inch moulding. We were able to pull up and reuse the floor moulding from the back wall (though as you can see in the photo above we need to get new quarter-round shoe moulding).
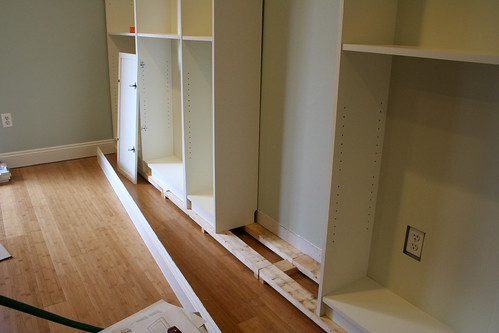
Our base moulding is pretty tall, and because we planned to install doors we needed to make sure the bottom edge of the lowest shelf was above the moulding. All together we needed to raise the bookshelves by 2 and a half inches. We built a frame out of two by fours, and nailed little wooden “feet” to the bottom to get things to the right height.
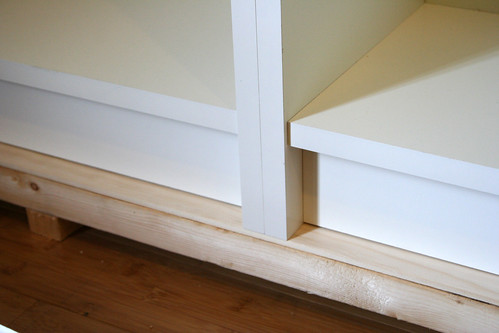
Like most houses, our walls and floor are not perfectly square so we had to fudge things a little bit to get them to line up. We used some scraps of the flat moulding as shims to convince the bookshelves to line up correctly. Conveniently, the crown moulding at the top hides any uneven edges between the bookcases. Once everything was in place we painted all the moulding to match the trim.
I’ve seen a lot of Billy build-ins, but none with doors. The doors weren’t quite as much of a problem as we’d expected; you can get away with up to 1/4″ thick moulding before you have to re-drill and reposition the mounting holes for the door hinges.
The bookcases themselves came in at $500 (more than half of which was the doors), and we spent about another $150 on wood, moulding, nails, etc. Despite being very crafty / hackery, neither of us is very handy so don’t have much in the way of spare lumber or hardware lying around. Thankfully we were able to borrow a compound miter saw from RD’s dad. We started the project on Wednesday and finished it Saturday morning, though it took longer than it needed to because we don’t have a car to easily get large things from the hardware store.
It may not be the most technically perfect bookshelf in the world (don’t look too closely at the mitered base moulding…) but we’re pretty proud of our first home improvement project. As a bonus, the living room is finally a livable space instead of a box maze.
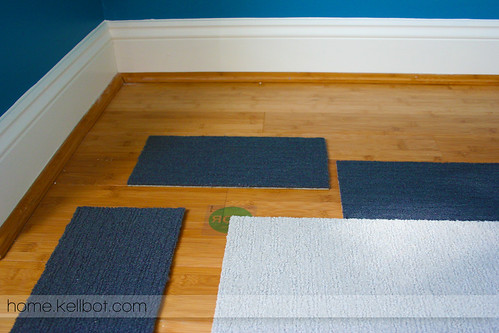
We used the Flor modular rug system in our TV room, which is made up of individual carpet squares you assemble yourself.
Each square is 20 by 20 inches. On the underside of each intersection is a small sticker which holds the pieces together. The rubbery backing on the carpet squares keep them from sliding around too much.
For the border pieces we cut the squares into thirds. To make the corners line up evenly we needed an extra 2/3 length border piece on the end of the border row.
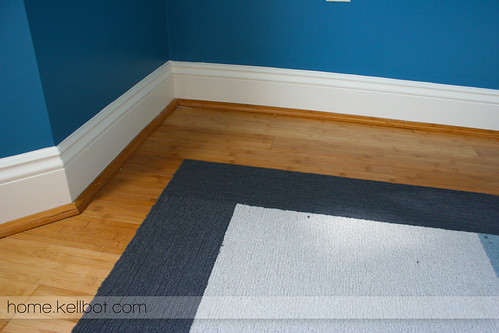
When it’s done you can’t tell that the pieces are separate, though there are a few “fuzzies” that need to be vacuumed up. My cuts weren’t quite as clean as the factory edges, so I turned the cut edge of each border piece in towards the center of the rug. The pieces with two cut edges were used at the back of the rug (shown above), which will eventually be covered by a couch so no one will see it.
Overall we’re happy with how it came out, and will likely use the Flor squares in a few other places.
I know I’ve been looking at home decor catalogs too much lately, because when I read this I laughed so hard I started hyperventilating. The latest post on Offbeat Home also resonates with me, since I use Pinterest to get ideas for organizing and end up just rolling my eyes at the same ridiculous styles that keep popping up. “[Frack] you, decorative typewriter,” indeed.
Now back to finding the perfect spot for my vintage sewing machine…
At last, the painting is done and the house is ready for us to move in! When people ask what color we painted, I say “all of them.” There were no less than 13 different colors used (though because I’m a creature of habit most of them were shades of blue, grey, or beige).
Unfortunately I don’t have great photos of all the different colors, because despite bringing all the rest of my camera stuff I somehow managed to leave the one lens I need at the old place. So the rest of the photos will have to wait until after we move this weekend. But I did manage to take a couple snapshots.
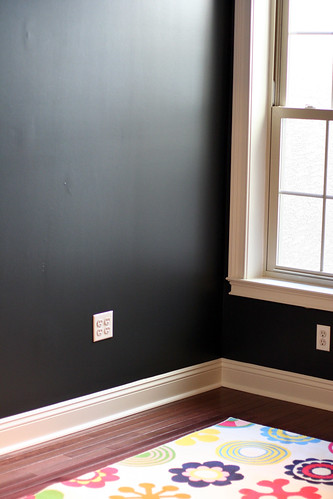
I really enjoy the looks on people’s faces when I say that we painted the nursery black. To be fair, it’s really a very dark slate grey (Sherwin Williams Iron Ore), but it looks pretty black. We’re pairing it with a lot of really bright furniture and decor.
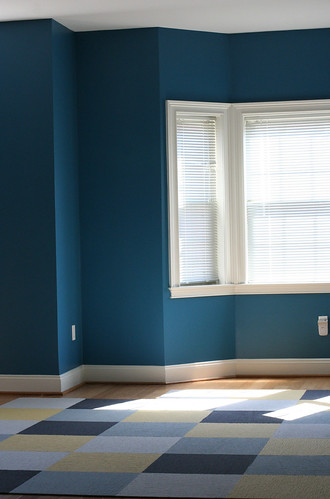
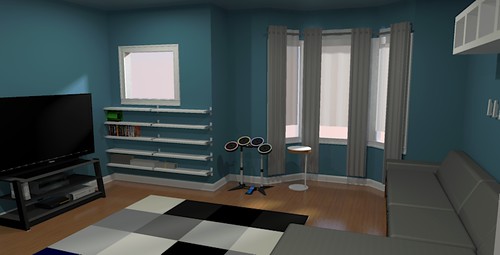
The media room, where our TV and games will go, is blue (Sherwin Williams Turkish Tile) except for one wall. A friend of ours who used to do TV installation said that blue walls make the colors of your TV look awful, so the TV wall is the same dark grey we used in the nursery. The carpet is made up of individual modular tiles, by Flor.
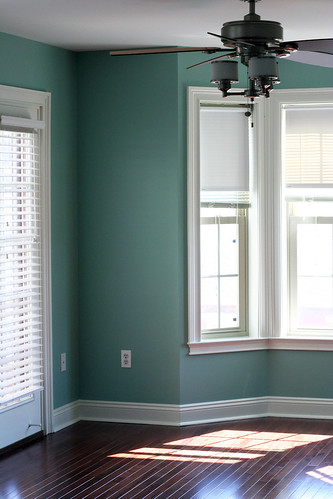
The front part of the master bedroom is a tealy sort of color. Sherwin Williams calls it “Hazel” but depending on the light it looks alternately blue or green.
The painter who did the work painted pretty much every paintable surface in the house, including all the trim and doors. It took about two weeks, but the house looks absolutely amazing. Should anyone be looking for a painter in Philadelphia I would definitely recommend him. After one more cleaning we’ll be all set to move in this weekend.
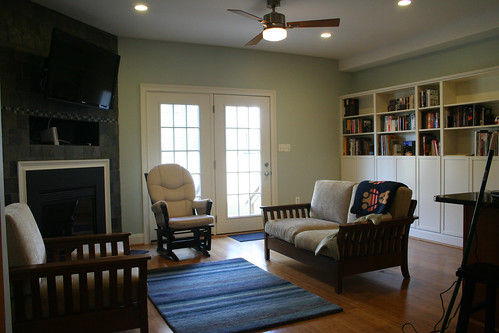
Now that the floors are in (photos forthcoming after the dust is gone) we can start picking out paint. Picking paint colors is hard. For the time being we’re just focusing on the main floor, which is an open floor plan with a kitchen in the middle and room for seating at either end.
On one end, nearest to the kitchen, we want to create a nice sitting area to chat / read, with built in bookcases. This area opens up to the back patio as well as the kitchen (which has decidedly contemporary cabinets), so we kept it pretty light and airy.
There’s also a fireplace surrounded by blue-green stone on one wall, which dramatically influenced what colors we could use. I got a few different swatch strips from the paint store and taped them all up next to the fireplace to see which hue matched the stone the best.
The chairs we chose in approximately the colors we chose.
Armed with our paint swatch and a sample of our flooring we headed to the furniture store, and spent maybe an hour comparing woods, stains, and upholstery until we got something that looked good together.
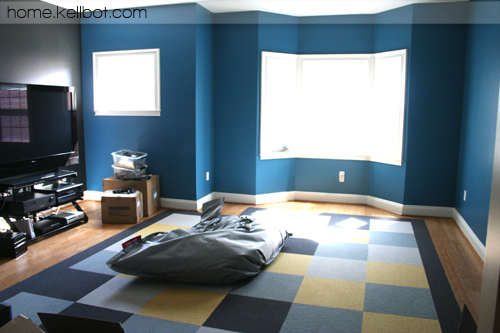
At the other end of the house is what we’ve been calling the “media room,” which is basically a shrine to our video game consoles. After keeping things pretty tame in the living room, we went a little nuts with color and opted for decidedly more modern furniture.
Sherwin Williams conveniently provides the approximate RGB values for their paints, and you can see some of the earlier color options on Flickr. After a ton of deliberation we had our color, and a vague idea of what it might look like. I got a sample quart of paint and painted swatches on each wall in the room, to make sure it was going to look right.
After picking out color for just two rooms I’m pretty sick of looking at paint swatches, so I doubt I’ll go quite as nuts with mockups and options for the bedrooms. We’re headed to Disney World next week, and I’m definitely looking forward to a week away from looking at home decor!