Crafting

Knitting Machine Teardown Part 2

After purchasing a fresh sponge bar for the Toyota K747 I started to put it through its paces. It knits stockinette beautifully, so I started working through the tuck stitches.

At first I couldn’t get the I and II buttons to stay in place at all. After some disassembly and a lot of oil, we got things moving again and it works great. But I quickly noticed that the 3rd needle selector wasn’t working. So I started to disassemble the machine to figure out why.

IMG_0289

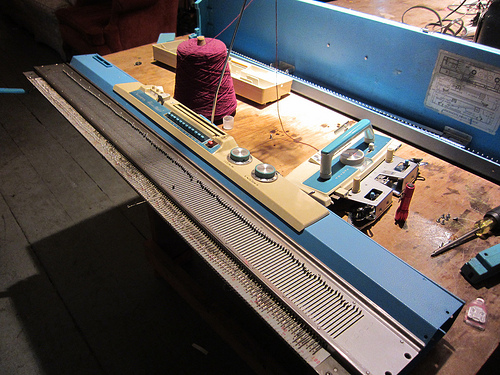
With the top cover off you can see some of the neat mechanisms in there. The zigzag gear (right) physically moves the needle selector up or down the needle bed. This means if you have a simple shifting pattern like a zigzag or checkerboard, you don’t need a punch card at all. You can just move the zigzag back and forth with each row.

Each of the blue needle selector levers rotates down to catch a small lever on the bottom of the machine. When these levers are caught, they cause the corresponding shafts (anyone know what these are really called?) to raise, which then push the needle butts forward. The small red lever releases the needle selectors.

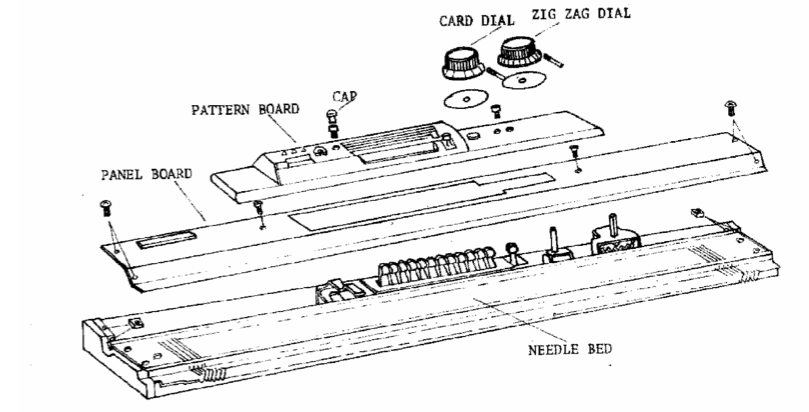
Getting into the machine was a little tricky, you have to remove the card and zigzag knobs to access all the screws. Thankfully there’s a useful diagram in the K747 service manual. With the knobs removed, you can see the discoloration of the plastic over the years.

IMG_0287

I had to fully remove the needle bed from the machine casing to get at the needle selector levers. Unfortunately by that time my hands were absolutely covered in grease so I couldn’t take many pictures. But once I got it out, I could flip it over and see the problem part:
Busted

The two little tangs on the bottom of the 3rd needle selector have somehow broken off, though I’m really not sure how. Unfortunately disassembly/repair of that part of the machine isn’t covered in the service manual. I see two options going forward: 1) I can carefully disassemble the needle selector mechanism, 3D print a replacement lever, and pray to God that I can get it all back together again, or 2) Fashion some replacement tangs with Sugru and hope they stay in place.

Since option 2 doesn’t require completely disassembling the machine, I’m going to try that first. There are a lot of little springs and I’m not sure I have the dexterity to get them all back in place again. I’d also like to better document the machine teardown, so sometime in the new year I’ll recruit an assistant and take apart / photograph the whole thing.

In the meantime the machine works great, and I can come up with plenty of patterns that avoid the 3rd needle selector.

Crafting

Toyota K747 Knitting Machine Instruction and Service Manuals

When I partially dismantled my K747 knitting machine I wasn’t able to clean it out much because I couldn’t get it completely opened up. I was thrilled to find a copy of the Service Manual as a free PDF, and can’t wait until I have a spare weekend to get in there are de-gunk it.

When I first got the machine, I had no idea what model it was. Thankfully the folks at Newton Knits did, and were able to guide me to the right replacement sponge bar and needles, as well as a copy of the instruction manual.

I’ve noticed that there are a ton of people selling PDFs of the scanned manuals, for a king’s ransom. One on eBay was $15 plus $4 shipping for a CD with the PDF on it. Mind you this is a PDF that the seller didn’t even author, they just scanned the book. Someone else holds the copyright.

I was able to find the instruction manual for the lace carriage as a free PDF, which led me to copies of the service manual and instruction manual for the machine itself. I’m making them available here for anyone who so desires them, free of charge.

Toyota K747 Instruction Manual
Toyota K747 Service Manual
Toyota K747 Lace Carriage Manual

If you have a different machine you need a manual for, check out this link. They list a huge number of free knitting machine manuals, many direct from the manufacturers.

Crafting

Knitting Machine Teardown

A few years ago I was given a Toyota K747 knitting machine, a gorgeous blue knitting machine that features a punchcard patterning system. It is by all counts a fascinating machine, and I was excited to receive a lace carriage for it today.

It’s been a while since I’ve devoted time to the knitting machine – they’re a bear to set up and take down so without somewhere to leave it set up all the time it can be daunting to use.

I noticed that one of the screws on the side wasn’t biting into anything, and decided to take the machine apart to figure out what was missing. I took out 6 screws on each end, and pulled off the end caps.

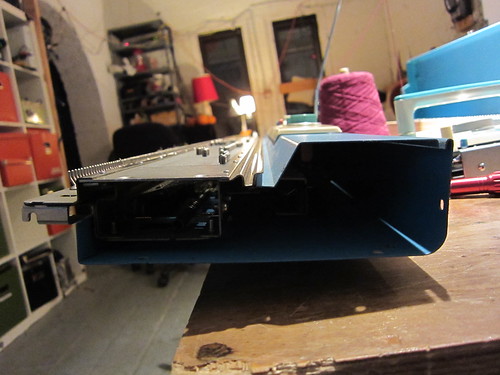
Side view

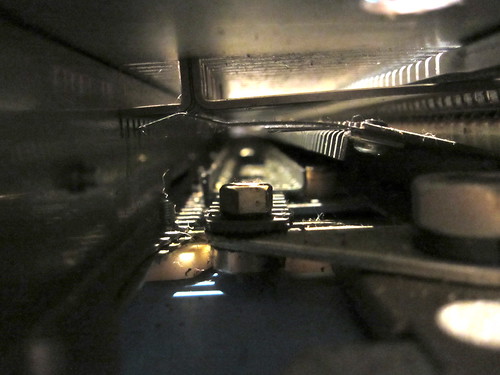
With the caps off I could stare into the dark abyss of needles and gears. I discovered it’s really challenging to take photos down a long, dark tube when using a point and shoot camera, so forgive the image quality of the following photos.

There are two “compartments” inside the machine, the front area which is all metal and has slots at the top for the needle tabs (called the needle butt) to stick out of, and the back which is mostly plastic where the needle butts rest. This is also where the patterning shafts (for lack of a better term) are located.

Here’s the front compartment, the front of the machine is to the left. If you have trouble seeing the needle tabs, click the image for an annotated version.

Front interior

Here’s the back. You can see there’s some greasy dusty areas. I’m not sure how to get in there to clean it. The needle shanks are pointing down to the “shafts”, which if you look closely you can see there are 12. The Toyota K747’s repeat is 12 stitches wide.

Rear interior

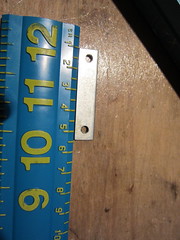
The missing part in question is a small rectangular nut which slides into the end cap. I’m really hoping this is something I can source rather than having to mill/tap one myself. Any suggestions for shortcuts are appreciated.

Mysterious nut

Aside from the missing nut, the machine is in great shape, and the nut isn’t super crucial to the machine’s operation. My next step is to find a scale version of one of the punch cards so I can cut some out on the laser cutter. I found a few places that claim to sell punch cards for it but none of them had them in stock.

Cooking

Muffin Tin Pancakes

My Pinterest stream is mostly home decor and food. When I saw the photo for these mini german pancakes, I knew they had to be mine.

Photo by Laura of RealMomKitchen

I skipped the orange zest, for lack of an orange, but otherwise made the recipe as written. I used a nonstick muffin pan, but greased it anyway for maximum nonstickness.

The pancakes puffed up in the oven, but I knew it wouldn’t last.

Minipancakes_oven

30 seconds out of the heat, the pancakes began slowly collapsing like the Ottoman empire. They actually did a little dance as they deflated and settled back into the muffin cups. It’s possible I did not blend the butter well enough, because each pancake has a little pool of melted butter sitting in the middle. What a delicious problem.

Minipancakes_cooling

The recipe in the original blog post uses a homemade triple berry compote. Delicious as that sounds, I only have the energy for one cooking adventure in the morning. Instead we used store-bought pastry filling. That’s right, call the food blog police.

Minipancakes_filling

As with most of my cooking adventures, they didn’t come out nearly as picturesque as the ones in the recipe photo. I’d like to take this opportunity to blame the lighting, and not my cooking. In a fit of cleaning up I finally removed the stand flash from the living room, so light was a bit hard to come by.

Minipancakes_done

They came out pretty tasty, though in my zeal for getting out all the lumps of flour I managed to over beat the eggs pretty significantly. This made things a little more rubbery than I prefer. The pie filling was a little sweet for my tastes, so next time I’ll just slice up some banana to put on them.

Etsy

Etsy Sellers: Spamming Blogs is a Waste of Your Time

Two and a half years ago (!) I wrote an article on how to improve your Etsy shop. It’s by far the most popular article on my blog, and as of this writing has 256* comments. I’ve noticed a particularly sad trend: Etsy sellers commenting with simply a link to their Etsy shop.

Photo credit freezelight


Comment spam is not at all unique to Etsy sellers, I get 20+ spam comments every day. Most of them are caught by the spam filters. But most of them are also from spambots – automated scripts that seek out popular blog platforms and spray comment spam wherever they can.

But the Etsy spam seems to come from mostly humans, which means that there are people who think that tediously copy-pasting their link onto blogs is the most effective use of their time to market their shop. This couldn’t be further from the truth, and the idea that someone is sinking hours of their life into this is just heartbreaking.

There are a number of reasons why comment linkspam isn’t an effective way to drive traffic to your shop. Frankly, no one is likely to see it. Very few people are going to click a link in a comment, and the chances of converting them into a sale is minimal. The return on the investment of your time just isn’t worth it.

A lot of people are under the mistaken assumption that planting links to their Etsy store all over the web will improve their positioning in search results. This is called Search Engine Optimization. But nearly all modern blog platforms are wise to this practice, and tag outgoing links in comments as “nofollow.” This tag tells search engines that they should not consider the link trusted, and not to give any SEO benefits to it.

I think part of the problem is that a number of sources, including Etsy itself, have promoted blogging as a means of driving marketing. And there are a lot of ways in which this is true. But comment spam isn’t one of them. A lot of marketing is about building a story behind your products. For the hour you spend copy/pasting your shop address all over the internet, you’d be much better off writing a story about your creative process or background and asking relevant blogs if they’d be interested in featuring it.

Comment spam feels “free” because there isn’t a cash investment involved, but ultimately your time is worth something. And for what you’re spending (time) versus what you’re getting back (nothing), comment spam is possibly one of the most expensive things you can do.

* Omg 256 comments! What a great number. That’s 2^8, which any nerd knows is a very important number!

Gaming, Software

Getting XBMC to work with our Xbox 360 Wireless Controller

This is part two of our home theater PC adventure. If you’ve just arrived you may want to start with part 1, Hello Xbox 360 Wireless Gaming Receiver.

Hooray, Windows can finally see the controller. We fire up the control panel tool for gaming devices and confirm that all buttons and axes work. We’re just about there! XBMC even helpfully includes keymappings for the xbox controller by default! We should be pretty much plug-and-play from here! I open up XBMC and…. nothing. The controller does nothing. I smash all the buttons, and still nothing.

The first step in debugging is to open up the log file and see what’s going on. The log file starts fresh every time you boot XBMC, and if you’re lucky you’ll see a line like this shoved in there:

19:00:17 T:2904 M:876916736 NOTICE: Enabled Joystick: Controller (XBOX 360 For Windows)

This means that XBMC can see the controller. It also tells us that it thinks the controller is named “Controller (XBOX 360 For Windows)” and depending on your OS and a few other seemingly random factors, it may be named something different.

This name is critically important, because it’s how XBMC knows which keymapping profile to pick up. When I went into the XBMC system/keymappings folder and looked at the existing 360 controller profiles, none of them was an exact name match. So I copied one of them and pasted it into the user keymappings folder.

The next step is to go into our copy and replace with or whatever your system thinks it’s called. That node pops up a bunch so you’ll probably want to use find+replace rather than manually copying and pasting all the time.

I’m not sure exactly what happened, at some point while I was messing around with all of this I managed to un-pair the controller from the PC without realizing it. After much cursing and whining, “why doesn’t it woooooork,” I realized what had happened and rebooted things.
Once I had renamed the joystick and it was actually communicating with the PC, I fired up XBMC and something magical happened: both the A and B buttons were functioning as Select and Back, respectively. Hooray! And the right analog stick was working as a volume control (though the axis was inverted). Not much else seemed to do anything, but IT WAS WORKING. Hooray!

The next task was getting the D-pad to work for navigating menus. Let me take this time to say that like most people who grew up with Nintendo controllers, the d-pad on the Xbox 360 controller is a source of scorn and hatred. But I wasn’t quite ready to tackle the analog stick, so the d-pad would have to do.

At this point I turned on debugging in XBMC and then proceeded to methodically press every button on the controller (and swivel each stick axis) exactly once. This worked great for the buttons but none of the axis data showed up in the debugger at all. Great. The keymap xml file I copied incorrectly identified the d-pad as “buttons” when it is in fact a “hat” according to Windows, so once I replaced the “button” nodes with “hat” nodes I was able to map the directions on the d-pad to Up/Down/Left/Right commands.

I should mention that I spent a lot of time googling about my problem, and mostly found forum threads where one person said “my xbox controller doesn’t work” and another person said “use xpadder,” or someone says “the d-pad doesn’t seem to work” and again the reply is “use xpadder.” After reading that response in about 20 threads, I was really starting to think the whole system was just too bugged to be viable. But in reality, people on the xbmc forums just aren’t willing to get their hands dirty.

Only in the process of writing up this post did I find someone who had actually taken the time to map out which buttons, hats, and axes where which. I wish I had found that post last night, it would have saved me about two hours.

I’m still deciding what the analog sticks should do, and trying to figure out how to get the controller to turn off when I’m done, but we got things to the point where it was good enough to navigate around to Dexter, and that was enough for one night. And I will say, navigating with the Xbox controller feels nice, much nicer than breaking out the clunky keyboard.

Hacking

Controlling our Home Theater PC with a wireless 360 Controller

We recently set up Xbox Media Center (XBMC) on the computer that’s attached to the TV. XBMC actually has nothing to do with xbox – it was a homebrew media center application for the original xbox that has since been ported to Windows/Linux/Mac/iOS.

We’re pretty close to what we feel is the “perfect” setup, but getting here was a headache and a half so I’m putting up a series of posts documenting our journey.

Part 1:  Hello Xbox 360 Wireless Gaming Receiver
Part 2: Getting XBMC to work with our Xbox 360 Wireless Controller

Hello Xbox 360 Wireless Gaming Receiver

We’re currently using a wireless keyboard/mouse combo with our media PC, which is clunky and sort of a pain to use. I started looking into media center remotes. We also have a collection of wireless 360 controllers, and only very rarely use all four at once. And so my mission began.

Microsoft did at one point make a wireless 360 controller receiver for the PC, a little white dongle that plugs in to a USB port. Unfortunately, they discontinued it some time ago. You can still find the receiver bundled with a controller some places, but I had a hard time finding an OEM standalone receiver.

Fortunately, the Chinese knock-offs on eBay are still readily available. I got one for $13 including shipping, it’s a little white wireless dongle with a USB cable. Unsurprisingly, it did not include a driver disk. Equally unsurprisingly, Windows had no idea what it was when we plugged it in.

We downloaded the official Microsoft drivers for the official dongle. You can find them here: http://www.microsoft.com/hardware/en-us/downloads , click under the gaming heading.

Our media PC is running Windows XP. Everyone else seemed to have a perfectly fine time installing the drivers by hand. I guess we’re just unlucky, but the damned thing just wouldn’t install.

Turns out, we had the same problem this guy had: the dongle wasn’t identifying itself correctly, and thus Windows didn’t recognize that it belonged to the driver.

The fix involves editing the driver’s .ini file, which sounds a lot scarier than it is. Here are the steps I took:

Step 1: Find your errant dongle in the hardware manager.

  1. Go to your Control Panel
  2. Click on Hardware and Sound
  3. Click on Device Manager under Devices and Printers
  4. Scroll down the list to Other devices
  5. Double-click the Unknown device. If you have multiple unknown devices, you may need to use the process of elimination to figure out which one it is.

Step 2: Find out your device’s PID

  1. Click on the Details tab
  2. Look for something like this USB\VID_045E&PID_0291&REV_0107
  3. The bit you’re looking for is PID_0291, or whatever number is in the place of 0291
  4. If the number you see is 0719, you have a different problem than I did. Sorry.

Step 3: Edit the driver .ini file to reflect the actual PID

  1. Figure out where the driver installed itself (probably somewhere within c:/program files) and open that folder
  2. Open up Xusb21.inf in Notepad or your favorite text editor
  3. Find and replace any instances of ‘Pid_0719’ with ‘Pid_0291’ or whatever your device’s number is
  4. Save the file

Now if you’re lucky, you can run through the update driver dialog, point it at the folder containing xusb21.ini, and Windows will recognize the device as a Wireless Xbox 360 Receiver. Hooray! You are now halfway to tv-controller bliss.

On to the next part, getting the stupid thing to work with XBMC.

Personal

Amit Gupta Needs You

Amit Gupta, friend of a friend and the founder of Photo Jojo, was diagnosed with leukemia and needs a bone buy levitra canada marrow transplant. Unfortunately, because South Asians (think India, Afghanistan, East Africa) are under represented in the national bone marrow registry his odds of finding a match are only one in 20,000.

Amit is using the power of his social connections to hold bone marrow donor registrations all over the country, in search of “brown bones,” i.e. minority registrations. People of any ethnicity are of course welcome to register but people of color are most desperately needed.

Unlike some events, which only help the high-profile person lucky enough to have such a network, these bone marrow drives will help anyone who matches with a potential donor. So your registration helps bring up the odds for all people in your ethnic group, not just the ones with a big twitter following. And I think that’s huge.

Registration is free, though if you can afford a $100 donation to cover the cost of processing it’s always appreciated. It takes less than 5 minutes – you swab your cheek and drop the kit in the mail. You can also go to any of the registration drives around the country. Should you match, the donation process is similar to a blood draw – “painless but boring.”

And just in case you needed motivation to register sooner rather than later, Seth Godin is offering a $10,000 bounty on some matching bone marrow.

Crafting

Showing off some knitting

I’ve been doing too much work-coding to really get into hacking lately, but I have gotten back into knitting. It’s nice for long bus rides and commutes.

Here’s some of what I’ve been working on lately:

Entrelac Hat
A festive entrelac hat. It’s neat because it looks like many different yarns, but in fact there’s just one continuous strand throughout the whole hat.

Snowflake Fingerless Gloves
Fingerless gloves. This was my first real attempt at fair isle color work, and it was a lot easier than I thought it would be.

Baby Booties
Baby booties for a friend’s baby

I also printed some yarn bobbins on our makerbot, to make it easier to manage yarn for intarsia:
Yarn bobbin


You can find details about each project, including the free patterns they’re made from, on my Ravelry page (warning: account required, but it’s free).

Cooking

Haphazard Pulled Pork of Deliciousness

Yesterday I made pulled pork in our crock pot. Since it was pouring outside, I wasn’t willing to walk to the big grocery store. As such, any ingredients I needed had to be available at our local corner store (minus the pork itself, which had been hanging out in our freezer for months).

It was delicious, and while I don’t have an exact recipe, I’ll describe the process so you can throw whatever’s in your house in and have something equally delicious. I didn’t take photos because it just looked like shredded meat.

You will need:

  • 4 – 6 pound pork butt. Which actually comes from the shoulder. It’s cheap. You should be able to get it for around $1.25 per pound. Less if it’s approaching the sell-by date.
  • Crock pot. It needs to be big enough to fit the pork butt.
  • An onion
  • A clove of garlic or two
  • A bottle of BBQ sauce
  • Various spices. Whatever you have around is probably fine.

Step 1:

Thaw the pork butt in the microwave, or overnight in the fridge if you’re better at planning than I am.

Step 1.5:

While the pork is thawing, coarsely chop up the onion and garlic. Throw them in the crock pot haphazardly.

In a medium sized bowl, mix together equal parts of the following various spices, making substitutions for anything you have / don’t have / like / don’t like.

  • Salt
  • Ground black pepper
  • Sugar
  • Brown sugar
  • Cumin
  • Tumeric
  • Chili Powder
  • Garlic Powder
  • Paprika

I used 2 tablespoons of each for an 8.5 lb chunk of meat, though I added some extra paprika because it smelled so nice. I also used curry powder instead of chilli powder/tumeric because I didn’t have either of those.

Alternately, you can used a pre-made BBQ rub, but they didn’t sell that at my corner store.

Step 2:

Take your thawed pork butt and rub the spice mix all over it. Place the pork butt in the crock pot on top of the onions/garlic, and go ahead and dump the rest of the rub in there.

Step 3:

Fill the crock pot about 2/3 with water, or stock if that’s how you roll.

Step 4:

Cook 6+ hours on high or 10+ hours on low. If you have a temperature probe, make sure the interior of the meat gets up to at least 145 degrees F. The longer it cooks, the easier the next step will be.

Step 5:

Once you’re tired of waiting, turn off the crock pot. If you’re lucky, the meat will be so tender it will slide off the bone and you can pull the bone out easily, and then use tongs to move the chunks of meat into a bowl. If you’re like me, the meat will hang onto the bone for dear life and you’ll have to figure out how the hell to lift an 8.5 pound roast out of a vat of boiling water and fat.

I ended up using a measuring cup to scoop off some of the liquid, cut some of the bigger chunks off the bone, and then move the whole thing into another bowl where I could hack at it for a little while.

Step 6: After liberating the bone and meat, get rid of all the inedible bits like the skin, bone, and fat. Discard them along with the onions and garlic, who valiantly gave up their lives for your pork. Pour off most of the water/fat broth, leaving about half an inch in the bottom of the crock pot.

Step 7: Return the meat to the crock pot and shred it using two forks. By the time you’re done, it should suck up the remaining broth and be deliciously juicy.

Step 8: Dump the bottle of BBQ sauce in there. Mix it up.

Tada! You now have pulled pork! Eat on a sandwich, or just straight up.