New Construction Townhome

Fix All The Things

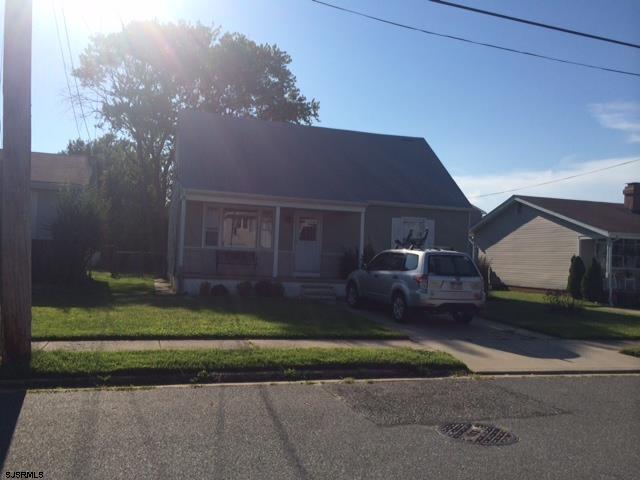
Inspection was last week. Man, 40 year old houses sure to have a lot of shit wrong with them. This is really the first time I’ve had to deal with most of this stuff. The places I lived in college were post-civil-war era shit holes slowly collapsing into the earth, but I was renting so I didn’t care.

Aside from the usual working/parenting thing, my spring will be spent coordinating or DIYing a whole bunch of household stuff. I can’t tell you how AMAZEBALLS it will be to have access to the place next door (my in-laws’) so I can retreat to the peace and quiet of somewhere that is not a construction zone.

In some ways it feels completely ridiculous to even start listing this stuff given that we haven’t closed yet. But I’d really like to get the major stuff done in time to enjoy the house this summer. So we’re getting quotes now in order to hit the ground running at closing. We close in 3 weeks and that feels forever away but is actually super fast given that we just put the offer in at the beginning of this month. Part of me is still thinking I’m jumping the gun, all “don’t count your chickens before they hatch,” but I don’t think “bracing for what could be thousands of dollars in repairs” is the same as chicken-counting.

Hello kitchen. I can't wait to destroy you.
Hello kitchen. I can’t wait to destroy you.

First, contractor stuff. I.e. stuff I am nowhere near insane enough to even think of trying to do myself

  • New heat pump. We could theoretically get the old one fixed maybe, but I can’t imagine any situation in which it’s worth it to fix a 15 year old heat pump. The energy savings alone make a new more efficient one worth the money.
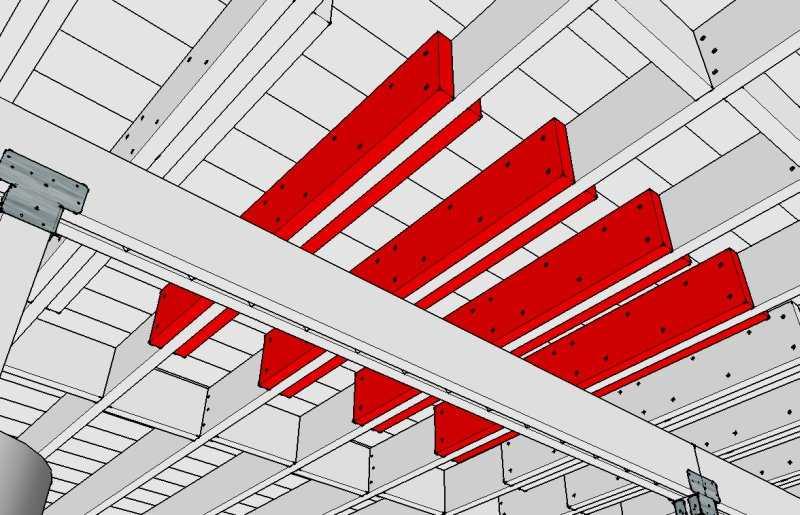
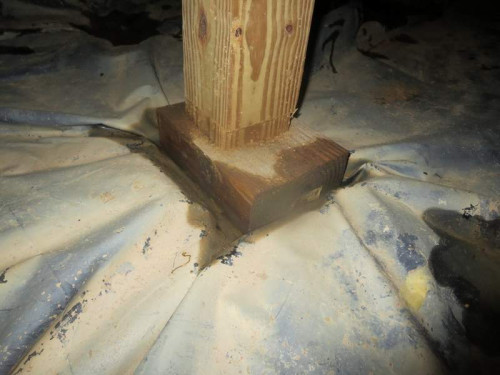
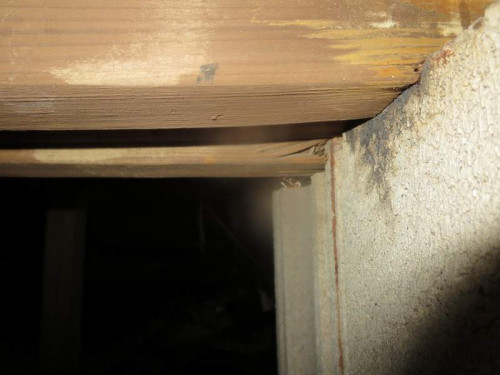
  • Structural stuff. Yeah that seems rather important.
  • Exterior grading. The slope of the land is towards the house, which is kind of awful if it rains.
  • Engineered flood vents. These will help keep the underside of the house from rotting, which seems like a good thing.
  • Replacing an oversized circuit breaker. Easy but not something I want to DIY.
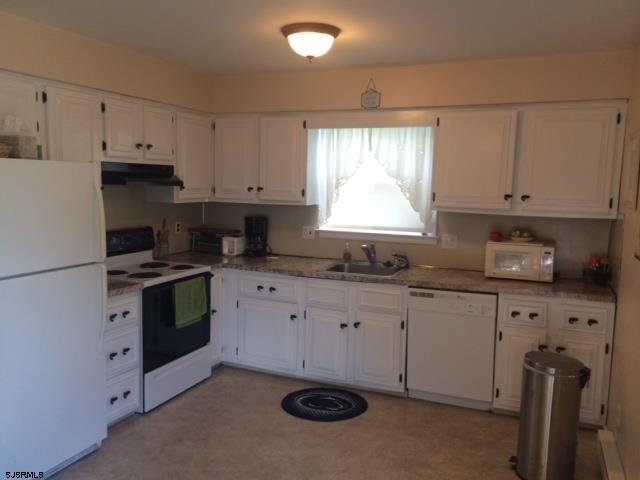
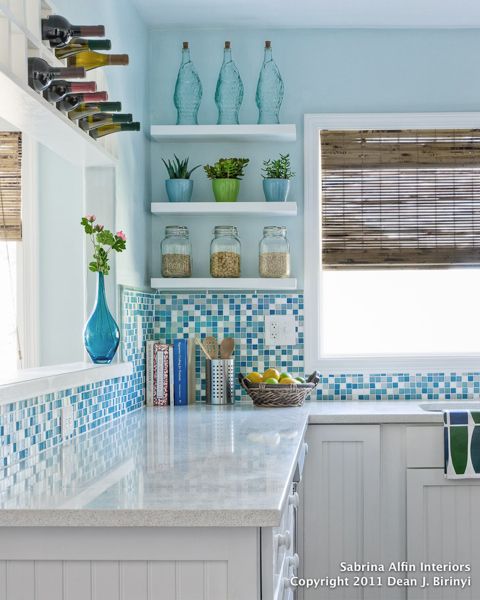
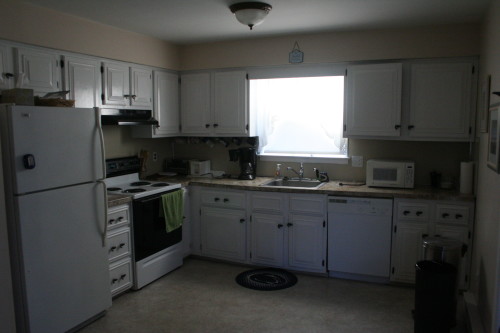
  • New countertops in the kitchen. Goodbye laminate.

Second, DIY stuff. Little things I can do myself. Or big things I can foolishly do myself.

  • New kitchen/laundry room floors. I want to do wood but vinyl plank is probably more practical.
  • New kitchen cabinets

Next, Stuff I’m on the fence about. Aka stuff I could do but don’t want to.

  • Painting. Painting sucks, y’all. It really really sucks.
  • Replacing the not-grounded outlets with GFIs. I can do this myself easily, but we might spring to actually have the outlets grounded.
  • Carpet cleaning. I mean I can rent a steam cleaner from the grocery store but I feel like a pro would do a better job?

Last, stuff that will have to be done in the not so distant future. This stuff isn’t on the agenda for omgrightnow, but it was all earmarked as “aging, budget for a replacement” by the inspector.

  • Roof replacement. Yeah, that’s gonna suck. Here’s hoping the current roof hangs on a few more years. But at this point we need to at least have someone come eyeball it once a year. I don’t want to find out the hard way when the roof fails.
  • Water heater replacement. Now accepting arguments for/against tankless water heaters.

We’ve got until Saturday to decide how to approach this with the seller. Obviously a lot of this stuff is “nice to have” and therefore not something we’d bring up with them. But the structural stuff, grading, and flood vents are definitely things that need to be done sooner rather than later. Fingers crossed the negotiations go OK and we can get a credit towards fixing it.

1970s Shore Home

Structural Stuff

One of the things that came up during the shore house home inspection was some cracking along the foundation. Foundation cracks are not an unusual part of settling, but these were bigger than usual. About 3/8″ wide and running all the way through to the crawlspace under the house.

This crack could be nothing, or it could be bad news

We called in a structural engineer to look at it and should hear back next week.

Additionally, some support beams under the house weren’t properly footed. These beams were clearly added later to mitigate some problems (not uncommon given how old the house is and how soft the ground is on the island) but they should have been set into poured concrete footings.

Water + wood + house = bad news long term

Lastly one of the joists is rotting. This is not surprising that the house isn’t properly vented underneath. It needs to be “sistered,” wherein they add new lumber on either side of the bad spot in order to shore it up.

Here’s the rotting support beam:

Bad news bears
Bad news bears

And here’s a diagram that shows what they do to fix it:

An illustration of some sistered joists

So yeah. While this stuff is a little terrifying now that I’ve written it all out, it’s not super uncommon for a home this old. Overall the structure is in good shape. When we get quotes back from the contractors we’ll approach the seller for a credit towards fixing this stuff. I’d probably be panicking right now except we’ve seen much, much worse.

Still, fingers crossed that everything comes back OK from the structural engineer!

New Construction Townhome

A Shore House in a Flood Zone

Let me start by saying that I never really wanted a beach house. I’ve been in enough hurricanes that the idea of owning property near the beach is more terrifying than alluring. Super Storm Sandy ravaged the New Jersey coast in 2013, bringing flood waters near or above what FEMA defines as the “100 year flood” level. While many businesses have bounced back, condemned houses and drawn-out reconstruction efforts still dot the neighborhoods along the Jersey shore.

So naturally, that’s where we’re buying a vacation house.

Our family vacations at the Jersey shore each summer and as we’ve grown the sleeping arrangements have become increasingly cramped. On weekends we pile six adults, two toddlers, and two dogs into my father-in-law’s 1,000 square foot house. When the next door neighbor’s house came on the market last year we joked about buying. The longer it sat on the market the more we eyed it up. In January the sellers dropped the price considerably, and we decided it was time to think about it more seriously.

Our Maybe House
Won’t You Be My Neighbor


The house got through Sandy mostly unscathed, and after checking it out we decided to put in an offer. We had the inspection this week and while there’s some stuff we need to follow up on, nothing was too horrible. That said, it’s a 40 year old house. It has a bunch of stuff that’s at the end of its lifespan, including the roof. But it’s all in decent shape right now, so we can spread the costs out over the next few years.

The flood risk is a non-trivial consideration in all of this. The house is built below “base flood elevation” or BFE. BFE is the “hundred year flood” level, or the expected flood level in the “one percent chance” flood. I don’t really like the term “hundred year flood” because it falsely implies that such a flood only happens every hundred years or so. But the distribution is not necessarily even. Every year there’s a 1% chance of such a flood, regardless of what happened the year before. This means that over a 30 year period (the length of most mortgages) there’s about a 26% chance of having a “hundred year flood.” Never mind any effects climate change might have on flood / sea levels. But I digress.

I mean, it's not the worst.
I mean, it’s not the worst.

One thing I am VERY excited about with the house is the chance to put in a new kitchen. The one that’s there now is original to the house, and it’s pretty sad. A fresh coat of paint made it look tolerable for the real estate photos, but in person it is a very tired kitchen. IKEA just released a new line of cabinets sooooooooo… yeah. This is happening. I’m going to DIY as much as I can, like assembling the cabinets and putting down a wood floor, and hire professionals for things like the electrical (duh) and maybe painting (I fucking hate painting).

This is the direction I'm heading in
This is the direction I’m heading in

At this point we’re getting a few more estimates from contractors. There’s some foundation cracking that could be nothing or could be significant and we need to find out which (and get a credit from the seller if it needs fixing). I’m filling up a Pinterest board with kitchen photos, and doing boring things like getting insurance quotes, but other than that we’re just waiting for closing. If all goes to plan we’ll get the keys in mid March, get contractors in there this spring to fix the big stuff, and maaaaaaaaaaaybe have the kitchen done by summer. Maybe. We’ll see.

Crafting

Toddler shirts as far as the eye can see

Last month I decided it was finally time to learn to use the serger I’ve been borrowing from a friend. Toddler shirts are a great starting point because they’re simple, cheap, and still have a few challenging elements.

I made all of these these using the Titchy Threads Rowan Tee pattern, which can be purchased online and printed on a home printer. The pattern includes a bunch of different sleeve and neckline options that you can mix and match.

The first one I did, below, I used my normal sewing machine and a zigzag stitch. It came out great.

This is her "Cheese" face
Shirt #1, long sleeve with shoulder stripe. This is her “Cheese” face

Next was a short sleeved shirt with stripes. I tried to match up the stripes at the shoulder but completely misunderstood how the sleeves attached. So they don’t line up after all. Oh well.

Rowan tee sewn by Kellbot
Tee shirt #2, this time with short sleeves and no shoulder stripe

The third one I made from a thrifted shirt. While serging the sleeve to the body, I managed to bunch up the fabric and some of the body fabric got caught in the knife. It’s not super noticeable, but still frustrating.

Shirt #3 from a thrifted adult tee. I didn't even attempt to line up the pattern.
Shirt #3 from a thrifted adult tee. I didn’t even attempt to line up the pattern.

My final shirt was a hooded long sleeve with a kangaroo pouch. The shirt itself went great, but I had a lot of trouble sewing the curves of the hood. It shifted around and came out off center. Next time I’ll baste it in place first.

Shirt #4 with the hood up

I’m really glad I took the time to get used to the serger. The knife was super intimidating at first, and I still leave it down sometimes, but I love not having to trim my seams afterwards. I even started using the serger to finish the seam allowance of stuff I do on my sewing machine. The toddler loves  her new shirts so I’m sure I’ll be making a bunch more soon.

Crafting

Stash Knitdown 2015

Depending on who you ask I either have a lot of yarn, or a totally reasonable amount of yarn. I have enough yarn to take up 6 “cubes” of an Ikea Expedit bookshelf. Like many knitters I have been slowly accumulating yarn over the years and it’s time to work on actually knitting what’s in my collection instead of buying more every time I see a pattern I like.2014-04-26 13.34.38

For 2015 I’m following “one in two out” meaning I have to knit TWO balls of yarn for each ball I buy. This goal has a nice bonus of getting me started early on my Christmas knitting. The downside is I can’t share many pictures of the stuff I’m making. I’ll use this post to keep track of my progress throughout the year. I’m hoping to use up 50 balls of yarn from my stash!

Progress: 50 of 50 balls used up, 12 skeins given away, 30 skeins purchased.

Completed projects:

2014-01-11 14.50.37
Christmas Present #1. This yarn was leftover from a hat I made for Chris in 2013. I used up one complete ball and about half of the 2nd. 1 ball used
Christmas Present #2. I got this yarn in high school. I am 30. It's time to use it. I've got two balls of it and I've picked a pattern that will hopefully use them both.
Christmas Present #2. I got this yarn in high school. I am 30. It’s time to use it. I’ve got two balls of it and I’ve picked a pattern that will hopefully use them both. 3 balls used
Christmas Present #3: 4 balls used up.
Winter Hat:  New yarn purchase! 4 balls used up.
z
Machine Knit Gloves. The blue was a random ball in my stash, and the grey was something I got for another since-abandoned project. 1 ball used.
Christmas Project #3. This is a super ambitious colorwork project. 3
Christmas Project #3. I got a bunch of this yarn in different colors for colorwork. 1 ball used.
No photo yet: Christmas Project #4 I don't have a photo of the yarn, it's yarn that I reclaimed from a thrift store sweater.  4 balls used so far.
Ripple scarf. Reclaimed yarn from another project. 4 balls used.
Christmas Project #5. 1 ball used.
Dish Towel. Some dish cotton that I don’t think I ever actually had plans for. 1 ball used.
Coin purses. I've had this ball of ribbon yarn I never knew what to do with and finally settled on coin purses. 1 ball used.
Coin purses. I’ve had this ball of ribbon yarn I never knew what to do with and finally settled on coin purses. 1 ball used.
Cardigan for Leona
Cardigan for Leona. Matches one I made myself a couple years ago. 2 balls used.
Clapotis Shawl. This is literally one of the most popular patterns in the world. 1 ball.

No photo yet: Cotton Throw
I’d meant to use this yarn for a dress before realizing that worsted weight cotton is a terrible choice for a garment. 15 used.

Cable knit sweater for my nephew. 1 ball used.
Cable knit sweater for my nephew. 2 balls used.

No photo yet: Magz Bias Scarf. 1 ball used.

No photo yet: Christening Dress. 2 balls used.

In progress projects:

Ripple bedspread. Leona is due to upgrade from a crib to a bed, and I plan to make her this to celebrate. 5 used so far

2015-08-23 21.58.24
Pom Poms. It turns out making pom poms is an excellent preschooler activity. I used up some odds n’ ends!   5 balls used so far.
Family, Personal

What I learned seeing Walt Disney World in a wheelchair

My 10k run at Disney World went really well. Unfortunately the run + all the walking after really aggravated my plantar fasciitis and I ended up unable to walk well by the last two days of the trip. I rented a wheelchair from the parks ($10/day) and learned the following:

  • Disney wheelchairs are not in great shape. The second one we got was OK but the first one veered so heavily to the left that it was nearly impossible for me to push straight by myself.
  • Disney wheelchairs are not designed to be powered by the occupant. Yes, they have those big wheels so you can in theory wheel yourself around. In practice this is nearly impossible for more than a few feet. First, the chairs are entirely too wide. I felt like a gorilla reaching out for the wheels. Second, the handlebars in the back (so someone can push you) get in the way of anything resembling a smooth motion.
  • Having to rely on someone else to push you around is frustrating no matter how much you love them and how awesome they are.
  • If you try to push yourself and can’t keep up with a walking pace, people will give you annoyed looks for being in their way
  • It’s nice having a drink holder if you’re going Around the World at Epcot

None of this was even remotely surprising to me as I have heard it all before from friends with disabilities, but it was still interesting/aggravating to experience first hand. I was reminded of an article I read last year called “how to illustrate wheelchairs.” It explains that the chairs you see in the hospital, and Disney World, aren’t the sort of things anyone would use regularly to get around.

Something like this is more what I would have wanted to use, but obviously that’s not what the average Disney wheelchair renter wants. I was curious if any of the off-site rental companies offered something a little more maneuverable. While some of them offered narrower chairs, they were all hospital-style.

It looks like the popular option for most people who want independence is an ECV (aka scooter). The expense and size of those made them pretty unappealing to me – getting one from park to park on the buses is routine but it takes a little while to secure/unload. It would have been a lot to deal with while travelling with a toddler.  They also just seem a lot less nimble than a chair. I could spin around in place in the wheelchair, which is handy when you’re watching your kid zoom around a playground.

There’s so much walking necessary in Disney World that even minor mobility obstacles can become big ones. Now that I’m home I’m getting around just fine – as long as I stay off my foot most of the day it doesn’t bother me. But at Disney I was on my feet 8-10 hours per day and it hurt. I’m guessing there are a significant number of people who decide mid-trip that they can’t deal with the walking anymore.

Lastly: no I did not get to go to the front of lines (nor did I ask to). Aside from the fact that I was absolutely capable of waiting in line like everyone else, Disney has recently(ish) changed their policies due to rampant abuse. Now instead of going to the front of a line Disability Access Service Card holders get a fastpass-like service allowing them to pass their wait time somewhere more comfortable.

Exercise, Hacking

Disney Marathon Weekend Corral Analysis

This is my third set of race stats from the 2015 Walt Disney World Marathon Weekend. If you find this interesting you might want to see my scatter plots of all finishers and histograms of finishing times.

Thanks to some help from my friend Will and someone on StackOverflow I’m finally able to run stats by corral.

Let’s start with the Half Marathon and Full Marathon. Those had the same number of corrals (16) whereas the 10K only had 6.

I started by calculating the median finishing time per corral. I was surprised to see that the last corral had a slightly faster median than the one before it. I suspect that this is because people without a previous qualifying time were put in the last corral, so folks who are more serious runners who are running their first Half Marathon might have been stuck back there. There was also a huge group of A runners who came in dead last, I expect these were course sweepers or other specifically paced volunteers.

Pace is in minutes per mile.

Half Marathon Full Marathon
Corral Median Time Pace # Runners Median Time Pace # Runners
A 1:42:26 7:49 508 3:38:53 8:21 519
B 1:47:07 8:11 336 3:41:49 8:27 373
C 1:56:18 8:52 656 3:58:14 9:05 704
D 2:02:47 9:22 722 4:10:45 9:34 758
E 2:06:45 9:40 755 4:24:55 10:06 767
F 2:15:03 10:18 1148 4:39:07 10:39 1138
G 2:19:49 10:40 1217 4:46:08 10:55 1223
H 2:28:57 11:22 1244 5:04:03 11:36 1172
I 2:36:08 11:55 1583 5:17:01 12:06 1518
J 2:44:10 12:31 1770 5:33:52 12:44 1737
K 2:53:51 13:16 1743 5:50:05 13:21 1613
L 3:02:28 13:55 1952 6:09:21 14:05 1948
M 3:06:32 14:14 1679 6:22:16 14:35 1509
N 3:11:19 14:36 2064 6:40:29 15:17 1704
O 3:13:17 14:45 1942 6:31:38 14:56 1440
P 2:54:27 13:19 2781 5:46:36 13:13 1864

I thought it was interesting how close the median pace for each corral, despite the full marathon being twice as long. This poorly labeled graph shows the median pace for each heat. The heats have numbers instead of letters because I am not good at matplotlib.pyplot

halffullpace


Next we have a boxplot of finishing times grouped by heat.

Full Marathon finishing times by heat
Half marathon finishing times by heat

From this we can see that there are quite a few runners in heats 0-9 (corrals A through I) who should have been in a slower heat. Those in the slowest 25% of each heat came in later than the median of the next slowest heat. The runners outside the caps are outliers, meaning the algorithm decided those runners statistically did not belong in that heat. Even if we ignore heat A, which has a bunch of pace teams in it, there are clearly a bunch of people who were a bit optimistic with their corral placement. Likewise we see folks in the back corrals who will hopefully get better placement next time.

I had a little trouble breaking the heats out on the 10K (not sure what’s up with 4 and 7, those shouldn’t be there) but you can get the general idea. Corrals ABCDEF are heats 0 1 2 3 5 6 8 respectively.


Ten K time by corral

Looking at these graphs I can gauge whether my friends and family were in an appropriate corral or not.

Chris: in corral B/1 for the half, finished in 1:47. Seems spot on.
Kate: in corral J/9 for the half, finished in 2:33. Also looks right.
Lorena: in corral P/15 for the half as she didn’t have a prior qualifying time. Finished in 2:03. E would have been more appropriate.
Matt: in corral O for the full. Finished in 4:29. E or F would have been more appropriate.
Dustyn: in corral D for the 10k. Finished in 1:03. B  would have been more appropriate.
Me: In corral E for the 10k. Finished in 1:04. B would have been more appropriate.

So why does any of this even matter?

I believe strongly that running should be for everyone. I don’t really understand the people who run long distance race at a 16:00 pace, but it’s still an accomplishment. That said if you run for time it is extremely frustrating to get placed in a late corral and have to dodge walkers during the race. Likewise I’m sure it’s frustrating to have fast runners diving in front of you if you’re walking in the back of the pack. Appropriate corral placement is key to everyone enjoying themselves.

Based on this I suggest the following:

  • If you run for time, make sure you run a qualifying race (if needed) ahead of time so you can get into an appropriate corral. If your race lets you self-report your expected time, give yourself some credit. When I signed up for the race I was running at a 12 minute pace, but was closer to a 10 by the time I finished training.
  • If you don’t run for time, be honest. Don’t submit a time that puts you in the B corral if you have no intention of running that time.
  • If you’re a new runner and want to run a friendly race where you won’t come in dead last, run a Disney race. Even if you do come in dead last, you’ll have plenty of company.

Before I wrap this up I have one more graph to show: a comparison of the finishing times at the Disney 10K vs the Philly 10k. I ran both, and came in about 6 minutes faster in the Disney 10k. Philly is purple, Disney is blue, and the dots are me. There were a different number of runners in the two races so I scaled them to match. The x axis shows place/total*100, which may or may not be the same as a percentile I’m not sure. I don’t think it is.

Kelly_PhillyvsDisney

Conclusion: Disney races are slower than my local race. A time that puts you in the top 1/3rd at Disney has you in the bottom 1/3rd in Philly.

I’m about stats’d out, but the data is on github if anyone wants to play with it themselves. You’ll need to edit the scripts to work on your system, I just chucked them into git so they have file paths for my filesystem in them (and now you can all see that I run Windows).

Exercise, Hacking

Scatter Plots!

So my stats / python skills haven’t greatly improved in the last 48 hours, but I did manage to find some fun new ways of displaying the data I already have from the 2015 Walt Disney World Marathon Weekend.

I’m trying to break up the racers into their heats (aka corrals) and while I’m having trouble doing that in a way that Python can “see” I found that a scatter plot makes it really obvious to the human eye what the corrals are.

On the X axis I graphed start time and on the Y I graphed net finishing time.

Here’s the Disney World 10k with its 6 corrals

tenk_scatter

The full and the half, each with 16

half_scatter
full_scatter

And by comparison, the Philly 10k which technically had corrals but didn’t make much effort to space them out

Philly_scatter

You’ll notice in the Disney races have the widest range of times in the first corral. Some of this is probably people overestimating themselves (particularly for the 10k which doesn’t verify qualifying times) but I believe a fair number of them are race volunteers / staff who are maintaining a particular pace to warn people who are about to be swept. From what I’ve read there are folks who place little warning flags on the mile markers to let people know they’re in danger of falling behind the required 16 minute pace.

Exercise, Hacking

Disney World Marathon Weekend Results Histograms

Four of my family members and three of my friends ran races during the Walt Disney World Marathon Weekend this past week(end). Three of us felt correctly placed in our starting corrals,  three of us felt the race was more of an obstacle course of slow-moving people. I started wondering about race stats and while I’m still sorting through them (and brushing off my rusty python skills) I did manage to come up with some fun histograms.

10kHistogram

First we have the 10k, which was my race. I finished in 1:03:58, or about 64 minutes. Since I haven’t figured out how to control the labels on my graphs they’re just listed in minutes. My time, which is not a particularly exciting time to most runners, is surprisingly early in the graph. There’s also an interesting jump at 90 minutes. Keep in mind these are net times, not clock times, so even folks who started late but ran fast should be competitive here.

Half_Histogram

Next is the half marathon. There’s an interesting drop at 3 hours. The pace cutoff for all the races was 16:00 (and wasn’t strongly enforced) which would be a 3:30 half marathon. I’m not sure what caused the huge drop at 3 hours.Full_histogramLast we have the full marathon – 26.2 miles. I’m actually surprised there isn’t a longer tail on this graph given how many folks were walking and otherwise going slowly. I’d love to compare the shape of the histogram to other more serious runs, but those don’t have such easy-to-scrape data so it may be a while.

I’ll post more on the stats process as I work on them, but it may be a while since I’m on vacation (woo!)

Edit: Here’s the histogram for the Philly 10k in September. It’s a very different shape (and was also a much smaller race)

south_philly10k

Cooking, Recipes

Goat Cheese and Spinach Quinoa in the rice cooker

We’re in that awkward stretch of time before vacation where you still need to eat but don’t want to buy any more groceries. I didn’t want to order in since we’ll be eating out so much on vacation, so I improvised from what was lying around the fridge. It came out pretty good!

I've heard that food photos look best in natural light. I'll let you know when I start cooking dinner during the day.
I’ve heard that food photos look best in natural light. I’ll let you know when I start cooking dinner during the day.

Ingredients:

1 cup dry quinoa
2 cups water
1/2 tsp dried sage
1/2 tsp dried basil
1/2 tsp salt (or to taste)
4oz goat cheese
3 cups fresh spinach
2 tbsp chia seeds

Instructions:

Add quinoa, water, sage, basil, and salt to rice cooker and start. After about 10 minutes when it’s steaming thoroughly, or when the countdown timer says 10 minutes if you’ve got a digital rice cooker, add the goat cheese, spinach, and chia seeds. Let steam in the rice cooker another 10 minutes. Stir and serve.

For the record, my husband thought it was “bland” so you might want to add more seasonings. If anyone tries it let me know!