Hacking

Customizing Buddypress / bbPress notification emails

We’re spinning up another buddypress community at work and need to customize many of the outgoing emails. This can be done via filters but is kind of tedious and doesn’t make it easy for non-devs to update the messages later. I found a plugin called Welcome Pack which provides a fairly straightforward interface for customizing some of the Budddypress emails, and have started extending it to encompass all of the outgoing mail we need control over (bbpress, wp core emails).

screenshot-local.wordpress.dev 2014-11-11 16-12-55

Ideally I’d like to add an Admin interface to link up new filter hooks, but for now I’ve just got a filter function you can use in your theme or plugin. It’s very much a work in progress, right now I’m doing a lot of refactoring to make things a little better suited to our use case. I think by the time it’s done it will save us a significant amount of time that I used to spend hunting down and editing email templates.

You can view my fork of the project on github. If this is a project anyone else is interested in, let me know!

Gaming, Hacking, Programming

Animating build progress on a Minecraft server

My Minecraft server is seeing some use again, and I decided to build a life size model of the Philadelphia Museum of Art. I also thought it would be cool to have an animated gif of the build progress as things go.

2014-10-15

Configuring Overviewer

We use Minecraft Overviewer to generate Google-maps style views of our world for the web. I created a config file limiting the render area to the coordinates around the building

worlds["Main"] = "/minecraft/Minecraft/world"

renders["normalrender"] = {
        "world": "Main",
        "title": "Overworld",
        "dimension": "overworld",
        "crop" : (200, -90, 420, 70),
}
outputdir="/minecraft/renders/museum"

Compositing the tiles
I found a script for making composites from google map data, originally written for use with Overviewer, but it was pretty far out of date and written for a different version of python than what I’ve got installed. I used it as a jumping off point for writing my own composite script.

#!/usr/bin/env python

import Image, ImageChops

import os, fnmatch
import os.path
import re

import sys

CHUNK_SIZE = 384

def trim(im):
    bg = Image.new(im.mode, im.size, im.getpixel((0,0)))
    diff = ImageChops.difference(im, bg)
    diff = ImageChops.add(diff, diff, 2.0, -100)
    bbox = diff.getbbox()
    if bbox:
        return im.crop(bbox)

def find_files(directory, pattern):
    regex = re.compile(pattern)
    for root, dirs, files in os.walk(directory):
        for basename in files:
            if regex.match(basename):
                filename = os.path.join(root, basename)
                yield filename

def getAllFiles(srcdir):
  return find_files(srcdir,  "[0-9]+.png")

def getCoordinates(f):
  return map(lambda x: int(x), re.findall(r'[0-9-]+', f))

def getX(c):
  return {
    0: 0,
    1: 1,
    2: 0,
    3: 1,
  }[c]

def getY(c):
  return {
    0:0,
    1:0,
    2:1,
    3:1,
  }[c]

if len(sys.argv) != 4:
  print "Usage:", sys.argv[0], "<source directory (Dir)> <output file> <zoom level>"
  sys.exit(1)

sourceDirectory = sys.argv[1]
zoomLevel = int(sys.argv[3])
outputName = sys.argv[2]

width = (2**zoomLevel)  * CHUNK_SIZE
height = (2**zoomLevel)  * CHUNK_SIZE
print "Width:", width, "Height:", height

output = Image.new("RGBA", (width, height))

for f in getAllFiles(sourceDirectory):
  coords = getCoordinates(f)
  if len(coords) == zoomLevel:
    chunk = Image.open(os.path.join(sourceDirectory, f))
    #print chunk
    xbin = ""
    ybin = ""
    for c in coords:
      xbin = xbin + str(getX(c))
      ybin = ybin + str(getY(c))
    y = int(ybin,2)
    x = int(xbin,2)
    output.paste(chunk, (x*CHUNK_SIZE, y*CHUNK_SIZE))

print "Map merged, saving..."

output = trim(output)

if outputName[-3:] == "jpg" or outputName[-4:] == "jpeg":
  output.save(outputName, quality=100)
else:
  try:
    output.save(outputName, quality=85, progressive=True, optimize=True)
  except:
    print "Error saving with progressive=True and optimize=True, trying normally..."
    output.save(outputName, quality=85)

print "Done!"

This generates a daily snapshot and puts it in a web-accessible folder. I can then make a gif of all the images in that folder with ImageMagick’s convert utility
convert -delay 80 -loop 0 *jpg animated.gif

Checking for modifications
Originally I ran the script once daily on a cron, but later decided to run the world generator every half hour and only generate an image if there’s something new to see.

#!/bin/bash

rendersecs=$(expr `date +%s` - `stat -c %Y /minecraft/renders/museum/normalrender/3/`)
snapsecs=$(expr `date +%s` - `stat -c %Y /minecraft/renders/museum/last-snapshot`)
if [ "$rendersecs" -lt "$snapsecs" ]; then
  echo "Render was modified $rendersecs secs ago. Last snapshot $snapsecs secondds ago. Updating snapshot."
  /minecraft/renders/merge.py /minecraft/renders/museum /var/www/html/museum/$(date +\%Y-\%m-\%d-\%H\%M).jpg 3
  touch -m /minecraft/renders/museum/last-snapshot
  convert -delay 40 -loop 0 /var/www/html/museum/*jpg /var/www/html/museum/animated.gif
fi

Setting up cron tasks
I put two new jobs in my crontab file: one to generate the terrain and one to run my shell script. I give Overviewer a bit of a head start in case it has a lot of work to do.

*/30 *  * * *  overviewer.py --conifg=/minecraft/overviewer-museum.conf
10,40 *  * * *  /minecraft/update-museum.sh
Hacking, Programming

SSH Woes with Vagrant, Windows, and AWS

Dumping this here in case anyone has a similar problem.

I was trying to use Vagrant to spin up dev boxes on aws. Every time I got to the rysnc part of my day, I got the error “Warning: Unprotected Private Key File, this private key will be ignored.”

I googled a bunch and got a lot of really unhelpful answers, mostly dealing with UNIX-like environments. I also tried messing with the Windows file permissions. Fail all around. Here’s how I finally solved it:

Step 1: Install Cygwin Terminal. Find private key and look at it

$ ls -la
drwxrwx---+ 1 kellb_000      None      0 Jun 25 12:51 .
drwxrwx---+ 1 Administrators SYSTEM    0 Jun 25 13:11 ..
-rw-rw----+ 1 kellb_000      None   1696 Jun 25 12:50 Vagrant.pem

Step 2: Chmod file to something more restrictive.

$ chmod 400 Vagrant.pem
$ ls -la
drwxrwx---+ 1 kellb_000      None      0 Jun 25 12:51 .
drwxrwx---+ 1 Administrators SYSTEM    0 Jun 25 13:11 ..
-r--r-----+ 1 kellb_000      None   1696 Jun 25 12:50 Vagrant.pem

Gee that’s odd, that gave it 440, not the 400 I asked for. Oh, hm, it doesn’t have a group. That’s odd. Let’s give it one and try again.

$ chgrp SYSTEM Vagrant.pem
$ chmod 400 Vagrant.pem
drwxrwx---+ 1 kellb_000      None      0 Jun 25 12:51 .
drwxrwx---+ 1 Administrators SYSTEM    0 Jun 25 13:11 ..
-r--------+ 1 kellb_000      SYSTEM 1696 Jun 25 12:50 Vagrant.pem

Much better. I then tried bringing up the vagrant box, and success! At least, until it failed for entirely unrelated reasons. Hooray.

Crafting, Hacking

Project Blinkenpants

Inspired by my friends’ work with the Brooklyn Ballet I decided to make some blinky pants for my student performance with the Philadelphia School of Circus Arts. The idea was to create pants that “twinkled” in time with movement.

Costumes for aerial silks have some very specific requirements. Outfits must be skin tight as any loose fabric can get easily caught. They need to be made of fairly strong fabric to withstand the silks (which are really nylon) rubbing against them. And of course I need a full range of movement, nothing stiff or restricting.

Running Leggings
Test pants, with stripes!

My first attempt was to hand-sew conductive thread into a pair of store bought running tights. This failed for three reasons:

  • The conductive thread, sewing with a running stitch, kept shorting out when I sweat
  • Having an electrical short across your leg means you’re being mildly electrocuted
  • Because the thread doesn’t stretch at all three of my lines snapped the first time I tried to climb and invert

The next idea was to machine stitch the conductive thread in a zig-zag. Since I only have a standard free-arm sewing machine this meant I would have to make my own pants from scratch.

After 2 different patterns and 5 different pairs of test tights I had something I liked the fabric and fit of. I went with Fehr Trade’s PB Jam Leggings and JoAnn Fabrics’ Sew Classic Spandex. The PB Jam pattern runs a little small compared to what I’m used to, I’m a US size 6 and I found the XS size was the best fit for me.

The best way I found to deal with the conductive thread was to couch it to the pants fabric using a zigzag stitch. I sewed the side seams of each pant leg and then drew on all the traces. One by one I very tediously sewed the conductive thread onto the pants, leaving a long tail at each end for hand sewing the electrical components in place.

The circuit itself is very basic. There is a PWM twinkle sequence which starts off a new twinkle every half-second. For the sake of simplicity I only wired up one axis of the accelerometer, and tried to trigger a twinkle every time it detected movement. Unfortunately I never really got it working right, it was always too sensitive or not sensitive enough. I ended up pulling it out of the design. One less thing to deal with.

2014-04-22 17.13.33

There were a few spots where it was impossible not to cross wires. Since conductive thread isn’t insulated I had to use a small scrap of fabric to make a little bridge for the wire to safely cross over.

Once I had the leads roughed in I stitched the front, back, and leg inseams. I confess I didn’t hem the bottoms, but I should have. From there I began the joyously tedious task of sewing in the LEDs and Lilypad. Each connection was secured with a lot of Fray-Check.

2014-04-22 22.03.34

2014-04-24 14.29.29The LilyPad Arduino is sewn to the inside of the waistline, front and center, along with the power board. This was a poor choice of placement, because I can’t actually reach it with a leotard on over it. Turning on my pants was not a graceful endeavor. The whole thing is powered by a tiny 300 mAh battery which I just tucked into my underwear.

The first time I tried on the pants it was obvious they were extremely prone to shorting out. I took fabric paint to the most obvious offenders, scotch taped down a few more spots, but ultimately had to accept that without completely insulating the wires it was just going to be part of the game. Future versions of these tights will use flexible insulated wire rather than conductive thread. Either that or casing the conductive thread inside some bias tape piping.

Because of the hard life these pants would lead I needed to wear a pair of footless tights on top of them. This protected them (sort of) against abrasion from the silks.

Here’s a video of the pants with some maroon tights worn over them.

Despite the tendency to short out, they held up pretty well in performance. Not perfect, but enough that people could get the idea.

Below is a video of my act, the music is a mashup by PomDeter.

Overall I’m pretty happy with how they turned out, but looking forward to improving upon the design in the next version.

Software

Integrating Github Issues with Pivotal Tracker

Over on offbeatempire.com we’re using GitHub’s issue tracking as a means for the staff to submit bugs and feature requests. But after years of using Pivotal Tracker, I found GitHub’s issue management to be a little wanting.

Thanks to rich APIs from both GitHub and Pivotal there are many third party integrations written between the two. So many that picking one to use became a task by itself.

After reviewing 5 or so I went with Pivothub, on account of the fact that it was a) recently updated and b) would run in an environment I could set up easily (heroku). I also really like that when a Github-linked story is accepted in Pivotal it’s link on GitHub is closed too.

Since Heroku is a read-only filesystem and I didn’t want to commit my config file to the repository, I forked Pivothub and changed it around to use Heroku’s environmental config variables.

It works pretty well, though some tighter integration wouldn’t be amiss. Right now if a closed issue is repoened via github, it doesn’t come back into Pivotal. The original author isn’t really using Pivotal much these days so any additional features are ones I’ll have to add myself.

Crafting, Software

Computational Art with Processing

Snapshots of a project I’m working on currently in Processing. I wanted to create drooping clusters of non overlapping circles, kind of like a grape bunch.

circles1
Non overlapping circles generated in a tree-like hierarchy

A random number of smaller child circles are spawned from the parent circle, at random angles from the parent. The spawning function is run recursively until the circles are 20 pixels or less in diameter.

circles2
Colorful clusters of circles

Each circle cluster or bunch is randomly assigned a color. The colorspace is in HSV and the hues are limited to greens, blues, and purples. The value (brightness) of the color is dimmed 10% each for generation of circles.

Each time a circle is generated, it’s spawned somewhere on the lower half of it’s parent, and then rotated around the circle until it no longer overlaps with any other circles. If it makes it all the way around without founding a valid place to be, it’s deleted.

circles3
Sketchy clusters of circles

A Processing library called HandyRenderer gives everything a more sketchy look. But the clusters weren’t droopy enough. So I modified the script to send the circle rotating back the other way if it rises above the center point of its parent. If it reaches the other side without finding a spot, it’s deleted.

Now more droopy!

Now to start working on the “tree” that supports them.
tree2

I put together a slimmed down version (no sketchy rendering) for the web. You can play with it here if you’re so inclined.

Hacking

Adding Live TV to XBMC

It started simply enough. “I would like to watch the olympics on our main television.” After about an hour of cursing at the tv we gave up and contented ourselves to watch the olympics in the kitchen.

We get our TV signal over cable. Although we don’t have a cable TV subscription the broadcast channels are sent unencrypted over the cable line. This works great on our newer Sony TV. It turns out it doesn’t work at all on our older Pioneer TV. After much research I discovered that the Pioneer has an NTSC and ATSC tuner (analog and digital over the air), but not a QAM tuner (cable without a cable box).

The simple solution would be to plug a set of rabbit ears into the Pioneer and call it a day. We probably even have some in the basement. Those of you who know me know that the simple solution is never, ever, the one I go for.

Enter the Hauppauge 2250. Oh yes, we’re adding live tv to our media PC.

DVR / Live TV functionality is experimental in XBMC. It was originally planned for Eden (version 11), but got pushed back to Frodo (verson 12). It’s under active development, and arguably useable, so I decided to go for it.  After 3 days and a ton of reading, I have it more or less working. If that’s not a ringing endorsement, what is?

The latest PVR builds of XBMC are meant to work as front ends to one of a handful of backend “TV servers,” software which will handle the nitty gritty of managing the TV tuner card. This can be either in the same machine as XBMC or on a separate one. For now I’m working locally. I chose MediaPortal as the backend because it runs on Windows and has a reasonably active community.

Step 1 was to install the card and see if I could get it to even come up in Windows Media Center. And it did! The setup wizard found 10 channels on the QAM tuner. A number of channels, including NBC and CBS, were missing. After about an hour of poking at it I decided to move on to my ultimate target, MediaPortal.

MediaPortal has two main parts: the TV Server and the client frontend. The client frontend is another media center program, which I ignored. The TV server runs as a service under windows, and is more or less invisible once you’ve got it running. It’s managed with its own configuration tool separate from the MediaPortal frontend.

With the TV server installed and running, step 2 was to scan for channels. This took about half an hour, and found hundreds of channels – many of which were encrypted. I deleted all the encrypted channels (marked with a red T). This left me with about 100 channels. Many of these were data channels (which gave an error when I tried to preview them) or otherwise uninteresting, so I deleted those as well. The remaining 40ish channels included broadcast and cable public access stations.

Step 3 was to identify each station and get scheduling data. The broadcast stations self-identified, but the call signs they used were sometimes opaque. WHYYDT is pretty obviously the local PBS affiliate, but it took me a fair amount of googling to figure out that RT is the station formerly known as RussiaToday, and is offered by local independent station WYBE.

Step 4! Armed with a list of call signs for each station, I started creating a grabber file for MediaPortal’s WebEPG plugin. In theory, listing data is sent along with the signal and can be picked up by the tuner, but I didn’t have any luck with that. WebEPG lets you get listing data via the internet. I copied the IMDB grabber included with the plugin and added a listing for each station in the following format:

<Channel id=”RT” siteId=”WYBEDT2″ />

The Site ID is generally the station’s call sign, with DT added to the HD digital feeds. Subchannels (e.g. 10.2) usually have a trailing number. So our local NBC affiliate, WCAU, can be found at WCAUDT and its substation NBC Nonstop can be found at WCAUDT2. You can double-check to make sure you’ve got the right ID by going to http://www.imdb.com/tvgrid/2012-08-01/WCAUDT/, replacing WCAUDT with the call sign of your choice. You should see the schedule for that station.

Lastly, I needed to install a plugin for MediaPortal that will allow XBMC to communicate with it called TVServerXBMC.

Whew! That concludes the MediaPortal set up, now on to XBMC!

In order to play with the PVR stuff you need to install one of the experimental PVR builds. I went with Margro’s build which includes the MediaPortal add-on. Setup in XBMC is fairly straightforward: enable the add on and a new option for Live TV shows up in XBMC. Assuming everything’s been set up correctly in MediaPortal your TV stations and listing data will be populated and there you have it: Live TV in XBMC.

There are a few bugs in my set up, which I assume are a combination of errors in my confguration, bugs in the still-under-development software, and features which have yet to be implemented. These include:

  • Deinterlacing problems on some (but not all) HD channels. This is most visible at the edges of moving objects on screen.
  • XBMC/MediaPortal only using one of the two available tuners (meaning I can’t watch one thing while recording another)
  • Visual glitches in XBMC, like text overlapping itself
  • Occasional trouble tuning stations, which is resolved by trying another station and then coming back
  • Occasional video stutter
  • Live TV can be paused/resumed, but not rewound / fast-forwarded

It’s still a work in progress, but it’s getting there! In theory one TV backend can serve all the XBMC frontend clients on the network, so getting that up in running is one of my next steps along with ironing out some of the configuration problems.


Software

Domestic Adventures: Cat 6 Ethernet and Daily Calendars

Things have been quieter over here lately, but busy on Kellbot’s Domestic Adventures, the part of my blog dedicated to home and personal posts. It’s a little tricky to balance what goes where, so for overlap posts I’ll provide a summary. If you’re not reading it, here’s some of what you’ve missed:

Wiring for Cat 6 Ethernet

It’s been a little  tricky to balance what posts go where, especially when they’re home improvement hacks. The second post in the series about our home network is now up!

A script to generate a daily chore calendar

Cleaning Calendar

Because I’m a slob, I have to have a daily check list every day to tell me to clean up. I converted an old page-a-day calendar into a daily chore checklist, with help from Ruby and ImageMagick.


Hacking

Our Overkill Home Network

This past week my dad came up from Virginia to help us install high speed ethernet lines throughout the whole house. Not only will this make it easy to set up multiple wireless access points for better coverage, it will also provide a high speed backbone for data throughout the house. In addition to bringing the internet connection to each room, the wired local network (LAN) will allow us to stream high quality video and audio throughout the house.

Why hard wire for ethernet?

Setting up a wired LAN in your house is somewhat unusual, because most people do just fine with a wireless connection. But it does offer some distinct advantages over an exclusively wireless network:

Faster network speeds and lower latency

We wired our house for gigabit ethernet (1000Base-T) which has a maximum speed of 1000 Mbit/sec –  about  20 times faster than what most people will get on a wireless network (54 Mbit/sec). This won’t do anything for your internet speeds, which are limited by your ISP (Comcast, Verizon, etc) at rates generally much slower than even a wireless network, but it will allow fast data transfer within the house which is useful for  shared file servers and streaming media to other devices in the house.

Latency is a measure of how long it takes for a packet of data to reach its destination. It’s different than bandwidth and matters more for live communication (online games, chat) than for downloads. Wired networks have considerably lower latency than wireless networks.

More reliable connection

Wifi signals are radio waves, which are subject to degradation for a number of reasons. Poorly shielded devices, such as microwaves and cordless phones, often cause interference with wifi connections. Other wifi networks in the area are also a source of interference, and in dense residential areas finding an available channel can be difficult. Even the layout / construction of your house plays a role in how radio waves travel.

Free up the wifi network for wifi-only devices

Wifi routers, particularly the inexpensive home models, tend to get saturated when there are too many devices connected. By taking our desktops and set top boxes off the wireless network there will be more wireless bandwidth for devices that can’t use a wired connection.

Why not wire for ethernet?

If a hard wired LAN is so awesome, why doesn’t everyone have one?

Cost 

Even if you do everything yourself the cost of wire, jacks, patch panels, and faceplates adds up (~$5 per jack + $100 per thousand feet of cable). You’ll also need a few special tools to terminate and test the wires, which can be an expensive investment for a one-time project. Then there’s also the issue of what’s managing the whole network. At the minimum you’ll need a network switch ($20 – $150 depending on size) and router (a home wifi router will do just fine). And few nerds can content themselves with just the minimum – we opted for a half-sized server rack full of various components.

Hassle of installation

No matter what shape your house is in, adding a LAN to an existing home will involve punching some holes in the wall. Depending on how your house was constructed, running wire can range from a mild hassle to a total nightmare. Some homes may be laid out in a way that makes running wires inside the walls impossible. If you’re not too concerned about looks and have a smaller home, you can run wires along the baseboards (they’re very low voltage so getting shocked isn’t an issue), but likely you’ll still need a few holes to get them all over to a central location.

My parents have an unfinished basement and reasonably accessible attic space, so running wires through their home was fairly simple. Our house has insulation inside even the interior walls, and no attic to speak of, making running wires a huge hassle that involved punching many holes in the drywall and fishing the wire out with a long cable.

Lack of flexibility

Unlike a wireless connection, your wired ethernet is stuck where you put it. If you decide later you’d like your computer to be on the other side of the room, you’ve got to run a long cable across. For this reason we’ll have both wired and wireless networks in the house. Multiple wifi access points plugged into the wired network will ensure the whole house has good wifi coverage.

 Our Network Setup

NetworkDiagram
If wiring a house for ethernet is unusual, our network setup is downright excessive. But if you’re going to put the time and energy into wiring, you might as well go all the way, right?

Our internet comes into the house courtesy of Comcast and is managed by a mid-range  Buffalo consumer router. Originally we had planned to run a dedicated Smoothwall server, but our collection of old dead computer hardware was a little more old and dead than we were hoping. The Buffalo router runs an Open Source firmware called DD-WRT, which lets us do some advanced network management.  Two 24 port network switches are plugged into the router.

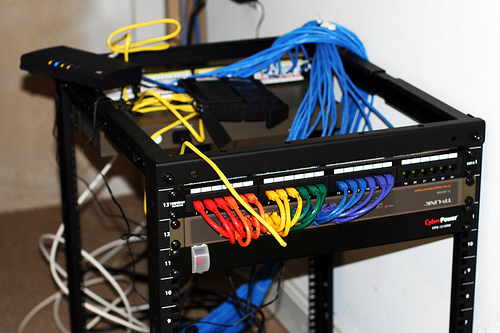
There are 34 network drops (individual lines) running from various rooms in the house down to a closet in the basement. These are terminated into one of two patch panels – long strips of RJ-45 jacks you can plug ethernet cords (patch cables) into. A patch cord runs from each jack in the patch panels into the network switches.

Throughout the house there are wall plates with jacks connected to the wires running into the basement. Each of our computers, printers, and video game consoles will be plugged into a wall jack. There will also be two wifi access points plugged in, one upstairs and one downstairs. The router we chose is a wifi access point as well, but due to its location (a closet in the basement) its signal likely won’t get very far.

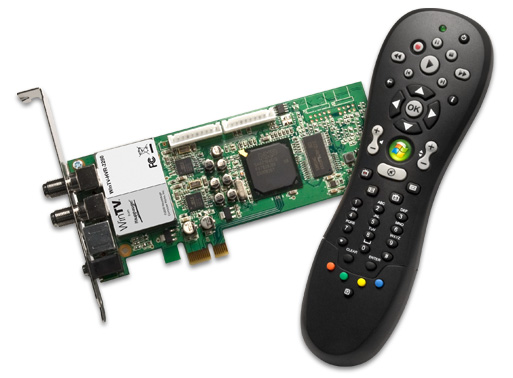
Also in the basement closet is a Debian server which holds all our movies, music, and shared files. Each PC in the house has a program called XBMC which can stream audio and video from the Debian server. I’m debating throwing a TV tuner card into the server so it can act as a DVR and record television programs as well. If we ever decide to do smart home stuff (computer controlled lights, etc) we could run those off this machine too, though for now we’ve got quite enough going on.

Each component in our network – the cable, patch panel, jacks, switches, and even the network cards in the servers – is rated for gigabit ethernet speeds. This is important to note because gigabit ethernet is new enough that only about 1/4 of the available consumer hardware supports it. In most cases the gigabit version of a component is only a few dollars more than the 10/100Base-T version, and it’s all backwards compatible, but it’s an important thing to note when setting up your network. 1000Base-T is much faster than we need right now, but 20 years ago 10Base-T was considered superfluously fast and now it’s considered pathetically slow.

Our network is, if nothing else, over engineered. I stopped myself short of building the server with hardware RAID and went for two unmanaged switches instead of one giant managed switch. We’ve definitely run more network cable than we’ll use at any given time, but since installing the cable involves tearing up the walls I wanted to do it all before we move in and before the painters come. And maybe we don’t strictly need it, but the half-rack of server hardware in the basement sure looks sexy.

This is part 1 of 3 posts about our home network.
Part 2: Wiring the House for Cat 6 Ethernet 
Part 3: Coming soon