Cooking

Veggies and fried tofu

We’ve signed up for a local CSA (community supported agriculture) and now get a giant pile of vegetables every week. It’s great because not only does it support the local community but it forces us to eat more vegetables. That said, we’ve had to get creative figuring out how find time to use all these awesome veggies while tending to a newborn.

This recipe, which started life as saag paneer but is now pretty much completely unlike it, meets my criteria for dinner: it’s dairy free (Bitmap may have an allergy to cow’s milk), it reheats well, and it has a wide margin of error.

IMG_6110

Ingredients List

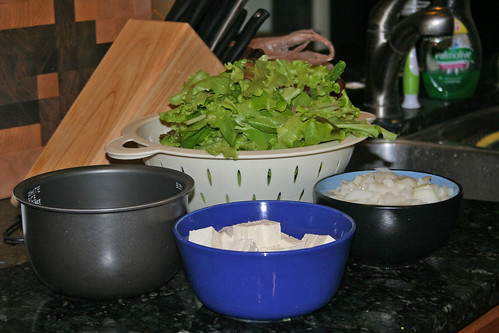
  • ~1.5 lbs leafy green veggies, chopped
  • 1 lb tofu, cubed
  • 1 tbsp sesame oil
  • 1 can coconut milk
  • 2 yellow onions, finely chopped
  • 3 cloves of garlic, minced
  • ~1 tsp ginger
  • turmeric, cumin, and any other spices you enjoy
  • salt
  • pepper

I leave the rice to soak while I chop all the ingredients. I usually wear Bitmap in a Moby sling while I’m doing the prep work, it’s easier than trying to convince her to nap.

Once the veggies are ready to go I throw the rice in the rice cooker. If you don’t have a rice cooker you’re on your own – I have absolutely no idea how to successfully cook rice without one.

IMG_6111

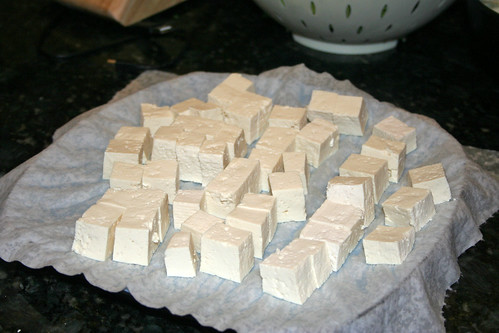
Next I place a paper towel on a plate and sprinkle it with salt. The tofu cubes are spread out and sprinkled with more salt, then left to their own devices for about 15 minutes. This helps to dry out the tofu so it will crisp up in the skillet.

Now the actual cooking! I start by boiling a giant pot of water, large enough to hold all the greens. Then I hand the baby off to RD.

I heat 1 tablespoon of oil in a skillet. When it’s nice and hot, I add the tofu cubes. While the tofu is getting crispy I throw the greens into the boiling water. Depending on what I’ve got I’ll cook it for 2 to 10 minutes (longer times for tougher greens). Meanwhile I flip the tofu periodically so all sides get fried.

IMG_6113

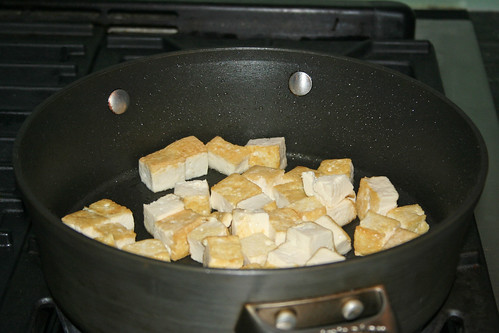
When the tofu is done I remove it from the skillet and place it to the side. The veggies are drained and I leave them in the colander while I fry the onions, ginger, and garlic with whatever spices look good at the moment.

IMG_6115

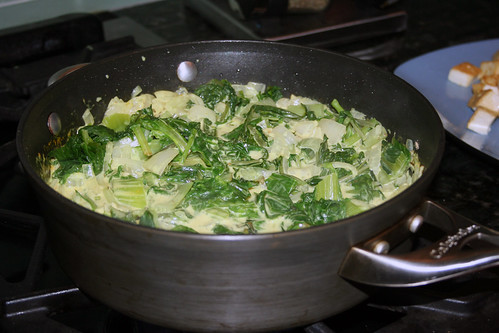
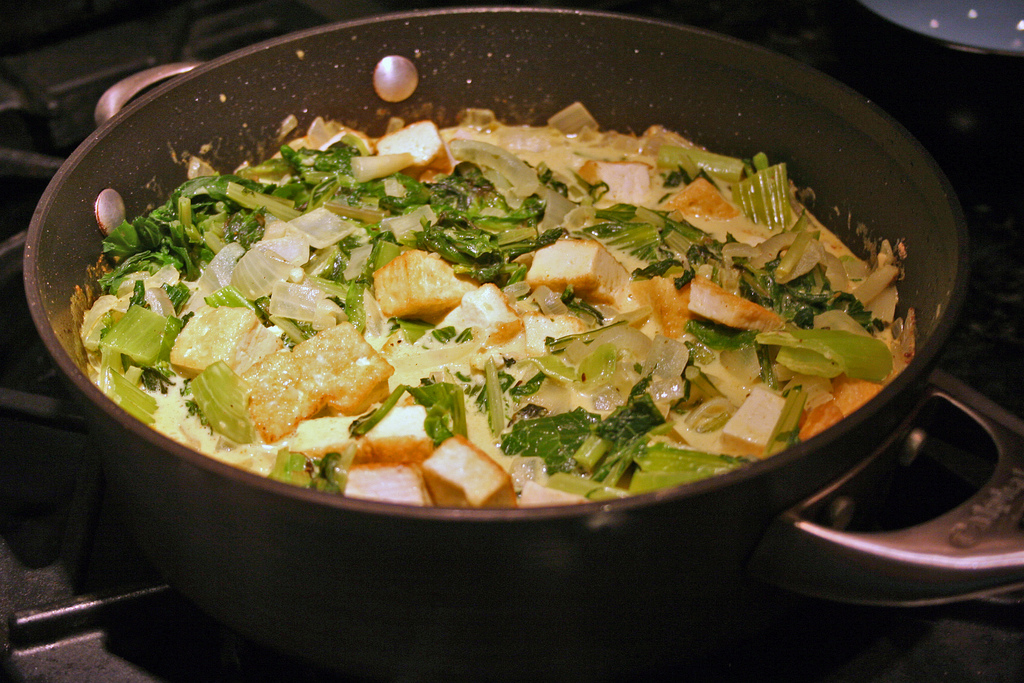
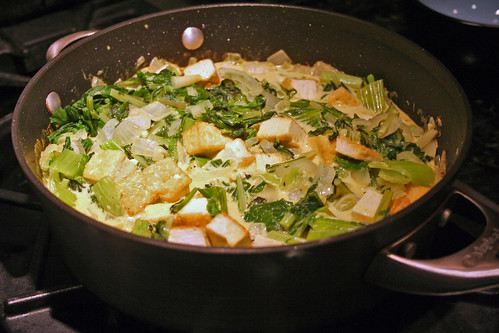
When the onions are starting to look translucent I add the coconut milk to the pan. After a minute or two the sauce will thicken and I add greens, followed by the tofu. Mix well and serve with rice.

IMG_6118

Leftovers can be frozen, and make an easy lunch. It’s surprisingly tasty, and you can change the flavor up quite a bit by varying what greens and spices you use.

Cooking

It Came From the Internet: Recipes

Things have been really busy around here, but sadly not with stuff that makes for interesting blog posts. In the meantime, here are some of the recipes I’ve been compulsively hoarding, holding out for the day when I actually have time to do some cooking / baking.

For the fantasy world in which I hold fancy dinner parties, prosciutto asparagus sprials.

Pizza muffins. Or, things I can throw in the freezer and then eat later when RevolvingDork isn’t around to feed me.

Strawberry Basil Margaritas. In ~6 weeks my basil plants will be fully grown, and I’ll be able to drink alcohol again. Coincidence?

Sweet Potato Veggie Burger. I’m not that into veggie burgers, but I am into sweet potatoes and avocado.

What’s on your recipe to-do list?

Cooking

Cinnamon Rolls of Doom

We make these when we’re afraid we’re not getting enough fat and sugar in our diets. Or when we want to make doubly sure we’re well on our way to type 2 diabetes.

My mother found this cinnamon bun recipe a few years ago, which uses nearly 3 cups of butter and 5.5 cups of sugar for 12-15 rolls. In short, these are terrible for you. But delicious.

First, you make a sugary, buttery dough, roll it into a slab, and cover it in sugar, butter, and cinnamon.

Slab!

Then you roll it into a log and slice it into 12 to 15 pieces of even width. The sharper the knife, the better your results.

Cutting!
Slicing!

Then you fill a pan with melted butter and place the raw cinnamon rolls in the buttery bath.

Raw rolls

Our pan was maybe a little too small.

Post baking

While they’re still hot, slather them with the frosting you made while they baked. Frosting is, of course, made up of two things: butter and sugar.

Now with Frosting!

Then you invite all your friends over to eat them! That way you can all become morbidly obese together.

Cooking

Muffin Tin Pancakes

My Pinterest stream is mostly home decor and food. When I saw the photo for these mini german pancakes, I knew they had to be mine.

Photo by Laura of RealMomKitchen

I skipped the orange zest, for lack of an orange, but otherwise made the recipe as written. I used a nonstick muffin pan, but greased it anyway for maximum nonstickness.

The pancakes puffed up in the oven, but I knew it wouldn’t last.

Minipancakes_oven

30 seconds out of the heat, the pancakes began slowly collapsing like the Ottoman empire. They actually did a little dance as they deflated and settled back into the muffin cups. It’s possible I did not blend the butter well enough, because each pancake has a little pool of melted butter sitting in the middle. What a delicious problem.

Minipancakes_cooling

The recipe in the original blog post uses a homemade triple berry compote. Delicious as that sounds, I only have the energy for one cooking adventure in the morning. Instead we used store-bought pastry filling. That’s right, call the food blog police.

Minipancakes_filling

As with most of my cooking adventures, they didn’t come out nearly as picturesque as the ones in the recipe photo. I’d like to take this opportunity to blame the lighting, and not my cooking. In a fit of cleaning up I finally removed the stand flash from the living room, so light was a bit hard to come by.

Minipancakes_done

They came out pretty tasty, though in my zeal for getting out all the lumps of flour I managed to over beat the eggs pretty significantly. This made things a little more rubbery than I prefer. The pie filling was a little sweet for my tastes, so next time I’ll just slice up some banana to put on them.

Cooking

Haphazard Pulled Pork of Deliciousness

Yesterday I made pulled pork in our crock pot. Since it was pouring outside, I wasn’t willing to walk to the big grocery store. As such, any ingredients I needed had to be available at our local corner store (minus the pork itself, which had been hanging out in our freezer for months).

It was delicious, and while I don’t have an exact recipe, I’ll describe the process so you can throw whatever’s in your house in and have something equally delicious. I didn’t take photos because it just looked like shredded meat.

You will need:

  • 4 – 6 pound pork butt. Which actually comes from the shoulder. It’s cheap. You should be able to get it for around $1.25 per pound. Less if it’s approaching the sell-by date.
  • Crock pot. It needs to be big enough to fit the pork butt.
  • An onion
  • A clove of garlic or two
  • A bottle of BBQ sauce
  • Various spices. Whatever you have around is probably fine.

Step 1:

Thaw the pork butt in the microwave, or overnight in the fridge if you’re better at planning than I am.

Step 1.5:

While the pork is thawing, coarsely chop up the onion and garlic. Throw them in the crock pot haphazardly.

In a medium sized bowl, mix together equal parts of the following various spices, making substitutions for anything you have / don’t have / like / don’t like.

  • Salt
  • Ground black pepper
  • Sugar
  • Brown sugar
  • Cumin
  • Tumeric
  • Chili Powder
  • Garlic Powder
  • Paprika

I used 2 tablespoons of each for an 8.5 lb chunk of meat, though I added some extra paprika because it smelled so nice. I also used curry powder instead of chilli powder/tumeric because I didn’t have either of those.

Alternately, you can used a pre-made BBQ rub, but they didn’t sell that at my corner store.

Step 2:

Take your thawed pork butt and rub the spice mix all over it. Place the pork butt in the crock pot on top of the onions/garlic, and go ahead and dump the rest of the rub in there.

Step 3:

Fill the crock pot about 2/3 with water, or stock if that’s how you roll.

Step 4:

Cook 6+ hours on high or 10+ hours on low. If you have a temperature probe, make sure the interior of the meat gets up to at least 145 degrees F. The longer it cooks, the easier the next step will be.

Step 5:

Once you’re tired of waiting, turn off the crock pot. If you’re lucky, the meat will be so tender it will slide off the bone and you can pull the bone out easily, and then use tongs to move the chunks of meat into a bowl. If you’re like me, the meat will hang onto the bone for dear life and you’ll have to figure out how the hell to lift an 8.5 pound roast out of a vat of boiling water and fat.

I ended up using a measuring cup to scoop off some of the liquid, cut some of the bigger chunks off the bone, and then move the whole thing into another bowl where I could hack at it for a little while.

Step 6: After liberating the bone and meat, get rid of all the inedible bits like the skin, bone, and fat. Discard them along with the onions and garlic, who valiantly gave up their lives for your pork. Pour off most of the water/fat broth, leaving about half an inch in the bottom of the crock pot.

Step 7: Return the meat to the crock pot and shred it using two forks. By the time you’re done, it should suck up the remaining broth and be deliciously juicy.

Step 8: Dump the bottle of BBQ sauce in there. Mix it up.

Tada! You now have pulled pork! Eat on a sandwich, or just straight up.

bento

Back to Bento

Now that I’m working full-time at an awesome startup downtown I’ve been packing bento lunches again. In addition to being better for me, it’s substantially cheaper than buying lunch in midtown. A wrap or salad at the “usual” place ends up being about $9. Even considering the fact that Chris works from home a few days a week it adds up fast, to about $300 per month. A bento lunch generally comes in under $3.

Today’s lunch consists of a baby spinach salad with peppers, carrots, and mushrooms, and a chicken sandwich with pepperoni. I use fat free cream cheese instead of mayonaise. Fat free cream cheese completely fails as anything I’d want to put on a bagel, but does well in sandwiches. I used “low carb” bread. Low carb bread has a weird spongy texture I really don’t recommend. Stick with the real thing.

bento

Bento is Back! Bento #11

It's been a while without bento. The main reason is that for the past two weeks, Chris has been working at home; no bento required. We've also both been running around like crazy. I still need to re-stock on bento supplies, but managed to make do with what was in the fridge this morning.

Bento #11

Today we have:

  • Carrots! Always with the carrots.
  • Grapes
  • Cheddar cheese slices
  • Hot dog wrapped in tortilla strips to make pseudo pigs in a blanket
  • steamed broccoli and red pepper
  • leftover noodly stuff from the other night

Also, let me reiterate that I am not starving Chris! There really is enough food in one bento box for a human male lunch. We're all used to eating huge portions, but it turns out you can totally get through canadian pharmacy discount code viagra your day on a rational sized lunch. If you don't believe me, try it. Get a 600ml bento and pack it with food. Notice how there aren't any gaps in my bentos (usually). You won't starve, I promise.

bento

Bento #10: Turkey Sandwich Maki

Today is another day for experimental foods. We have:

  • Carrots
  • Orange wedges
  • Pita
  • Laughing Cow cheese wedge
  • Turkey sandwich maki (what?!)

Once a week or so I make fresh rice and freeze it, and today was the day so I wanted to make use of the fresh rice on hand. Using Soy Wraps instead of nori I made maki with sliced turkey, american cheese, and cucumbers. If I'd had more turkey sandwich veggies on hand I'd have used them too. Sprouts seem like they'd be good.

I also attemtped to make banana maki (not pictured) with a soy wrapper, rice, and banana. It came out pretty bland, so next time I may mix purchase viagra in australia some peanut butter up with the rice before rolling it.

bento

Bento #9: Cheese and Crackers!

I’ve been slacking on the bento photos a bit. It’s been a hectic week and while very few of my bentos take more than 10 minutes, staying organized and waking up more than 30 minutes before I’m supposed to leave has been a bit of a challenge.  I’ve also skipped photographing bentos which were just more of the same. And I entirely missed the one with the chicken pot pie. Chris was running out the door so there wasn’t time for theatrics.

This is one of the faster bentos I’ve put together. It couldn’t have taken more than 5 minutes. Today we have:

  • Leftover pasta and meatballs. You’ll recognize this from Bento #7. We’ve finally managed to eat it all!
  • Half an orange. Are you starting to see a pattern? At least I know he’s getting vitamin C.
  • Snow peas
  • Laughing Cow cheese spread
  • Water crackers

Snow peas are great for bentos because you can toss them in raw and they fit in small spaces. I like to eat them cold, but Chris prefers to heat them along with his entree. The laughing cow cheese is also great because it comes in a wheel of eight individually wrapped wedge shaped servings. It’s a soft cheese so it doesn’t really need any utensils.