bento

Bento #3: Rushed Bento

This morning, about an hour before Chris usually leaves, I asked what time he was headed into the office. “About now,” he replied. Suddenly my plans of edamame, gyoza, and more heart shaped rice flew out the window. “It’s ok, you can pack a lunch tomorrow,” he said.

NONSENSE! I jumped to my feet and, viagra prescriptions in only slightly more than the time it took for him to sync his ipod, put together this lunch:

Bento #3: Last Minute Bento

  • Turkey sandwich wrap (turkey, cheese, baby spinach)
  • Naval orange
  • brownie
  • baby spinach for garnish (it looked kind of sad without it)

It’s not very densely packed, so it may be a little on the small side. If not a full lunch, it’ll at least be a nice snack.

    bento

    Lunch #2: Un-bento

    Chris stayed home today, so I didn't pack him a lunch. I still made him one, I just served it on a plate instead of cuddling it natural viagra pills all up in a box.

    In what I'm sure is an affront to all japanese cooking, I made something that can best be described as hot dog sushi.

    The lunch consists of:

    • Fresh red pepper slices
    • hot dog sushi: slices of hot dog on heart shaped rice balls wrapped in nori (seaweed)
    • baby spinach
    • a brownie

    Chris said the hot dog sushi was good, and unlike anything he'd eaten before. The texture of sushi doesn't generally anticipate the flavor of hot dog. But after the surprise wore off it was indeed delicious.

    I made Japanese rice for the first time today. Actually, I'm pretty sure it's the first time I've successfully made rice of any kind. I washed it yesterday evening and let it soak overnight.

    I don't have any official rice molds, but I do have a silicone ice cube tray I got from Ikea.

    I greased half of them with some vegetable oil as an experiment. Definitely do this, it makes it much easier to get the rice out and maintain the shape. You can tell in the picture below which ones had sticking problems. I'll probably get some nonstick spray next time I'm at the grocery store, they're kind of a pain to grease by hand.

    I started packing with a wooden spatula, but eventually just pushed the rice in with my hands. Make sure your hands are wet or the rice will just stick to them hopelessly. I kept a bowl with a little water in it nearby.

    Oh, and what did I eat today? Yesterday's bento. After sending Chris off to work with his and blogging about it, I forgot mine at home.

    Organization

    Craft Room Redux

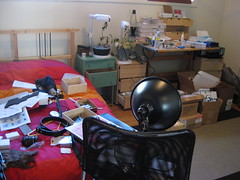
    The craft blogs are full of reorganization photographs. I think it’s a universal: we all trash our workspace during the holiday madness. Only when we dig out in January do we look around and say “oh god I have to do something about this.”

    Or at least that’s what I did:

    The beginning.
    The beginning.

    Uh yeah. There’s a workspace somewhere in there. Where, I’m not sure. As such operations had to be moved downstairs, the only place with any remaining horizontal surfaces. Oh any my plants died. The DIY aeroponics project was actually incredibly successful. But even pseudo-aeroponic systems need water added every few weeks.

    The first step is admitting you have a problem.

    The second step is (wait for it…) throwing out all the trash and putting away everything you can. I know it seems obvious but when faced with a room that looks like the scene of a recent natural disaster it can be overwhelming and hard to know where to start. For me, I accumulated a number of new things over the holiday season, so a lot of stuff never had a “home” to begin with. Which led to it simply floating around the room, helping to hide the rest of the junk.

    Suddenly, with the trash in the trash can and everything either put away or sitting in a box / on a table awaiting further instructions, you can see the floor:
    Step 2Step 2

    You still can’t sit in the chair or on the bed, and the tables are still covered in crap, but hey! I have a rug!

    At this point, I was at a bit of a loss. If you look at my shelving unit, all the cubes are full. And yet there’s a ton of stuff lying around I don’t know what to do with. It’s hard to see in the pictures, but there’s a secondary workbench on the right which is also piled high with items in need of a place to be. And this is when you call in the big guns. Have a friend come over and help you, if you know anyone vaguely organized. Your friend will not only keep you motivated and prevent you from simply sitting on the floor staring at the mess (my mother has seen me do this just about every time I move), they’ll also keep you honest. They say things to you like, “Kelly, if you put that box in front of the magazine file and then need a magazine, are you just going to put the box on the floor and leave it there?” And then you (if you’re me) say, “… yes,” and find a better place for said box.

    Progress

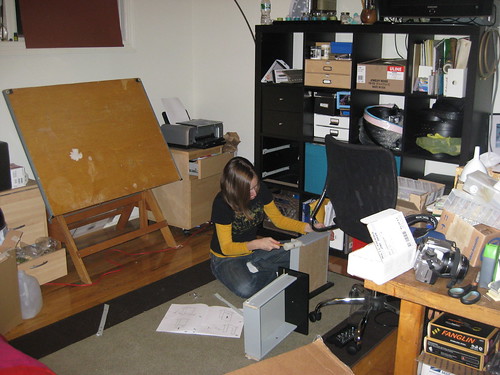
    I thought we needed more shelving, but my superstar amazing organizer friend managed to rearrange what was on the existing shelves to fit almost everything. In the above picture we’ve got most of the leftovers condensed to the workbench while my friend assembles some additional drawers for the ubiquitos Ikea EXPEDIT shelving. The workspace still needed some work though, otherwise it would just revert to its natural disaster state as soon as she left. We went to Ikea and got a nice wide desk to replace the drafting table I’d been working on, and separated the workspace into building/making on the right workbench, and shipping/administration/finished products on the left table.

    Done!
    Work table

    It doesn’t look quite as dramatic in the pictures, but anyone who has been in the room is stunned with the transformation. I’m excited to have a workspace I can actually use. Yay!

    Crafting

    Craft Room Redux

    The craft blogs are full of reorganization photographs. I think it’s a universal: we all trash our workspace during the holiday madness. Only when we dig out in January do we look around and say “oh god I have to do something about this.”

    Or at least that’s what I did:
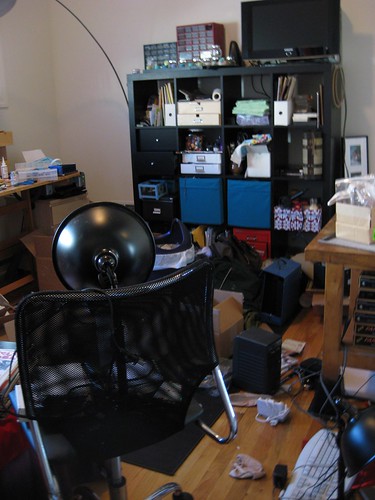
    The beginning.
    The beginning.

    Uh yeah. There’s cheap online viagra a workspace somewhere in there. Where, I’m not sure. As such operations had to be moved downstairs, the only place with any remaining horizontal surfaces. Oh any my plants died. The DIY aeroponics project was actually incredibly successful. But even pseudo-aeroponic systems need water added every few weeks.

    The first step is admitting you have a problem.

    The second step is (wait for it…) throwing out all the trash and putting away everything you can. I know it seems obvious but when faced with a room that looks like the scene of a recent natural disaster it can be overwhelming and hard to know where to start. For me, I accumulated a number of new things over the holiday season, so a lot of stuff never had a “home” to begin with. Which led to it simply floating around the room, helping to hide the rest of the junk.

    Suddenly, with the trash in the trash can and everything either put away or sitting in a box / on a table awaiting further instructions, you can see the floor:
    Step 2Step 2

    You still can’t sit in the chair or on the bed, and the tables are still covered in crap, but hey! I have a rug!

    At this point, I was at a bit of a loss. If you look at my shelving unit, all the cubes are full. And yet there’s a ton of stuff lying around I don’t know what to do with. It’s hard to see in the pictures, but there’s a secondary workbench on the right which is also piled high with items in need of a place to be. And this is when you call in the big guns. Have a friend come over and help you, if you know anyone vaguely organized.  Your friend will not only keep you motivated and prevent you from simply sitting on the floor staring at the mess (my mother has seen me do this just about every time I move), they’ll also keep you honest. They say things to you like, “Kelly, if you put that box in front of the magazine file and then need a magazine, are you just going to put the box on the floor and leave it there?” And then you (if you’re me) say, “… yes,” and find a better place for said box.
    Progress

    I thought we needed more shelving, but my superstar amazing organizer friend managed to rearrange what was on the existing shelves to fit almost everything. In the above picture we’ve got most of the leftovers condensed to the workbench while my friend assembles some additional drawers for the ubiquitos Ikea EXPEDIT shelving. The workspace still needed some work though, otherwise it would just revert to its natural disaster state as soon as she left. We went to Ikea and got a nice wide desk to replace the drafting table I’d been working on, and separated the workspace into building/making on the right workbench, and shipping/administration/finished products on the left table.

    Done!
    Work table

    It doesn’t look quite as dramatic in the pictures, but anyone who has been in the room is stunned with the transformation. I’m excited to have a workspace I can actually use. Yay!

    bento

    Bento!

    If you’ve been reading our humble local paper, the New buy cialis and viagra online York Times, you know that bento lunches are gaining popularity among yuppies. For the uninitiated, bento lunches are densely packed lunches that generally feature smaller portions of many things. Bento is most widely known in the US for super cute design, with Hello Kitty bento boxes and heart shaped rice molds. But it really is just any densely packed, well portioned, nutritionally balanced lunch.

    Now my boyfriend’s awesome new startup has an office and the guys don’t have to work from home, Chris is off to work every day for the first time in about a year and a half. In an attempt to cut lunch costs and eat more veggies, I’ve volunteered to pack Chris a bento lunch every day. It’s a good excuse for me to wake up earlier (if you knew what time I usually get up you’d lynch me) and uh, I could really use the practice cooking.

    While I’m super excited to send Chris off with adorably shaped rice balls and eggs in the shape of bunnies, I’m starting smiple with the tools I have on hand. Here’s today’s lunch, my first ever attempt at packing lunch for someone else:

    It consists of:

    • leftover Pokemon macaroni and cheese with beef and broccoli
    • half a banana
    • festively chopped carrots
    • fresh red pepper
    • a mini chocolate chip muffin for dessert

    To keep the banana from browning I dipped it in a little bit of watered down lemon juice. The internet promises me this will keep it from looking totally nasty by lunch. We’ll see if it’s true.

    As you can see, I don’t have a super cute hello kitty bento box. In fact, I just used a $0.25 plastic food tray I got from the dollar store. If I decide to keep up the lunchmaking I’ll invest in some better hardware. But the point of this is to save some money, not spend it all on adorable lunchboxes.

    Later this week I’ll try an actual Japanese style meal, with sticky rice balls wrapped in seaweed and some gyoza for the main dish instead of last night’s leftovers. I also saw some super adorable mini PBJs made using soy wrappers. I’ll have to go on a hunt for them in the city as I’m too stubborn to buy them on Amazon.

    There are a number of good websites for would-be bento makers. http://www.justbento.com has a lot of beginner information, especially food safety and packaging tips. http://lunchinabox.net/ is a blog mostly about preparing meals for toddlers, but also has a lot of good information on food prep, speeding things up, and how to freeze things in a way that doesn’t leave them mushy and gross when you thaw them out.

    Oh, and because you can’t see them so well in the picture, here’s what I did with the carrots (shown on cucumbers):


    It’s really easy, instructions can be found here. I ended up only using one knife though, I didn’t want to dirty a second one and was concerned about dulling the knives if they hit each other. You just have to be a little more careful to not go through all the way.

    More bento pictures to come as I make them!

    Uncategorized

    Sparkfun Free Day

    Sparkfun, who sell a variety of electronics doodads, held a cheap real viagra england “free day” wherein they essentially gave a $100 credit to the first $100,000 worth of people who claimed it. It’s was pretty good marketing ploy, with press on all your favorite geek blogs. The promo ran from 9am to 11pm or until the $100,000 ceiling was hit.

    For the amount of buzz generated, it was probably a good use of $50k.  And they got some general goodwill points for giving stuff away at all. Gee those Sparkfun guys are nice, lets give them a big hug. Unfortunately the “starts at 9am” part of the execution meant that starting around 8 (and some the night before) their servers were slammed so hard checkout was pretty much impossible unless you hit refresh like it was your job. They essentially DDoS’d themselves.

    Mind you, they’re giving away free stuff. And few people on the internet feel so entitled as those who are getting something for free. There are a handful of whiners on the internet (very vocal whiners, mind you) complaining that they “wasted” hours of their lives and “will never buy from Sparkfun again.” I suspect most of them never bought from them in the first place.  There are even conspiracy theories about how Sparkfun didn’t really give anything away, or it was all just a hoax. These people are of course crazy blowhards.

    But while I wouldn’t call the Sparkfun Free Day a fail (contrary to the twitter hash tag), I’m not sure I’d call it a complete success either. Frustration with checkout undoubtedly left a bad taste in the mouths of some, although I doubt there will be many long lasting effects to that end. But it was a missed opportunity of both marketing and upselling.

    Because of the intense traffic, you couldn’t really browse the site during the onslaught. I’m almost positive the only people who made it through checkout are those who loaded their cart beforehand. While Sparkfun’s stats haven’t been released yet, I suspect the number of people purchasing more than $100 worth of stuff is lower than it would have been had they had more time to contemplate their extra purchases. With only every 100th or so request getting through (if that much) you certainly don’t have time to go back and add that thing you forgot. So you’re losing a lot of impulse purchasing. Purchasing that could offset the cost of the promotion.

    Sparkfun also made its way into the Twitter trending topics which, and it kills me to say this, is a decent opportunity to familiarize the unwashed masses – non hackers – with the brand. Except during it’s few moments in the godawful twitter sun, the site was unreachable. It made me think of the mLife commercial during the 2002 Super Bowl. AT&T ran a bunch of cryptic ads telling you to go to mLife.com. Except the site was unreachable. So you couldn’t find out. AT&T is an extreme example; Sparkfun failing to reach out to compulsive hashtag checkers on Twitter is nowhere near the level of fail AT&T pulled off. But there’s something to be said for having the mic handed to you and then not being able to speak.

    At the end of the day Sparkfun did what they set out to do: give away free stuff and put their new hardware through its paces. It’s unfortunate that some people got frustrated during the stunt, but they’ll get over it. But at the same time I feel like it’s a good lesson in contest/giveaway marketing. The “first come first serve” model of internet giveaways is tired. I can think of dozens of more interesting ways of giving out loot. But if you insist on sending a flood of freeloaders to take down your services, you might want to do it separate from your shopping cart. Let the army of nerds hammer your “get a coupon” site, but leave the cart itself out of it.

    It was an interesting experiment, and it sounds like the Sparkfun guys had fun, so all’s well that ends well. But I hope they and other online retailers take away something from it, so we’re not all doomed to repeat it. Or refresh it, as it were.

    Business

    Luddism for Fun and Profit

    One of the things I’m doing this January is revamping how I handle shipping. Which means investing in a little bit of hardware. I picked up a nice USB postage scale to replace the food scale I’d been using. Aside from more precise measuring, it interfaces with my shipping software to automatically enter the correct postage amount. And I’m viagra next day delivery finally graduating from sheets of Avery shipping labels to a thermal printer.

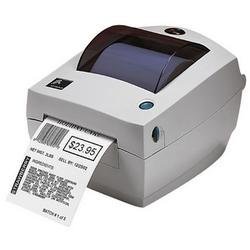
    But let’s back up a second. Let’s talk about thermal printers. Specifically, the LP 2844.

    zebra

    The Zebra LP2844 is an exceptionally common printer. Both UPS and DHL give them out to their shippers, and provide free labels for them. They’re fairly compact, versatile, and since they’re thermal there’s never any ribbon or toner to replace. All in all a decent little printer. Unfortunately I do most of my shipping through the US Postal Service, who don’t seem to have any interest in rewarding me with free hardware.

    There have been a number of iterations of the LP 2844 over the years. DHL has their own bright yellow branded one, and the new ones have entered the modern age and now support USB. Which means there are now a ton of the older ones for sale on Ebay. The current models go for about $400, but if you’ve got a machine which still sports a parallel port, you can grab an older one for $40. If you’re not the sort of person who keeps a parallel port around for kicks, but have an open PCI slot, you can get a parallel card for about $15. They even throw two USB ports on it so you don’t feel like a total chump.

    The printer also supports serial, so in theory if you have a USB serial adapter lying around (most good hackers do) you could use that. But the data transfer is so painfully slow it’s not something you’d ever want to use in production. I’ve also seen a few USB to parallel cables, but reviews on those are mixed. Apparently getting the drivers happy is a bit of a pain.

    So thanks to my Luddite boyfriend, who insists on purchasing motherboards which still have parallel ports, I was able to get a super cheap label printer. That coupled with my new scale should make the whole postage printing process much faster and smoother.

    Gaming

    Defense Grid: The Awakening

    After three very busy months at Everything Tiny, I have been mostly vegetating over the holidays. The first thing that always happens after a busy period is a cold catches usa pharmacy viagra up with me. But now that I’m mostly well again, I’ve been playing the hell out of Defense Grid: The Awakening. The game normally sells for $10 on Steam, but it was on sale last week for $3. After playing for a few hours I decided it was definitely worth $10, and bought it on XBLA so I could play it on our giant TV… and rack up achievement points.

    defense_grid

    Defense Grid is an addicting tower defense game by Hidden Path. The gameplay is quick, although I made liberal use of the fast forward button, and can easily kill a few hours. Or days. The main story campaign is pretty meaty and once you’ve completed it a plethora of challenge / alternate modes for each map opens up. The artwork looks good, although honestly I spent most of the game zoomed out to see the whole map, so I didn’t have a ton of time to appreciate it.

    The story line is simple but compelling enough. Defend your city against aliens with the help of a computer who speaks with a British accent and waxes poetic about raspberries. The aliens have come to steal your “power cores,” and in many maps they must walk out the same path they came in. Like most tower defense games, enemies come in waves of increasing toughness.  Simply surviving a campaign isn’t terribly difficult on most maps, I only lost all my cores once or twice, but setting up your towers so you don’t lose any at all can be a real challenge. Awards are given for the number of cores protected and resources remaining at the end of the scenario.

    One interesting variation from many RTS / tower defense games is resource management. In many (Starcraft comes to mind) if you’ve got resources sitting around, you’re doing it wrong. Defense Grid gives interest on resources in the bank. Depending on how much you’ve got stashed away it can be a pretty significant boost, so there are often advantages to wait on putting down an expensive tower.

    The game is overall very well balanced. There weren’t any tower types I didn’t really use, and the variety of aliens made it hard to get stuck in any one strategy. There’s good variety in the maps as well; some are about choosing the right types of towers for a limited number of spots, others are about placing them such that the aliens are routed along the longest path possible. There weren’t any points where it felt monotonous, although when being a stickler about not  losing any cores it occasionally felt like work. But that has more to do with my own problems with perfectionism than any fault of the game.

    Defense Grid is emphatically worth the asking price, and a great way to spend a few hours. After playing it non-stop for three days (and some before that) I plan on taking a break before taking on the challenge campaigns. As it is I see lines of aliens every time I close my eyes, and have had the music stuck in my head since Christmas.

    Crafting

    Last Minute Displays

    7 (1)

    My craft show displays, like so many others’, are in a constant state of flux. I’m constantly adding new products to my line, and for some reason I don’t usually think about how to display them until right before a show. This month I had discount viagra sales back to back weekend shows, Squidfire and the Brooklyn Lyceum, so I scrambled to put together some new displays for my new line of pendants and my older line of belt buckles whose display I wasn’t totally happy with. I had about a week to get it all together.

    Belt Buckle Display

    Belt Buckle Display

    The belt buckle display is made of PVC and wood, and the cost of all the materials was about $20. The goal for the display was to put many of the buckles at eye level and keep the belts themselves from getting tangled up. Bonus points for being able to easily see the backs of the belts to view sizing info.

    Parts list:

    • 18″ long piece of 1×6
    • 2 metal flanges for 3/4″ pipe
    • 4 6″ lengths of 3/4″ PVC pipe
    • 2 16″ lengths of 3/4″ PVC pipe
    • 6 3/4″ PVC straight couplings
    • 2 couplings to fit the 3/4″ pipe into the flange threads
    • 3 16″ strips of rectangular molding
    • Scraps of 1/8″ plywood
    • 18 magnets
    • C clamp to keep it from falling over

    To make the rails to hold the buckles/belts, I took the rectangular molding and glued magnets evenly along them, 6 per rail. The buckle backs are steel, so they stick to the magnets pretty well. I used some ceramic magnets and some neodymium magnets because that’s what I had lying around, but if I were to do it again I’d probably use all neodymium.

    To attach the rails to the PVC I laser cut some rings (shown on the left) out of some scrap 1/8 plywood and glue them to each end of the rails. While I’m lucky enough to have a laser, it’s something you could pretty easily cut by hand with a little patience and an appropriately sized drill bit.

    The rings slip over the PVC, and rest on top of the coupling. The whole thing is surprisingly sturdy, and breaks down easily to fit in my Big Box of Craft Show Gear. The C clamp helps keep things stable. The last show I did had super wobbly floors that shook the table any time someone walked by.

    Eventually I’d like to make some cloth covers for the PVC pipe, so it’s not so ugly, but for the time being the display worked pretty well. I sold a good deal more belt buckles than usual, and I think having them all easy to see was a big part of that.

    Pendant Display

    Pendant Display

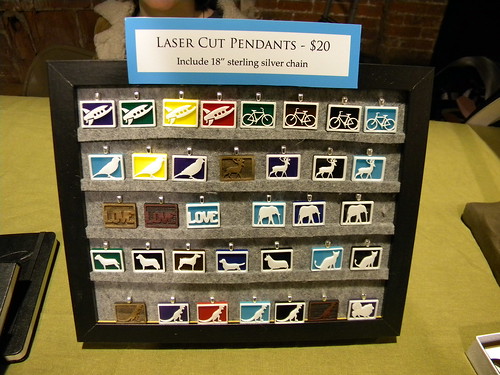
    The pendant display was made literally the night before the show. I grabbed an Ikea frame and a 12″ square piece of grey industrial felt I had lying around. I cut the felt to fit the frame, and had some leftover. From that I cut narrow 1/4″ strips of felt the same width as the frame. I glued them at pendant-sized intervals, and the pendants are just thin enough that they can sit on the felt rails. And unlike my last slapdash jewelry display, this one doesn’t have nails sticking out the back to stab me.

    Overall I’m pretty happy with the two displays, although I sometimes wonder what craft shows would look like if it wasn’t for Ikea. The Tinysaurs themselves are in need of some new display furniture, so I’ll probably put something together for them in the spring. I’m free from craft shows for a whole four months!

    Hacking

    Kindle vs Nook: 5 minute review

    Tonight at Resistor someone came in brandishing a Nook, so of course we all crowded ’round to see if what we’d read was true. Was it really painfully slow? How does it look? Will it crush the Kindle with its bare hands when B&N finally get their supply chain straightened out?

    I am not an ereader connosoir. I’m still waiting for the first good Ebook reader to come out. I was hoping the Nook would be it, but for the time being I’m going to have to say there still aren’t any. With a software update the Nook might be a contender, but right now it feels a little half baked.

    We held a Kindle up next to it for comparison. Size wise they’ll take up about the same space in your purse. They Kindle was a little bit more comfortable to hold, but neither was particularly uncomfortable. I don’t know what the official specs are on the screens, but the sizes seemed comparable. The Nook’s eink screen looked a lot better than the Kindle’s. The kindle looks like a newspaper, whereas the Nook looks more like a paperback book.

    The Nook’s page refresh rate isn’t as fast as the Kindle’s, but honestly it didn’t bug me. What did bug me was the slowness of the UI on the LCD.  This is the same thing pretty much every reviewer has complained about. It sucks.

    Typing on the Nook’s software keyboard was only moderately irritating.  I am as a whole not a fan of software keyboards. I don’t understand people with iPhones because they keyboard drives me nuts. The Kindle wins there hands down by having a physical keyboard, although it then loses points for having all that single purpose space.

    The Nook makes me appreciate a few things the Kindle does well, but doesn’t change the fact that the Kindle isn’t the device for me. A firmware update should move the Nook from “early adopter toy” to “useable ebook reader” but I’m not convinced B&N has got it right yet. I think for me the ideal reader would be less of a e-ink wannabe tablet computer, and more like the Cool-ER reader, although the Cool-ER currently has a price tag that’s about $150 too high and a reportedly miserable UI.

    So the wait for a good e ink ebook reader continues.