LEGO

From Polygons to Voxels to LEGO: A Utah Teapot

It was only after hours of searching that I finally came up with what I was looking for: a way to take a polygon mesh (OBJ or similar) and convert it into a blueprint for building LEGO sculptures.

Don’t get me wrong, there are tons of tools out there for LEGO CAD. But strangely none of them mention being able to go from a mesh to a LEGO layout. It’s surprising, since it seems like such a natural fit. The rise of 3D printers has rejuvinated interest in voxels, voulmetric pixels, and as evidenced by all the LEGO sculpture artists we seem to be in a golden age of LEGO.

Armed with Blender and a giant LEGO collection, I set out to get the computer to do the hard work for me. I used Blender, graph paper, a pencil, and of course lots of LEGOs.

Step 1: Voxelizing a Utah teapot

Let me preface this by saying that the Blender UI is not for the faint of heart. I took classes on Rhino and 3DSMax in college, and thought to myself “how different could it be?” The answer: very. If you’re new to blender, don’t fear the manual. You’re going to need it, particularly the parts on installing/using python scripts.

To voxelize the teapot I used a script called Add Cells which covers the surface of any object with any other object. First I imported the teapot, and scaled it up a bit. Then I created my “fundamental unit” of LEGO. LEGOs have an aspect ratio of 6:5, so I created a 1×1 LEGO, a 0.6×0.5×0.5 rectangular prism in Blender.

Selecting both the teapot and my 1×1 lego I ran the Add Cells script (go to the Scripts menu –> Add -> Cells). I chose the Teapot for my object to be voxelized and the 1×1 LEGO as my voxel model.

Tada! A blocky teapot!

Step 2: Graphing each layer on paper

In order to make the build process easier, I went through layer by layer and drew a map of each layer on graph paper. This way when building with LEGOs I could shade in with a pencil each voxel I’d built. It sounds redundant, but when things all start looking the same after a few minutes and something isn’t lining up, it’s very helpful.

To see one layer at a time in Blender I went into Sculpture Mode, side view, and used ctrl+shift+right mouse to select and hide all but the layer I wanted to see. Then I switched to Top view and copied the layer onto my graph paper. By the end I had a sheet of paper full of wobbly circular outlines.

Step 3: Building it with LEGOs!

The completed model uses 244 LEGOs, many of which are tiny 1×1 and 1×2 bricks. The model is hollow, but the walls need to be fairly thick to be able to support the top. As it is I probably should have made things a little thicker; putting the last two layers on was a delicate operation.

I built each layer sequentially. There were a few overhang pieces near the bottom which I had to append to the layer above them, since they couldn’t anchor to anything below.

Overall the project took about 4 hours, with a break in the middle for breakfast, church, etc.

Total LEGO count for the project was 244 individual bricks, distributed thusly:

  • 44 2×3 Bricks
  • 46 2×2 Bricks
  • 58 2×4 Bricks
  • 27 1×2 Bricks
  • 17 1×3 Bricks
  • 8 1×4 Bricks
  • 8 2×2 L shaped Bricks
  • 33 1×1 Bricks
  • 1 2×8 Brick
  • 1 2×6 Brick
  • 1 1×8 Brick
LEGO

My First Lego Ovoids

My first lego ovoids

After ordering a few hundred bricks from bricklink, I started working on what is for now a top secret project.

Step one was to practice making spherical and organic LEGO shapes, and I’m pretty happy with the two sphereoids I came up with while catching up on House. PS, Dr House is a huge jerk.

Software

Success!

Now that I have a few more runs worth of data, I was able to pick a little bit of information out of the miCoach binaries.

There are 40 EXRCS001.BIN files on the device (after the data has been unpacked), each one corresponding to an individual workout. This means you can store up to 40 workouts before you need to sync the device again. Knowing that, I had a bit of a better idea what I was looking at.

The miCoach pacer records various data points periodically – every few seconds as far as I can tell. The record length for these data points is 14 bytes. So far we have:
0x1E – row number, increments one each row
0x21 – distance
0x23 & 0x24 – Not sure exactly what the values are, but these dropped to 0 at a point where I paused the pacer and the miCoach graph shows a stride/pace of 0
0x25 – stride rate
0x26 – same situation as 0x23 and 0x24
0x27 – heart rate
0x28 – Not sure what this is, but it’s the same for each row
0x29 – time in. I think this is in seconds, but I’m not sure. It goes up by 5 each record.

At the start of the file, from 0x07 to 0x10, is a bunch of data that I suspect to be the date but haven’t figured out an obvious format. For my workout on 5/20/2010 9:58am, the hex values are 01 5A 4F B4 3C A7 53 B4 3C 24 8C

Yay progress!

Programming

Extracting + Graphing Wii Fit data

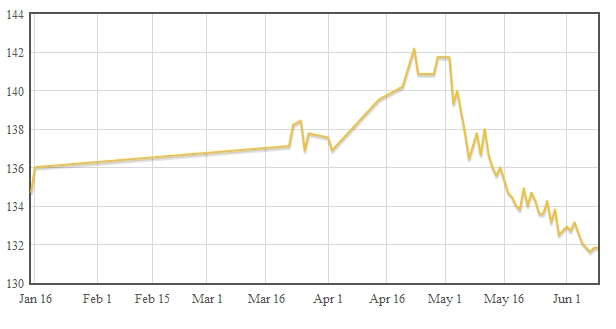
In preparation to tinker with the miCoach data, I started with some better-travelled exercise bits: WiiFit body test data. Starting with Jansen Price’s excellent blog post on the subject, I slowly worked through the data and wrote a python script to interpret the binaries and save them to a CSV. By using the excellent flot javascript library, I was able to generate the nice graph above. There was a lot of trial and error, but here’s an overview of the process:

  1. Copy Wii save game data to the SD card. This is done from Wii Options > Data Management > Save Data > Wii
  2. Find the save game data on the card. It’s in something like ‘private/wii/title/RFPE’, although different regions may have slightly different codes. RFPE is the code for WiiFit Plus. Copy the WiiFit data.bin file from the SD card to your local machine.
  3. Decrypt data.bin. This is explained pretty well here. To create the keys I ended up creating text files with the hex string for each and then using “xxd -r -p sd_iv_hex sd_iv” et al to save a binary version. If you’re getting “MD5 mismatch” errors, you probably saved the keys incorrectly. If you aren’t sure, check the file size. They should be 16 bytes each.
  4. Run the decrypted RPHealth.dat through a parser (I wrote one in Python for this)
  5. Run the CSV through your favorite graph generation library. I use flot because Google Charts don’t handle dates very well.

Thanks to Jansen’s handy chart of which bits are where, writing the parser was pretty easy. This isn’t the most elegant code I’ve ever written, but it gets the job done:

import struct
import string
import csv

mii = 0
#we know that each record is 0x9271 bytes long
record_length = 0x9281

record_start = 0

#path to WiiFit data file
infile = 'RPHealth.dat'

FH = open(infile, 'rb');

## It loops through 7 profiles, because I happen to know I have 7.
## A better approach would be to go to the end of the file, of course.
while (mii < 7):

    #go to the start of the current record
    FH.seek(record_start)

    #read the first 30 bytes (header + name)
    line = FH.read(30)

    #for some reason names are stored as N a m e instead of Name.
    #Throw away the header any extranous spaces
    data = struct.unpack("i",line)
        #bit shift to get the month, day, and year. Could also get time if you wanted.
        year = data[0] >> 20 & 0x7ff
        month = data[0] >> 16 & 0xf
        day = data[0] >> 11 & 0x1f

        #break the loop if the date comes back 0
        if(year == 0): break

        #format the date into something humans like to read
        date = str(int(year)) + '-' + str(int(month)+1) + '-' + str(int(day))

        #the next three sets of 2 byte data represent weight, BMI, and balance
        line = FH.read(17)
        data = struct.unpack(">3H",line[0:6])

        recordWriter.writerow([date] + [data[0]] + [data[1]] + [data[2]])

    #now that we're done with the record, advance to the start of the next one
    record_start = record_start + record_length

    mii = mii+1

You can download a copy of it here.

Exercise, Hacking

Exercise + Gadget Lust

I have to give Adidas credit where credit is due. They’ve managed to tie a $140 upsell to a pair of shoes I bought for $55.

It’s no secret that I, like many nerds, suffer from gadget lust. When I see a new gadget, my thought process goes something like: “Oh that’s so neat… but it’s kind of expensive, and I could build something way better for less money… but I’m never going to actually get around to doing that so I’ll just buy it.”

So when I noticed a sticker that said “miCoach compatible” on the new pair of running shoes I got from the clearance rack at DSW, I was intrigued. “Compatible” is almost certainly a hardware term. Was miCoach some sort of Adidas version of the Nike+? Did this mean that my shoe had a secret cavity for storing circuit boards? And would that cavity also fit the Nike+ so I could log my workout data automatically?

The answers to all of the above was yes. Hooray!

I did some research on the miCoach. It’s similar to the Nike+ (widget you put in your shoe to track your workout) but is more of a comprehensive package (includes a heart rate monitor and pacing tool which tells you to slow down / speed up according to your HR). It’s also about $100 more expensive than the Nike+. The shoe sensor has a user replaceable battery, but still.

Then I did some research on the data export. Because what fun is collecting data if you can only get it via someone else’s bad UI? Nike+ hacking is well traversed ground, with easy access to the XML workout data. miCoach doesn’t seem to have much going on, and uses a proprietary binary format to store the workout data (which is then presumably decoded by their servers). Gross.

I was all set to buy a Nike+ when I found out that my 5th generation iPod was not compatible with it. In order to use the Nike+ I’d have to pick up a new Nano. The price of the Nike+ just got a lot more expensive.

After talking to some of the Resistor folks I decided tinkering with the miCoach could be fun. Between the raw data from the device and whatever software is used to transmit it to the the miCoach servers we should be able to get *something* interesting. It’s admittedly pretty far out of the realm of things I’ve done before, so it’ll either be a good learning experience or a huge road block / dead end.

We’ll see when it gets here next week!

LEGO

And another note on LEGO

Another thing that bugged me about the LEGO store…

One of the employees was enthusiastically telling us all about LEGO (as employees ought to), and showed us a magazine dedicated to “Adult fans of LEGO” or AFOL.”

He then went on to explain that within AFOL is a subgroup, AFFOL or “Adult Female Fans of LEGO,” a rare and mystical breed of AFOL. He proceeded to flip through the magazine to show us a photo of a REAL LIVE LADY who ACTUALLY BUILDS WITH LEGOS!

I wasn’t in the mood to pick a fight over nomenclature, but really? When are people going to realize that singling out women in a male-dominated field, be it work or play, is counterproductive? I’m not an AFFOL any more than I am a “girl gamer.” Drop the extra adjective, people.

LEGO

Hundreds of LEGO bricks

I’m in need of many, many LEGO bricks for what is currently a SECRET project.

This week I went to the LEGO store in Paramus, NJ. It was a bit of a let down, and not really worth the hour of fighting traffic it took to get there. They didn’t have any big tubs o’ bricks, just kits, and their pick-a-brick selection was pretty limited (I was looking for 1×2 bricks).

What I DID find was an amazing resource, Brick Link. Bricklink is like eBay for LEGO bricks. You can find pretty much any size/shape/color. Their interface is a little clunky, without integrated shipping or payment, but it gets the job done.

I ordered roughly 700 red LEGO bricks for $40, most of which was the cost of shipping. It’s marginally cheaper than the cost per brick of a big tub, but I was able to hand select the colors and shapes that I wanted.

More details when I get the LEGO bricks in…

Hacking

Manga on the B&N nook

The main reason I chose the B&N nook over the Kindle when I bought an ebook reader was the fact that the nook supports PDF and Epub. While the nook’s PDF support is really only suited for text, it doesn’t do a very good job with graphs and images, I find that I can convert most anything a nook-friendly format using Calibre.

One thing the nook handles surprisingly well is manga, Japanese comic books. The nook doesn’t do so well with full sized American comics due to resizing (thus rendering text illegible), but the smaller form factor of manga is perfect for the nook’s screen size:

A lot of manga is only commercially available in Japanese, and the English translation are largely done by fans. The translated files are available in .CBR or .CBZ format, which is really just a renamed zip file full of images. Calibre does a great job of converting the CBR files in to an Epub suitable for the nook. The pages are very readable, and the artwork looks good.

There was also some new nook firmware released today. While most of the attention is going to the new browser (in beta) and games, the page turns are noticibly faster in 1.3. They’re now fast enough that I don’t really notice them, and consider it on par with the amount of time it takes to physically turn a page:

The nook got off to a shaky start, but it’s turning out to be a really nice ebook reader. The games are cute, but not something I see myself using much. Hopefully when the browser is out of beta it will allow for downloading books through it (right now you have to cable sync or use B&Ns app). Or better yet, I hope they let folks develop their own apps for them. A Calibre client for the nook would be great.

Programming, Software

Importing Data from Magento to PrestaShop

Today I gave up on Magento. It’s a powerful piece of software but it’s still pretty rough around the edges, and the UI and architecture makes it a pain to dive in and debug if something goes wrong. It’s built on Zend, so someone who has spent more time with Zend than I have would probably have an easier go of it.

Anyway, I’m moving over to PrestaShop, and don’t want to lose all my customer and order information. Since I managed to trash my Magento installation, I’m migrating the data over manually via an exciting series of MySQL queries. I’m posting them here in case anyone else needs them.

This data is then imported into PrestaShop using the built in import tool. They have a fairly easy to use interface for assigning columns in the CSV to various PrestaShop information (name, address, etc).

Getting the customer’s ID, name, and email address:

SELECT DISTINCT ce.entity_id AS b, email, 'default_password', (

SELECT value
FROM customer_entity_varchar
WHERE attribute_id =7
AND customer_entity_varchar.entity_id = b
) AS l_name, (

SELECT value
FROM customer_entity_varchar
WHERE attribute_id =5
AND customer_entity_varchar.entity_id = b
) AS f_name, 1
FROM `customer_entity` AS ce
JOIN customer_entity_varchar AS cev ON ce.entity_id = cev.entity_id
WHERE 1

You’ll notice I select the string ‘default_password’. This is just to generate a column of dummy password data. I haven’t thought of any creative ways to migrate the password data, and instead am just resetting it. The downside is that users will have to request a new password in order to log in. You should not use default_password as the actual string, for reasons I hope are obvious.

Get the address books:

SELECT DISTINCT 'Home', cae.entity_id AS b, 

(select email from customer_entity where entity_id = parent_id) as email,

 (
SELECT code
FROM customer_address_entity_int as mm1 join directory_country_region as mm2 on mm1.value = mm2.region_id
WHERE mm1.attribute_id =27
AND mm1.entity_id = b
) AS state,
(
SELECT value
FROM customer_address_entity_varchar
WHERE attribute_id =25
AND entity_id = b
) AS country,
(
SELECT value
FROM customer_address_entity_varchar
WHERE attribute_id =24
AND entity_id = b
) AS city,
(
SELECT value
FROM customer_address_entity_varchar
WHERE attribute_id =18
AND entity_id = b
) AS f_name,
(
SELECT value
FROM customer_address_entity_varchar
WHERE attribute_id =20
AND entity_id = b
) AS l_name,
(SELECT value
FROM customer_address_entity_text
WHERE attribute_id =23
AND entity_id = b
) AS addre1,
(SELECT value
FROM customer_address_entity_varchar
WHERE attribute_id =28
AND entity_id = b
) AS postcode

FROM `customer_address_entity` AS cae
JOIN customer_address_entity_varchar AS caev ON cae.entity_id = caev.entity_id
WHERE 1 

Getting the order data over is another beast, one which I’ll tackle another day. There’s a convenient importer for products, but unfortunately the individual order data will have to be migrated painfully via SQL.

Programming

Tutorial: Writing a TCP server in Python

During the last 12 hours of the hackathon I decided to write a TCP server for an old project I want to finally finish. I decided to write it in Python, mostly because my friend Adam likes Python and Adam would inevitably be the one answering my questions when I got stuck. I should mention that prior to yesterday evening I knew nothing about socket programing. And I only had a vague idea of what threading was.

Since not everyone has friends like Adam, I’m writing up my findings in a tutorial.

Note: A bug in my CSS is causing the code blocks to show up extra wide. I’ll fix it once I’m back home from the hackathon

Understanding Sockets

First, I’m going to assume you understand that this is not a tutorial about writing an HTTP server. Instead this server will take connections from clients and keep them open to pass data back and forth until one side decides to close the connection. By keeping the connection open we eliminate the need to constantly poll the server for updates.

Socket Programming HOWTO provides a broad overview of sockets and is a good starting place.

Python’s Socket Library

Luckily python has an easy to use library. Like other libraries, we import it with thusly:

from socket import *

Many of the socket methods you’ll use are pretty self explanatory:
socket.listen() – listens for incoming connections
socket.accept() – accepts an incoming connection
socket.recv() – returns incoming data as a string
socket.send() – sends data to client socket*
socket.close() – closes the socket

*in this context the ‘client socket’ can be on either the server or client side. When a client connects to a server, the server creates a new client socket on its end. The two clients, one on each end, communicate with each other while the server socket remains open for incoming connections. This becomes more clear as you work with socket connections.

Writing the server
First thing’s first, we need to establish our server socket:

##server.py
from socket import *      #import the socket library

##let's set up some constants
HOST = ''    #we are the host
PORT = 29876    #arbitrary port not currently in use
ADDR = (HOST,PORT)    #we need a tuple for the address
BUFSIZE = 4096    #reasonably sized buffer for data

## now we create a new socket object (serv)
## see the python docs for more information on the socket types/flags
serv = socket( AF_INET,SOCK_STREAM)    

##bind our socket to the address
serv.bind((ADDR))    #the double parens are to create a tuple with one element
serv.listen(5)    #5 is the maximum number of queued connections we'll allow

So now we have a server that’s listening for a connection. Or at least we did until the script reached the end and terminated, but we’ll get to that in a bit. Let’s leave our server hanging and jump to our client software.

Creating the client
Start a new python script for the client. We’ll need many of the same constants from the server, but our host will be ‘localhost’. For now we’ll be running both the server and the client on the same machine.

##client.py
from socket import *

HOST = 'localhost'
PORT = 29876    #our port from before
ADDR = (HOST,PORT)
BUFSIZE = buy online levitra cialis viagra 4096

cli = socket( AF_INET,SOCK_STREAM)
cli.connect((ADDR))

Notice that we’re creating another socket object on this end but instead of binding and listening, we’re using the connect() method to connect to our server.

So what happens if we run our server and then run our client? Well, not much. While our server starts to listen, it then hits the end of the script. We need it to instead wait until it accepts a connection and then do something with that connection.
socket.accept() does just that, and returns two things: a new client socket and the address bound to the socket on the other end. Once we have that, we can send data!

Continuing on server.py:

serv = socket( AF_INET,SOCK_STREAM)    
 
##bind our socket to the address
serv.bind((ADDR))    #the double parens are to create a tuple with one element
serv.listen(5)    #5 is the maximum number of queued connections we'll allow
print 'listening...'

conn,addr = serv.accept() #accept the connection
print '...connected!'
conn.send('TEST')

conn.close()

The last step is to jump back over to our client and tell our client to expect to receive data:

cli = socket( AF_INET,SOCK_STREAM)
cli.connect((ADDR))

data = cli.recv(BUFSIZE)
print data

cli.close()

Now when you run your server it will wait until a client connects. Once you run your client it will connect and receive a short message (the word “TEST” in this case) and print it to the screen. If you wanted to you could have the client send a response, using the same send() and recv() methods (but reversed).

Make sure you close() your connections when you’re done using them. If you don’t close things nicely they have a nasty habit of staying bound/connected until you forcibly kill the python process. This can be a real pain when you’re debugging.

By itself this isn’t particularly useful, especially considering we can only handle one connection at a time and exit once it’s closed. By adding a few while loops and some threading we can make this into something much more valuable. As it is, I’m pretty wiped from the hackathon, so the threading tutorial will have to wait until another day.