I was browsing Pinterest for work (yes that is an actual thing) and saw a pin on how to whiten your pillows. It links to a “magic whitening formula,” most of which is probably just OH MY GOD DID EVERYONE ELSE KNOW PILLOWS WERE WASHABLE?
Somewhat skeptical, I went to the Closet of Old Gross Pillows (aka the guest closet) and read the tags. Lo and behold, they all say they’re machine washable. By George, I’ll try it!
Since I have a high efficiency front loader, the recipe in the article won’t work for me. But with a little improvising I came up with something that worked really well.
1 tbsp powdered laundry detergent
1 tbsp borax
1 tbsp dish detergent
bleach to the “max” line in my machine’s bleach dispenser
For the love of god, defer to the instructions on your machine if you decide to try this. I use a very low-suds detergent, and did not have any issues in my machine, but please use common sense and err on the side of caution.
My machine has a pretty good soak setting, but for the grosser pillows I stopped it during the rinse cycle and ran them through again. Then I chucked them in the dryer. Martha says to make some felted dryer balls to fluff them up, but aint nobody got time for that. They dried just fine on their own.
So how’d they come out?
When I pulled them out of the dryer I thought “meh, they still look kinda dingy.” And then I set them down next to the ones that hadn’t been washed yet.
Prior to washing, the left and right pillows were the same color. Gross!
I think most of the credit goes to simply washing the pillows, rather than the “magic” whitening solution, but I’m happy either way.
I put my new sewing machine through its paces making some clothes for Bitmap. I like making toddler clothes a lot better than making adult clothes, because all the pieces of fabric are so small! No wrestling many yards of fabric on my floor, and I can make a dress with 1/2 yard of fabric.
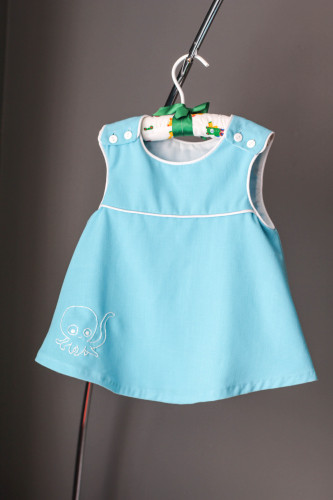
The first thing I made is a jumper using the free Vivienne pattern from BurdaStyle. I used a washable Linen blend and added white piping. I am now obessed with piping and will add it to all of Bitmap’s clothing. If you’ve never tried it before there’s a great tutorial here.
This dress was the first time I’ve ever used the buttonhole setting and it takes some practice. Do not look too closely at the button holes, please. The octopus was hand embroidered, RevolvingDork designed it after I requested a “cute octopus.”
Overall I’m happy with it, though I will probably practice a bit more with the buttonholer before sewing my next dress.
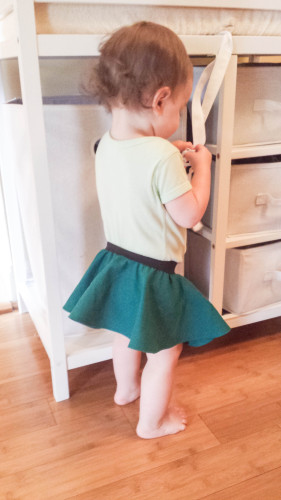
I also made a quick circle skirt to wear over onesies. It’s a good use for fabric scraps. You could probably even use a fat quarter if it’s for a small enough baby. Detailed instructions, including how to get a nice hem, can be found here.
Remember how I gave up on making baby food because it was crushing me emotionally? Well, these days I have a toddler brimming with teeth, and even a few molars in there. You’d think I’m well past the woolly world of pureed vegetables. You’d think that at 15 months, my daughter would be shoveling finger food into her mouth. And you’d be wrong.
Vegetables, she has decided, are not finger food. Vegetables are for throwing on the floor. I tried burying shredded broccoli in mac and cheese. She took a bite, chewed it, reached into her mouth, and pulled out the offending plant. She then handed it to me with a look that said “I think you lost this, here it is.”
Pouches of pureed vegetables (preferably with fruit mixed in) are the only way I can get most veggies into this kid. As a bonus, they’re fairly clean and she can self feed them. As an anti-bonus, they cost a goddamned fortune. Amazon’s Subscribe & Save brings the price down, but not nearly enough.
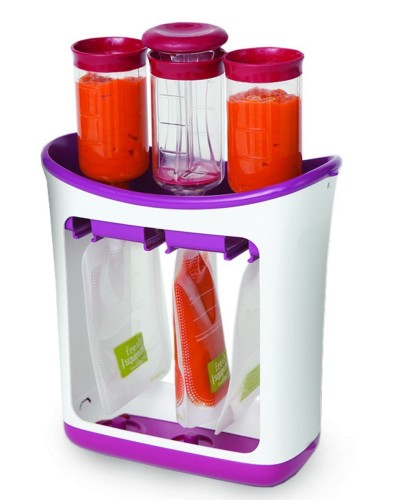
HEY LOOK A KITCHEN GADGET
We saw the Infantino Fresh Squeezed system at Target, and I was intrigued by the idea of not having to mortgage our house to get Bitmap to eat some veggies. I also happened to be at Target for some post-miscarriage retail therapy, so I was totally into the idea of buying some stupid baby food thing I don’t really need. RevolvingDork was less convinced, but for $20 was willing to try it if it meant I would stop pouting at him. Oh and the reviews online were all very positive.
You guys, I am totally in love with this thing.
It is really weirdly satisfying to shove puree into little pouches with a plunger, and even more exciting to see Bitmap consume things like carrots and spinach. I’ve been making purees of pretty much everything. I’ll give her a store-bought pouch to sample, and if it’s a hit I will recreate it in my food processor. So far it’s great. She can eat them without my help, they’re relatively tidy, and oh thank god she is eating vegetables.
The pouches are disposable (though they do make a reuseable one), and they do cost a little more than I’d like. It’s still not a cheap way to feed your kid. But if I think of it as a bribe for eating vegetables it almost seems reasonable. And it’s still a hell of a lot cheaper than the store-bought pouches (most of which range from $1.25 to $1.90 per pouch).
Various purees ready to eat
I throw equal parts cooked veggies and applesauce/pearsauce into the food processor and blend until smooth. If you are a super amazing mom who loves her children more than her sanity, you will probably pick some organic produce from your hobby farm and steam it lovingly before smashing it for your child. If you are like me, frozen or canned veggies are totally fine. Also, it turns out pre-made applesauce is WAY CHEAPER than buying fresh apples and saucing them. Just make sure to read the labels on everything to make sure there’s no added salt / sugar.
A can of pears + a can of peas is enough to make 4 pouches of food. They’re around $1 per can. Four disposable pouches works out to roughly $1.30. So add that all up ($3.30) and the cost per pouch is $0.82. More than I’d like, but far cheaper than the store bought ones.
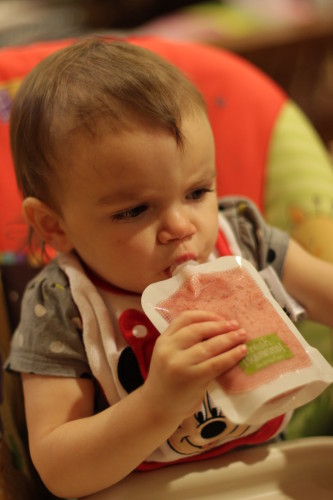
I also make some yogurt + fruit pouches, which I keep in the freezer and serve as smoothies. Either run them under warm water for a bit or let them warm up in the fridge before serving. We gave one to Bitmap this evening after she bit her lip. It cured her hysteria instantly.
She’s gonna make it after all
Here are some “recipes” that Bitmap likes. I use either fresh, frozen, or canned food as it’s available. Fresh veggies are great, but I won’t judge you if you’re too tired to do anything but crank the can opener. Smoothies are a good use for fruit that is looking slightly over-ripe. You may need to add a little water to get the consistency you’re after.
Strawberry Spinach Smoothie (makes 4-5 pouches)
1 cup greek yogurt
2 cups whole strawberries
1 cup steamed spinach (or kale)
Spinach Applesauce (makes 2-3 pouches)
1 cup steamed spinach
1 cup applesauce
Applesauce / Pearsauce and Veggies (makes 4-5 pouches)
1 cup steamed peas
1 cup steamed green beans
1.5 cups applesauce or pearsauce
I picked up a new sewing machine from shopgoodwill.com. It was sort of an accident. A friend linked to a knitting machine for sale (cheap!) and I noticed they have a ton of old sewing machines. Most of them are junk but a few are just solid old machines in need of love.
I have two other machines in addition to the one I just purchased, the younger of which is approaching 70. Both work flawlessly. But every now and then I have a need for a zig-zag stitch, and neither machine can do that.
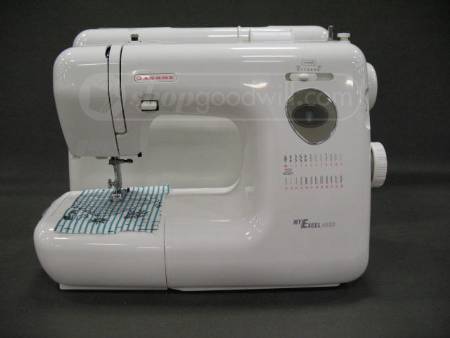
The photo of the machine from the listing
While poking around the Goodwill website I saw a Janome My Excel 4023 for sale. It’s description merely said “works.” I couldn’t find much information about the particular model but I figured for under $50 it was worth a gamble. Even the low end Janome machines are made with metal frames (and then covered in plastic for aesthetics), so as long as the machine was in decent shape it would suit my limited needs.
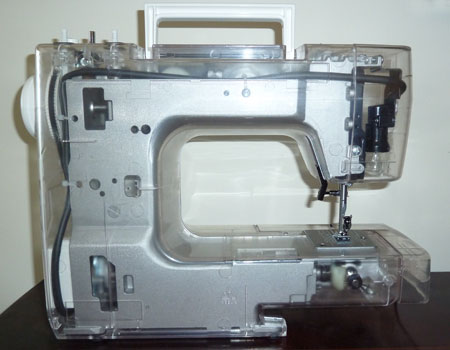
A Janome JR1012 in a clear plastic case so you can see the metal frame inside
$37 later the machine was mine. Goodwill of Indiana did a thorough job packing it up, and sent it along with a scrap of cloth, spool of thread, and full bobbin loaded up and ready to go. I plugged it in, turned it on, and realized I had no idea what half the knobs did. The machine didn’t come with a manual and I couldn’t find one online. So I did the unthinkable: I contacted Janome customer support. 15 minutes later, a PDF instruction manual landed in my inbox. Magic!
Some less than scrupulous companies are selling digital copies of the PDF, despite it being freely available from Janome. If you are looking for a copy you can download the Janome My Excel 4023 for free.
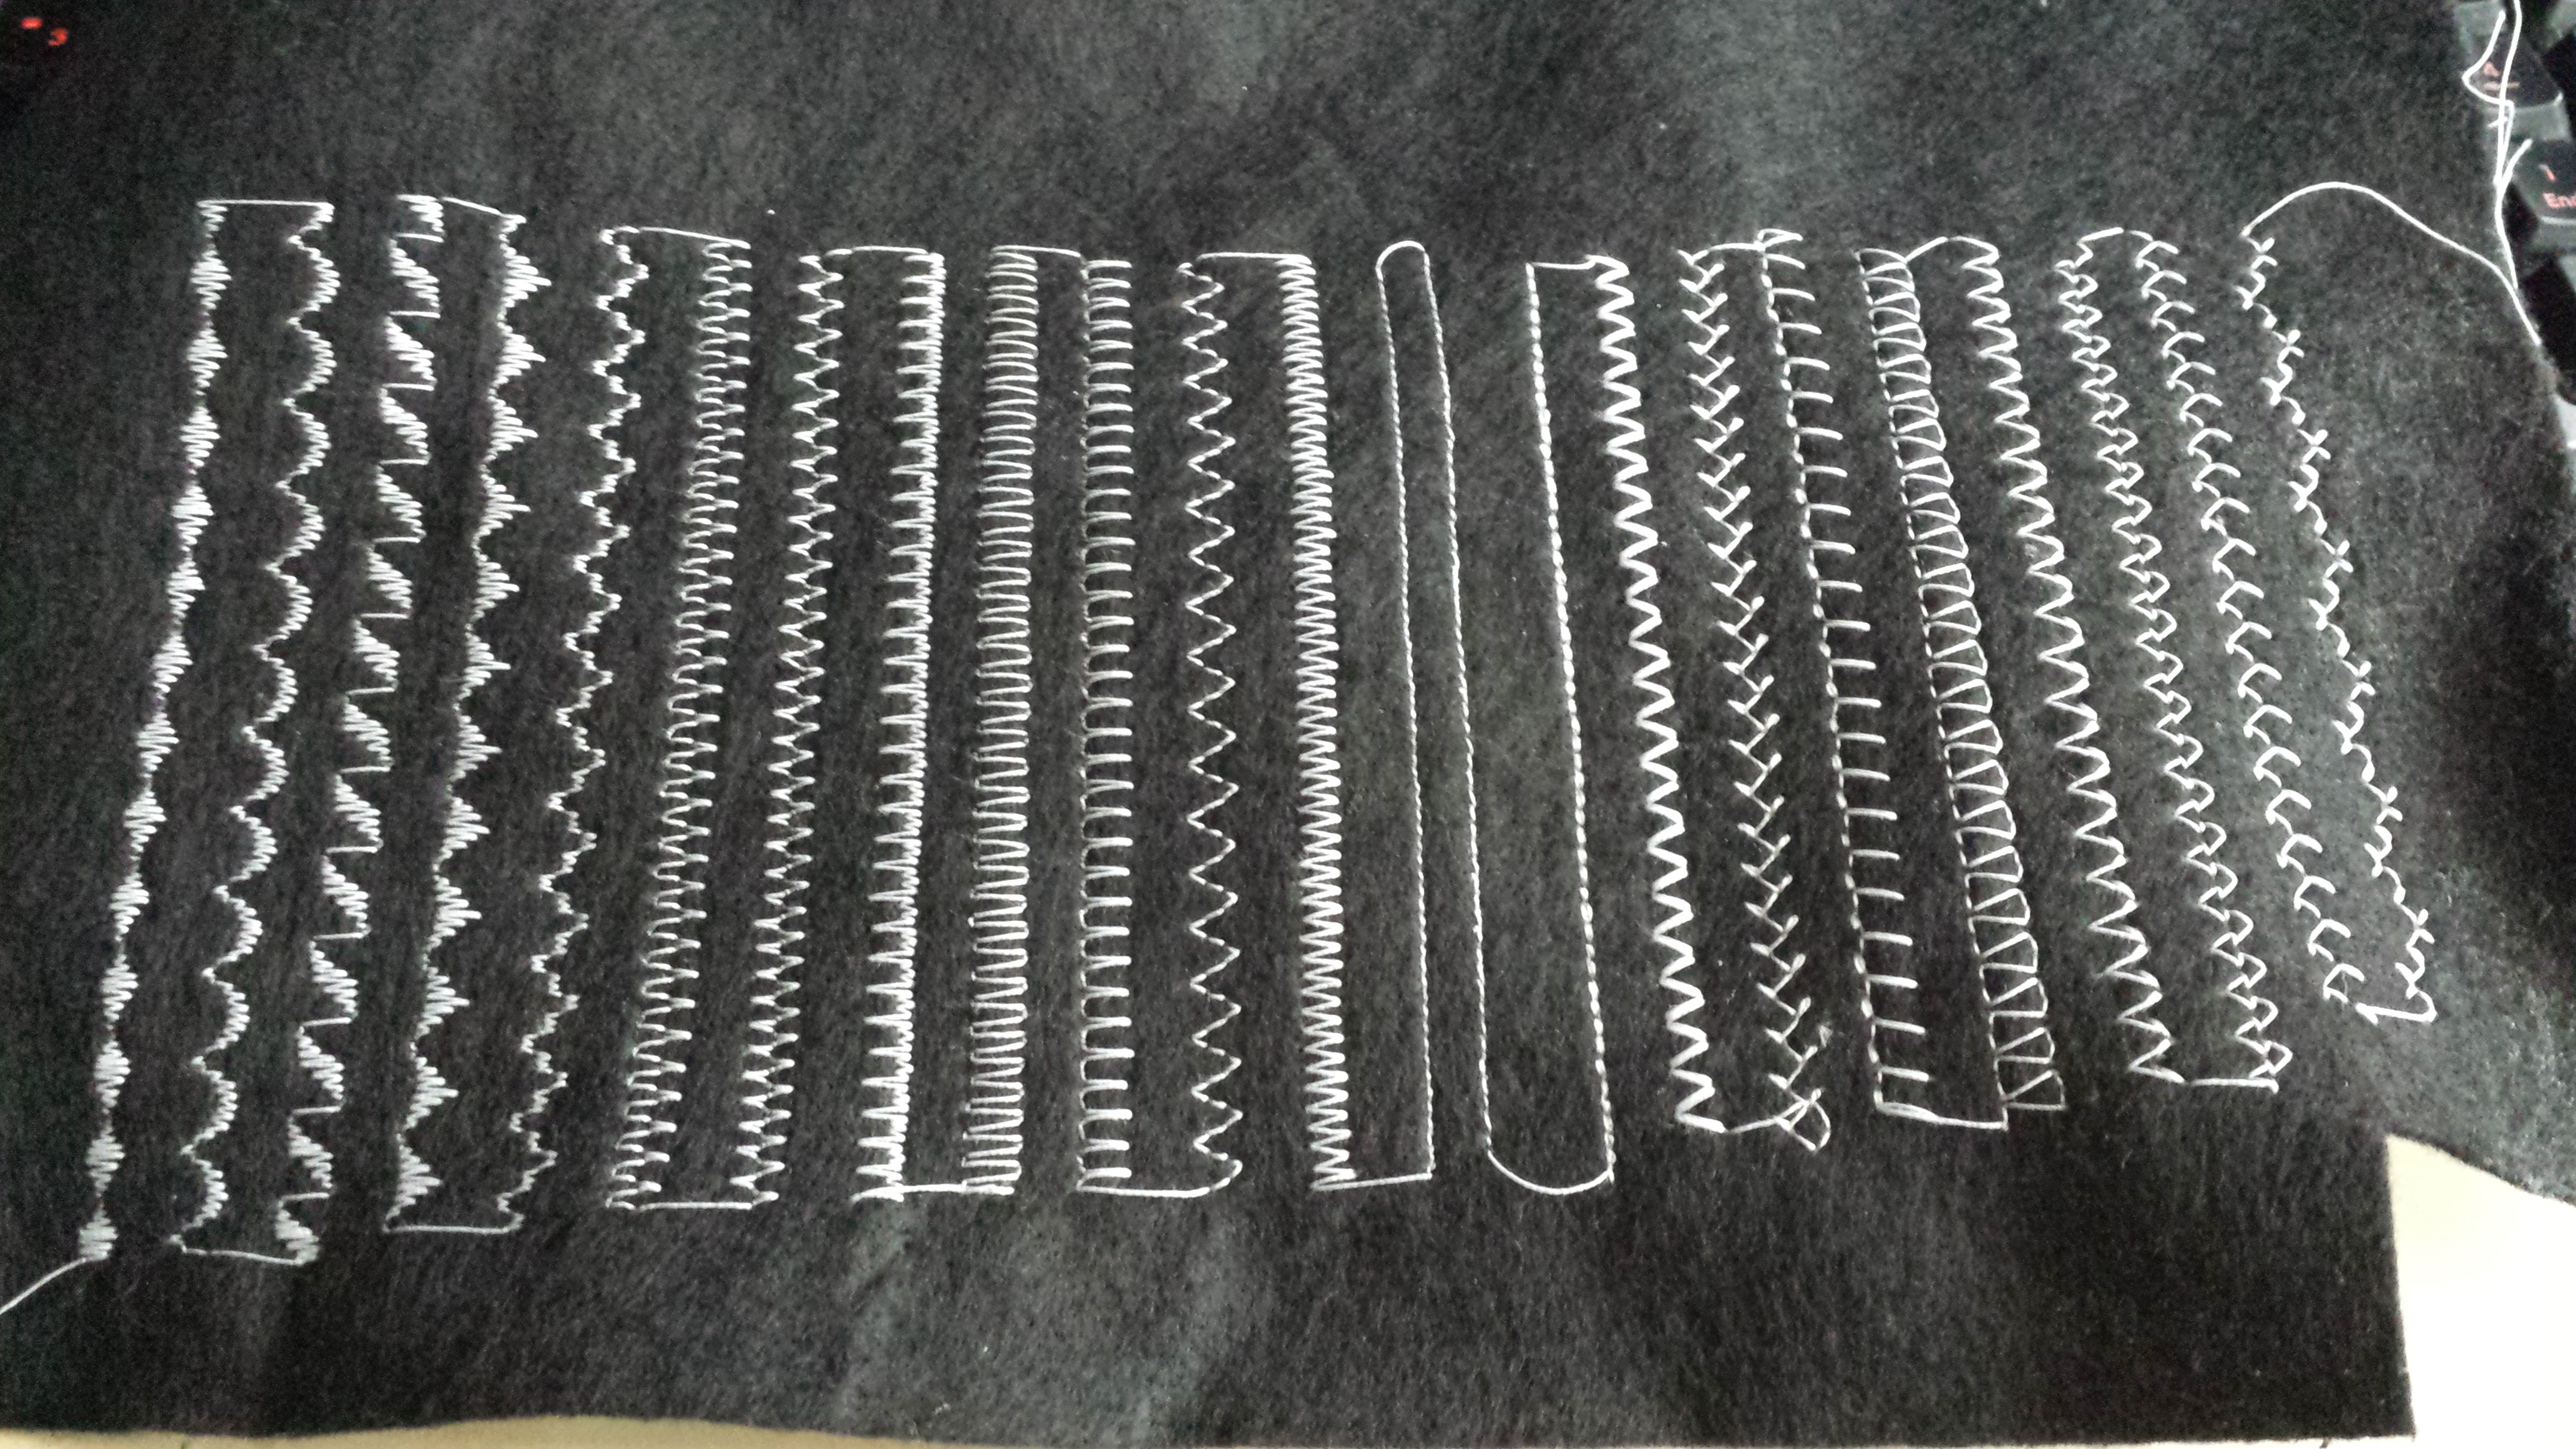
It’s an all-mechanical machine. Each of the 24 stitch patterns has a little metal disc with grooves for the needle positioning. I did a test swatch of each pattern on some scrap felt.
A swatch of all the different stitch patterns on the machine.
After a quick cleaning everything looks to be in good shape. The My Excel line was made in the 90s, so I’m guessing this machine is 15 years old, and is in incredible shape given that. It barely looks used and could probably use a professional once-over, but for $37 I feel like I got a really good deal.
A few weeks ago I found out I was pregnant. I admit I wasn’t entirely thrilled at first, having hated being pregnant the first time around. But I slowly came around to the idea, and started getting really excited about adding another little blob to our family.
On Friday I went to the midwife’s office, and everything looked normal. Because I wasn’t exactly sure how far along I was, we scheduled an ultrasound to date the pregnancy. On Wednesday I popped into the hospital for a quick ultrasound. Forty-five minutes later we were still waiting for the “result” from the radiologist, which was a red flag to me, but I shrugged it off as paranoia. Then I got a call from my midwife, who let me know our fetus had no heartbeat.
In that moment I felt like the world ended. I went straight into denial. Surely it was a mistake, since the fetus was measuring right where we thought it would. I cried and cursed and begged the radiologist to admit that this fell within some sort of margin of error, and that everything was actually OK. At only 8 weeks along, they must have just missed the tiny heartbeat. There was no way it wasn’t there. I knew in my heart they were right, but I held on to every shred of denial I could.
I asked if I could see for myself, and the radiologist obliged. Back up on the ultrasound table, I could see our little proto-human, with its big head and lizard-like tail. The tech showed us where she looks for heart movement, and I recalled how on my 6 week ultrasound with Bitmap we watched her little heart beat furiously. Fetusaurus just had a black dot. She pulled up an overlay which showed blood flow, and my body lit up like a blue and red Christmas tree. Fetusaurus remained an island of grey on the screen, sitting serenely among the hustle and bustle of my insides. In that moment I acknowledged the truth: Fetusaurus was not going to grow into Baby #2.
I did a lot of crying that day, and have a lot of crying yet to do. But I’m also starting to get some perspective. Tragic as it is, these things happen. At this stage, we have no reason to believe I won’t be able to carry another child to term. We didn’t have to jump through any medical hoops to get pregnant, and my first pregnancy was totally normal (if unpleasant).
My friends have rallied around me and I feel truly blessed to have such a wonderful support network. Many of them are pregnant as well, and due around the same time I was. I thought I might feel some resentment towards their pregnancies, but it turns out I’m just happy to have some good news to contrast mine.
A friend of mine told me her mother had eight miscarriages before she was born. Eight. I can’t even imagine how one goes through that, but her mother maintains “I knew it was you every time.” The idea of a persistent soul trying to find a viable vessel is comforting to me. And makes about as much sense as any other religious explanation. So while it may not be Christian canon, I’ve adopted it for myself.
Baby #2 will have to wait a little longer to meet us, but I know it will eventually. I’ve learned over the years that families grow in a huge variety of ways. Some of them happen the old fashioned way, some require the help of medical intervention, and some are made through legal declarations. But as I wade through my haze of grief I know that this is a setback on the road to growing our family, not the end.
I just finished reading Boy in the Ivy, a memoir about buried pain brought into clear focus by the suicide of the author’s brother. It’s a pretty heavy book by all counts – in fact I switched to Game of Thrones when I wanted a break for some lighter fare. But it’s an unusually honest and personal account of a man who is buried so far under his past he’s hardly conscious in the present. The author also happens to have been my seventh grade English teacher, T McKinley.
It’s a little strange to read such intensely personal stories from someone I knew in a decidedly professional context. Sort of like driving by a distinctive house every day and then, years later, happening to meet someone who lived there. When we know people superficially we file them into neat little compartments. But real people almost never fit into tidy boxes. Once when I was in the seventh grade, a classmate asked why Mr. McKinley had quit doing stand-up. He replied simply and somewhat solemnly, “it would have killed me if I’d kept doing it.” Even a twelve year old can recognize that statement belongs to a man carrying some pain.
A few chapters happen to overlap with the years I was his student, and I recognize a few of the colleagues he describes. The description of my math teacher is so spot on I had to read it aloud to my husband. Perhaps the most shocking is that T’s feelings towards both the math teacher and the Head of Middle School mirrored my own. At the time, the veil of professionalism between staff completely precluded the idea that some of the teachers might find the Head as vapid as I did.
As uninspiring as I found the Head of school, the math teacher and I were in a stand off. Our school had tracked math, and once you got stuck in one track it was difficult to move out. The math teacher, “Ethyl,” was a dear and doddering old lady to those students she’d groomed since grade school. But to me, an interloper who had switched into her class mid-year because I was blowing the curve in lower math, she was cold. As I was finally being challenged, my math grades slipped from 98 and 100% down to more reasonable numbers (I was, after all, a somewhat apathetic seventh grader taking pre-algebra). Ethyl took each middling grade as proof that I didn’t really belong there.
A recurring theme in the memoir is impostor syndrome. T fears the new school administration will notice he has no formal background in education, and sack him in favor of some shiny-resume’d fellow who loves khakis. It’s impossible to know whether that was a serious risk, but I don’t doubt there was at least a shred of reality there. And I can’t imagine the “battleaxe” of a math teacher feared for her position in the least. One would hope the administration would be able to appreciate any teacher whose students were engaged and interested, regardless of whether it was due to cutting edge educational training or just an incredible ability to improvise. But having been in the professional world for a decade now, I know better than to count on that. T gives no concrete reason for leaving the school, possibly because it’s not relevant to the story, or maybe to avoid burning any bridges.
Which brings me to my only complaint, and it does feel blasphemous to even attempt to critique one’s English teacher (especially given some of the clunkers I turned in). Towards the end things feel rushed. Early and middle years are laid out in painstaking detail, drawing a clear road map between childhood and the buried state T found himself in 40 years later. But the last decade is given just a few chapters, a rush of moving cross country and finally asking for help. I couldn’t help but feel like something important had been left out.
Part of it may be that I recognize myself in parts of the book. Although our lives and paths have very little in common1, I empathize all to well with loathing one’s inner child. I see it manifest in my own short temper with my daughter. My dad was short tempered too, although he’s mellowed out in his old age. We’re close now, but it took a while. I want to ensure that I break that pattern a lot earlier with my own kids.
But Boy in the Ivy is a memoir, not a self help book. It is perhaps a mild call to action: if you see yourself here, you may also be buried. But it is primarily a personal story. It is the story of one man who found his way out, and is still walking that path. It takes an incredible amount of courage to publish anything that deeply personal, and even more skill to make it into a compelling story. Boy in the Ivy does both beautifully.
In particular I want to mention that my parents were warm, loving, encouraging, and completely averse to corporal punishment of any sort. Lest you read the book and get the wrong impression. [↩]
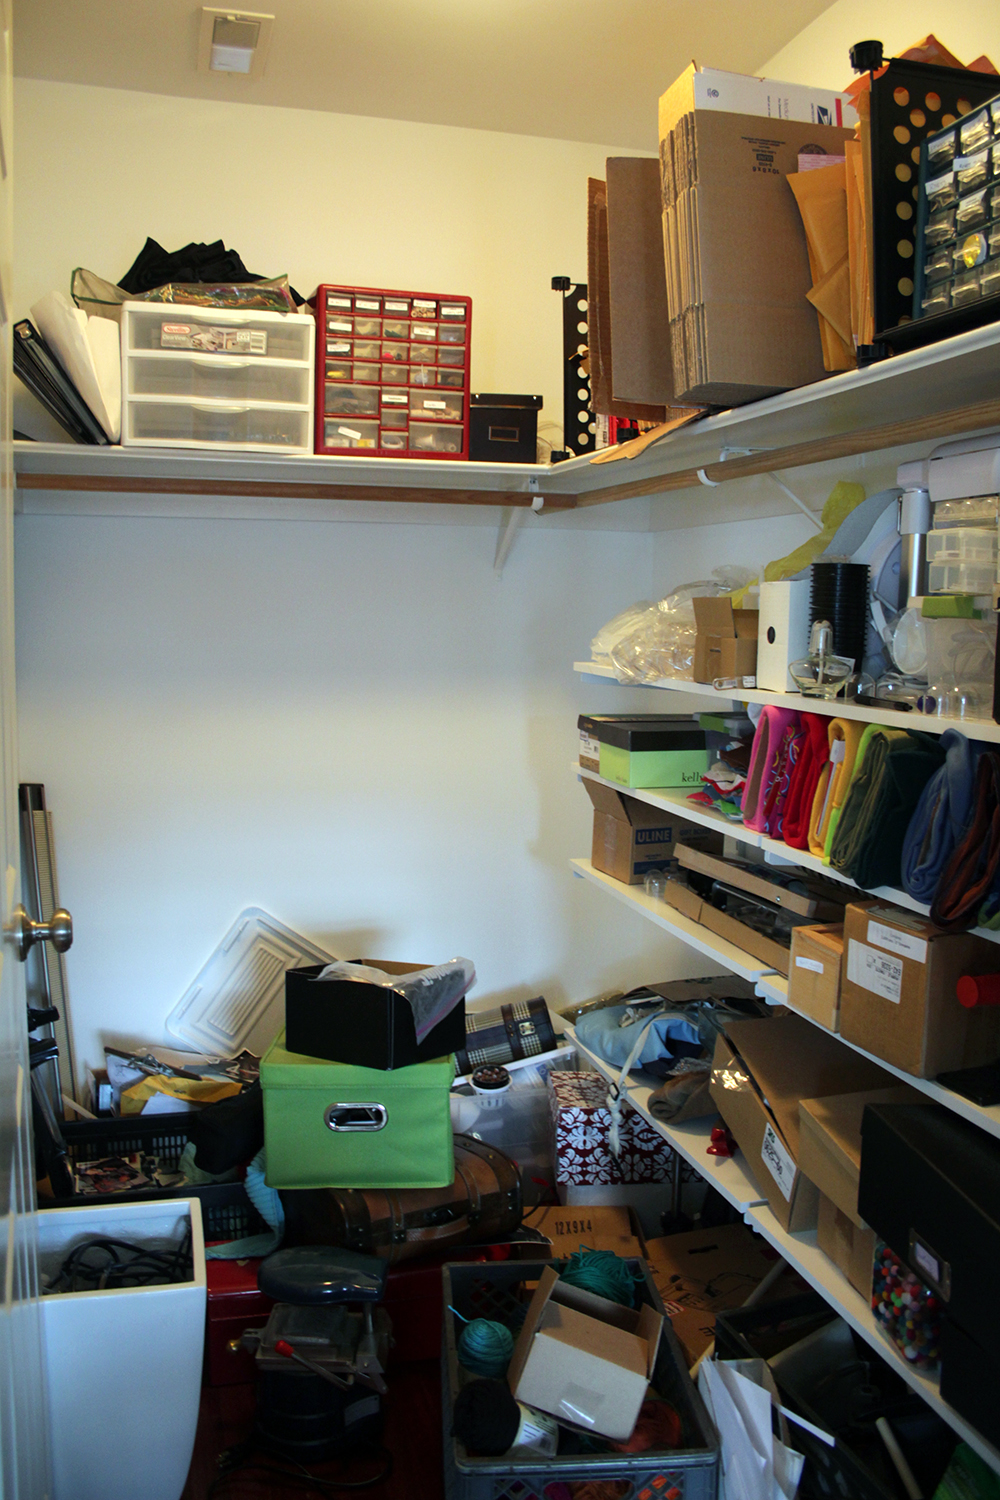
The shelving is up (pictures forthcoming), and I’m now replacing the contents of the closet. For the most part it was easy; the huge pile of stuff has dwindled to just a few errant boxes of flotsam and jetsam. But this last little bit is taking forever. Almost like zeno’s paradox, each box I sort through seems to take twice as long as the last.
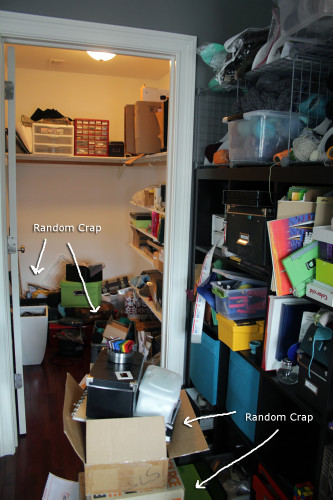
Behold: boxes of junk. Junk I suddenly desperately need.
Some of these boxes haven’t been touched since I moved in. After the exhaustion of moving, I punted on the boxes labeled “random crap” and shoved them in the closet “for later.” More than a year after moving, it is taking all of my willpower not to do the same now. In fact, I’m pretty sure there’s one box that hasn’t been touched since I moved out of my apartment in Brooklyn, long before RD and I got married.
Going through each box is exhausting. Each one contains various relics I’ve completely forgotten about until the moment I open it; at which point I can’t imagine parting with. Some things are easy: old bank statements can safely be shredded and discarded now that the information is available online. Others are tougher: college artwork (some good, some not so good), trinkets given to me by good friends, and various objects that might be useful someday.
Triage on this stuff takes a lot out of me. I part with a lot of small items, rationalizing with myself that although this pin / pencil / whatever meant a lot to me at age 15, it’s just a piece of plastic crap now. The friendship it symbolizes is the enduring thing I should keep. As a result, I’m unable to part with the items from friends I’ve lost touch with. It goes in a bankers box marked “memorabilia,” full of old papers and photos that I plan to scan into the computer “someday.”
Some of it is neat, and doesn’t take up much room, but I’ve got no idea where to put it. Included in this are MRI photos of my brain and neck; the former from a medical study I participated when I was unemployed, the latter from a neck injury sustained while washing my hair. During the brain scan, the MRI tech complimented me on how still I held my head, and asked if I would be willing to participate in other studies. I got my head scanned a bunch that year.
I’ve whittled it down to two bags full of papers “to be filed,” a stack of papers I’ve already sorted but have no idea where to file, and one 8 x 10 box of “random crap” still to contend with. With each trash bag I fear I’m throwing out something I desperately need. Something I’ll curse myself looking for down the line. But given how long I’ve managed to live without while it languished in a box, I suppose that’s pretty unlikely.
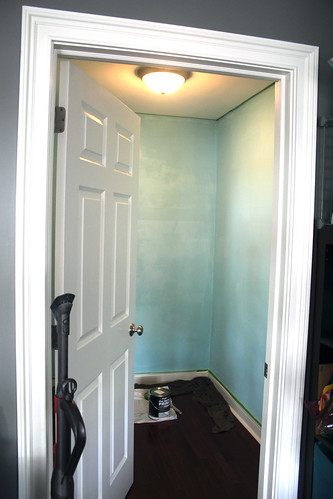
I’ve got the first coat of primer on the closet wall. It’s tinted to match the paint. I’ll let it dry for the rest of the afternoon, and possibly overnight since I have plans this evening.
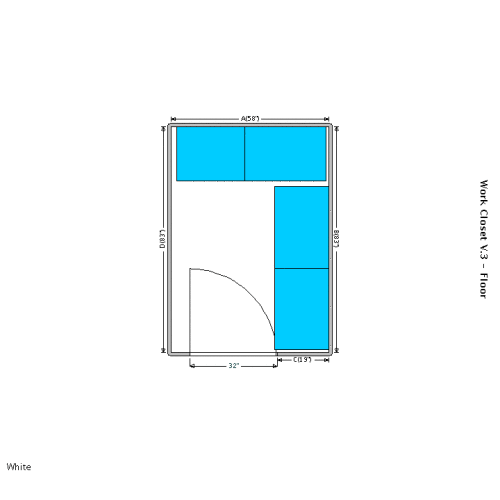
So, before I ripped out huge chunks of drywall from my closet, I did a lot of planning. Ultimately I would like all the things to fit inside my closet, so I can get rid of the huge Ikea bookcase in here. And for that to happen I needed serious shelving. Floor to ceiling, fit-to-my-belongings shelving.
Dear god why do I own all this?
The Container Store’s Elfa is the gold standard in modular shelving, and it’s gotten a lot better looking over the years. Elfa is a standards and brackets system with a mind boggling array of shelves accessories. It’s well made and has stayed fairly consistent over the years – the cart I got freshman year of college is still compatible with what they’re selling now.
The downside of Elfa is the price. Most of the kits on the Container Store website are north of $1000. Ikea, Rubbermaid, and ClosetMaid all offer similar systems. So I sat down and priced them all out (except ClosetMaid which had mostly negative reviews).
Top view of my closet, sort of to scale
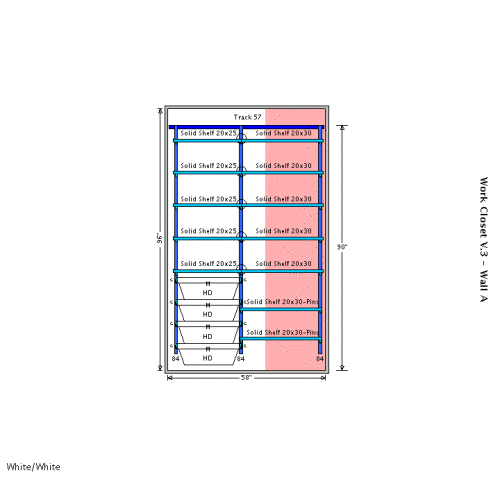
I knew I wanted shelves along the back and side wall. Because the door swings in, I decided to leave that wall empty save for maybe a few coat hooks. I tried to price out designs that were as close to identical as possible, so I went for 5 rows of shelving all the way around in an L shape.
Elfa was by far the easiest, because they offer free design planning. I called them up and spent about 20 minutes going over my options with their rep. You can see the designs online as you’re working on them, and when you’re done you get a full parts list and instructions. You can also buy the whole kit with one click. Total quoted price: $950. Ouch.
The option I liked most from The Container store, with white melamine shelves.
With Elfa as the high water mark I moved on to Rubbermaid HomeFree. Rubbermaid provides an online design planner, but I found it irritating to use and ended up just doing it by hand. The HomeFree system features parts that overlap to fit your space, rather than having to get them cut to size. Unfortunately the shelves are only available in 12″ deep, which is shallower than what I need for my stuff. It came in the cheapest at $475, but ultimately wasn’t the solution I needed.
Next I priced out Rubbermaid FastTrack. FastTrack is a much more industrial looking solution, with all wire shelves. You can cut the shelving yourself with a bolt cutter, or have it cut for you in the store. A layout very similar to the Elfa layout (but with wire shelves) came out to $650.
From there I went back to look at the Elfa configuration. I really like how extensible it is. I’m not entirely sure what my storage needs are, so the rep helped me design my system so that it would be easy to add drawers later if I decided I needed them. Most of the individual components seemed about the same price as Rubbermaid’s, why was it so much more expensive? I pulled up the parts list and compared.
It turns out, the Elfa shelves include a lot of “vanity” parts to help things look nicer. Bracket covers, rail covers, etc. Things that help class up the setup but aren’t needed for structural integrity. By dumping all those parts I got the price down to about $800. With a 25% coupon I found online, it came down to $600.
It’s still a lot of money to spend on a closet. I’d love to get the drawers now, but at $65 each for the drawer, gliders, and brackets it’ll have to wait. In the mean time, some extra shelves will go into the ‘someday’ spot for the drawers.
In all honesty, even if I’d paid full price for the Elfa, the design service makes it worth the extra $150. I’ve spent the better part of a week planning, pricing, and trying to negotiate the various shelving systems. The phone call with the Elfa designer was so painless I’d do it again in a heartbeat. Of course, we’ll see if I’m still singing their praises after I install the damned stuff.
“Organize my office closet” has been on my to-do list for a long time. This week was the week.
Not shown: piles of boxes outside the closet
I have some cheap Ikea standards and brackets (on the right) which absolutely had to go. They wobble and are a pain to deal with. And I needed shelving on the back. And the wrap-around top shelf and clothing rod weren’t helping matters.
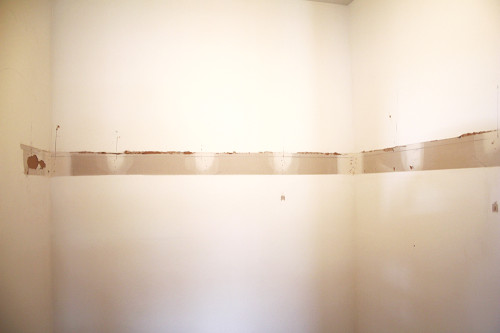
The Ikea stuff came out easily enough (save for the drywall anchors… ugh). But the wrap around shelf was another story. It turned out it had been nailed in all the way around. And there were many coats of paint on the shelves so the nails were near impossible to find, let alone dig out. So I got out a prybar and started pulling the stuff down.
At one point, with a sickening ripping sound, it became clear that some of the drywall was coming along for the ride. It turns out not only was the shelving nailed to itself and the wall, it was also caulked and glued in place. And so a great deal of drywall came down with it. The horizontal stripe below is the totally unpainted drywall, with a scar on the left and all along the top from the caulking.
Please excuse the bad lighting in my closet.
To make things more awesome, all this caulking, nailing, and gluing had been done on unsealed drywall so there was absolutely nothing to keep it from taking giant chunks out of my wall.
Well that sucks.
I got a self-adhesive mesh patch to go over the worst spot (shown above) and a big tub of joint compound. The first coat is drying now. In all honesty I’m not being a perfectionist about it – it’s a closet. I used a 8″ wide putty knife to smooth the edges of the layers, and only plan on sanding after the final layer. Most of the closet should be OK with two, except for the huge gash which will need at least 3.
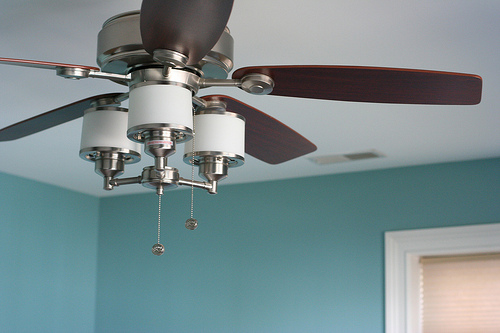
I hadn’t originally intended to paint the closet, because it’s a closet, but now I’ve got to prime and paint at least the patches. And it’s a small enough room that I can probably handle painting the whole thing. And while I’m at it, I’ll change the color to something nice, like the blue we used in the guest room:
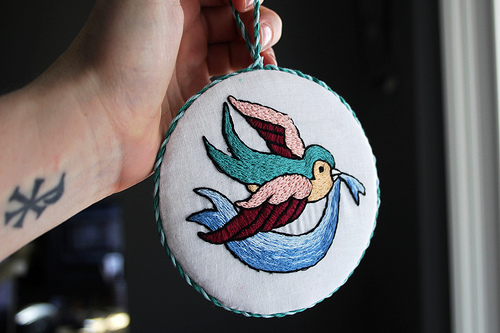
Many people who do needlepoint don’t ‘finish’ them themselves. Instead they do the stitching, and then send the stitched canvas to a finisher to be turned into an ornament or a pillow. It’s not cheap – even a small ornament will set you back $30 for finishing, and the turnaround is incredibly long. The finishers used by my local needlepoint shop take months to return an ornament. So if you want it ready by Christmas, you need to finish your stitching by early fall. Eugh.
I was taught how to finish needlework in college, by a professor who forbid us from taking shortcuts like using glue, and absolutely considered the back-side of your stitching when grading. I looked at the little ornaments coming back from the finisher and thought, “how hard can this possibly be?”
As suspected it’s not that hard. A little tedious, but it’s absolutely something you can do yourself. I found a number of ornament tutorials online, although none of them was exactly what I wanted, so I made up my own by combining techniques I liked from each one. Here’s the result:
I think they both came out pretty well. I’ll need a little more practice to get the cording / seam perfectly even, but I think DIY finishing is well within reach for most people who do needlework.


 I just finished reading