DIY Aeroponics

Sowing Garden #2

Today I sowed the seeds in garden #2, which is the first one I started on. It uses an aquarium water pump, 1/2″ tubing, and spray nozzels.

I’m not really happy with it. I managed to order the wrong spray nozzels (again), and the ones I got spray a fine mist, but straight out instead of in a 360 degree circle. This would be great if I had a big outdoor garden, but doesn’t really work for my little planter. I also don’t like how tall the whole thing has to be for the plants to clear the spray nozzles, since the tubing sits about an inch taller than the pump, which itself is an inch and a half tall. And it’s noisy. You can hear the sound of trickling water when it’s on, although I’m hoping that will be resolved by eventually getting the correct nozzles.

Garden #2

I also realized I had a design flaw. The power cord, which is supposed to go through the small hole in the front, won’t fit. Because unlike airline tubing, which can be detached and reattached easily, the water pump power cord doesn’t come off. So it has to go through a hole big enough for the 3 prong plug to fit in. Unfortunately the only hole big enough was one of the plant holes, so until I order more acrylic to cut a new top it’s just a 5 plant unit.

Overall I’m feeling a little cranky about this planter. I think this design would be well suited for something larger. Home Depot had some fun looking 12″ diameter plastic planters, and if I had anything resembling a basement I’d build something nice and big and grow tomatos in it. But I don’t, and this design just isn’t working so great on a smaller scale.
Garden #2
On the plus side I cut black caps to replace the felt ones I was using before and etched the plant names into them. And they look pretty sweet. They give the whole thing a sweet sci-fi look. I stuffed a plastic bag into the open holes (one for adding water, one which is the failed power cord hole, and one which is a plant hole with a power cord sticking out). It’s very technical.

It’ll probably be a week or two before I get more acrylic in, so this one will have do until then. I’m holding off on ordering different spray heads until I get a better feel for exactly what I need, because it’s annoying to spend more on shipping then you do the actual item.

Over at planter #1, things are starting to grow. One very eager basil seed is starting to sprout, and another one looks like it may come up tomorrow. The oregano is still in hiding, probably won’t see that until next week.
A sprout is sprouting!

Exercise

100 Push Ups

Now that I’ve ditched 10 pounds of excess flab I’m more interested in building up some strength than weight loss. Sure, I still have another 5 pounds to go to reach my goal, but focusing on my weekly weight loss is frankly a little boring now that my pants fit again. I’m still losing weight, but more slowly than before, and I’m OK with that.

Embarrassingly enough, I cannot do a single pull up. In fact, I don’t think I have ever done a single pull up in my life. In elementary school we had to do the President’s Challenge, specifically the Physical Fitness Test, and I always opted for the “flexed arm hang” instead of an actual pull up. That combined with my unwililngness to do the one mile run meant I never got the Presidents’ Award. Oh well.

So clearly my upper body strength is a little lacking. While I’m not quite ready to head over to the park every day to practice my pull ups, I can do some push ups.

Last week I started doing the One Hundred Push Ups program. In my initial test I could do 2 consecutive push ups.  In theory over the next 6 weeks or so I will build up enough strength to do 100 consecutive push ups. The program has you doing 5 or so sets of push ups 3 times a week, slowly building up the number you do at a time. There’s a similar program for squats, but those I actually have pretty well under control.

I’m now up to being able to do 10 consecutive push ups, and that was after doing 4 sets of 3-5 push ups, so things seem to be progressing pretty quickly. This in combination with continuing the EA Sports Active 30-Day Challenge (which I have been totally slacking on – but getting exercise in other ways)  should turn me into a super buff fitness freak. Or at least make me less pitifully weak. We’ll see.

DIY Aeroponics

First Planting!

I’m still waiting for some parts to come in for the garden I was working on in my last post. But in my research I found another, much simpler way to set up an aeroponic garden. Since I already had most of the necessary parts, I decided to try it out.

caps!

Rather than use a water pump and sprayers to mist water around, this setup uses an air pump (outside the water chamber) and an airstone in shallow water. Airstones and pumps can be found at any aquarium store.  I got a $10 pump (anything suitable for 10 gallons will be fine) and I had this airstone lying around. They’re about $5 new.

Lid out I’m using a tupperware container for a vessel, with a laser cut top and seed pods. I wish I hadn’t been totally sleep deprived and forgotten to photograph them, the seed pods are pretty neat. They’re made from 3 pieces of acrylic plastic, held together by gravity, and hold a plug of rockwool nicely. I’ll need to make some for the water pump version of the garden, and will be sure to get a good shot then. You can sort of see the bottoms of them, hanging from the blue top. Plans for the top and seed pods are both up on Thingiverse.

A quick note about working with rockwoool – it’s kind of like fiberglass, so you need to wear a mask when you’re working with it dry. Depending on how sensitive your skin is you may also want to wear latex gloves. It needs to be soaked for 24 hours before use, for pH reasons I only vaguely understand. I did not soak mine, because I did not read that until after I had already painstakingly embedded seeds into the plugs. By the way, oregano seeds are very hard to pick up one at a time with tweezers.

Rockwool soakingHere’s a shot of a seed pod, it rests in the hole in the top. Each seed pod needs some sort of opaque collar to keep excess light from getting into the root chamber. I used felt because it’s easy to cut and I had some on hand, but I plan on making acrylic plastic collars for them with the name of the herb engraved. The collars stay on even after the plant has sprouted. The plastic domes on the other hand are temporary, and just there to keep all the water from escaping before the seeds germinate. Once things pop up I’ll take them off.

The total cost for this setup, not including lighting, was about $30, although if you don’t have access to a laser cutter it would be a little more to have them cut by a service like Ponoko. You could also just buy the AeroGarden seed kits, which are about $20 and include 6 plastic pods, and use your tupperware container’s original lid by just drilling a bunch of holes in it. But I have a laser cutter, so I wanted to get fancy.

We’ll see in a few things whether this thing actually grows anything. I’m slightly dubious. It’s also hella ugly. Partly because of the little domes (which will hopefully be off in a few days)  and partly because of the black plastic bag I’m using to keep light out of my otherwise clear tupperware bin. I’m debating between making a nice fabric enclosure for it and just grabbing a can of rustoleum and spraying the outside. Maybe I’ll do both.

DIY Aeroponics

Gardening Gets Underway

Today I started collecting things for my DIY Aerogarden, and testing out spray set ups. Here’s what I found:

Aquarium Pump106 GPH pump

I started my search at a local aquarium store, New World Aquarium at 38th and 3rd. It cost a little more than it would have online, but the salesperson actually knew things about it and could answer questions, so it was worth it.  It’s about two inches tall and has variable output between around 45 and 106 GPH. It seems to push water through the tubing/misters nicely.

Bits of tubing Various hose bits

I stopped at the local hydroponics store to get some T joints for my hosing, and some sprayers as well. The sprayers attach to 1/2 hose pretty easily, just cut a small hole in the hose and push the sprayers in.

Food! I also picked up some rockwool and plant nutrients, so make my own “seed pods.” The bag of nutrients was $18 for more than 2 pounds of dry mix, which gets mixed with water at about 1 tsp per gallon. My garden will probably hold about a quart. So it should last me quite a while. The rockwool is $7.50/48 cubes, and I’d need a max of 1 cube per planting (tho I plan on using half, they’re big cubes).

Hosing with misters

Hosing with spray barbs I ended up using a circle of 1/2″ hosing about 6″ in diameter. The four misters are placed relatively evenly around it. The bottom of the T joint goes to the pump.

The misters I got are a little more like sprayers than misters, the water coming out isn’t very fine. I’m not sure if this is a function of water pressure or the type of misters I got, I think the latter.

I ordered some different misters from Drip Depot which are supposed to produce a “very fine mist” so we’ll see what difference that makes. Luckily all this stuff is really cheap, the hosing I can get at the pet store down the street, and the misters/connectors are all under a dollar each.

Pump in vase Here’s my pump/hose setup in the planter I got from the dollar store. There are two problems. One, it’s not tall enough. The planter has these “feet” which make it look taller than it actually is. I want at least 2″ from the top of the sprayers to the top of the bucket. The hose connectors add a substantial amount of height to the whole thing.

I ordered some L connectors which would allow me to put the pump on its side, but I think that would give me an extra 1/2″ at best.

But the real problem with this planter is that it leaks. Sure, it *looks* sturdy and without holes, but there are thin spots in the plastic near the bottom where water started eeking out. No good.

So tomorrow I’ll go in search of a more appropriately sized leak proof bucket. Once I have that I can start working on the top part to hold the plants and deal with lighting.

DIY Aeroponics

New Project: DIY Aero Garden

I’ve always been amused by / interested in Aero Gardens, an aeroponic tabletop indoor growing system for herbs and small plants. But $200 seems like a lot to spend on a wannabe space-age novelty item. So I started looking into what exactly they’re doing. And decided I want to attempt to make my own.

Aeroponics is the science behind growing plants in air (very very damp air). Like Hydroponics it uses no soil, and apparently this makes things grow faster. There’s a fair amout of chatter about it on the internet, mostly pertaining to the growing of illicit substances.

The plants sit in a nice sterile looking tray and the roots of the plant are suspended over a vat of water, which is either constantly or occasionally (I couldn’t tell which) spraying mist on them. Some sort of UV light gives the plants what they need to photosynthesize, and everyone lives happily ever after.

There are only a handful of basic things I need:

  • Some sort of base container for the water, preferably plastic so I can put holes in it as needed. Roughly the dimensions of this Rubbermaid container.
  • A water pump. I found a Micro Jet 450 for $16 on Amazon which is tiny and 120 GPH (gallons per hour) which *might* be enough.
  • Tubing and spray nozzles to hook up to said pump. Tubing I’ve got. Not sure where I’m going to find tiny spray nozzles to poke into it. These are apparently rated for 3 GPH.
  • Something to hold the plants. I plan on laser cutting this.
  • A light fixture and a light which plants will grow under

Looking at my parts list, this thing will probably be quite ugly, which is probably why Aero Garden gets away with being so expensive. Because it looks space age, and not like something you’d use to grow illicit plants. I’m starting my hunt for components, and will update as I find things and do more research.

Etsy

6 Common Photo Mistakes – And How to Avoid Them

There are some photo mistakes I see over and over and over on Etsy. The good news is they’re easy to fix, and can make a huge difference in your photos.

One thing you do need is a decent camera. I have both a digital SLR (a Canon Rebel XT) and a point and shoot (Canon SD1100, now defunct, try the 1200 which is the updated version of my camera), and to tell you the truth I use the point and shoot for 90% of my product photos because it’s handy and takes fantastic photos. I’m a big fan of Canon cameras, but any camera which will let you turn off the flash and has a macro mode (for smaller items) is perfectly fine.

As a side note, a big thank you to all the sellers who were gracious enough to let me nitpick at their photos for the purpose of this article. Visit their shops when you’re done reading!

Just say no to heavy shadows

moondogfarm.etsy.com 
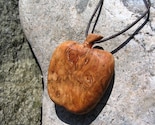
Dark shadows around your items are no one’s friend. They can make the photograph look cluttered and detract from the item itself, sometimes making it difficult to see properly. Moondogfarm has picked a great background for her necklace, but the shadow behind the pendant makes the photo feel uneven.

The trick to avoiding hard shadow lines is to diffuse the light hitting it. If you’re taking photos inside try shining your lights through a thin sheet of white tissue paper, or bouncing the light off a white card instead of aiming it directly at the object. If you take outdoor photos try to take your photos early in the day or later towards the evening rather than in the afternoon when the sun is directly overhead. A slightly overcast or cloudy day can be a great day to photograph.

Beware the crop

Almost every online marketplace will resize or crop your photos in some way. Make sure you take this into consideration with your photos! This can be especially difficult with larger items.

Bytheway‘s vintage maternity dress features some nice details in the sleeve and collar, but unfortunately Etsy’s center crop means all we see is a navy blue stomach and part of an arm. But as sellers, we don’t have any control over that, so we need to do our own cropping before we upload. By trimming off the bottom of the original photo the crop is pushed up, including the collar and sleeve. You can (and should!) still use the second through fifth images to show the whole item.

headless_dressCropping the image just below the chest changes the aspect ratio of the photo and gives us a much more favorable crop (shown right). Just be careful you don’t cut it too short or you’ll start to lose some of the sides of the photo.

A lot of sellers choose to chop off their model’s heads in photos. Showing your full model (head included) in a photo can be helpful for buyers to get a feel for how the item drapes and falls, and your model’s head buys you some space above the shirt/dress. So when the image is center-cropped you’ll still be able to see the collar and shoulders of the item. Confused? Check out TheVelvetVixen’s photos: here’s the original in the listing, and here’s the cropped version.

Avoid busy backgrounds

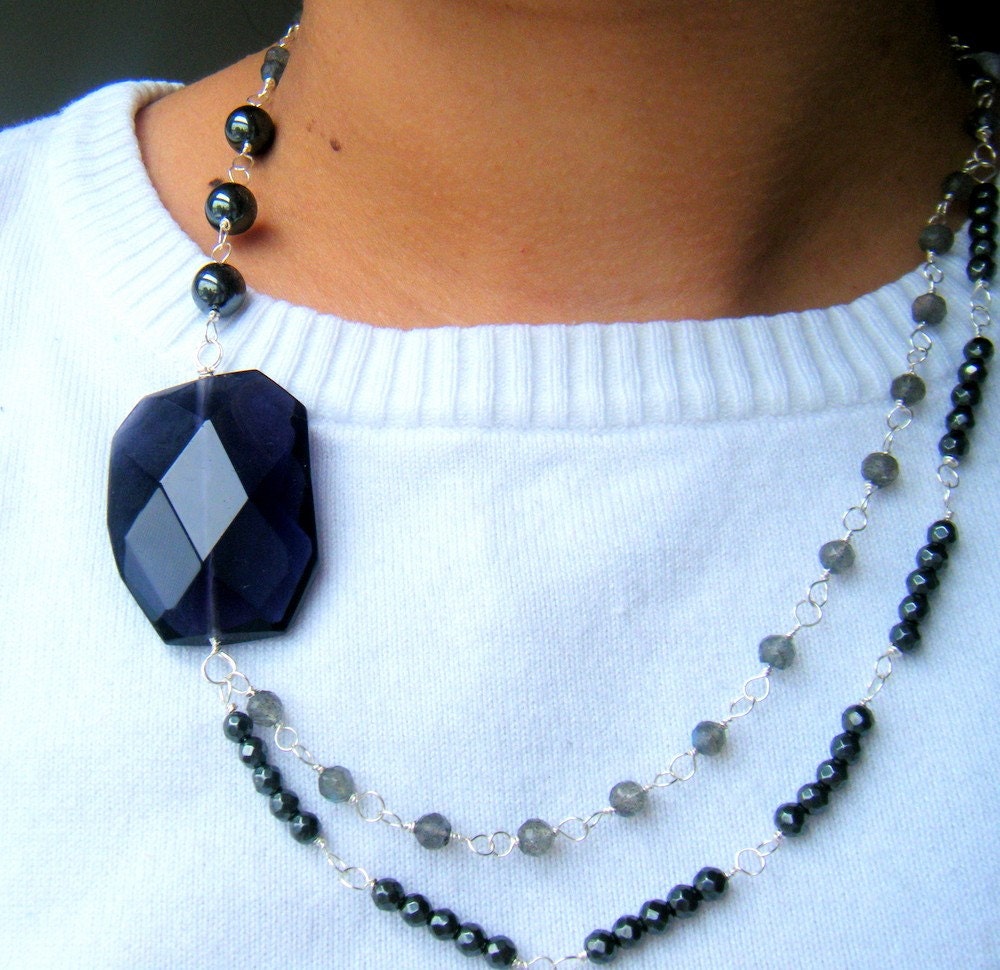
KnotOriginal has clearly put some time into her staging, and her photos are interesting and engaging as a result. She has a beautiful scarf on the left, and a mannequin to display it on… but it’s lost in the complicated background. The horizontal lines of the railing and vertical lines of the ships’ masts draw the eye away from the scarf. Busy backgrounds compete with your item for attention. You want people to see your item, not where you took it.

But that doesn’t mean you’re doomed to a life of white backgrounds. In fact white backgrounds are best avoided. They can be hard to photograph because they throw off your camera’s metering, and generally aren’t very interesting. Look at the photo on the right (also by KnotOriginal). The leaves in the background add texture without taking away from the item, and the contrasting color help it stand out.

Don’t let your edges show

If your background is a flat surface or plane, such as a table top or floor, take care not to let your edges show. Like a busy background it can detract from the item, drawing the eye away. The example on the left by andtherainfell is pretty mild – just a corner of a the window peeking in – but it’s still best avoided. And I’ve seen some really painful examples of this browsing Etsy.

Try changing your angle or crop to get rid of any unsightly edges. If you don’t have the luxury of a huge surface, or have larger items to photograph, work with your edges instead of against them. Try propping an item up against the wall, or bring other objects to serve as a backdrop and create visual interest. Just don’t let it get too busy. Using a shallow depth of field can also soften changes in your background, like domestikate’s photo on the right.

Unbalanced White Balance

Do your natural light photos have a bluish tint to them? You may want to check your camera’s white balance setting. Most digital cameras have settings for daylight, tungsten (incandescent lights) and fluorescent lighting. Select the option that best fits where you’re taking your photos. If possible, shoot your photos in RAW format, this saves the raw data without assigning a white balance profile to it. Instead you’ll select the appropriate lighting option when you convert the photos on your computer. Check the software which came with your camera or use a program like Photoshop to manipulate RAW files.

color_correctedIf your camera doesn’t support changing the white balance,  you don’t want to mess around with RAW files, or you’ve already taken your photos, you can still tweak the levels a little bit in a photo editor such as Gimp (free) or Photoshop (not so free). On the right we have the same photo, but after using Photoshop’s “auto color” option. Note that “auto color” won’t work well on all photos, particularly ones without a lot of contrast. If you aren’t happy with “auto color,” hit undo and go to Image > Adjustments > Color Balance. Move the top and bottom sliders slightly away from cyan and blue to warm up your image.

Pass up the white background

On the subject of white… sometimes a white background is best avoided all together. White backgrounds can be extremely tricky because they cause your camera to think the scene is lighter than it is, which can result in an underexposed photo. It also accentuates any unevenness or “hot spots” in your lighting. Post-processing with programs like Photoshop make things a little easier, but even then it can be hard to get an image that has natural looking shadows and edges.

Colored backgrounds tend to be much more forgiving. Linen fabric makes a good backdrop, or lightly patterned cotton. Stay away from velvet unless you really know what you’re doing – it’ll look cheap if you don’t. And for heavens sake iron your fabrics before you photograph on them, everyone can tell when you just chucked an item onto the bed to photograph it.

Practice Makes Perfect

Taking good product photos is an iterative process. You just have to do it a lot to get good at it. Reading photography articles is great, but at the end of the day you just have to sit down and try a bunch of different things to see what works for you. Try not to get discouraged, it’ll come slowly but surely.

Etsy

Send Me Your Awful Photos

edit: thanks everyone who submitted photos, the post is now up here!

I want to write an article on how to improve your photos, but I feel like it would be a little self serving to just throw up pictures of my own work, take better photographs, and tell you how great I am now.

So if you’re an Etsy seller (or any other online marketplace) drop me a comment with a link to your shop, and I will tell you what sucks about your photos, but in a constructive way! Because I’ll tell you how to fix it too. This is my way of appearing philanthropic while actually just telling other people what to do.

Now, I know what you’re thinking, “But Kellbot, your shop photos look incredibly mediocre. Why should we listen to anything you say?” And before pointing out that Roger Ebert hasn’t made any good films lately, I will show you proof that at one point, when I was less lazy, I did in fact take good photos of my work:

Haiku Bracelet

Fred: Closed

Now, I was in art school at the time, so I went for the Official Art School Gradient Effect. I suggest you avoid this in your product photos unless you are in fact selling high end art. Frankly it just looks silly on Amy Butler fabric purses.

So leave a comment with a link to your shop, or email me at kellbot@gmail.com if you’re shy. C’mon, send me your bad photos! I promise I won’t be too mean to them.

Uncategorized

Electronics 101

The other day I needed to build a circuit to bump 3v up to something between 3.5 and 5 for my CHDK Remote Cable hack. I looked up a handful of schematics for circuits that do this… and realized I didn’t really understand what any of them were doing. At least not well enough to appropriate the circuit for my own needs.

I took Electricity and Magnetism second semester of my senior year of high school. Which is to say I don’t remember any of it. So I figured it was time I actually learn the math behind the electrical circuits I’m building instead of sticking things together haphazardly to see if they work. I remember how to use V=IR, but that doesn’t really answer the question “how do I bump 3v up to 3.5v?”

Teach Yourself Electricity and Electronics

I’m reading “Teach Yourself Electricity and Electronics” , so far I’m just as far as some basic concepts of DC and AC power. Of course I almost never do anything with AC power, but I suppose it’s handy to know.

The book itself is pretty dry. But it’s an electronics book, so I suppose any of them are going to be dry. If there are any other good basic electronics theory I’d love to hear them. On the plus side, this one is great for getting me to sleep.

Hacking

Canon Camera Hacking With CHDK

This short and somewhat boring clip is the result of playing around with CHDK (Canon Hack Development Kit). I’m working on a stop-motion animation for Tinysaur, but sadly neither of my cameras (a Canon Digital Rebel XT and a Canon SD1100IS Point and Shoot) had a built in timer that would shoot over and over indefinitely. Using the CHDK Ultra Intervalometer script I set my camera to take a shot every .5 seconds. Although it didn’t quite go that fast… I’ll get to that in a bit.

CHDK is a firmware add-on for Canon point and shoot cameras that lets you control absolutely every aspect of the shot. It loads from your SD card at boot, so it’s non-permanent (although you can set it to auto load). It gives you access to a plethora of fine tuning options and display monitors, and also lets you run scripts to take pictures based on time, motion detection, etc. But the most exciting thing I found is that there’s a script which will let you trigger the camera with a hacked USB cord with a switch.

img_0149
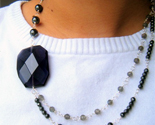
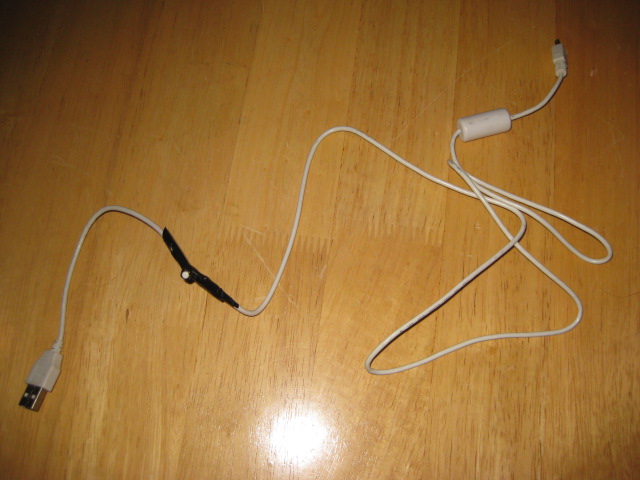
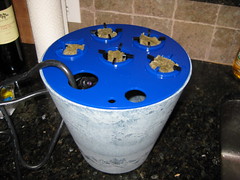
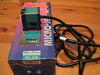
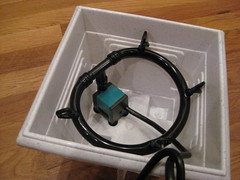
Mine is shown on the left, it’s not very pretty. I spliced a reset switch into the +5v (red) wire. It uses a USB port for power, which makes it a little silly, although ok for my uses. Ideally you’d rig up a power supply along with the switch. I would have but I only had AA battery holders and it needs between 3.5V and 5V of juice. There are some neat hacks listed on the CHDK wiki for making remote cables out of old joysticks and flashlights and whatnot.

There’s a ton of documentation, but it’s a bit scattered around the CHDK wiki. Here’s what I did to get the Ultra Intervalometer script up and running. The instructions are almost identical for the USB remote script:

Getting CHDK going:

  • Grab a spare SD card and format it. If it’s >2 gig and you think you’ll want to auto boot CHDK, format it as FAT16 (‘format X: /fs:fat’ from the comand line). Leave it in your machine’s SD reader (which, by the way, you need for this).
  • Make sure you have a CHDK compatible camera. My SD1100 works well with it (and without it, for that matter), apparently the latest version of that camera (SD1200) doesn’t yet have a version of CHDK for it. CHDK isn’t available for SLR cameras.
  • Check your camera’s firmware version. Create a blank file called ver.req on the SD card. Put the card in your camera. Make sure the camera is set to playback mode and turn it on. Press “Func Set” and “Disp” at the same time. A screen with the firmware version should pop up.
  • Download the appropriate version of CHDK. Unzip it onto your SD card.
  • While not necessary to get CHDK running, now is a good time to stick the Ultra Intervalometer script on the card, so you don’t have to take it out to do it later. Copy the script code and save it as something like ‘ult_interval.bas’ in the SCRIPTS subdirectory on the SD card.
  • Pop the SD card in your camera.
  • Make sure your camera is set to playback and turn it on. Hit ‘Menu’ and scroll down, you should see an option to update the firmware. Do it!
  • When you update the firmware, the ‘print’ button will blink for a bit, strange things will happen, and you should see the CHDK splash screen. Hooray!

Now you can use the ‘print’ button to switch between the normal boring Canon menus / normal shooting and “<ALT>” mode, which brings up a totally different list of options when you press the Menu button, and triggers a script when you press the shutter release rather than taking a picture.

Using Ultra Intervalometer

  • Make sure you’re in <ALT> mode
  • Press Menu and scroll down to Script Parameters
  • Select “Load script from file” and select ultra_interval.bas or whatever you called the script.
  • Set the script parameters (those under the heading Ultra Intervalometer) to your whim. Use left/right to increase or decrease parameter values.
    • Delay 1st Shot (mins) – this is the time between when you start the script and the first shot, in minutes
    • Delay 1st Shot (secs) – As above, but seconds
    • Number of Shots – how many to take
    • Interval (minutes) – number of minutes between shots
    • Interval (seconds) – number of seconds between shots
    • Inerval (10th seconds) – as above, with 10ths of seconds
  • Exit out of the menu (by hitting menu)
  • Press the shutter to start the script. The camera will fire at the interval you chose, hooray! Press the shutter again if you want to stop the script before it finishes.

When I set the interval to 1 second I noticed that the camera wasn’t actually shooting that often. The ‘review’ period, where it shows you waht you just took, seemed to be getting in the way. I exited out of <ALT> mode and was able to set the review time to 0 seconds in the camera’s normal menu. I also turned off AF-Zoom. It still takes a little bit of time to auto focus between each shot,  I haven’t dug through enough of the CHDK documentation to find out how to only focus at the start of the sequence.

Here’s a short (ok, still boring) clip of my walk from NYC Resistor down the street, in search of some tacos:

Cooking, Exercise

Diet and Exercise Work. Film at 11.

As some of you may remember, at the beginning of May I realized I needed to do something about my diet / exercise levels as I crossed into the “overweight” BMI. While it’s true that BMI isn’t terribly accurate as it doesn’t account for your body fat vs muscle, I think it is fair to say that most of my weight was emphatically not muscle.

I made a number of changes to my lifestyle, some of which were relatively small, and some were larger. I enrolled in Weight Watchers, picked up a copy of EA Sports Active, and got more diligent in making sure I exercise every day (even if it’s just 10 minutes). The results speak for themselves:

Wii Fit Weight Chart

Food-wise the changes I’ve made have been pretty minor. I’ve cut out the constant snacking on candy bars, and that alone is probably the bulk of the weight loss. I’ve also switched to more whole grains. I still hate whole wheat bread, and have no intentions of switching from my plain white, but whole wheat pasta is surprisingly pretty much the same as the white stuff once you cover it in sauce. And in the morning I’m too tired to notice whether my multi-grain cheerios taste any different than the normal ones. 

I’m slowly adding more veggies to my diet. Lately I’ve been cooking a lot of broccoli because it’s easy. Throw it in a bowl in the microwave with some water, set a plate  (or, a lid, if you’re classy like that) on top to keep the moisture in, microwave for a couple minutes, add a slice of fat free american cheese, and consume. Normally I’m morally opposed to fat free cheese because its disgusting, but those american cheese slices are all chemicals anyway, so I can’t tell the difference.

Exercise is a little harder. I was doing 10-15 minutes of Wii Fit (mostly the Hula Hooping), and that was getting a little tedious, so I picked up a copy of EA Sports Active. It’s not a magic bullet, but it’s nice to have some variety in my exercise. EA Sports Active is also more resistance training than cardio, and I think the switch to that may be why there’s some weight bobbling in the past week or so. Cardio is better for burning calories, but building muscle raises your resting metabolsim, so you really want both. I’ve also been biking around Liberty State Park when I can. And doing little things like take the stairs on my commute (there are 4 flights down and 8 flights up on my morning trek).

I haven’t experienced a magical total body transformation, it’s only been a month and honestly I don’t have all that much to lose, but I can see some physical changes. My stomach seems to be retreating, and my arms actually have muscles in them. But mostly I’m just happy to feel like I’m in control of my weight instead of just watching the scale climb up up up.