I snuck down to check out the bathroom progress yesterday, newborn baby and 3 year old in tow. The walls are back up, there’s a floor again, the plumbing is all roughed in, and hopefully this week they’ll start tiling.
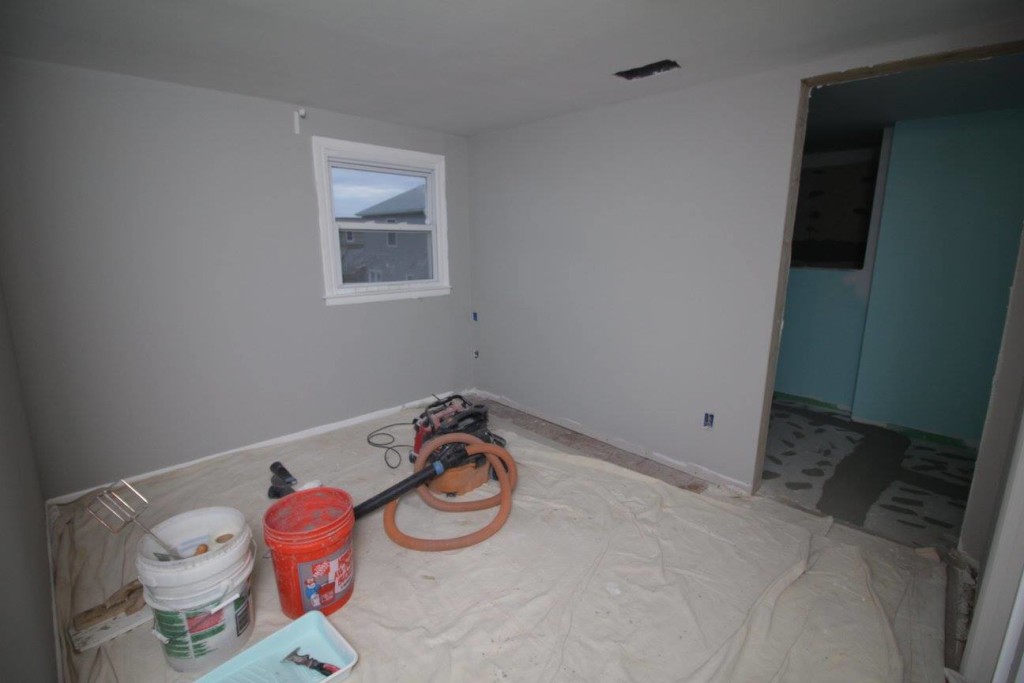
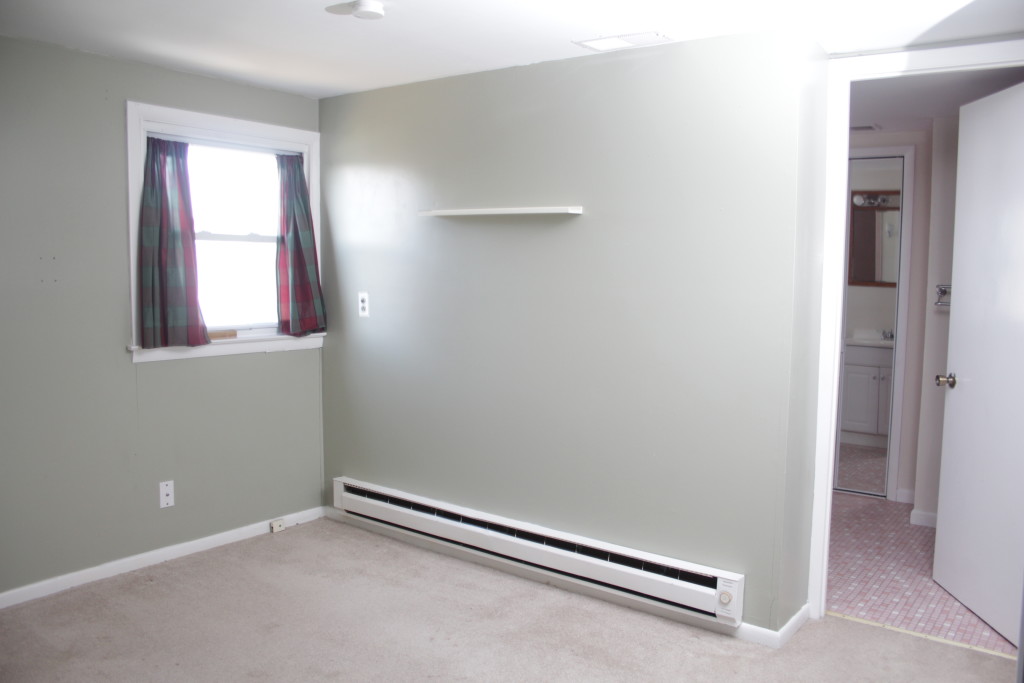
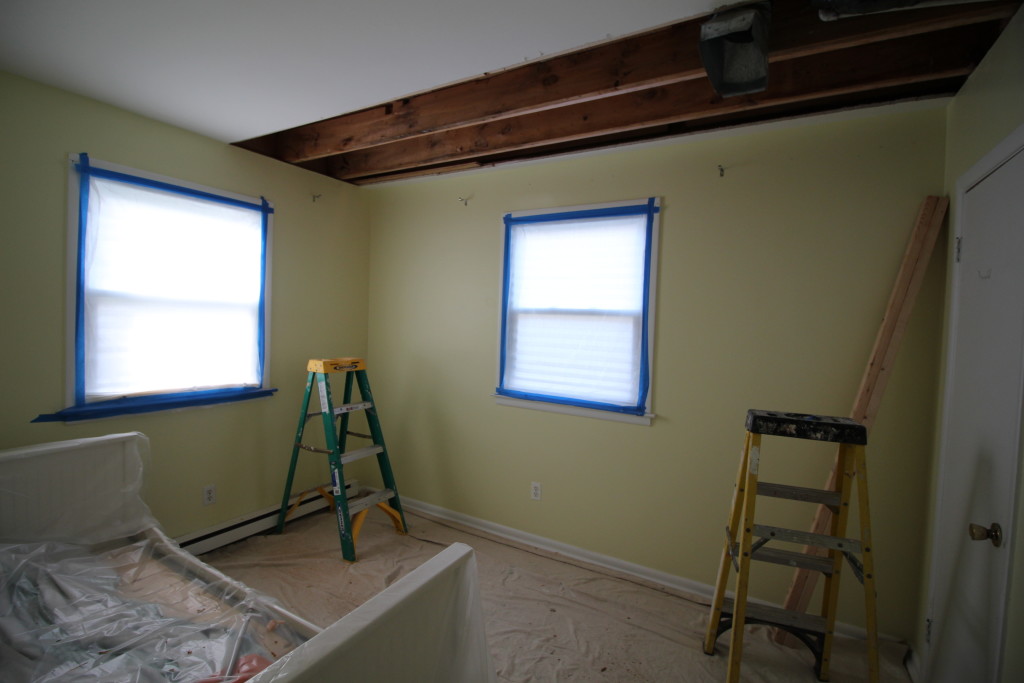
The downstairs bedroom, which had to be cut into to access the joists, is also all buttoned up and repainted. You’d never know it was disrupted.
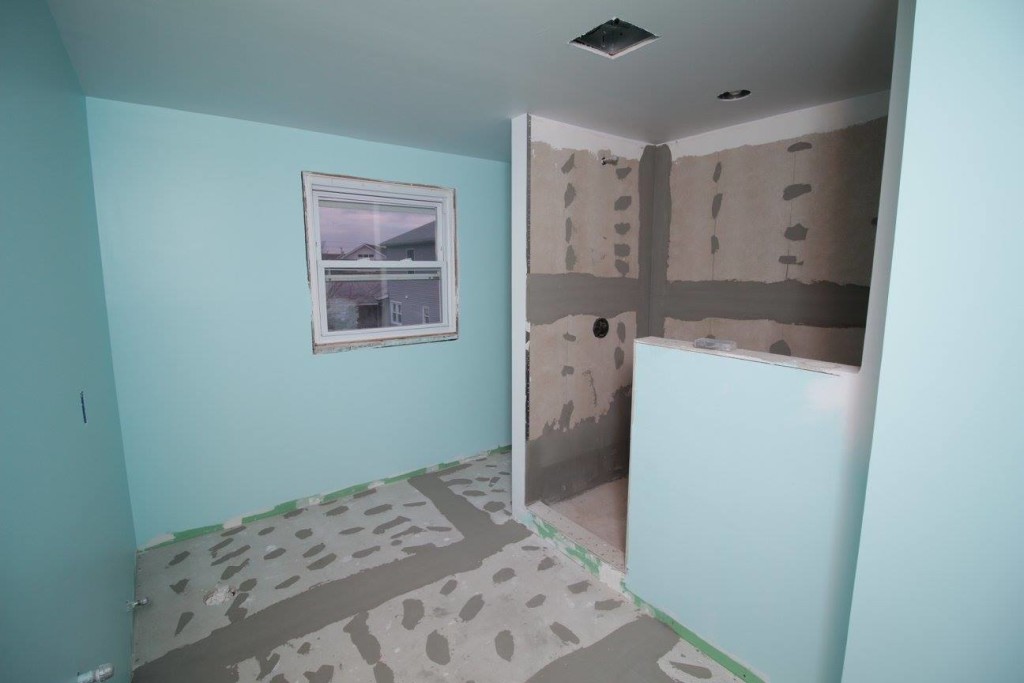
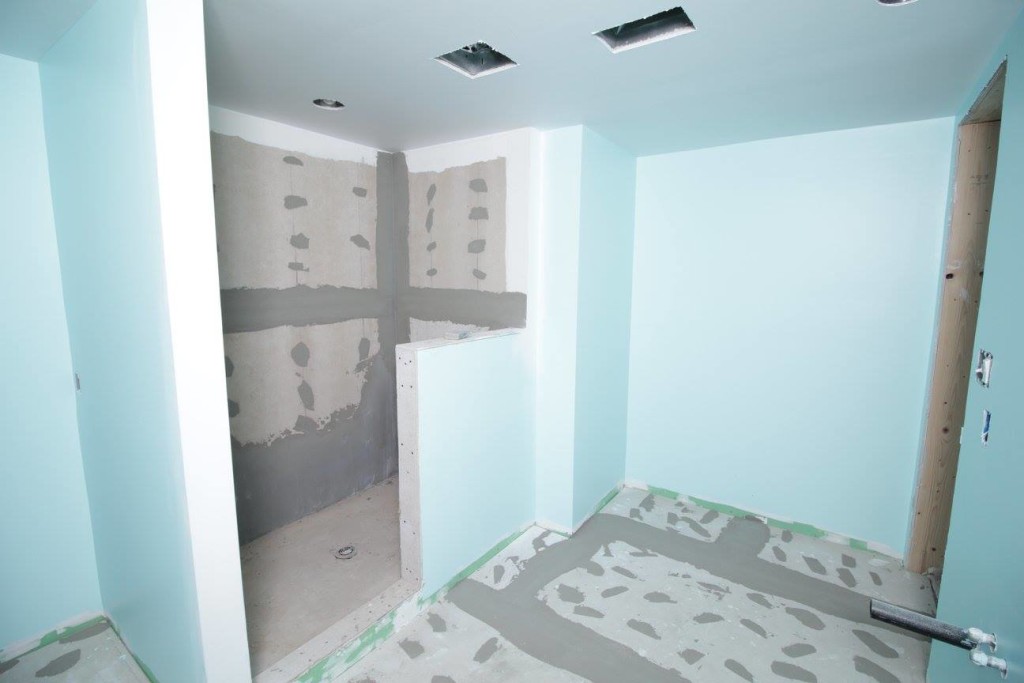
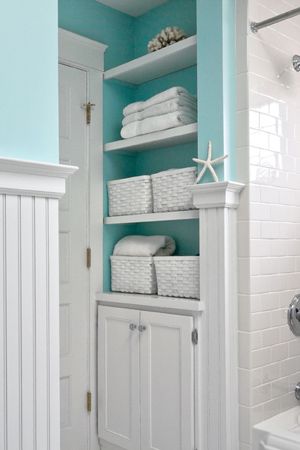
The landing before the bathroom, now about 8″ wider. Previously the wall was right up against the window. There’s a small scar on the floor where the wall-to-wall carpet doesn’t cover but we’ll just put some furniture over it.Looking into the bathroom from the doorway. The shower is now where the closet used to be, and that alcove behind the shower is where a new closet is going. The bathroom will actually feel a little smaller than it did before due to the fact that the shower is an entire foot wider than it was before. Best of all, my dad can now stand in it without hitting his head. There is also a light in the shower and an exhaust vent right in front of the shower.Another view of the shower.
We’re about a week and a half into the bathroom project and demolition was, in a word, enlightening. Other words one might use include “complete horror show” and “dear god what were they thinking?” I’ll dive into the details in a second, but first let’s skip to the end and see where we’re at now:
Once upon a time there was a bathroom here
You may notice something is missing. Something like… a wall. Or maybe you’ve forgotten, in which case let me jog your memory…
Hm something is different…
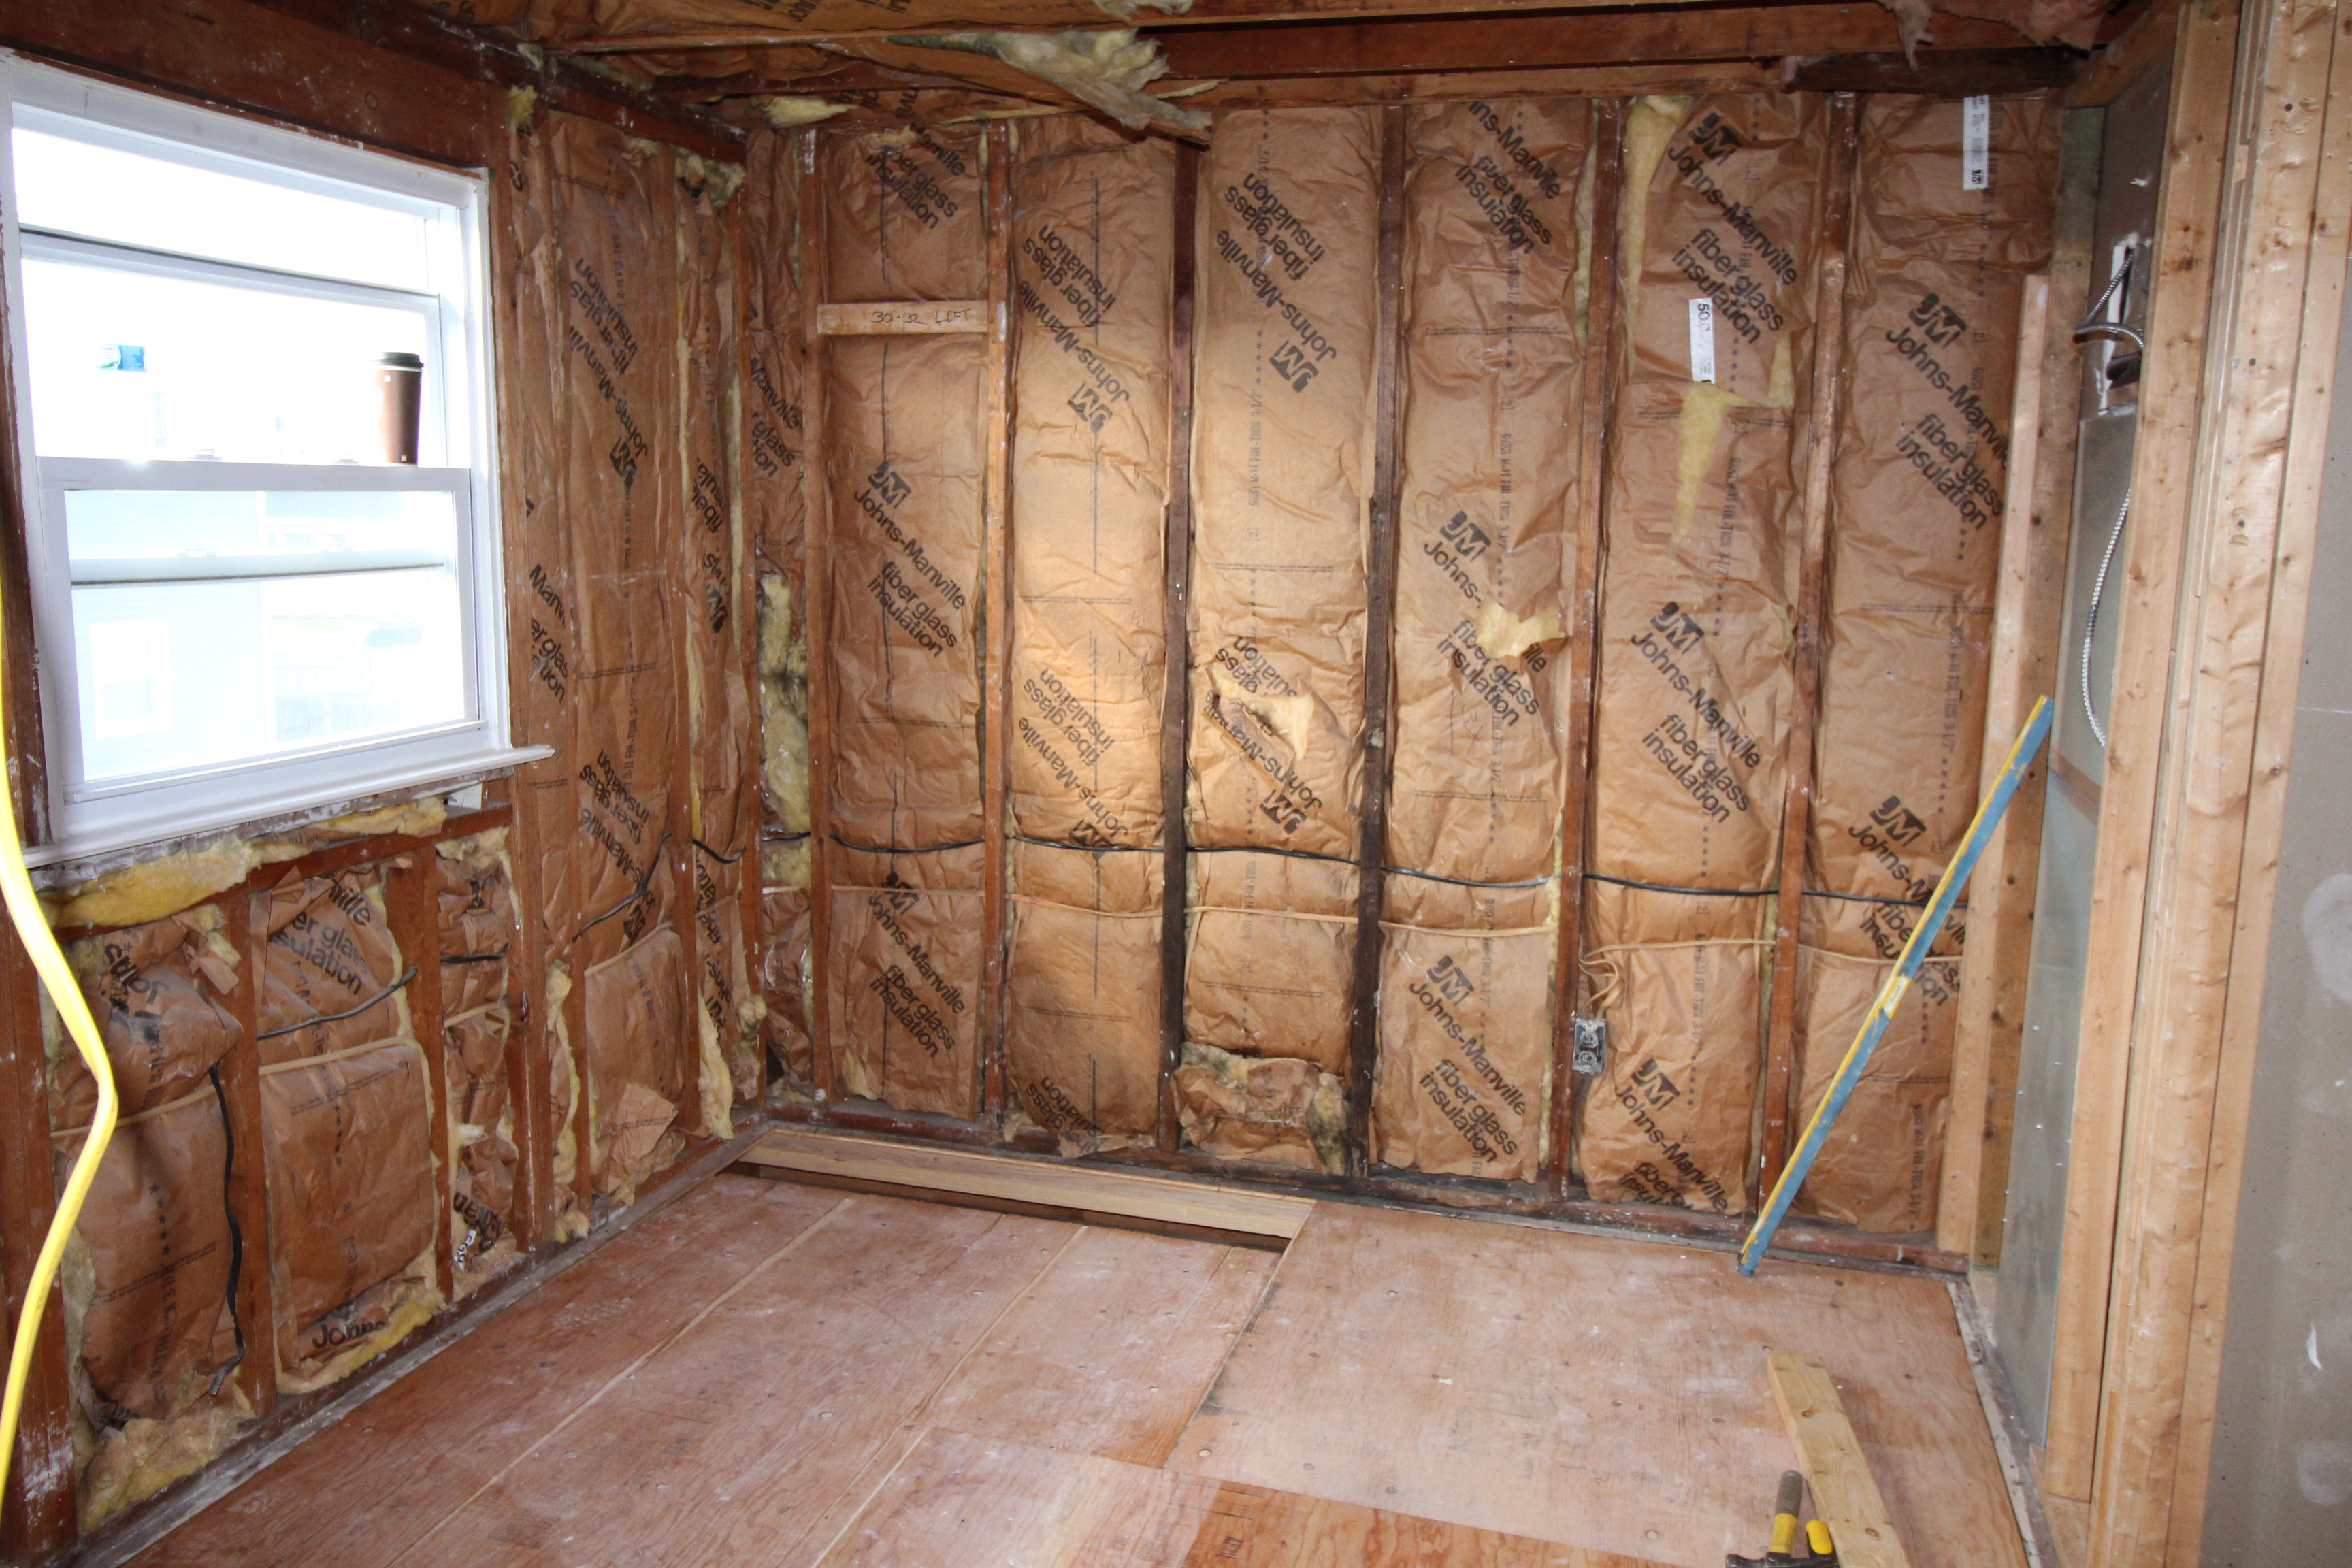
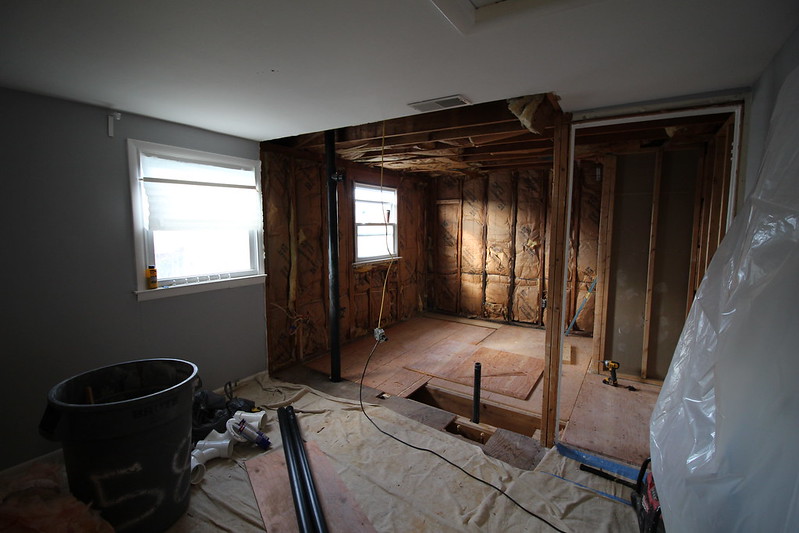
So yes, we removed a wall. Actually all the walls. And the floor. The whole room was gutted down to the studs and joists, and then we removed most of those as well.
You’ll notice in the ‘before’ photo that the wall between the landing and the bathroom is about a foot thick. Why? We weren’t sure. Maybe there was ducting running through it. Maybe it was full of treasure. Or bees. So we opened it up and found…
Oh.
…Basically nothing. Well, we found a lot of questionable plumbing and electrical work. And the wall was framed with 2x3s. Badly. So it’s being torn out and replaced with a wall of more reasonable construction. We’ll gain about 8″ of space on the landing, which is nice. Downside is there will be a scar where the wall-to-wall carpet doesn’t cover, but that’s what area rugs are for.
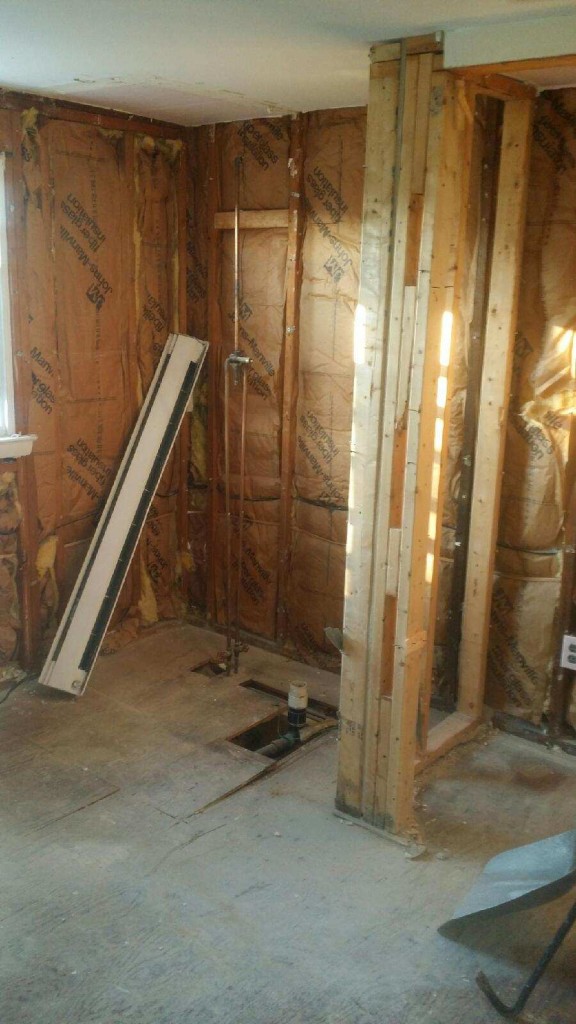
Where the shower used to be
In a rare bit of good news it turns out the reason the shower was 8″ off the ground is that the person who installed it merely had no idea what they were doing. The new shower will have no problem being installed at floor level.
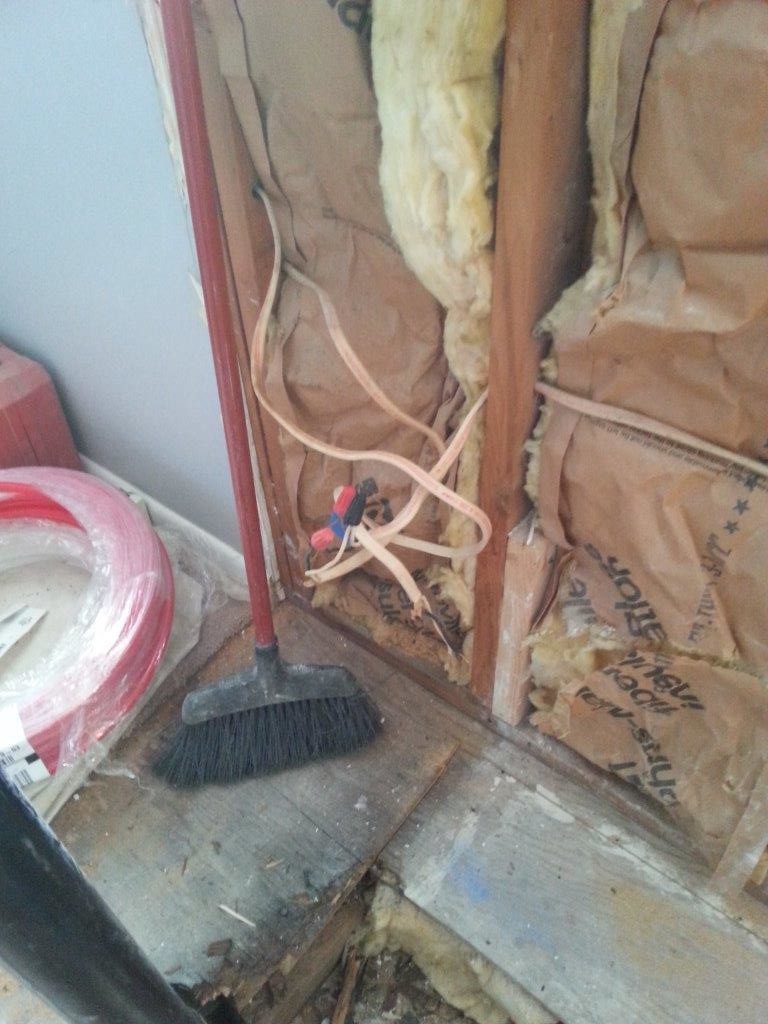
The electrical situation in the bathroom (and in fact the entire top floor) was rough. Random wires were taped together inside walls, everything was running on one giant overloaded circuit, improperly terminated junction boxes… it made me really glad we’re doing this now, and also amazed that the entire house hasn’t gone up in flames sometime in the last 30 years.
Oh yeah that looks super legit.
All the electrical in (and really anywhere near) the bathroom is being completely removed and redone. On the plus side we’re getting some new outlets in the rooms adjacent to the bathroom.
With the walls out of the way it was time to open up the floor and find out why it was so saggy / bouncy / otherwise shitty. It turns out the answer was very simple… giant chunks were missing from every. single. joist.
This is not
how you run
plumbing
Rather than cut holes through the joists, which would have required some basic skills, the original owner just notched them to make room for the drain lines. Which was especially impresive in the case of the toilet drain (far right), which was left with barely 2″ of material. It is amazing no one ever fell through.
We also found out why the pipes were leaking (which is what started this whole process). They weren’t glued together at all. Just dry fit and then covered in silicone at some point when they started to leak. A cookie sheet was found underneath the shower drain, presumably to catch water. Because that is how you solve problems!
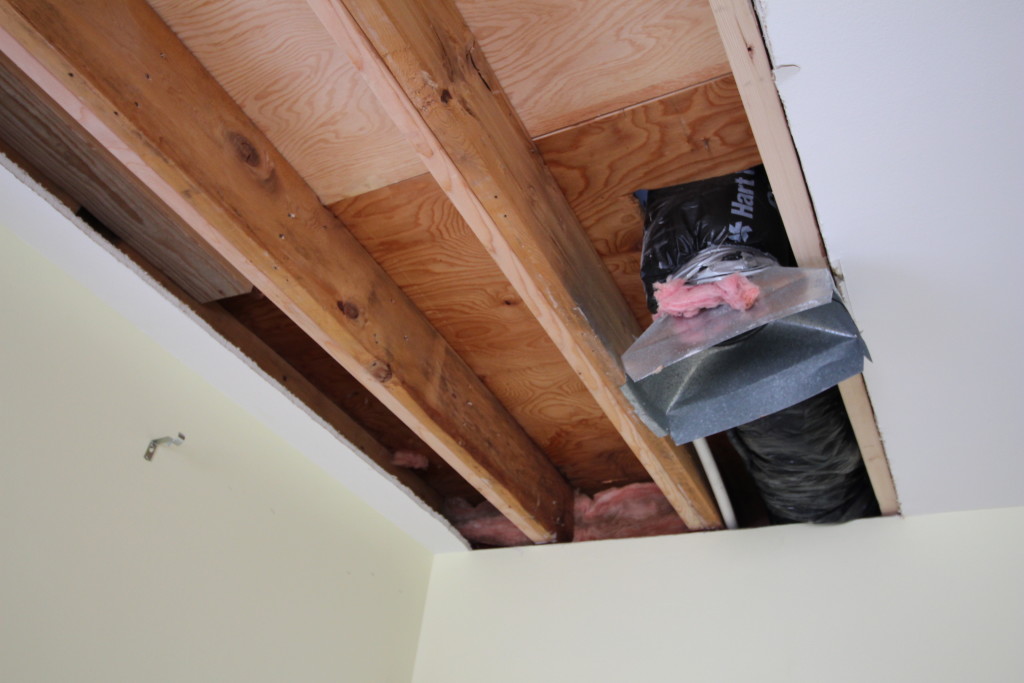
To fix the issues every single joist was sistered with new lumber. Unfortunately due to how the HVAC closet cuts into the room this meant having to cut into the freshly painted sheet rock in the room below. Unsurprisingly, it was super moldy and gross on the inside.
You can see the new lumber (lighter) running along next to every joist, and an HVAC vent popping out.
Moisture damage was a huge problem everywhere. The tile for the floor and for the shower were just installed over the plywood/drywall. The rotting subfloor has now been replaced but you can see the dark stains on the exterior wall studs from 30 years of water damage.
Where the shower and new closet will go.
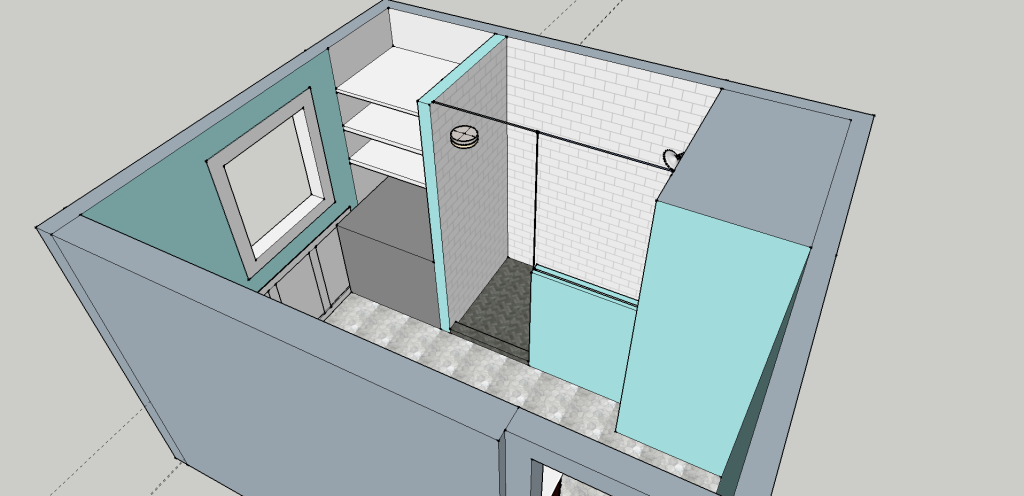
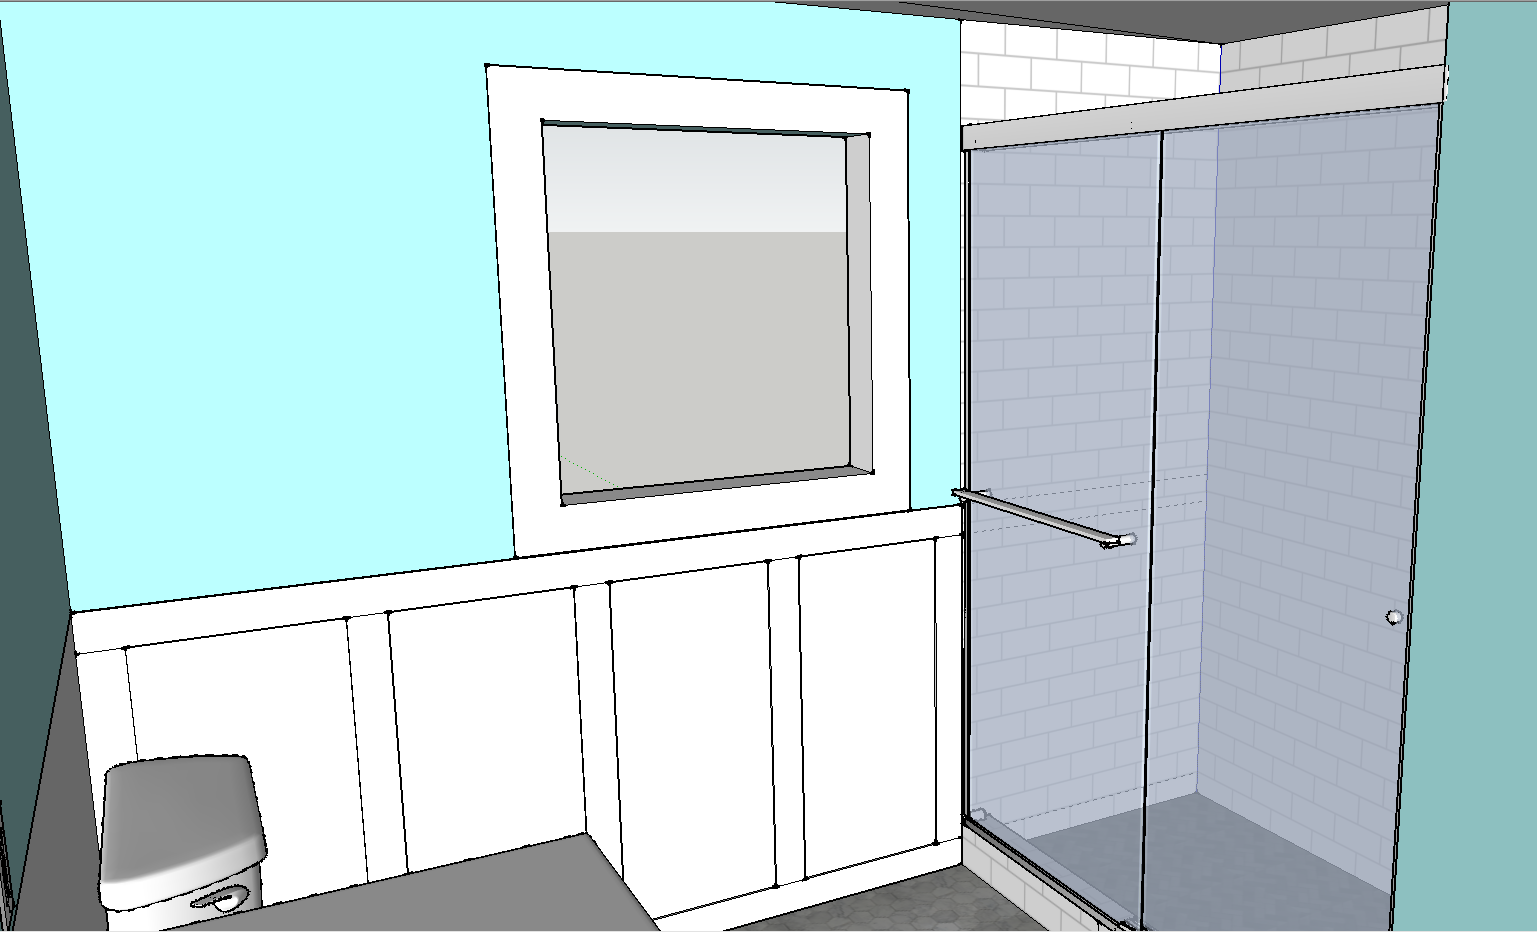
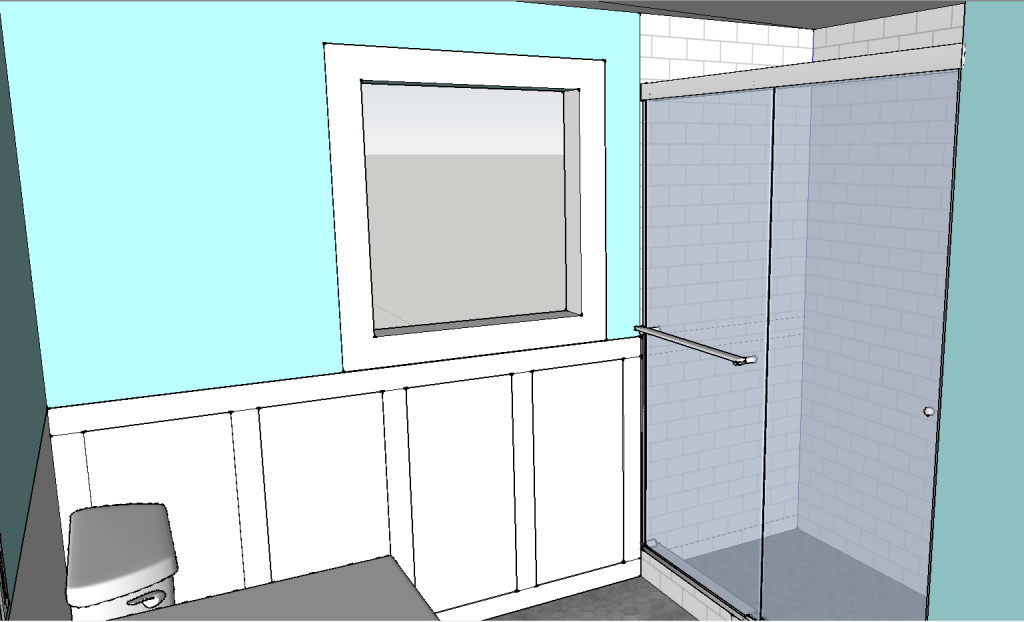
We made a decision to deviate from the original plan. Rather than put the shower on the outside corner next to the window we’re swapping it with the old closet. The shower will now butt up against the HVAC closet (which opens into the adjacent bedroom) and a combination cabinet / open shelving unit will be built between the shower and the exterior wall. The front of the shower will have a half-height wall to allow more light in. The main reason for doing this is to make the pipes easier to run, but it also allows us to make the shower whatever width we want without having to worry about running into the window.
Here’s a super rough sketch of the new layout
Hopefully by the end of this week we’ll have walls and floors again. Not that I’m likely to see it, at this point I’m too pregnant to stray very far from Philly. I only went down today because my husband was able to come with me and I was sort of daring the baby to come. I am only mostly disappointed it didn’t.
Between being super pregnant and … being super pregnant… I haven’t had much time to blog what’s going on with the house. Mostly I wander around in an 8-months-pregnant zombie state due to lack of sleep. But there are things happening!
You may remember that our waste stack started leaking. Due to a number of factors, the biggest of which being that the bathroom is completely ridiculous and was done incorrectly, the only sensible solution is to strip it down to the studs/joists and remodel it completely. This is not a surprise, but it wasn’t something I was planning on doing this year. Or really any time in the near future. But not having a working bathroom upstairs blows, so we found a contractor who seems good and thinks he can have it done by the end of the calendar year (ha).
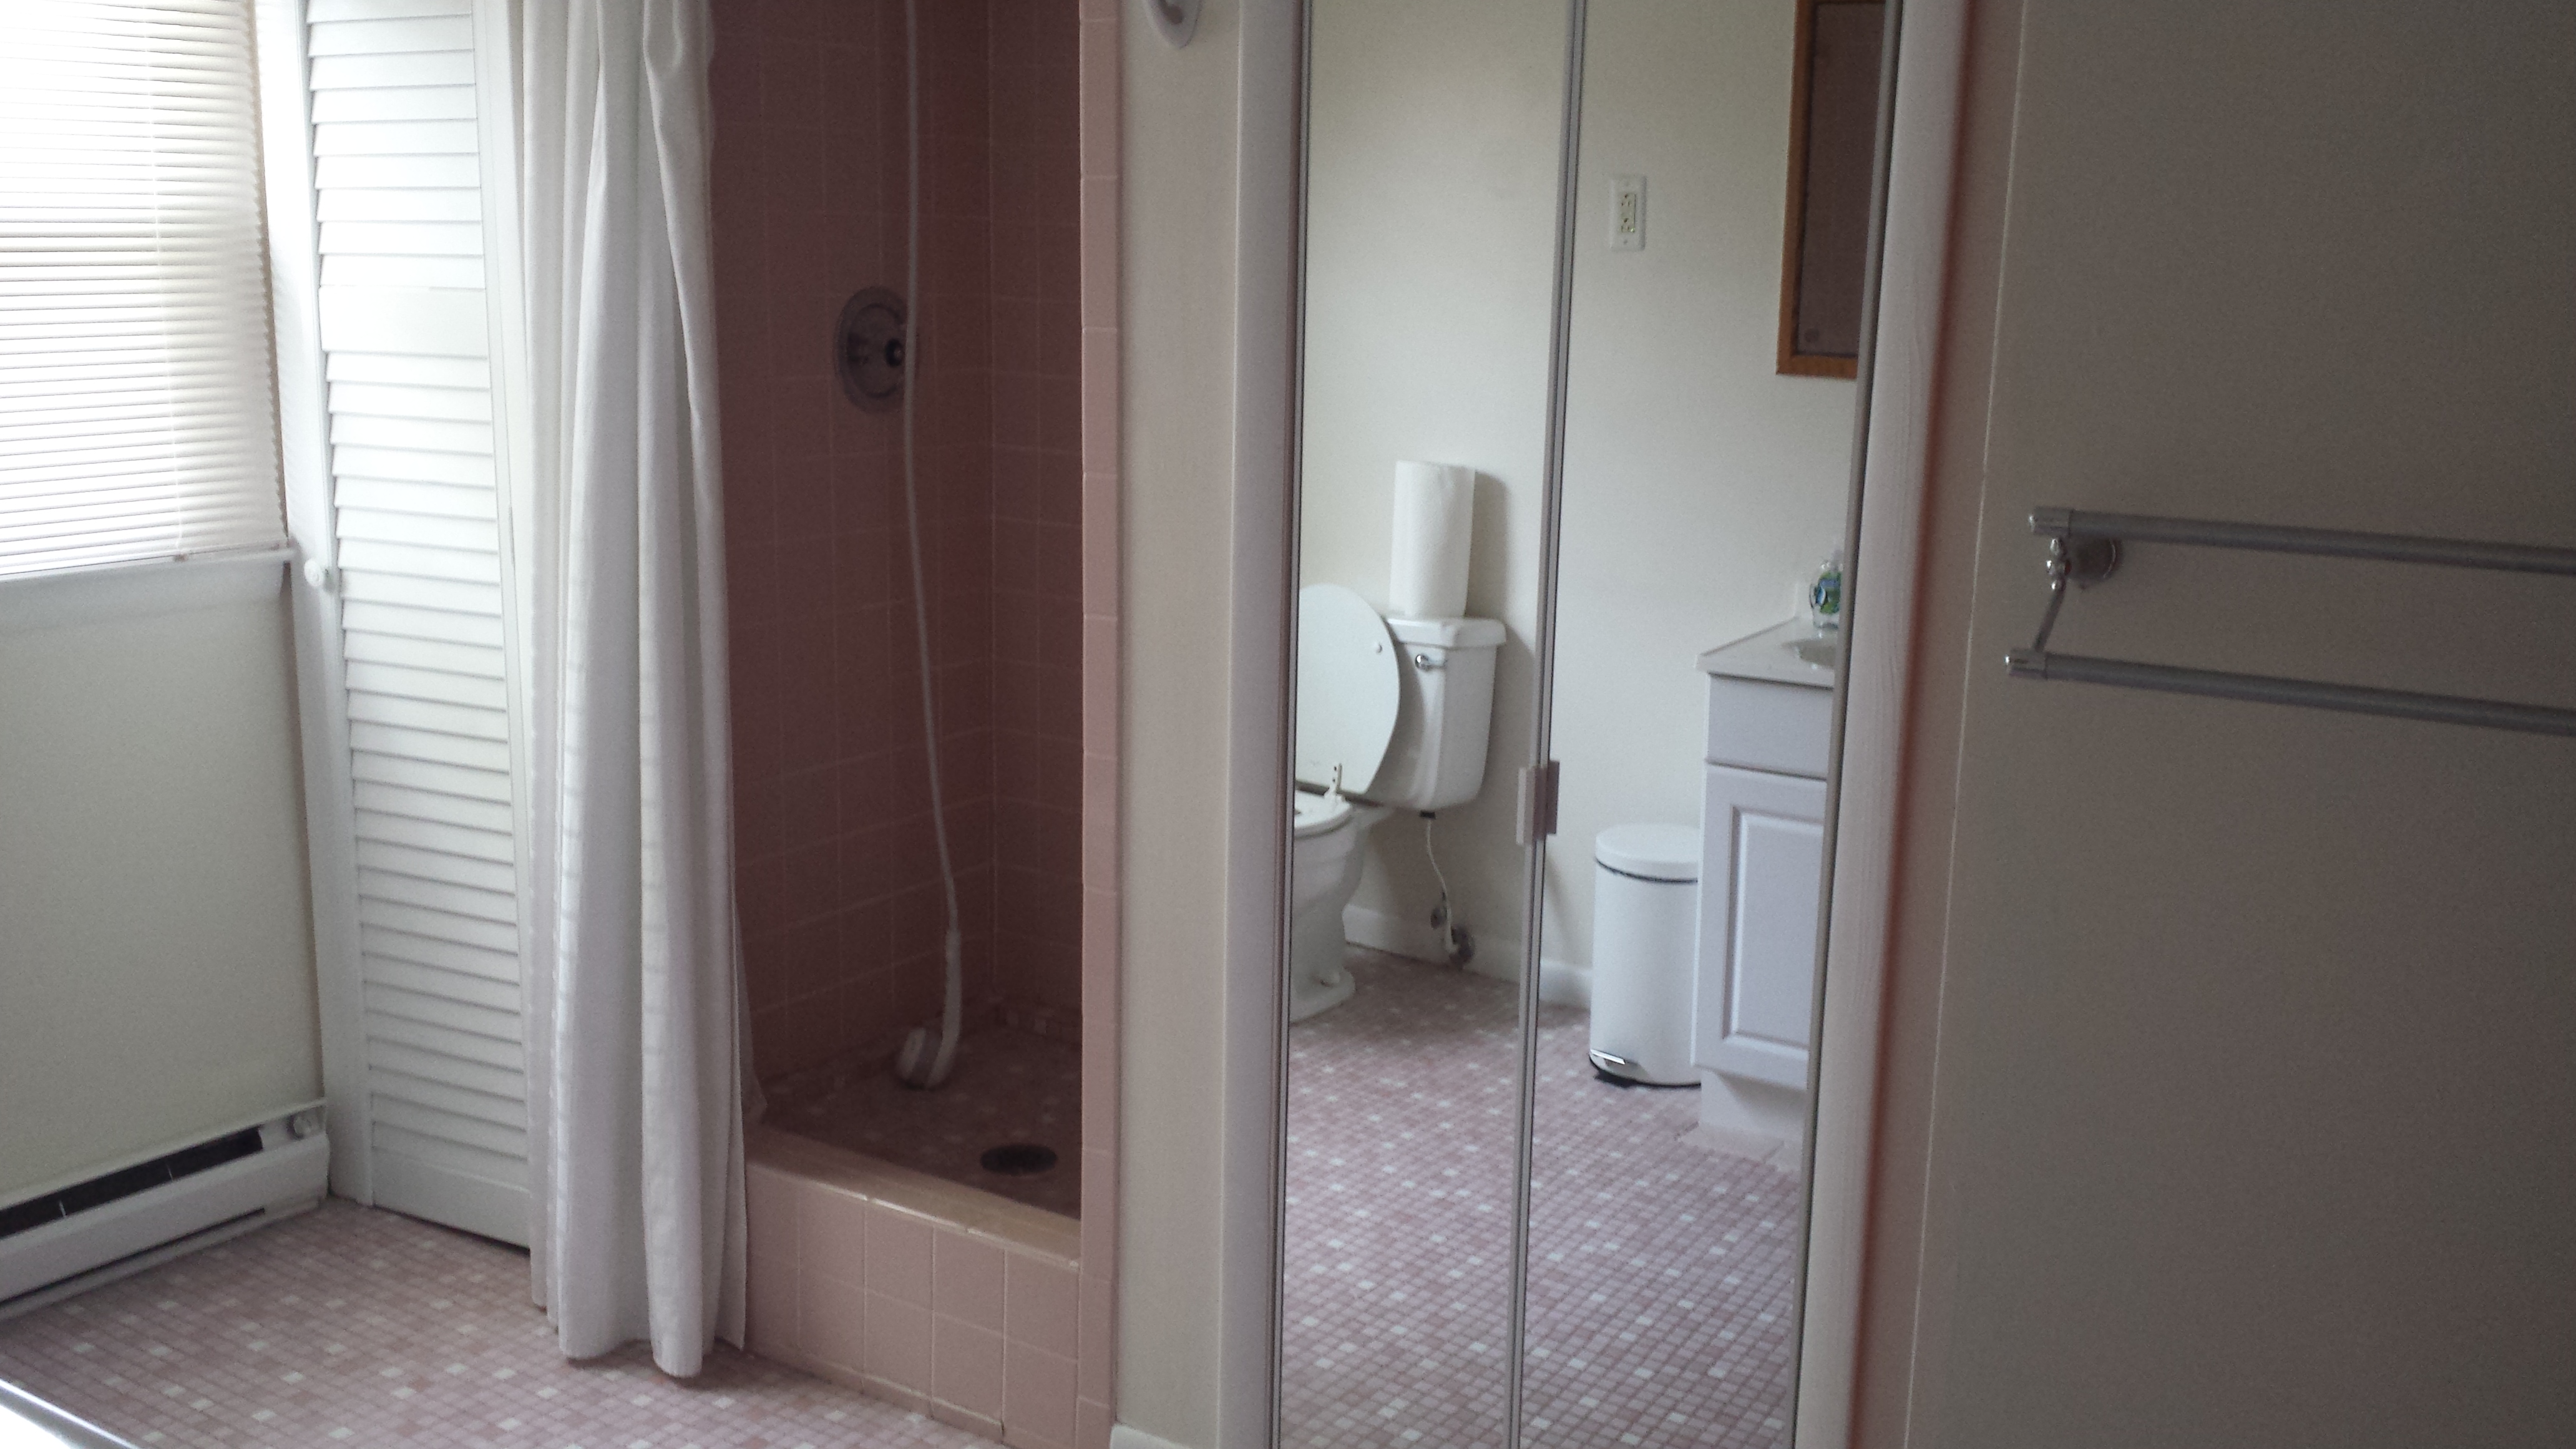
Closet, totally fucked up shower, mirror door.
Aside from the leaking waste stack our bathroom has a number of exciting “features” including:
A shower pan that is 8″ off the ground
A closet with a non-gfci outlet
Another closet that is totally stupid
A floor that slopes towards the shower and flexes as you walk on it
Water damage in the closet due to the fact that the shower walls are drywall instead of cement board
An interior wall that is a foot thick for no apparent reason
No bathroom fan
This week is the demolition and investigation phase, where we hope to find answers to questions like “why is the shower not on the ground?” and “how many new joists will have to be installed if we want the floor to stop jiggling?”
This time around we’re bringing in a contractor. I’m 8 months pregnant and sick of home improvement. The contractor is doing all of this, I’m really too pregnant to even go down there much after this week (the thought of sitting in traffic on the expressway while in labor is not appealing).
Initial sketch of the new shower
The basic idea is to remove the closet to the left of the shower in order to make it a more reasonable size (the current one is less than 3′ x 3′). Our contractor convinced us that in the long run we’d be happier with a swinging door rather than a sliding one, and he’s going to build a half height wall on the left side which he’ll put a little accessory nook in.
The rest of the bathroom layout will stay the same, but the mirror door closet will be replaced with something like this:
I’m not usually a fan of open shelves but I think they make sense in a guest bathroom. Folks can easily see where towels and stuff live without having to rummage through my closets. The cabinet doors will be made to match the vanity, which is this 4′ long monster:
I still need to figure out what we’re doing for vanity lighting. The ceilings are only 7′ so there’s not really room for a light bar above the mirror. I’m trying to find some wall sconces I like to put on either side of the mirror but not finding any I’m in love with.
Fingers crossed that we don’t find anything horrible lurking in the walls/floors. At least not anything worse than what we already know about. If we’re very lucky the bathroom will be done before the baby shows up, but since this is not my first home improvement rodeo I’m expecting delays. I’ll be happy if it’s done by the end of January.
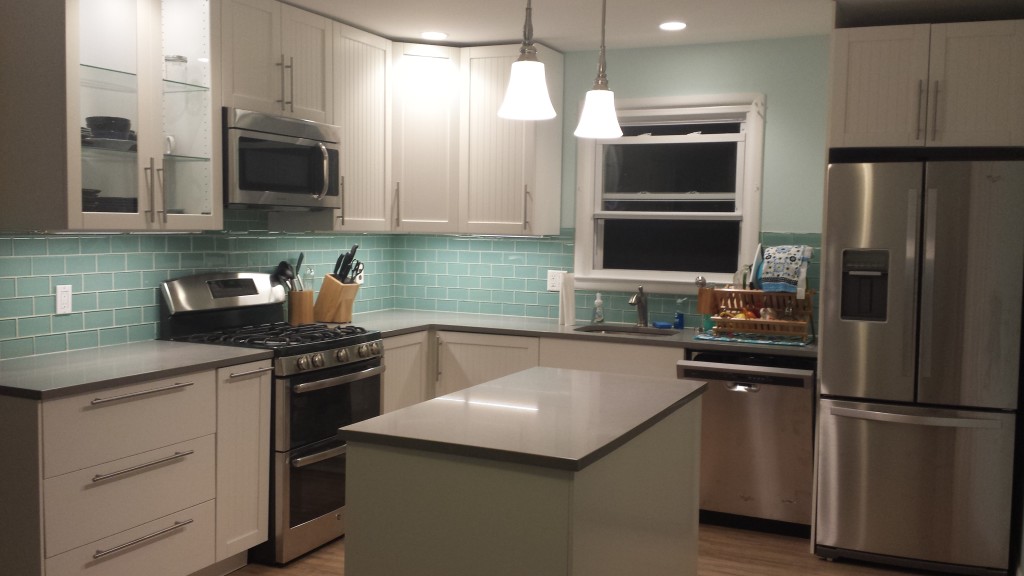
The kitchen is very near completion! I haven’t had a chance to take photos with a real camera, or write up a recap of the many things I learned in the process, but here’s a quick phone snapshot:
There are still a bunch of finishing touches to do, but the hard stuff is all done! We had our first weekend of using the kitchen and it worked very well, with two people able to cook without driving each other insane.
When I stepped into the house earlier this week I had a bit of a panic moment: I was immediately greeted by a very musty smell. After all this work on the house, damp musty grossness is absolutely NOT what I want. We had a really dry summer so we haven’t had a chance to see how the house holds up in a storm. After some poking around I found a window that had been left open, and thankfully after a few days the house has returned to its usual neutral scent.
In boring-but-important news, we had our structural contractor install a new beam under the house. Now the bathroom no longer jiggles around when you step! The end of the house is no longer sinking into the sand! It’s still not level, but it’s been raised a few inches. The drywall cracked in a few spots around the door frames but other than that it was a pretty painless process.
Over Pope Weekend we had 10 people total staying in the house, and no one came to blows! So I consider that a ringing endorsement for the house. Unfortunately, over the course of the weekend we also discovered that the upstairs bathroom has sprung a leak. Wamp womp. It’s a really weird leak. There’s a water stain on the ceiling below the shower, but even if the shower is off there is fresh water trickling down the waste stack (which is behind the toilet). The toilet has a tendency to run because it’s an old toilet with an old flapper I haven’t gotten around to replacing.
My totally unscientific theory is that the toilet is leaking, and since the bathroom has a distinct slant towards the shower the shower drain is no longer appropriately sloped, letting water run from the toilet to the shower where it then drips onto the ceiling below.
Please note the fact that the shower starts 8″ off the ground.
There is no easy way to access any of the waste line to see what’s going on. At the very least it will require cutting into the (freshly painted!) bedroom ceiling below it. Due to the bizarre way the shower is built, there’s also a chance we’d have to open up the shower tile. This bathroom is kind of a nightmare and we knew going into it that a full remodel was on the short list of things we wanted to do. But I wasn’t intending to tackle that until next spring at the earliest.
Now I’m trying to decide whether I rip up the bathroom just to fix the drain line, or just pull the trigger on the remodel now. I’ve met with two contractors so far and am waiting on estimates.
If we end up doing the bathroom now it will be a total gut remodel, and I’m contracting out 100% of it. At 6 months pregnant I have neither the energy nor time to do another major renovation.
Potential layout for new shower
The last item on the agenda this week was preparing for the potential doom of Hurricane Joaquin. Thankfully the storm went out to sea, but we still had a really nasty nor’easter come through. My dad and I took care of some lingering to-dos, like removing the old HVAC condensation line (which was just sort of flapping around outside the house). Both of our storm doors don’t latch shut, so somewhat counter-intuitively we removed them before the storm so they didn’t fly open and rip off the door frame in the process. Getting replacement storm doors is on the short term to-do list once the storm passes.
So far almost every issue we’ve had with the house is something we’d budgeted to fix when we bought it. What we didn’t anticipate was cramming so much stuff into the first year. Many of the stuff on the “eventually” list became “now” either because they were more urgent than we thought, or because it didn’t make sense to do certain tasks separately. For example, the immediate project of “replace the broken heat pump” became “convert to gas heat” when we found out they cost about the same, and then that morphed into “convert and replace the hot water heater” since we were having gas lines run anyway. Silly me, I thought the electrical panel upgrade was gonna be next on the to-do list, but it’s actually the bathroom. Surprise!
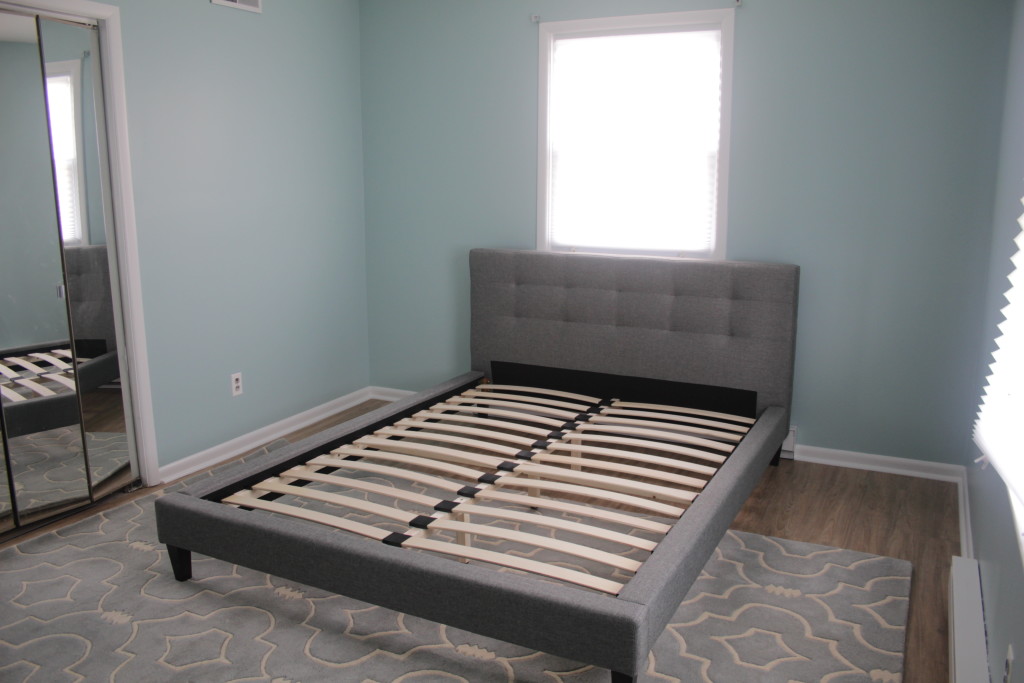
Now that summer is over and I have to bunker down and focus on other things, there won’t be as many dramatic progress photos of the house. When it’s all done I want to go back in with a nice wide angle lens and take good photos, but for now here are some quick before and after shots of the downstairs bedrooms so you can see how far the house has come.
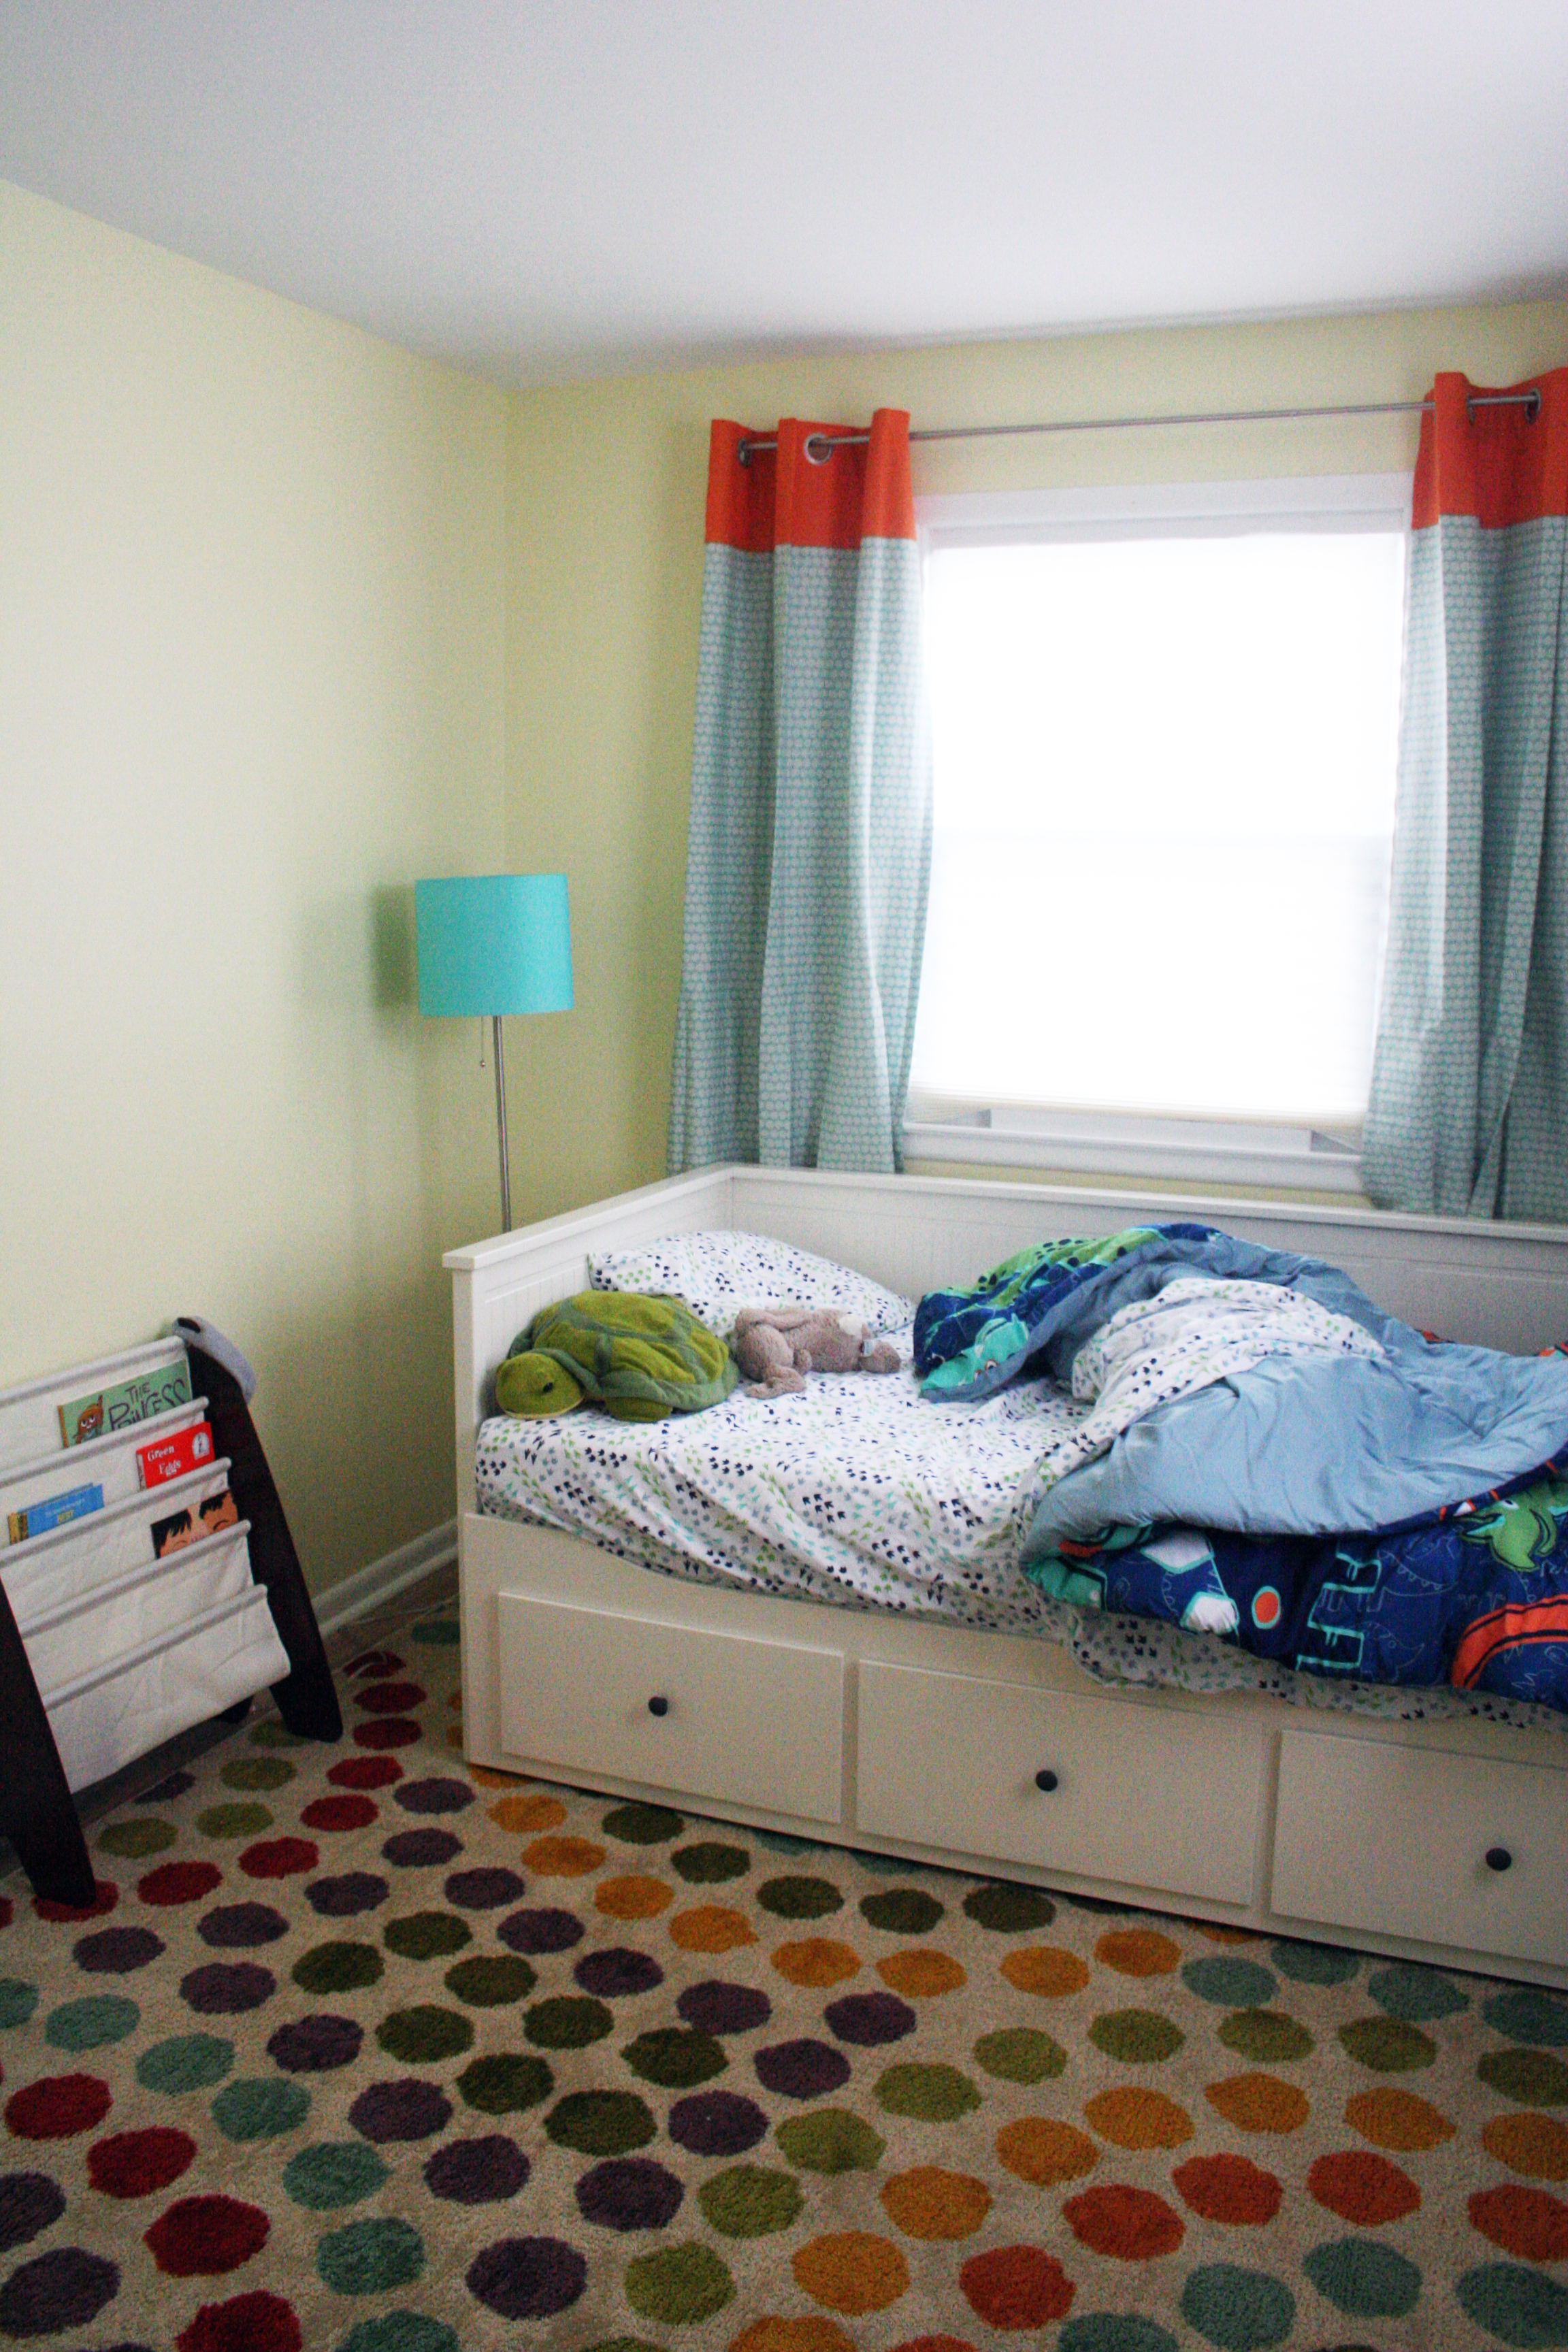
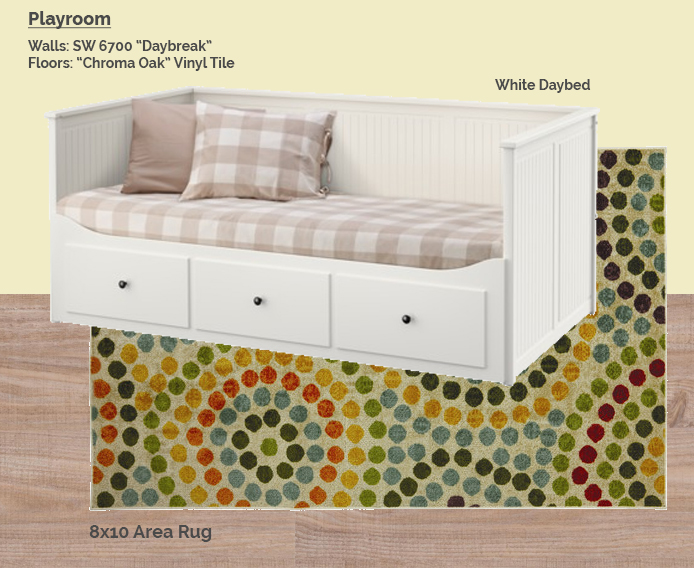
The Small Bedroom aka “Playroom”
This room was being used for storage when we toured the house. We replaced the flooring, added a big rug, removed the chair rail, and painted the walls. Toys and games will be stored in here, and the daybed pulls out into a double in the event we have so many guests that our 3 year old gets demoted to an airbed.
Playroom Before – Used for StoragePlayroom After – Sleeping and playing. Bed is from Ikea, rug is from Wayfair, curtains are from Lowes, dinosaur sheets are from Target, lamp is from Target, and the walls are SW6700 “Daybreak”
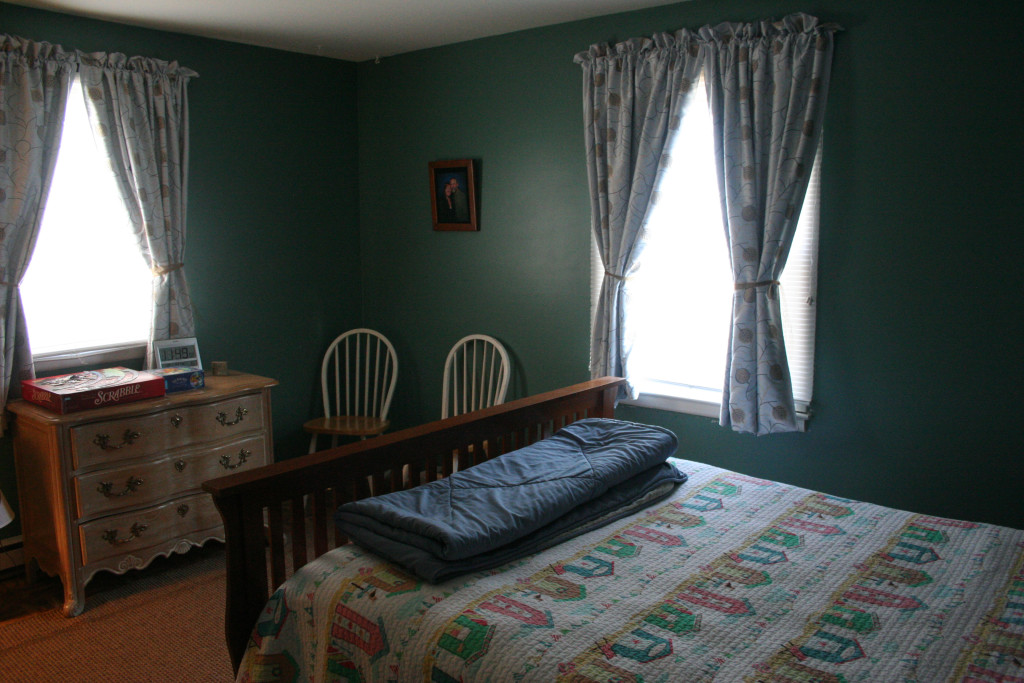
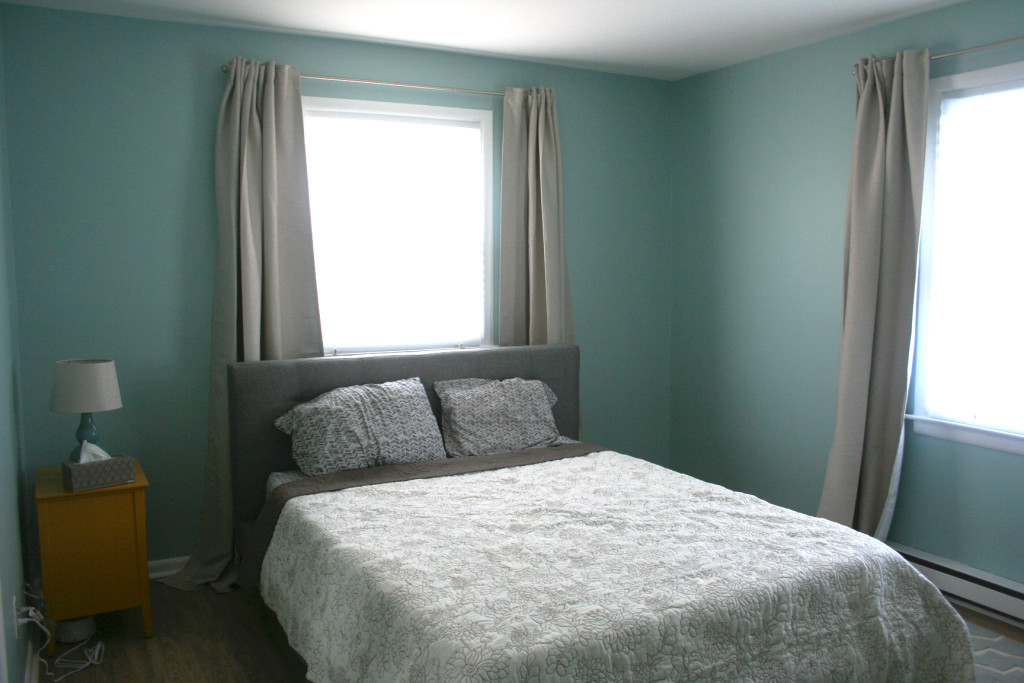
Master Bedroom
We replaced the floor, changed the curtains, and moved the bed to another wall so that the “sitting area” is now right when you walk in.
Before the bed was the first thing you ran into when you entered the roomNow the bed is against another wall and there is a chair (not visible) in the entryway. Curtains are from Ikea, rug and bed are both from Wayfair, lamp, bedbpread, sheets, and nightstand are all from Target. Walls are Sherwin Williams “Watery”
I’m really hoping that I can get the backsplash finished sometime over the next few weeks, since the kitchen has the most dramatic change, but we’ll see if that’s realistic now that our weekends are booked solid with other obligations.
We’re having our first guests stay at the beach house… just in time for the end of summer! This meant my husband and I spent a lot of yesterday running around desperately trying to get the house clean and ready for people to stay over.
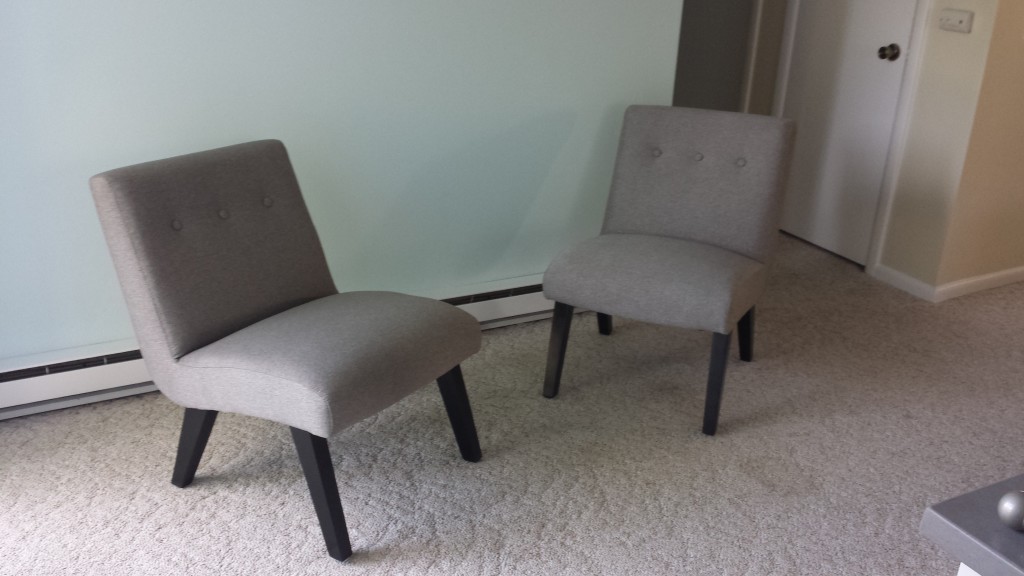
In the morning, Chris took an entire Honda Fit’s worth of cardboard to the recycling center. Around 3pm we ran out for a Massive Emergency Trip to Target and Home Depot. This was an emergency because we desperately wanted to buy everything and get home before the Friday night shore traffic set in. We ran around like madmen getting all the last minute odds and ends we needed. Somehow despite going in with a list and a strict “get what we need and get out of there” attitude we came home with two additional chairs. My husband had been eyeing them up for about a month and they were on clearance.
My daughter needed to give up “her” room for guests, so we let her pick out some linens so the little room she was staying in would still feel like hers. She went with dinosaurs (I was pulling for the truck sheets but got overruled).
Camping out on the floor
The biggest task was tackling some plumbing issues in the bathrooms. The upstairs shower didn’t have enough water pressure to trigger the tankless hot water heater when it was in use, leading to unpleasant cold showers, but the sink worked fine. The culprit was a gunked up cartridge in the handle. We were too busy to take any photos of the process but this YouTube video explains it pretty well if you’re curious:
Once we got the cartridge out we brought it with us to the store and picked up a replacement for about $15. Installing the new cartridge was pretty straightforward. We went from getting ~0.4 GPM of flow through the shower head to 1.6 GPM (as reported by the hot water heater).
The downstairs bathroom was supposed to be a straightforward replacement of the shower head. Unfortunately when I pulled the old head off I found it had a ball stem instead of the threaded stem the new head attaches to. So what was supposed to be a 10 minute project ended up with another trip to the hardware store to get a new shower stem. It took a little bit of force to get the old stem out but other than that it was simple to replace.
Of course when I opened up the box to the new shower head and it was broken. Since we had just returned from the store I had absolutely no interest in going back. By some odd coincidence my in-laws next door had a spare shower head they weren’t using (???) so we grabbed that and now we have two working showers!
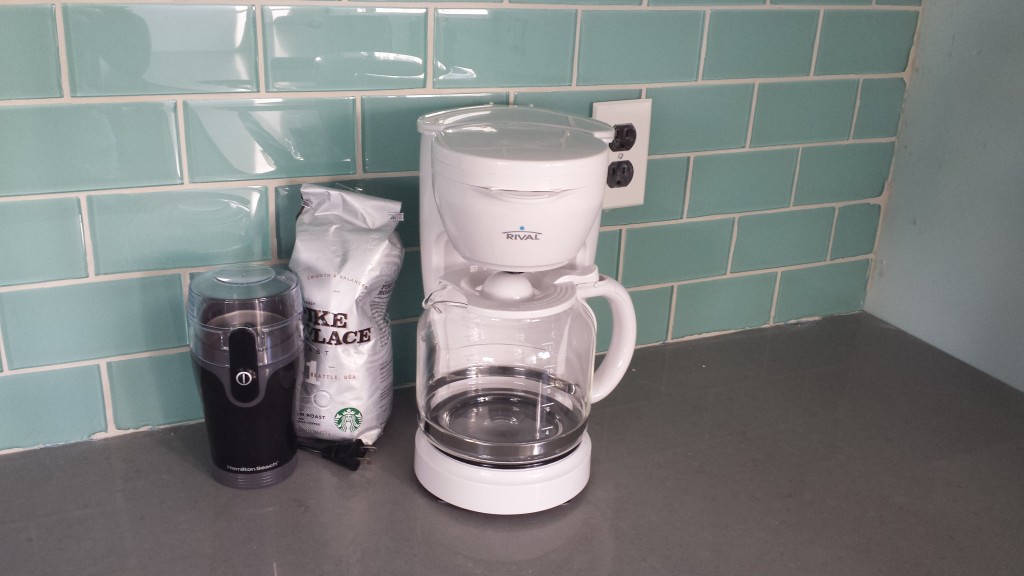
With all the construction a bunch of the outlet faceplate screws have gone missing (yes, I know you’re supposed to keep them with the outlet so that doesn’t happen, no I did not do that) so I got a box of those, as well as a box of longer screws for the outlets in the kitchen need now that the backsplash bumps them out another 1/4″. The kitchen isn’t done, but we do have the essentials ready now. Oven, dishwasher, fridge, and most importantly: coffee maker.
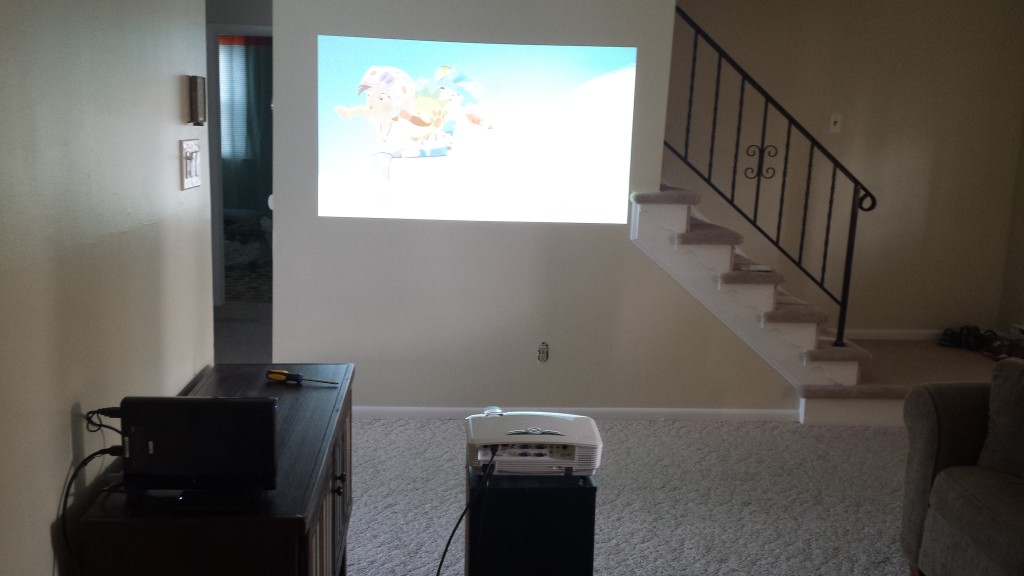
We don’t have a TV in the living room but Chris aimed a projector at the wall and brought his Wii U down. The couch in there is one Chris has had since before we got together, but it’s still in good shape despite many years of abuse from cats. So there’s somewhere comfortable to plop down and watch It’s Always Sunny in Philadelphia (or kids shows, I guess).
We hung curtains in the bedrooms, did a ridiculous amount of laundry, scrubbed both bathrooms, vacuumed the hell out of everything, and managed to get the house to a place where we don’t have to apologize for its appearance. We’re in the home stretch now. I still have one major project (finishing the backsplash) and a lot of little fit and finish things (caulking the tile to the countertop, installing toekicks in the kitchen, etc). But I’m done with contractors (!!!) and after today’s Ikea delivery we’ll have beds in every bedroom. On Sunday I’m hoping to take a bunch of pictures of the house now that it’s free of construction debris.
We’re so close! It’s finally happening! Just in time for summer to be over!
We’re filling the shore house with family for Labor Day weekend and it’s finally starting to look like a house! We still have to do a massive cleaning, and a huge trip to the recycling center, but things are starting to come together. I know I say that a lot but it’s really true this time!
Master Bedroom
The master bedroom is looking good. I’m not keeping the mirrored closet doors forever, but there’s a bed! And a carpet! I still need to get curtains, and I’m running into some decision fatigue. There’s so much blue in the room (both the rug and bed have a slight blue tint to them) that I’m thinking beige. Boring old beige.
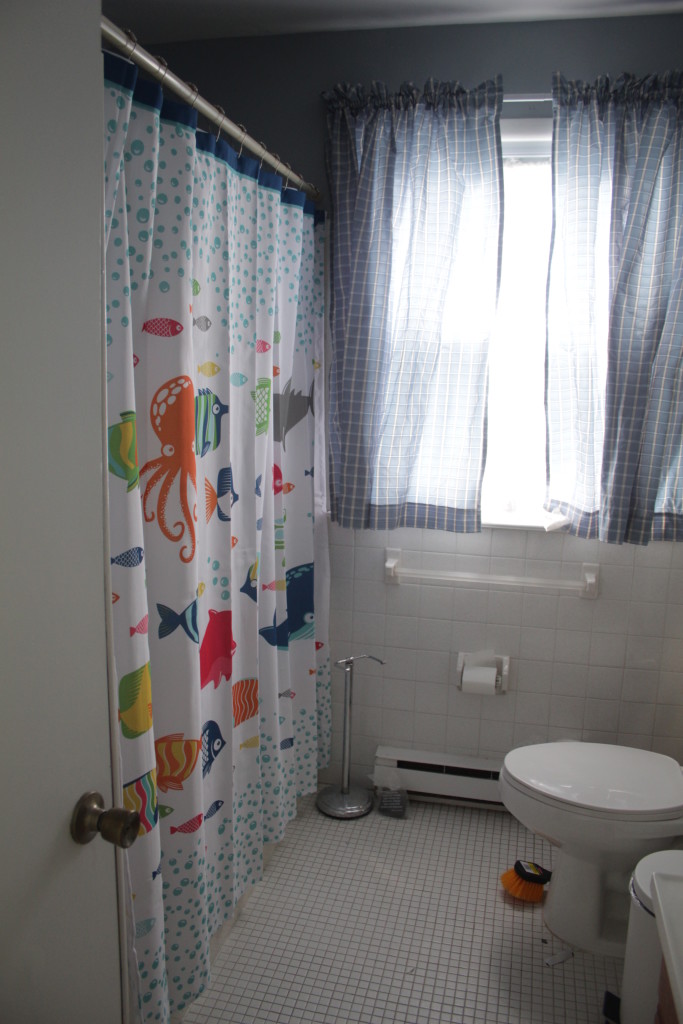
Shower is ready to use!
The bathroom still needs a thorough cleaning, but the shower has been re-coated and re-caulked and we got a festive new shower curtain from Target. The last step in here is to replace the shower head with the hand shower we got, but it’s totally a usable shower right now!
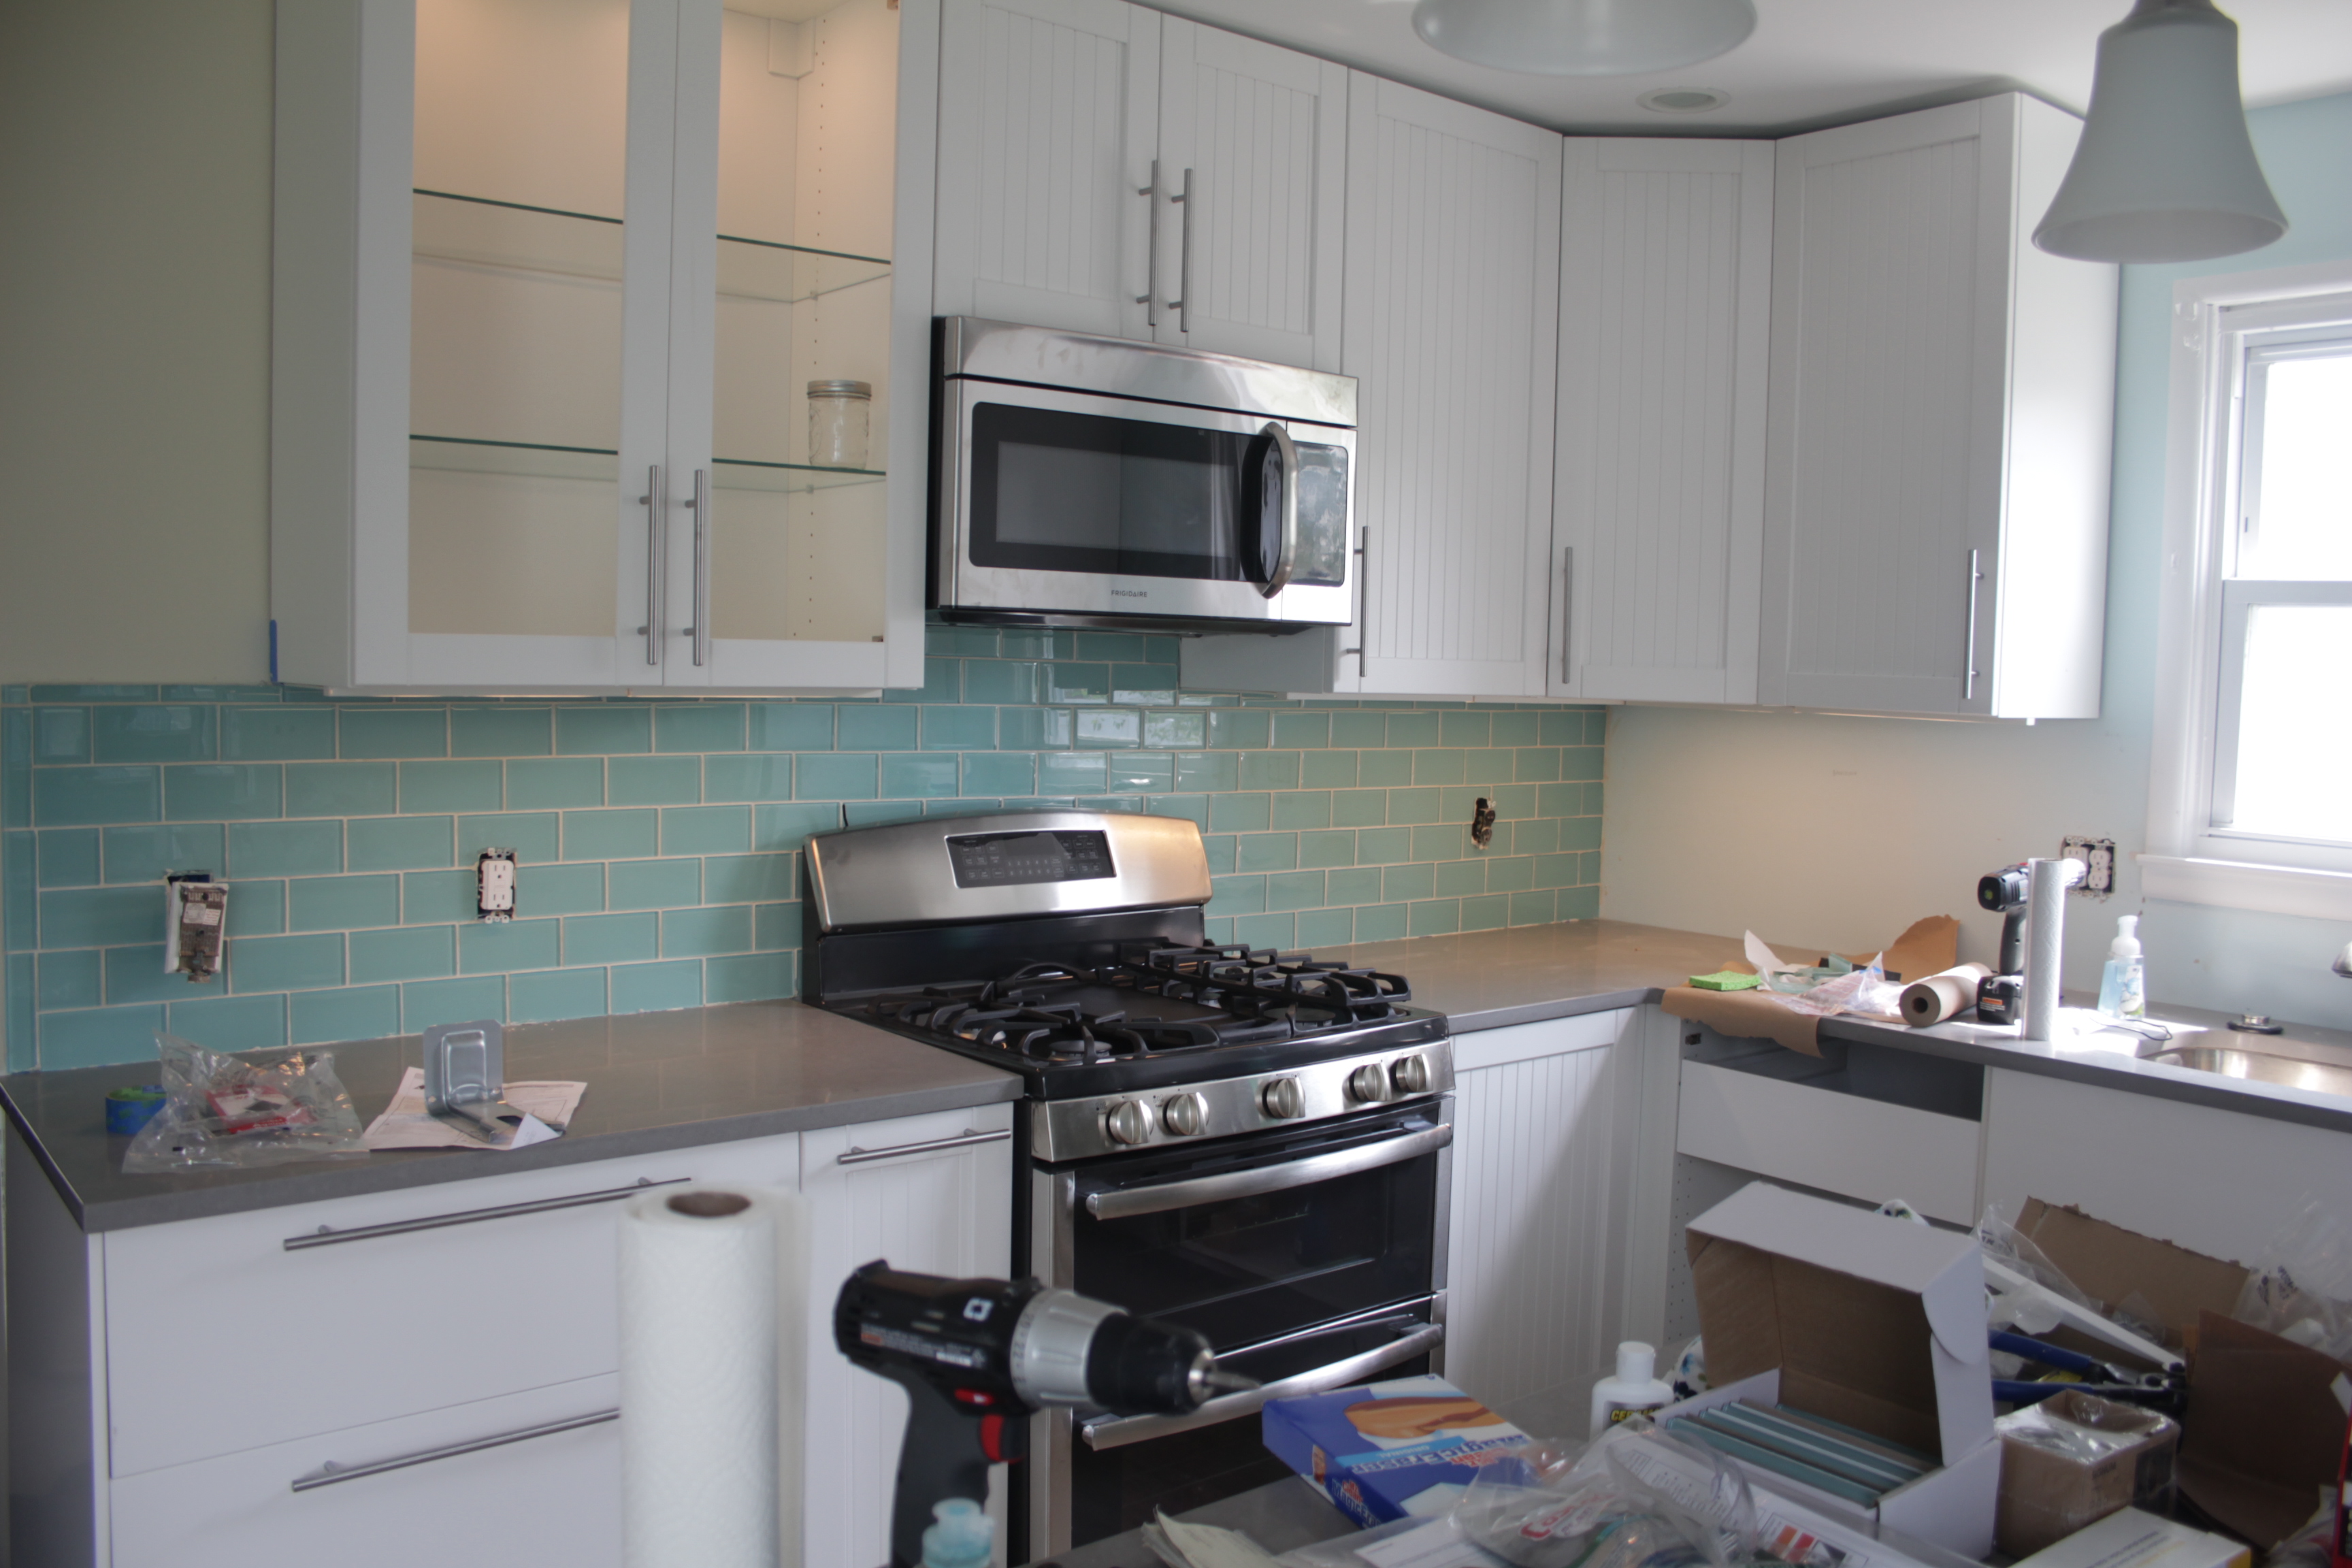
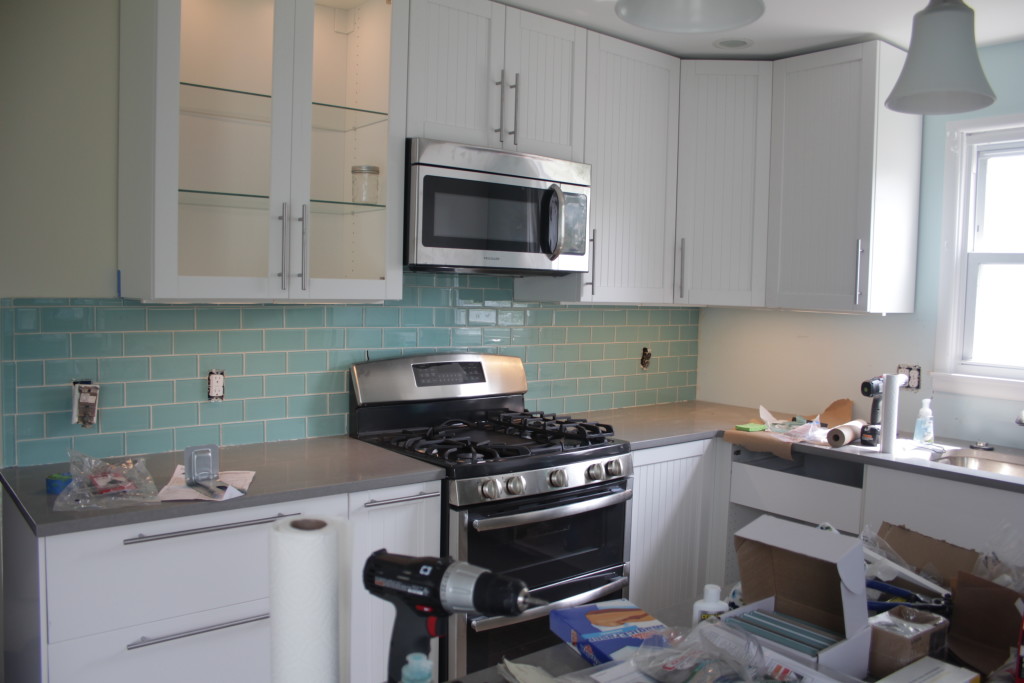
Kitchen, with half the backsplash and a working stove!
We did one wall of backsplash tile. I would have loved to do both but it took two of us a solid 7 hours to do just the one wall! It looks OK but not perfect. I learned a lot in the process, and I still need to caulk where it meets the counter top. The oven is also hooked up and working, as is the dishwasher, so aside from needing to clean up all the construction debris we have a working kitchen!
You guys you guys it’s finally here… the moment I’ve been waiting for… when I can stop “camping out” in a half-finished home and start actually making it into a space for guests and friends and us. I’ve been doing what I can here and there in the rooms that are finished, but now it’s finally time to pull the trigger and order some of the larger items I’ve been eyeing up. I’ve been haunting the local thrift store for months and coming up dry, but managed to snag some good end-of-season clearance prices on stuff online and at the big box stores (Target, Lowes, Ikea).
Instead of cleaning my office like I said I would, I put together mood boards for the rooms! Aren’t I just the pinnacle of responsibility?
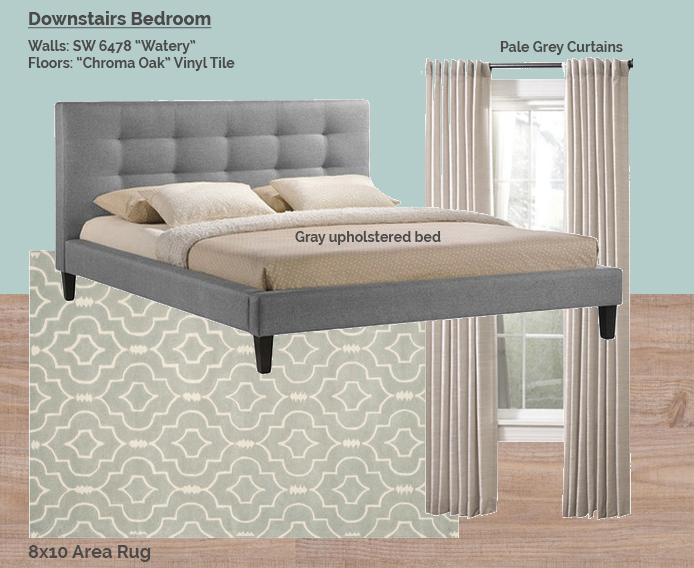
Room #1: Downstairs big bedroom
The master bedroom (for lack of a better term, it’s the biggest) gets a lot of natural light so I tried to keep the colors a little calmer in there. It’s a good sized room and I’d like to eventually get a couple chairs as well. I’m still in the market for some inexpensive bedside tables for that room.. and lighting! It’s one of the few rooms that doesn’t have any wired-in lights. It also has these super-90s mirrored accordion doors on the closet. I hate the mirror doors but I haven’t seen anything else I like much better. Current plan is to hang curtains across the closet opening instead. I haven’t decided if those will be the same color as the window curtains, or slightly different.
5 bucks says those mirror doors are still there a year from now because I haven’t made up my mind. Also I guess I’ll have to get some sort of comforter or duvet cover for this room, it gets pretty cold downstairs if you crank the AC enough to cool the upstairs (thanks, crappy duct layout).
Lazyweb, bring me: lighting, closet door/curtain ideas, bedside table, and comforter ideas for this room!
Bedroom #2 aka the “Playroom”
I’ve been calling the 2nd downstairs bedroom the “playroom” but it’s really more like “a bedroom where we will store all the toys so they don’t clutter up my living room. We picked out a fun rug and a daybed which pulls out into a double AND has storage. Anyone who has been to Ikea in the last decade probably recognizes it. Beyond that… I got nothing. We’ll need toy storage (though it does have a small closet) and lighting, but it’s not a very big room so I’m trying to keep things fairly compact/modular.
Lazyweb, bring me: child-friendly lighting, toy storage
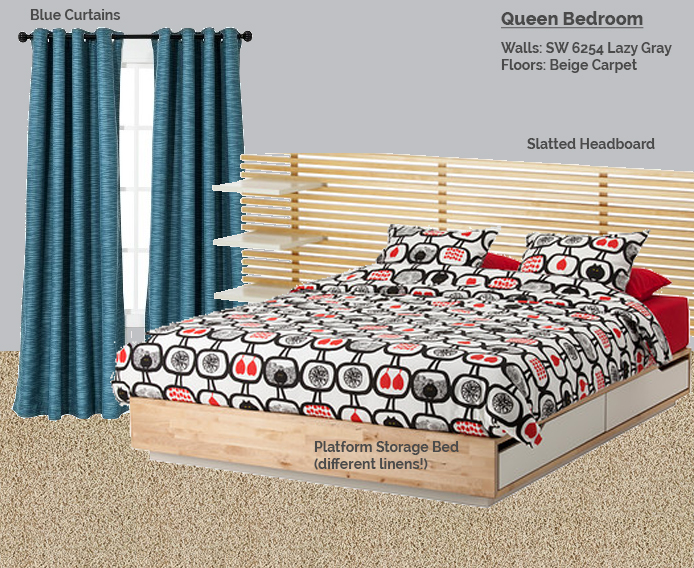
Bedroom #3. It has a queen bed!
As we move upstairs you will quickly see my design ideas get far less… cohesive. Also I start referring to the rooms by the size of the bed in them. The “Queen room” has an Ikea bed that again many folks will recognize, some Target curtains and not a lot else. I did get a quilt for this room, which looked SUPER CUTE in the store and SUPER CUTE when I washed it and KIND OF MEH when I put it next to the curtains. Urp. Here’s a photo from the Kohl’s website:
Also while I really like the Ikea bed itself (solid wood! storage!), the white melamine drawer fronts kind of kill the look. Looking at the assembly directions they’re really simply constructed. It’s basically a board with a groove in the bottom and some holes on the sides. I feel pretty confident I could create new drawer fronts in a nicer wood (and with handles instead of the weird 80s cutouts) some day down the line. Who wants to take another $5 bet on whether I ever actually do that?
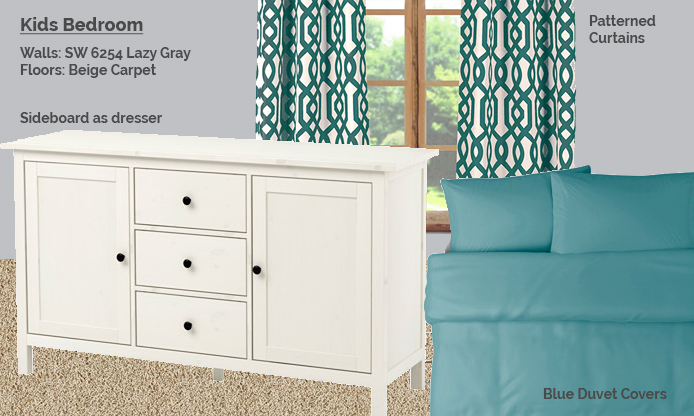
Bedroom #4. For kids!
The kids’ bedroom is actually pretty close to being done. I initially had some crazy plans for bed nooks, and I still might do that someday, but for the time being I’m gonna content myself with just two beds hanging out. There are two twin beds against the wall (visible here), one of which has a pull out trundle underneath it. The other has storage. While we don’t need a ton of storage in this room, I’m looking at getting a sideboard to use as a dresser since there’s no closet in that room. There’s a ceiling light in there but I’ll probably put one on the sideboard as well.
Lazyweb, bring me a kid-friendly lamp!
Bedroom #5 has no plan. No plan at all.
When it comes to the 5th bedroom there is no plan. Only Zuul. This is the room that my husband and I have been staying in during construction, and therefore it has items based on what was necessary for us to sleep. It has an Ikea bed from 2009 which we migrated down from elsewhere, a duvet cover I think is cute, two accent tables I got on impluse because they were cute AND ON SALE, and that’s about it. There is no plan for this room, other than to someday replace the bed with something that isn’t awful (the one we have is actually the older version of the one pictured, and it’s really weirdly low to the ground). I’m not even sure if I want the accent tables in that room, or if I want to abduct them for elsewhere. Also the duvet.
Not shown: beige curtains that were purchased exclusively for their light-blocking properties, and a roller shade that is really difficult to operate.
Lazyweb, how much of this room should I cannibalize for other rooms?
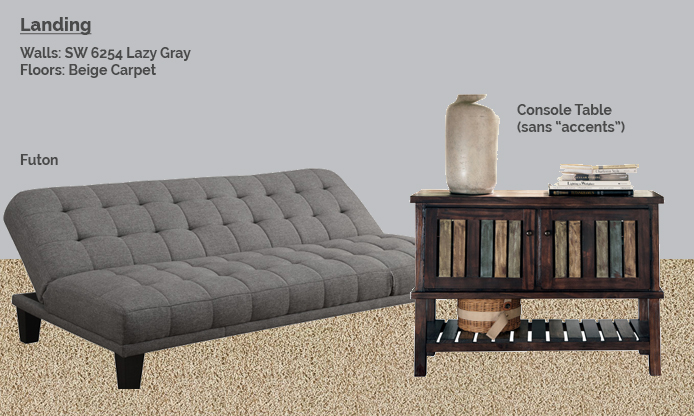
You guys, I am getting kind of tired of photoshopping together all these items of furniture, but there’s only one left so I’ll saunter on. No, it’s not the living room. I have no idea what the plan is for the living room. Right now it has a sectional my husband has owned since before we got together, and since there’s a place to park my butt I’m pretty much done for now. No, the last “room” is the landing at the top of the stairs, which we’re totally sticking a futon in just like the previous owners did.
Someday a TV will go here. Right after I have some outlets added.
The idea is that the kids can all pile onto the futon and play video games while the adults have distinguished conversation in the living room. Just kidding, the kids will pile onto the futon and play video games upstairs because they haven’t yet learned to hold their own against the adults playing Super Smash Bros downstairs.
And that, my friends, is the current decorating plan. Clearly some of the rooms are more thought out than others. Also, putting together these mood boards (which is a totally normal thing to do on a Wedesnday night, right?) has made me absolutely hate the carpet upstairs. And downstairs. And all carpet. Can you put an area rug on top of carpet? Is that legit?
Last night I had to go down the shore… again.. to let the painter in this morning (because I didn’t want to wake up at 5am to drive down there). For some reason the outlet covers were not removed / painted under when the painters came last week. The manager was very apologetic and came out this morning with the crew leader to fix it.
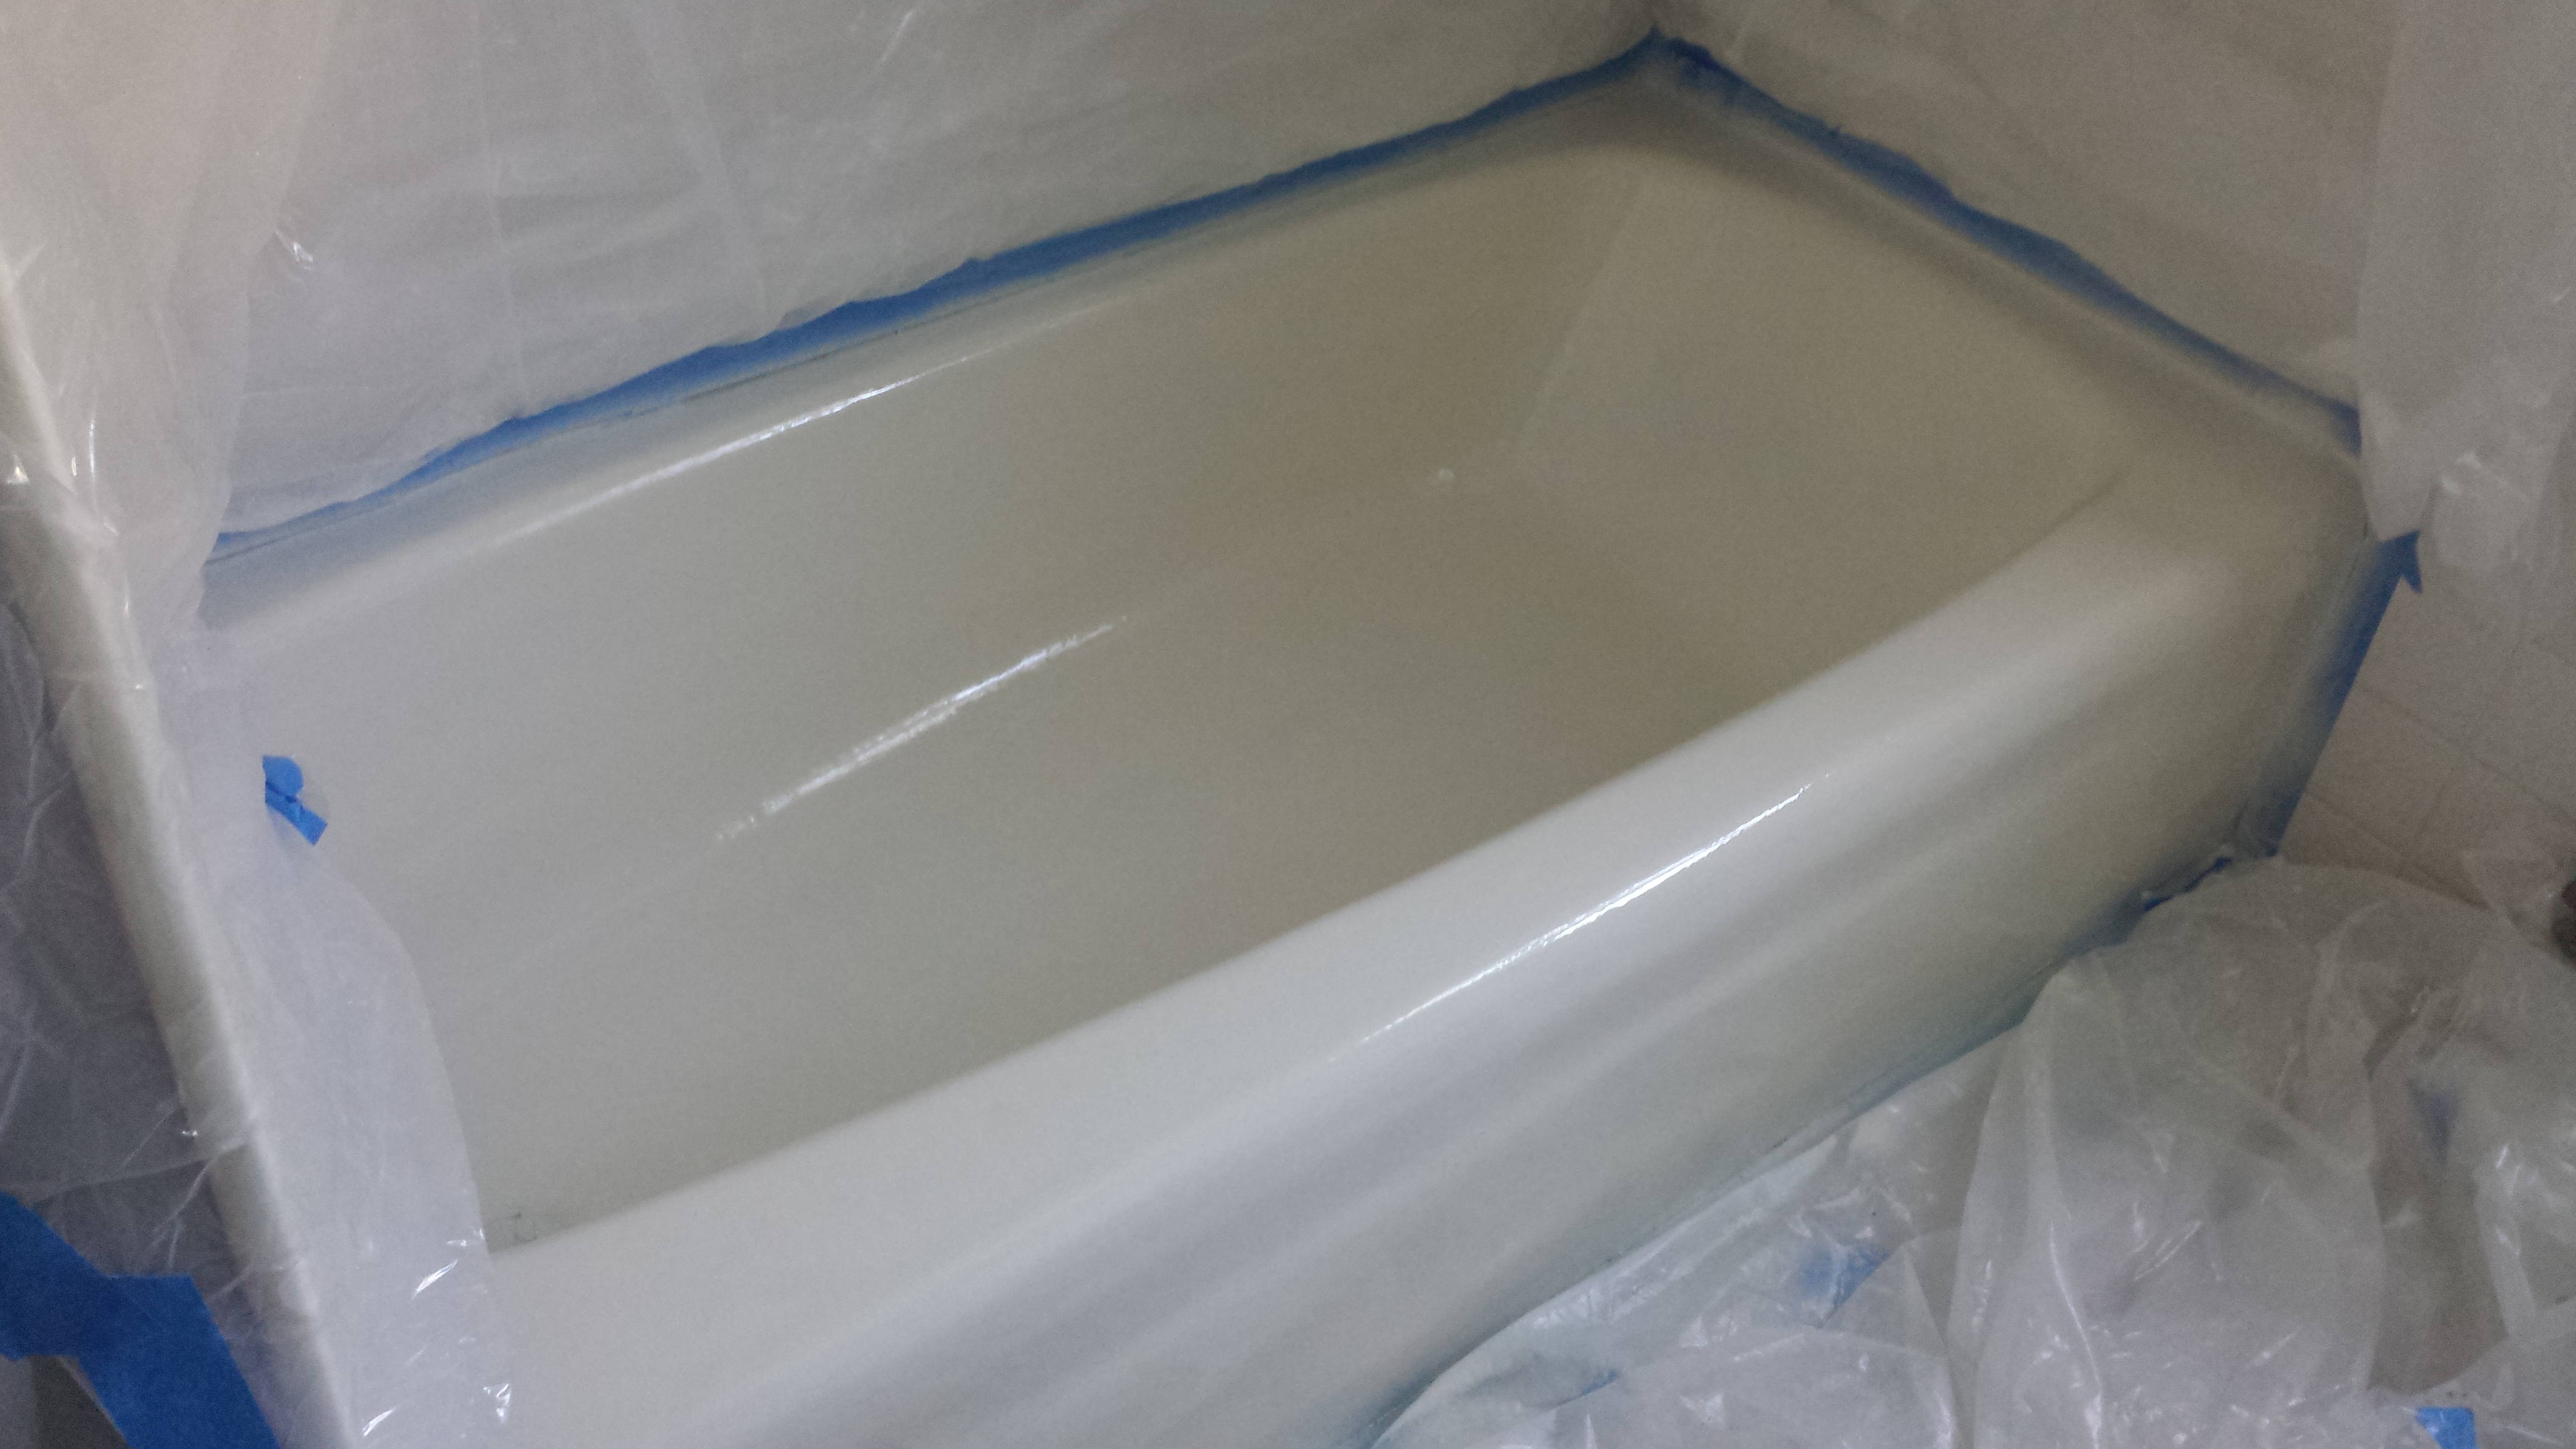
Since I was down there anyway I decided to tackle the tub (which I foolishly did not get a ‘before’ photo of). The finish on the tub was scraped off in a bunch of places, and the yellow fiberglass shows through and looks gross. It was also caulked with white caulk, despite being a bisque colored tub, which makes everything look yellow and gross. So last night I stripped off all the old caulk. That allowed me to discover what a mess the tub surround is. For about 5 minutes I contemplated other options, and then decided to just barrel ahead with the current plan to re-caulk and re-enamel the tub. It won’t look great, but it will look better, and I can deal with the bathroom as a whole at some other point in the future.
One freshly-coated tub
Recoating the tub is fairly easy, I got a tub refinishing kit at Home Depot. First you clean the living daylights out of it using cleaner and steel wool, then you mask everything off, then you spray the enamel on. It looks good, although I’m a little concerned about the durability. The bathrooms are on the to-be-addressed list but there’s a lot of other more critical stuff that has to come first. The enamel needs to dry for 72 hours, so I’ll caulk the seams the next time I’m down there.
I’ve got a new theory about the upstairs shower, which isn’t drawing enough hot water to trigger the tankless heater to fire up. Apparently the cartridge in the temperature knob can get clogged with minerals over time. If the cartridge is blocked up that would explain the low water pressure, as well as why the sink in the same room seems fine (and we’ve got a brand new shower head).
Meanwhile I’m scurrying around trying to coordinate all the furniture/mattress delivery so that everything shows up before the weekend and I don’t have to make multiple trips down to sign for stuff. We expect the house to be full or nearly-full with family, so we need as many beds as possible.
Guys can we talk about window treatments for a minute? Most of the aluminum / vinyl mini blinds that were in the shore house were in pretty rough shape. And the curtains were not to my taste. So now that the house is painted and nice looking I’ve started to turn my attention towards window treatments. At home in the bedrooms we have cordless cellular shades (which came with the house) and then curtains hung over the window. This way it can be super duper dark in the bedroom even with the sun decides to rise at 5:30 or some horrible hour. This has been essential in getting my kid to sleep past dawn, and it works great.
Shopping for curtains is sort of fun, and not too intimidating. There are a good number of inexpensive options at Target and Lowes, so it doesn’t feel like that much of a life commitment. I even snagged some from Woot.com that like.
I find these totally acceptable at $20/pair
Aside from needing to hem the ones for the upstairs (damn you, not-even-eight-foot ceilings) curtain shopping went pretty well. Until today.
For some reason I am in curtain limbo. I set out this morning in search of curtains for the 2 downstairs bedrooms, and came up empty handed. Since the downstairs have colored walls (upstairs is gray) I wanted to see stuff in person to make sure the color looked good. Everything I found that I liked was mysteriously out of stock. Target was super weird: none of the display curtains seemed to be anywhere on the shelf. But I made a note of the styles I liked and figured I’d order them online. Except my notes must not be good enough because I can’t find any of them online. So now I’m just curtain-less. Good luck keeping up with the glaring summer sun, new AC system!
Next I went to Lowes to look at shades/blinds. Holy shit you guys, those cordless cellular shades I love cost a fortune, it turns out! Thanks, person who we bought our house from, for buying nice things I am way too cheap to ever purchase on my own. I mean I guess if I was doing one or two windows I could stomach the cost, but I have ten. Then I looked at vinyl/aluminum mini blinds, which are cheap. And ugly. So ugly. I hemmed and hawed for about 10 minutes before turning to the display of disposable stick-on paper accordion shades. And bought ten. That’s right, I bailed on this decision. I’ll return to it in 6 months when the paper shades start falling down.
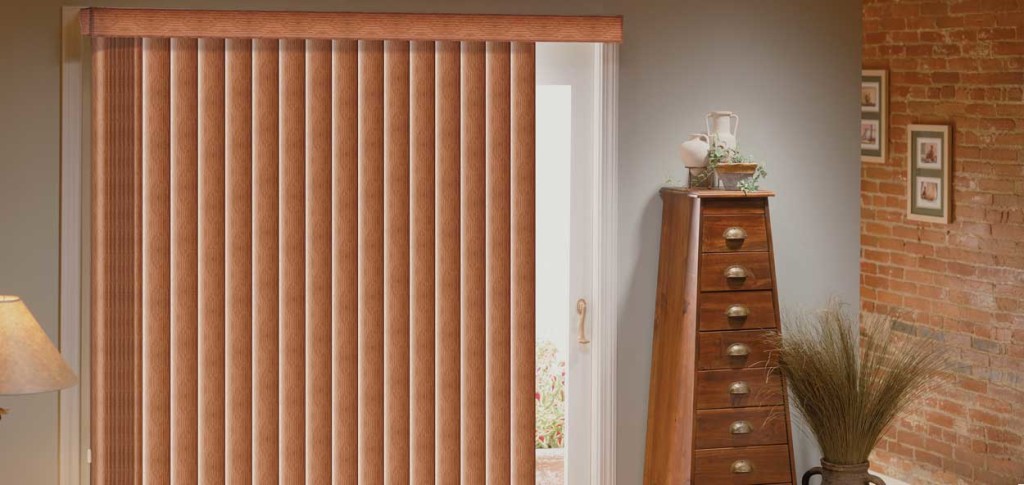
The other thorn in my side is the sliding glass doors. They’re problematic for a number of reasons. First, the seal is busted. Water is trapped inside, and the only way to really fix that is to get new doors. They are also really hard to open and close. And also I hate pretty much every window treatment option available for sliding glass doors. Curtains are bulky and annoying, vertical blinds are ugly, and a nice multi-layer drape system is too expensive to spend on a door that has to be replaced in the next year anyway.
Not convinced this is an improvement over the vinyl ones
So don’t be surprised if you come to visit and find that all my curtains just have a sheet tacked up over them, college style, because I am incapable of making any decisions about window treatments.