Uncategorized

A Eulogy for the Galactic Starcruiser

I would be lying if I said I wasn’t devastated by the closure of the Galactic Starcruiser in Disney World.

The Galactic Starcruiser was a fantastic piece of immersive theater, and the fact that a company as wealthy as Disney couldn’t pull it off financially is hard to swallow. A lot of it is Disney’s own fault – I cringe every time I hear someone refer to it as the “Star Wars hotel” – they never really succeeded in explaining to the public what on earth it was.

Getting ready to enter the Halcyon

It’s a hotel in that you do indeed sleep there, but that’s about as far as that comparison goes. It’s a ride you sleep in. It’s 48 hours of willingly suspending your disbelief and immersing yourself in a story. It’s going to a Disney park without ever going through the front gate or waiting in line. It’s a cruise ship that happens to be in a Florida parking lot. And it’s probably the most innovative performance art ever attempted at that scale.

This was essentially the hotel lobby and I audibly gasped when we entered this room. It’s breathtaking.

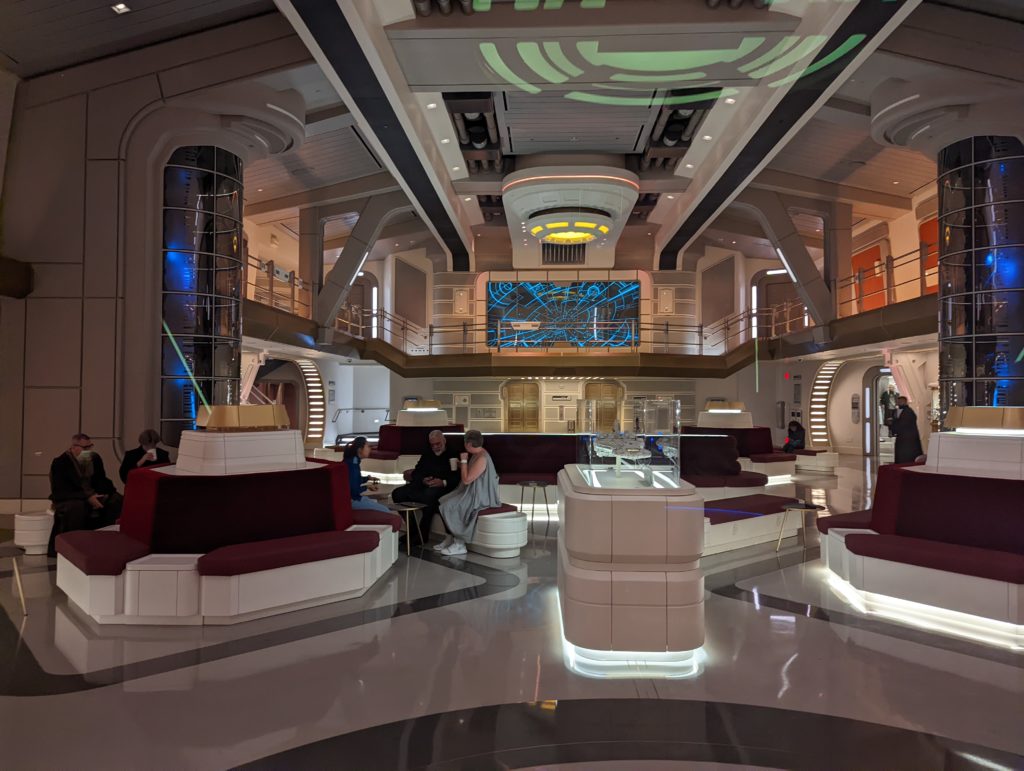
The premise of the journey was that you were aboard the galactic cruise ship Halcyon, on a nice vacation with some surprises in store. In a lot of ways it felt unfinished, like a school assignment handed in at the last minute, but only because what they attempted was so over the top impossible. Some of the early reviews criticized the finishes, which are fairly simple compared to the design of Batuu (the Star Wars area of Hollywood Studios), and they’re not wrong but I felt like they missed the point. The point of the Halcyon boiled down to the childlike wonder I felt moving through the ship. It kicked off with our discovery of an honest-to-god secret passage onboard, and was furthered by every interaction I had with the phenomenal cast.

The cast, which includes everyone from the lead actors to the housekeeping staff, truly demonstrated what’s possible when you give talented people the support and flexibility they need to put on a show. I’ve scrolled through Reddit posts about the Halcyon and it’s funny how everyone insists their Lt Croy (played by at least 4 different actors over the various voyages) was the best and they can’t imagine anyone else in the role. The 6 or so folks in the main ensemble were with us from 3pm to 11pm each day. Their energy was infectious and brought the story to life around us.

Also the food was fantastic

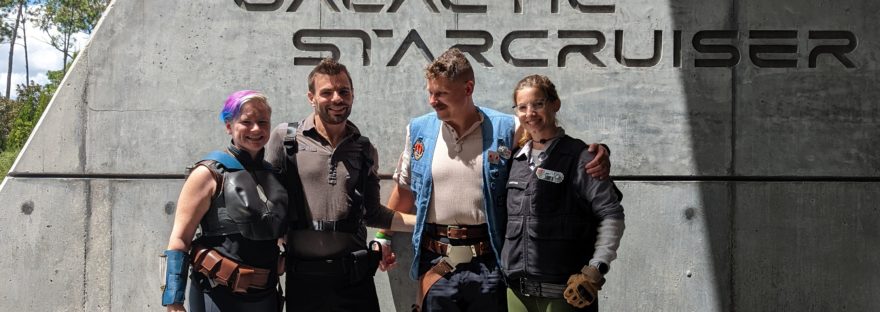
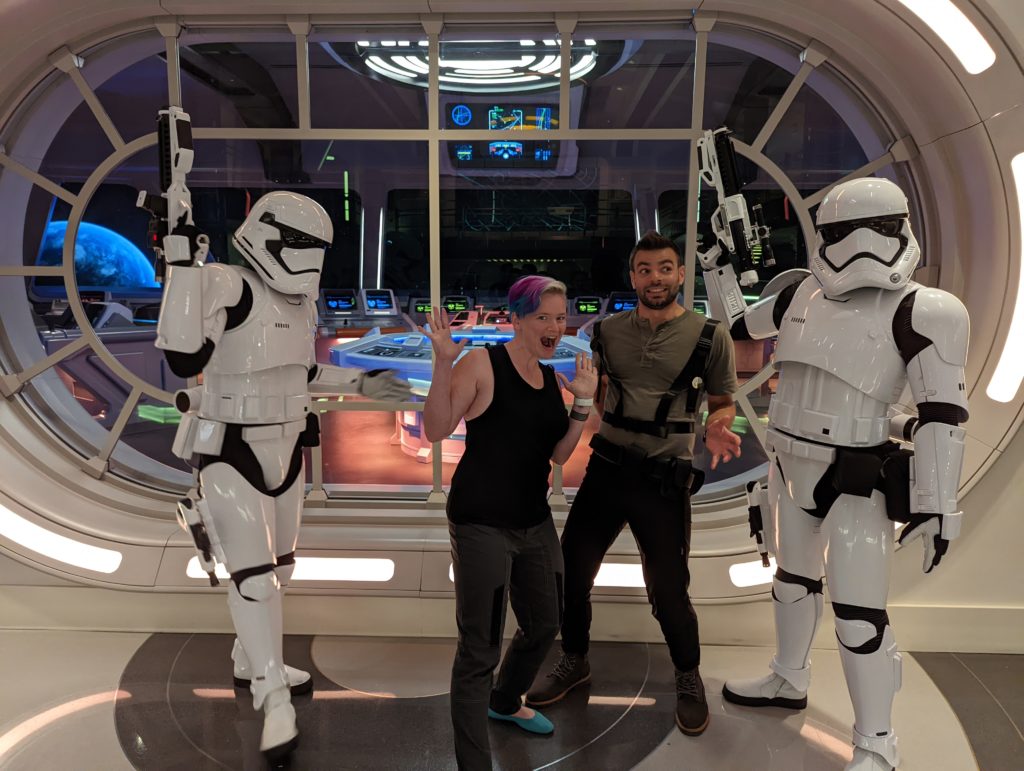
I had a Bo Katan armor costume but no real plan for a character beyond that. I put it on for out trip to the park (and I cannot stress how cool it was to come in through a dedicated back entrance) and then sort of forgot I was wearing it when we sat down to dinner. Our waiter came over to take our drink orders but seemed a little uncomfortable. When he got to me he said “I want to make it known that all my debts are paid…” and I remembered that I was dressed as a bounty hunter. He told us about lots of bounty hunter related lore and gave me plenty of “yes and” moments to build my character. I promised him I was only there for dinner, not business, and he relaxed a bit.

We spend so much of our lives trying to be cool, or acting like we don’t care about things. On the Halcyon everyone was encouraged to drop the act and just embrace the moment. The actors helped remind us that having the “right” answer isn’t always as important as just playing along and having fun.

Bugging some stormtroopers

Disney World can be a real grind sometimes, and the opportunity to just soak it all in – without the grueling itinerary, Fastpass juggling, or rushing to a dinner reservation – was a true privilege. The Starcruiser was definitely at a price point that was inaccessible to most people but I don’t think it was overpriced. And they still manage to find 1000 people a day willing to pay $500+ to see Hamilton at the Rogers Theater, so it’s not like there aren’t people out there with the money for it.

I sincerely hope that Disney figures out how to recombobulate the parts of the Halcyon into something sustainable. The work the cast members put into the project deserves follow up, even if it’ll never be quite the same.

Uncategorized

Fire the Laser: My Trotec Speedy 300 laser cutter

Ever since moving out of New York City and away from NYC Resistor I have dreamed of once again having access to a laser cutter. A decade later it’s finally a reality! I got a Trotec Speedy 300, 80w. It’s a huge beast compared to the Epilog Mini 35W we bought in 2008.

I spent a long time looking at various brands of lasers. I ruled out Glowforge early because their cloud based software was a dealbreaker and I also wanted something at least 12×24. After doing a bunch of research I decided I didn’t have the time or patience for the various Chinese lasers (though there are some really nice looking options there now). I wanted something that I could call someone to fix if it broke. After talking to Epilog, Universal Laser, and Trotec I decided that the camera registration system on the Trotec set it apart enough to justify the increased cost over Epilog and Universal. It’s worth mentioning that Trotec also has a budget line called Rayjet, though I didn’t spend a lot of time looking at those.

I placed a deposit on my machine in mid January and was told to expect a delivery date of 4-6 weeks. 10 days later it was sitting in a crate on the elevator, where it remained for a couple weeks while I got the studio space ready for it.

Massive elevator dwarfs the not so small laser cutter in its crate

Note: if I was doing this again I’d get the Speedy 360. Why? The Speedy 360 is slightly shallower than the 300. The 300 does not fit through a standard 36″ wide doorway, and turning it on its side to move it was a stressful pain in the ass. I ended up hiring some movers to pick it up and carry it through the doorway.

Trotec speedy 300 in the sud

I hired an HVAC company to run an exhaust vent through the roof and connected a Penn State Industries 1.5HP motor blower to it. I then build an MDF box to put it in, both to make it easier to deal with and to muffle some of the sound. There’s also a DIY prefilter (not shown, made from a 5 gallon bucket) to catch the larger particles from engraving.

In the first picture up above you can see a fire extinguisher on the floor next to the laser. This is a CO2 fire extinguisher rather than the foam spray kind you can get at your local hardware store. It’s considerably more expensive ($200ish) and kind of a pain to get (I had to drive to Grainger to get mine) but absolutely worth it in the event of a fire in the laser. CO2 fire extinguishers work by starving the fire of oxygen and work well in situations like this. The benefit is that you don’t have to clean goo out of your laser after putting out a fire.

The laser with blower in a box. This was an in progress shot, we’ve since moved some things to make the ducting straighter.

After the exhaust was set up my sales rep Josh came out to show me how to use the machine and software. I have a ton of experience using the old Epilog but the software for the Trotec is very different. Instead of a printer driver that integrates with Corel / Illustrator they have locally hosted network based software. The benefit is that you can set up jobs from any computer on the network, and don’t need to have Corel / Illustrator installed on the computer that’s connected to the laser. The drawback is that the software, called Ruby, is very new and definitely feels like a beta product. It works very well for the things it does, but feels a bit limited in functionality. The other downside is that all their help documentation still references the old software (JobControl), so I was kinda on my own when figuring out things like how to make delrin embossing seals.

I got the Trotec Vision camera, which I got a good price on because it was being phased out in favor of a new, cooler camera that mounts in the lid. It cuts extremely accurately, so I don’t have to add bleed to my images. This saves on ink (which I think is still the most expensive liquid on earth).

Some stickers I cut on the laser

I also made a wooden puzzle from some of my generative art postcards. I first cut the puzzle out of Unisub, then printed it on my sublimation printer. I think next time I’ll reverse the order and print it first.

Other fun stuff includes some merch for my body positive fitness studio and a whole bunch of felt mouths for the puppets for a puppetry studio.

Then of course there’s the boring stuff, like signage for the office building in Manayunk where I have my studio.

I’m taking commission work on a case by case basis right now, if you’re in Philly and looking for some laser cutting please reach out! If I’ve got the time I’m happy to do it.

Hacking

Generative Art Postcards

This is not the postcard you will receive.

Get some fun mail! You can order a postcard of art generated from the Algorithm That’s Of the Moment. Your art will be unique, no two postcards will be the same.

Artwork will come from both myself and other artists who have open sourced their projects. The back of each postcard will list the author and technology used to generate the image.

The goal of this project is to share art, and to give people a sense of connection with the work knowing it was generated just for them.

Current ATOM: Twisty Bits

Each art is $2, which covers the cost of printing, postage, and transaction fees. You can expect to get it about a week after ordering.

Want to get a postcard every month? Subscriptions are now available on Patreon!

Postcards will be mailed directly to you, and are at the mercy of the US Postal Service.

If you’d like something that is more display-worthy there are additional options for higher quality versions mailed to you in nice protective packaging.

Silver Halide Print – a fancy way of saying photo. Same dimensions (6×4), same artwork, but printed on a photo printer and mailed in a protective envelope. Downside: no printing on the back telling you what the heck it is.

Giclée Gallery Board Print – One 6×6 inch archival quality print mounted on thick gallery board, ready to display. I’m happy to hand-tweak these to match any color scheme you like, just leave a note at checkout or email me.

Personally generated art

Answers to questions no one has actually asked

Can you notify me of new ATOMs?

Yes, fill out this form

Can I see what the ATOM looks like before ordering?

No.

Can I order something from a previous ATOM?

No. Well, probably not. I’m not saying I’ll never resurrect an old one but in general no. If you really want an old one email me and plead your case.

What if I don’t like my art?

It was $2, you’ll be OK.

I lost my art, can I get another copy of it?

Probably not. Well, maybe. But probably not. I can’t re-generate the same image. However when your print is originally generated the image is saved on the server for a brief period of time. It is possible it’s still lingering around, email me and I can check.

I think this is cool, how can I help?

Tell your friends! Or if you like making generative art email me about offering up your work here.

Uncategorized

Yet Another Raspberry Pi Jukebox

We decided to move the Amazon spybot Echo out of the living room and I needed to come up with a new way for the kids to play music, since they can no longer run around yelling “Alexa, play Katie Perry!” 200 times per day.

I combined a Raspberry Pi with an RFID reader to make a system where the kids can grab a card and swipe it in order to play a song or playlist.

I’ve seen both RFID and mag-stripe based music players built around Raspberry Pis so putting this together was more about assembling the bits that suited my needs rather than actually doing any hard work. Helen Hou-Sandí has a really thorough write up of her project which was the jumping off point for mine.

I ended up installing and configuring the music server by hand rather than using Pi MusicBox. Pi MusicBox is built on top of Mopidy, which I installed on a fresh copy of Raspberry Pi OS (formerly Raspbian). I added in four extensions: Mopidy-Iris (web frontend), Mopidy-MPD (needed for command line control of the player), Mopidy-Spotify, and Mopidy-Local (which used to be bundled with the core but is now separate). This was a moderate pain so if you’re not familiar with the joys of Linux and Raspberry pi I suggest sticking with Pi MusicBox, which Just Works.

While I’m not an audiophile I do think the sound output on the Raspberry Pi is pretty miserable so I added a Hifiberry DAC+ card to it, which has RCA outputs I can connect to my stereo. Configuring the card is pretty easy, you just need to make sure you set the appropriate Mopidy config so it uses the RCA out and not the onboard headphone jack.

I picked up a 125kHz RFID reader and a package of 100 RFID cards. The RFID reader is a ready to go USB device that functions like a keyboard when you plug it into a computer, so no driver setup was needed for the pi.

Side note: the RFID reader has the weirdest configuration method I have ever seen. You plug it into your PC, swipe a special “configuration card” and then it will start spitting out config options, one second at a time, into Notepad or whatever you’ve opened up to accept text input. When it gets to the setting you want you unplug it to “save” that setting.

When the Pi boots up it runs a bash script that listens for the RFID reader’s input. The cards I got were pre-programmed and read only, so I set up a document that correlates the card number to the song or playlist to play. Each line has the 10 digit card number, track URI, and a comment about what it is to make the list easier to update later. The script is a fork of the one Helen wrote for her jukebox project. I tweaked it so I could include the card number and comment in the song list, and designated a specific card to trigger a graceful shutdown in case it needs to be unplugged, moved, etc.

Helen’s original repo is here and my modified version of the file is here.

My hamburger of the Pi, Hifiberry DAC+, and RFID reader.

I’m using a Raspberry Pi 3B+ which has the ethernet jack on the side and I wanted everything to be on the same face so I make a short ethernet cord to bring the jack around to the back.

I had all these parts lying around like a totally normal person.

Eventually I’d like to make a nice enclosure for it but right now this cardboard box is doing just fine. I made a template for the outputs and hacked some holes in it with an xacto knife.

Here’s everything nestled into the box, with plenty of room to spare:

I put together a quick tool to generate the labels. Photoshop has surprisingly clean SVG output. I was able to use that with a script that swaps in the artist / song title and changes the colors for each label. I’m still working on tweaking the label images but the basic process is to put the titles into a JSON file, run that through the script which outputs to a browser, then use Chrome’s “print to PDF” to print it out. It’s not really the best way to dynamically create printable PDFs but it was easy and it works.

Printing the labels in Chrome

Future Enhancements

I’ve got it working well enough to suit our needs but there are definitely some things that could improve it for the future, including:

  • Nice looking enclosure
  • Attached card holder / organization
  • Physical play / pause / next / previous and power buttons
  • Moving the track listing into a database of some sort (maybe Airtable) for easier updating and maintenance
  • Cutting out the labels on my Silhoutte Cameo rather than by hand
  • Amiibo support

The last one is just a silly add-on. I realized after I’d ordered the reader and cards that Amiibo use NFC and it would be neat to be able to scan those and play songs as well. Unfortunately it’s a different frequency than the reader I ordered.

Originally I had planned for a card holder to slide the currently playing card into, and have it look like a cassette deck. Right now this doesn’t work because after a few seconds the RFID reader scans it again and starts the song over. I’m sure I could come up with a software workout for that though.

Materials

Here’s a list of materials and components, most of which I already had lying around.

  • Raspberry Pi 3B+ ($25 at Microcenter)
  • Hifiberry DAC+ ($29 at Hifiberry)
  • 125kHz RFID reader ($34 on Amazon, though this is a generic Chinese brand)
  • 125kHz RFID cards ($22 for 100 on Amazon)
  • Ethernet extender (I made my own but they’re $5 on Adafruit)
  • Sticker Paper ( $37 for a 100 sheets at Onlinelabels, you can find smaller quantities at Michaels or Staples)

Uncategorized

Tabletop Game Organization

The past three years we have attended PAX Unplugged and the general pattern goes like this:

  • Play a bunch of games at PAX
  • Buy a bunch of games at PAX
  • Put those games away
  • Go back to mostly playing Galaxy Truckers and Sagrada

This came to a head this past Chrismas when I went to put away some games we’d gotten as gifts (Mega City: Oceana and Ticket to Ride: London) and there just wasn’t any room on the shelf. As I shuffled things around I came across games we’d only played once, games we’d never opened, and games I swear I’ve never seen before. It was then I realized there needed to be a Reckoning.

What even is all this stuff?

The first step in getting organized is figuring out what you have so I set out to inventory my games. I started out with a spreadsheet but quickly decided to switch to using my account at BoardGameGeek.

The awesome thing about BoardGameGeek is that is has a really comprehensive database of pretty much every tabletop game. The less awesome thing is that the UI is completely overwhelming and I didn’t find out until after I was done entering everything that there were some shortcuts I could have taken (namely the tiny ‘add game’ button at the top of your collection list).

Once it was all in BGG I connected my account to a site called GeekGroup.app which has a very nice UI and got this easy to digest list of games:

Nine of the 49 tabletop games I own

What’s also neat is you can make a group collection with friends who have done the same. This does mean badgering your friends into logging everything in BGG, but the reward is a list that makes it easy to see who owns what (and thus whether you can leave Galaxy Trucker at home because there will be a copy where you’re going.

Circled letters under each game title indicate who owns what

Planning to play games

I came across the idea of a 10 by 10 challenge wherein you set out to play 10 games 10 times in a year (or other timeframe of your choosing). You can decide how strict you want to be (I’m allowing myself to swap out games if I really start to hate them)

10 by 10 tracker by daftconcepts on Etsy

I don’t have a fancy board so I’m using a phone app called BGStats to track my plays. Each time I play a game I log who I played it with, what the score was (where applicable), and who won. I hand picked 6 games that I want to play this year (Chaturanga, Eclipse, The Expanse Board Game, Mage Knight, Pandemic Legacy, and Power Grid) and the other four will auto-fill in the app based on whatever I’m playing the most.

More Stats

Now that I’m tracking my games I suddenly have all this data! Data which can be used to generate… MORE STATS AND VISUALIZATIONS.

GeekGroup has a bunch of different ways to visualize your playing. There’s the streaks and records page:

But what I really love is the playback visualization which walks through the timeline of your plays. Check it out on the GeekGroup site to get the full effect.

I’m heading into 2020 with a goal to get to know my game collection better (and jettison anything we just don’t like to play). I’m excited to dig into some games that I’ve only played once or twice, and even more excited at the idea of getting away from Weekly Rules Explanation Night by playing repeats.

Crafting

Making school valentines on my crafty robot

For Christmas I got myself a crafting robot. It’s a Silhouette Cameo, which is basically an ink jet printer with a knife where the ink ought to be. It’s a pretty neat bit of crafty hardware!

Like all good parents I started thinking about valentines for my kid’s class approximately 12 hours before her class party. Like all good craft hoarders I had a couple packs of festive pencils leftover from kiddo’s birthday party goodie bags, so I decided to make some pencil-holder valentines on the Silhouette Cameo . These were super quick to whip up and a great option for when you want it to look like you care (but you don’t).

The first step, and the one that took the longest, was finding a picture of a heart that was sufficiently cute. I got mine from OpenClipArt. I imported it into Silhouette Design Studio and resized it to be about 3″ tall.

Resize by selecting the image and dragging the handles

Next I drew a rough outline of the heard with the “Draw a curve shape” tool.

The tool icon kind of looks like the infinity symbol

Then I cleaned up the shape with the point editing tool (2nd icon from the top of the toolbar)

I have the heart a 1/8″ border by using the offset tool. I like borders like this because it hides any minor issues with registration. In general the Cameo is great with registration, but when you’re running a classroom’s worth of valentines it’s easy to get lazy.

The last step of the design was to remove the inner cut line (the original curve line I drew) and add a few slits for the pencil. Make sure these are at least an inch wide or you’ll have trouble getting the pencil through and have to widen them by hand with an xacto knife. Ask me how I know this.

I was able to fit 6 of each heart per page by flipping half of them upside down.

Before printing I had to nudge the hearts around a bit to make sure nothing was outside the registration area (red border) or within the registration margins (hatched area). The size of this area is determined by how close your printer can print to the edge of the page.

After printing the sheets on my laser printer cutting them on the Cameo was pretty straightforward. I used the default cardstock setting and the automatic blade. My daughter addressed / decorated the backs and I pushed the pencils through the slits.

Don’t feel like doing all that work? Feel free to download the Silhouette file and print out these right now!

Crafting

The Disney Waiting Scarf

My plan to knit through the Walt Disney World Half Marathon was abruptly canceled by the Florida weather, which saw fit to bring thunderstorms on Saturday morning. Left with a whole lot of yarn and a week of vacation I decided to knit while waiting around Disney World instead.

If there is one thing Disney World is known for, it is waiting. Waiting for rides. Waiting for shows. Waiting for the bus. So. Much. Waiting.

I had already cast on 60 stitches for a scarf knit in the round. The reason I’m knitting in the round is that it’s completely mindless for me. There’s only knit stitches and I never have to worry about turning the row. The only time I need to look at the work at all is when I’m joining a new color, or if I drop a stitch.

On the way to EPCOT Center (which is, for the record, my favorite Disney park) I pulled out my knitting and got to work. I set up some very loose rules: switch colors for each new wait, try to keep the color distribution somewhat even, and don’t stress. It’s just a scarf.


Day one didn’t have a lot of waiting. We had fastpasses for most of the rides we cared about, and didn’t spend a ton of time at the park because we were still exhausted from traveling. There were also rides we went on which had no waiting at all so I didn’t get any knitting done for those. Shucks!

Day 1: EPCOT


Wait knitting in order from bottom to top:

  • Riding in the car on the way there (white)
  • Soarin’ (Teal) – A lot of this was watching the “intro video” they show you right before you enter. It was a nice time to get some knitting in!
  • Living with the Land (Green) – This is honestly one of my favorite rides, because I’m a nerd and I really like the greenhouse tour. The line for this was probably the longest I’ve ever seen it… maybe 10 minutes? EPCOT was pretty busy due to all the folks in town for the marathon.
  • Turtle Talk with Crush (Blue) – Since this is a live show that runs every 15 minutes or so I had some nice seated knitting time. My daughter (age 4) got called on by Crush, but forgot her question which was pretty much the most adorable thing ever.
  • Test Track (Light Blue) – We had a fastpass for this one but it still takes a short while to go through the last part of the queue where you make your car.
Magic Kingdom Wait Knitting

Day 1 Evening / Day 2: Magic Kingdom

We were able to take advantage of “Extra Magic Hours” in the evening of day 1, so I left the kids at the hotel with their dad and set out with some friends to ride the “big rides” at Magic Kingdom. The lines were short enough that I didn’t get a ton of knitting in, poor me. Then we came back in the morning to do the kiddie stuff with the little ones.

Magic Kingdom knitting (starting from just after the white stripe):

  • The Haunted Mansion (Light Blue) – Most of this was done in that first little room you wait in.
  • Big Thunder Mountain Railroad (Green) – One of my favorite roller coasters. I briefly considered knitting while riding but thought maybe that was a bit too much.
  • Riding the bus back to the hotel (Teal) – Our longest wait of the evening!
  • Dumbo (Blue) – Our first wait on Day 2 was for Dumbo (after fastpassing the Barnstormer), and it wasn’t even a necessary wait. Inside the queuing area for Dumbo is a really great playground. They give you one of those restaurant buzzers and your kid plays until its your turn to ride. Now if they’d just put one of those things in at Peter Pan…
  • The Carousel (Teal) – Can I make a confession? At this point I was sort of sad about how little knitting time I was getting in. So I knit during the carousel ride in addition to the <5 minute wait.
  • Country Bears Jamboree (Green) – We saw this while waiting for a fastpass time on another ride, and oh my god you guys what the… I knit through the whole thing to distract me from the animatronic nightmare before me.
  • Waiting for the bus (Light Blue) – I have no idea why the bus took so long to show up this time, but we were waiting approximately forever.
  • Ride home (White) – At least that part was short and sweet.


Day 3: Drinking Around the World

Guys, I’m gonna be honest… at 30something the idea of drinking around the world at EPCOT, a time-honored tradition in which you get an adult beverage at every country in the World Showcase, is not a great one. I didn’t even drink that much and I still felt like crap the next day. Nonetheless I did get a lot of knitting done.

World Showcase knitting – From Right to left we’ve got France, the Morocco, then back to France cuz they had a guy doing handstands on chairs! Japan, America (where I did not drink cuz all they had was Bud… gross), Italy, Germany, Africa (which is a country according to Disney World?), China, Norway, Mexico, a quick trip through Spaceship Earth, and the walk to the car (white). On day 4 we did the Safari ride wait (green, above), the safari ride itself, Expedition Everest, drove home, and then walked to Disney Springs from our hotel (light blue). Magic Kingdom again – Big Thunder Mountain, Space Mountain (thin white line), wandering around deciding what to do next (dark blue), Seven Dwarves Mine Train (light blue), the Haunted Mansion, and the ride back to the hotel.

Some older folks on the walk spotted me and were very impressed with my ability to knit, walk, and chat all at the same time.

Extra Magic Hours at Magic Kingdom meant not a ton of time for knitting (poor me, not enough time waiting in Disney World), but I still got some stitches in.

By this point I was feeling more confident in my knitting skills, and even managed to get some knitting done while on a roller coaster.

Here I am sitting peacefully at the beginning of the ride
And a little less peaceful a few seconds later

I’m still bummed I didn’t get to walk the half-marathon, but at least I got some solid knitting in!

1916 Row Home, Crafting

Rhinebeck and other Knitting Things

Guys I have a secret… I have another blog. One dedicated specifically to knitting. I started it last year meaning for it to be a site for aggregating knitting news and information, but didn’t have the time to put into it. The idea was that it would be sort of like a long-form Pinterest board to save knitting stuff I care about. Now it’s just sort of my awkward spot for writing about my own knitting. I haven’t figure out exactly how I plan to approach having two separate places for stuff. For a while at least I’ll probably cross post things here. Like this post about my trip up to Rhinebeck, NY for the annual Sheep and Wool festival. Spoiler alert: I bought some yarn.

http://balderstash.com/2016/11/29/notes-from-a-successful-rhinebeck-weekend/

I’ve been doing a ton of knitting, so at least for the next few months there will probably be a fair amount of activity there. I do have a bunch of stuff to post here about the house I’m working on, but I’m waiting until that whole project is wrapped up to share more. Mostly because I haven’t had a chance to get any decent photos lately. Between work, kids, the house, and my husband’s ice cream shop it’s easy to let stuff fall through the cracks. But in case you’re waiting with bated breath, here’s a crappy cell phone shot of the kitchen!


2016-11-17-15-59-12

DIY Ikea Kitchen
1970s Shore Home, DIY and Decor

My DIY Ikea Kitchen 1 Year Later

It’s been a year since our “kitchenwarming” down the shore, and it’s finally starting to feel like a functional place to cook and not just a showroom. It took a while to stock it; to collect all the spices we use regularly, to amass odds and ends like cupcake liners and cutting boards. We’ve gotten used to how it functions, and started agreeing on where we keep things. I’ve had some time to think about what I’d change if I were to do it all again (I’m not).

DIY Ikea Kitchen

The custom-made cabinet doors

I didn’t like the available Ikea doors so we got custom made doors and I painted them myself. They look great, and didn’t cost much more than the Ikea doors, but it was a ton of work and honestly not worth it for a kitchen I only see on weekends and the occasional vacation week. Even with a sprayer, priming and painting the doors was a pain. I still think the custom doors are a good way to get a high end look in an otherwise budget kitchen, but I think I could have skipped it for this particular project.

The only really frustrating thing about the custom doors is that you’ve got no room to change your mind later. On our sink cabinet I had originally planned for a pull out trash drawer. Once everything was in it was very obvious that wouldn’t fit under the garbage disposal. I needed to switch from a drawer front to hinged doors, and ended up going with some that don’t quite match (and I still haven’t gotten around to painting). Granted I could have ordered more doors from the cabinetry company, but that would have taken another few weeks and I wanted to be done.

Custom doors on Ikea cabinet


The island

Our kitchen is about 10 foot square and I really didn’t think we had room for an island. I taped it out on the floor and took a while to pace around the room trying to get a feel for it. I’m really glad we put it in, the island makes it much easier for two people to work in the kitchen at once.

I think if I did it again though I’d get a freestanding island rather than a built in one. It would be nice to be able to move it out of the way for parties, and we really don’t need the massive amount of storage space it provides. Half the drawers in it are still empty.

Ikea kitchen island

The flooring

We went with luxury vinyl tile and it looks great. It’s waterproof, durable, and most people haven’t noticed it isn’t wood. To be fair, most people are also not looking because they are busy being on vacation. We’ve gotten many compliments on it. The transition molding I picked up from Lowes isn’t a perfect match, but it’s enough to make the room feel finished and put together.

Carpet to Vinyl transition

The drawers within drawers

Ikea has this feature where you can put drawers inside of doors or other drawers. We actually have this in our non-Ikea kitchen at home, and inside cabinets with doors it’s pretty great. It functions kind of like a pull out shelf for your pot lids or other doodads.

Ikea cabinets function on the idea of elements being a certain number of “units” high. Drawers can take up 1, 2, or 3 units. Our configuration has 2-high exterior drawers with a smaller 1-high drawer inside it.

Ikea drawer-within-a-drawer

It sounds great in theory but in practice the smaller drawer is practically invisible if it’s closed. We’ve started calling them the ‘secret drawers’ because guests can’t find them.

Hidden Ikea drawer

Additionally there are two small spots where the paint has worn away due to the hardware we used to mount the handles. I’m not sure if we were supposed to countersink the screw holes on the back, but we didn’t so they stick out a bit and rub against the smaller drawer.

Screws sticking out back

The lighting

For the most part I am very happy with the lighting choices we made in the kitchen, especially having the recessed lighting put in over the counter area. Having a well lit work area is essential. The only thing I don’t love is the Ikea ANSULT undercabinet lighting, which is pretty poorly made. If I were to do it again I’d get my cabinet lighting from someone else.

Overall we’re still really happy with the kitchen, and I’d use Ikea again. In fact I am using Ikea again in our rental remodel.

The glass subway tile backsplash looks amazing, but it was a huge pain to install and they were expensive. I’m not sure whether I’d do it again, I’d have to really love the project.

I still absolutely love the quartz countertops and while they were out of budget for the rental, I would use them again in a heartbeat.


Removing carpet staples
1916 Row Home

How to Remove Old Carpet and Flooring Staples


Our 100 year old house came with wall to wall carpeting everywhere except the kitchen and bathroom.

Old blue carpet

Actually there’s evidence there was once carpet in the kitchen too.

Kitchen carpet scrap

I ripped out all the carpet and found all sorts of things, like this very old outlet that had just been carpeted over at some point. I hope they had the common sense to disconnect the outlet first, but who knows. We put all new outlets in so now this thing can be safely removed.

Hidden Outlet

The flooring under the carpet is indeed solid wood, and it’s in OK shape, but it’s really just 100 year old subfloor. At some point it was painted brown. It has been carpeted over many times and the carpet padding was a disintegrating sticky mess. It left behind at least 60 years worth of rotting wood tack strips, rusted nails, and gunked up staples.

Old carpet padding

The tack strips can be removed with a pry bar and some patience, but the carpet staples are trickier. For a while I was using a pair of normal pliers and then the plumber took pity on me and lent me a pair of end cut pliers. It makes the task much easier.

It’s worth mentioning that I have heard this particular tool called a “cross cutter,” “end cutter,” and “side cutter” by various people. End cutter looks the most correct to me, so I’m going to go with that one.

I also have a teeny tiny pry bar that I use for the ones that are really flush to the floor. It came in a 3 pack of adorable pry bars and they’ve been super handy during this whole process.

dasco

The first step is to find a nice line of staples to work on. I find it easiest to work in one small area at a time. Keep a handheld brush or broom handy so you can keep the area clean and see what you’re doing.

Old Carpet Staples

Sometimes there’s a ton of padding around the staple, to the point where you can’t even see which way it faces. Use the tiny pry bar to scrape away gunk until you can see your target. Then place the pliers over it and gently grab it. You don’t want to actually cut it, just grab it.

Removing carpet staples

Then rock the pliers to the side in order to pull up the staple.

Removing carpet staples

Voila!

Removing carpet staples

Some staples need to be coaxed up a bit with the pry bar first, and a few staples were so stuck I actually had to get a pair of vice grips to get them out. But most of them come out pretty easily this way. It’s still not a quick process, but if you get into the swing of it there’s a nice sort of tedium. Keep sweeping up as you go, the little bits of carpet fuzz and staples get everywhere and if you don’t stay on top of it you won’t be able to see what you’re doing.

One thing about this process is that it’s pretty hard on your hands after a while. Take breaks and stretch out your wrists, no one wants to get carpal tunnel from staple removal!