My closet is now officially tidied (or KonMari’d, if you want to turn the method into a verb)! It doesn’t look drastically different, especially because the most dramatic change is in the drawers, but it feels so much better in there. No more piles of t-shirts on the top shelf, no more collections of crap on the floor under the hanging clothes. No more pile of clothing I haven’t put away! Everything is where it belongs! Of course I’ll have to go through it again in 6 months once I’m back to my pre-pregnancy self and can wear normal clothes again, but even what I’ve done so far is a huge improvement.
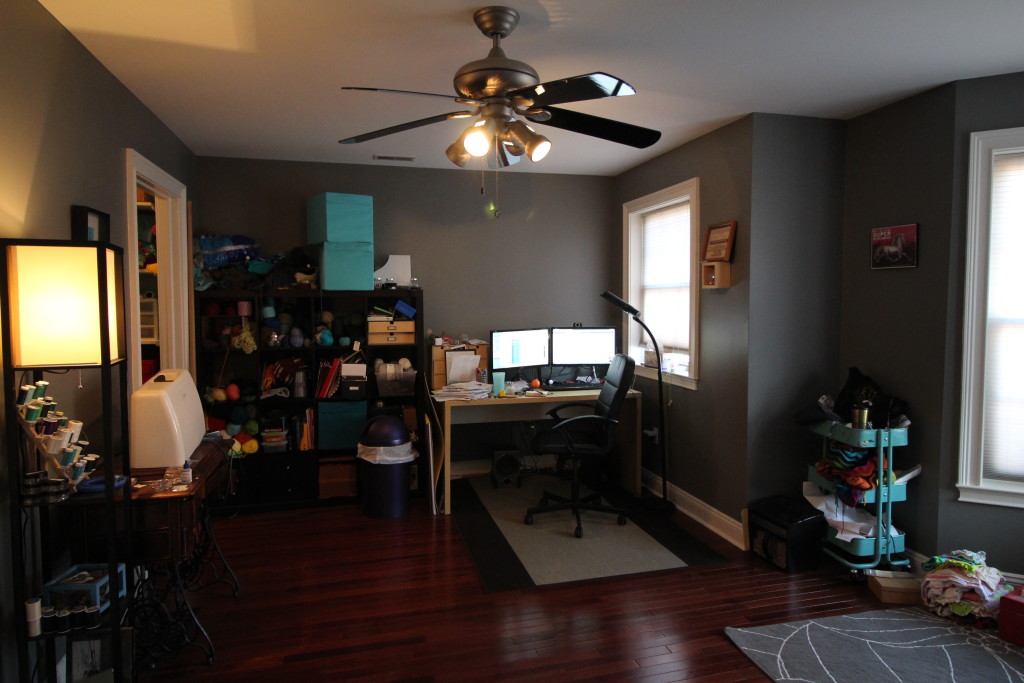
Next up is the hobby category. I talked about strategies for tidying hobby supplies in my last post, and sat down to tackle a new one today. Except my office is a mess (which is what inspired this whole thing in the first place). I realized that there’s a certain catch-22: you need to have a clear space to work in order to tidy effectively, but the reason I have no clear space is that I need to tidy! I spent about 20 minutes putting things away, throwing out trash, and doing the sort of clean-up I might do before company comes over. I didn’t worry too much about exactly where stuff went, I just tried to lump like items together and get the floor to a place where I could vacuum.
This brought me to tidying step 0: a vaguely clean office.
Clean enough to vacuum but still pretty cluttered
Then I tackled my electronics, which didn’t have a ton of stuff in it but was still challenging. I relocated a lot of random cables to the basement (where we have storage bins with various computer parts) and got rid of some very old mostly broken hardware.
Next on the agenda was the linen closet. I hadn’t intended to tidy it, but when I went to put fresh sheets on the guest bed and realized I had no idea where the queen sheets were. There are queens, doubles, twins, and Twin XL in there and I can’t remember which is which.
Sooo anyone know where the queen sheets are?
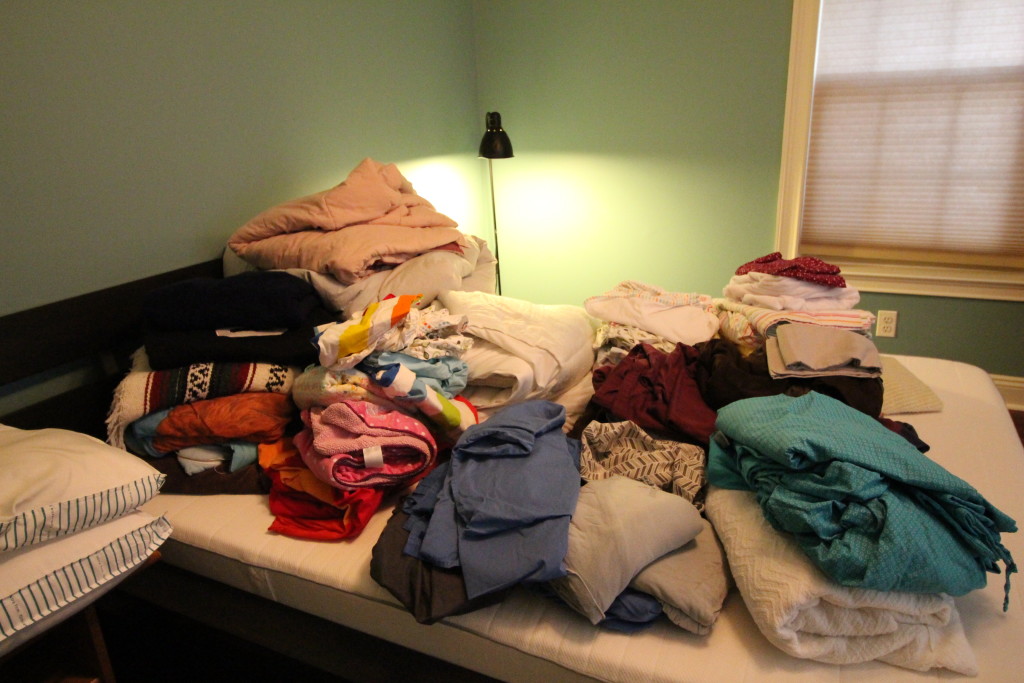
We store linens in 3 different closets, plus the “in use” linens which occupy the beds/bathrooms. I amassed all the sheets and blankets on the guest bed. Keep in mind this is justthe “spares.” The guest bed sheets/comforter were in the wash, and the other 3 beds in the house (ours, our daughter’s, and the crib) all have sheets on them.
No joke, there is an ALF sleeping bag in there.
I pulled out anything that I felt was too gross for a guest to sleep on. I pulled out the Snuggie and some polar fleece throws (I hate polar fleece). Since some of these came with my husband when we moved in together I gave him right of first refusal for anything on the chopping block. He agreed with my assessments though.
Next I went through the towels. Not including the full sets hanging in the bathrooms we had 15 bath towels, 16 washcloths, 3 beach towels, 10 hand towels, and 5 bath mats. Once again I culled anything that wasn’t in good enough shape to offer a guest. I set aside a couple towel/washcloth sets to take down the shore along with a surplus duvet.
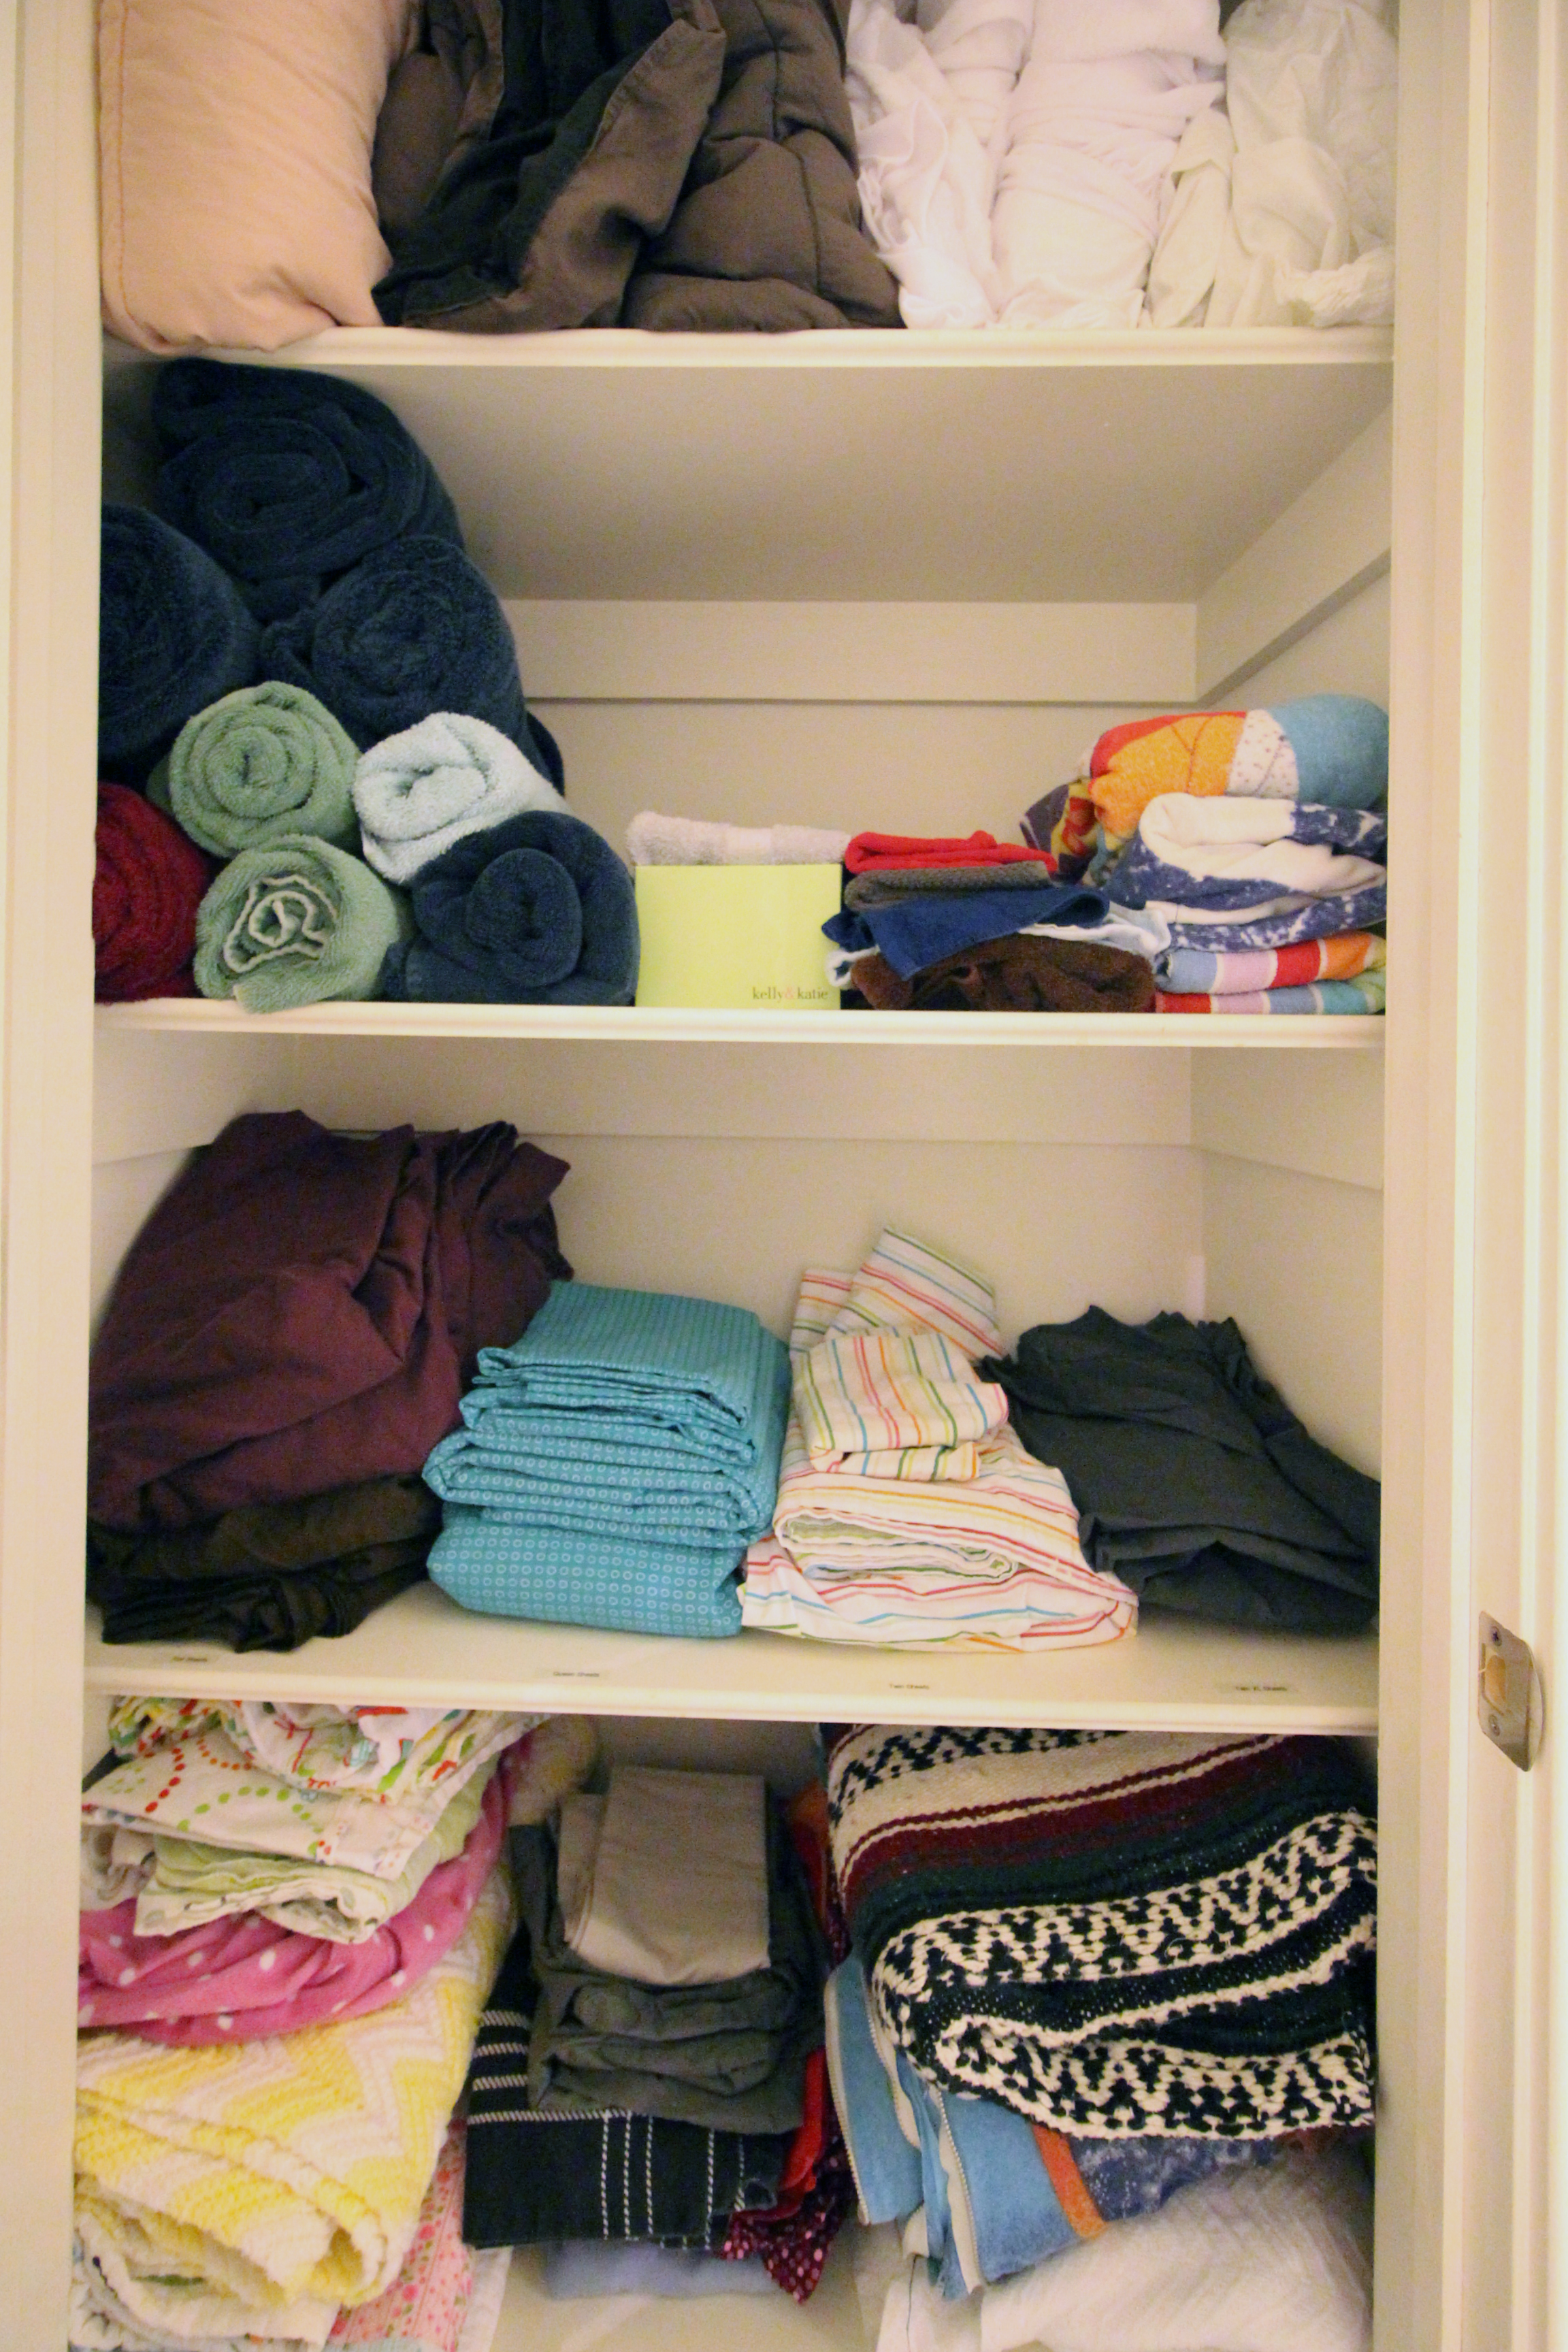
I didn’t quite hit my goal of fitting all the linens in one closet. We have a bunch of extra waterproof covers for furniture which are bulky but we’ll definitely need them when the baby shows up. I put the crib sheets back in my daughter’s closet, but everything else fit! I rolled the towels for easy grabbing, then folded the washcloths and stuck them on end in a shoe box to keep them from getting mixed up with the hand towels and beach towels.
I put labels in front of each stack of sheets indicating what size they are
This whole process is so much work but I really think it’s worth it. Just being able to easily grab a set of clean sheets is a huge improvement in my domestic life.
Are you interested in my quest for a less disastrous house? Check out my whole tidying archive of posts!
If you are a person who reads the internet, you have probably heard of Marie Kondo’s book The Life-Changing Magic of Tidying Up. Perhaps you have even tried to read it. Most people who succeed in reading it join her KonMari tidying cult, but in all honesty it can be a challenge to get past the first few pages if you are turned off by the huge number of self-help cliches found in the beginning. I’m told that part of this is due to the book’s translation, and perhaps also some bad advice from an editor. Or very good advice, given the book’s position on the bestseller list. Suffice to say I found the beginning of the book a little grating but I’m glad I stuck with it.
The book contents can be divided into 3 categories: super useful advice about decluttering and organizing, somewhat repetitive stories about her childhood / clients, and advice that might be useful to some people but doesn’t seem to apply to any of the American yuppies I know. One example of the third is her assertion that you should carry all your coins as “no one actually cashes in their change jar.” Do they not have Coinstar in Japan? Because cashing out a change jar is an amazing treat whereas digging through my purse for a dime sucks.
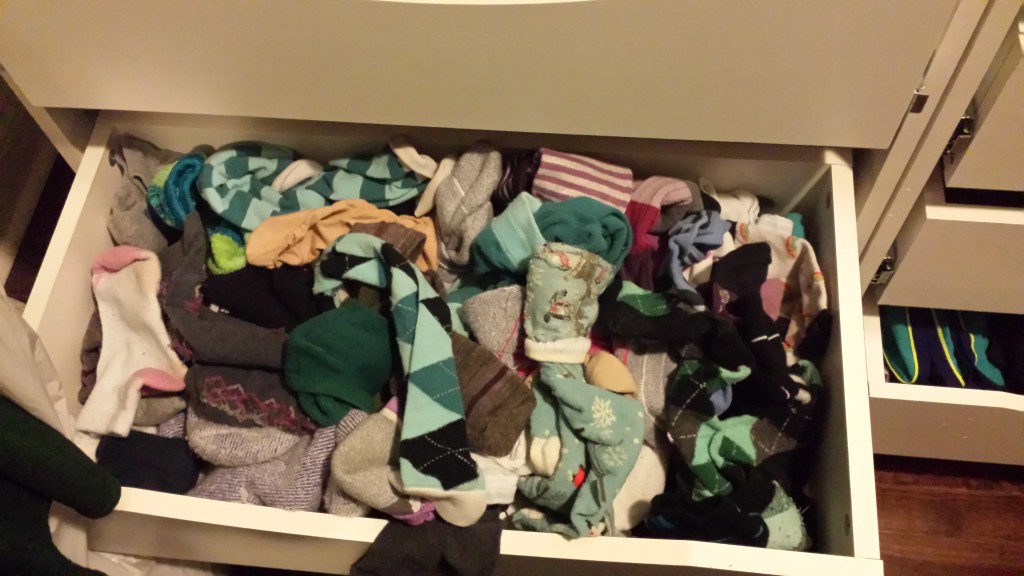
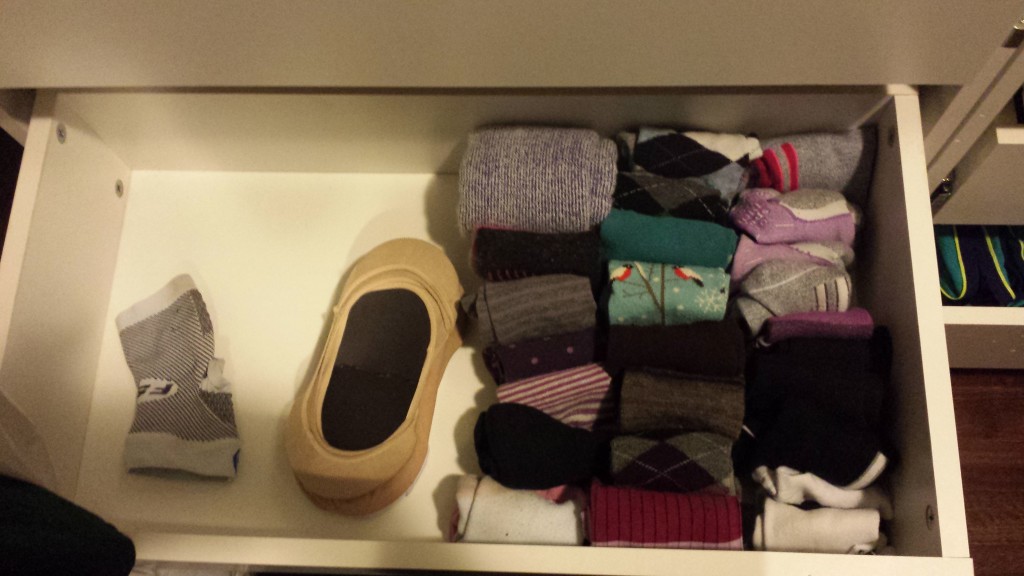
Anyway, I’m reading the book and feeling inspired to clean (ok, I read the book because I was inspired to clean and felt overwhelmed by how much stuff I have). The book suggests starting with clothing because it’s the easiest, and I agree. I did my sock drawer first:
BeforeAfter
As you can see, I got rid of about half my socks. They were not in great shape. Many were threadbare at the heel or stretched out. Others were in OK shape but I had to ask myself “how many pairs of black athletic socks does one person need?” I decided the answer was not “10” and culled all but the heartiest. A couple pairs of socks were like-new but didn’t really go with my wardrobe, or were nearly identical to other socks I never wear. I’m still trying to figure out if I should donate them somewhere or just pitch them. I mean, does anyone actually want used socks? Probably not.
At first I struggled a lot with wastefulness, a feeling that nagged me while reading the book as well. Kondo talks a lot about discarding things, and as someone who is opposed to waste this was hard to accept. I rolled it around in my head for a few days and realized first: ‘discard’ does not mean I have to throw it in the trash, there are still plenty of responsible ways to pass something on for reuse. Second: I was already being wasteful the second I purchased that 6 pack of athletic socks, knowing full well I still had some at home (they were on sale!). Holding onto something indefinitely when you’ve already replaced it isn’t being responsible, it’s hoarding. Then I had a moment of “well I wear these socks when I run out of ones I like, what will I do now when I run out?” Um, wash them? Stop playing King of the Mountain with the hamper?
One of the most often cited ideas from the book is to only keep items which “spark joy.” I can immediately tell which critics haven’t actually read the book, because they make snide remarks about how something mundane-but-necessary fails to spark joy. Except even items we don’t actively like can spark joy. Maternity underwear does not spark joy directly, it’s pretty dowdy, but not having a wedgie 100% of the time is its own indirect joy.
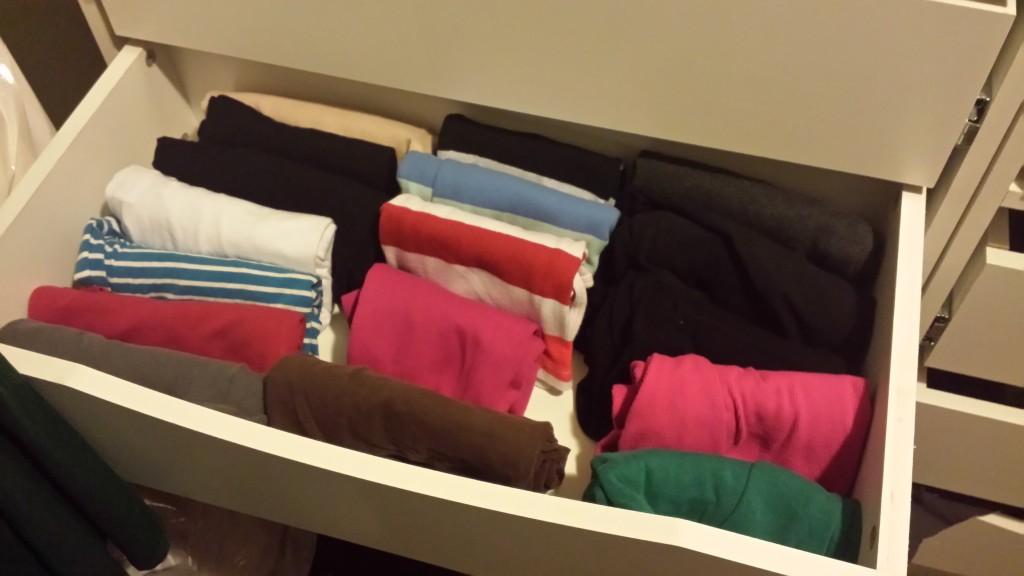
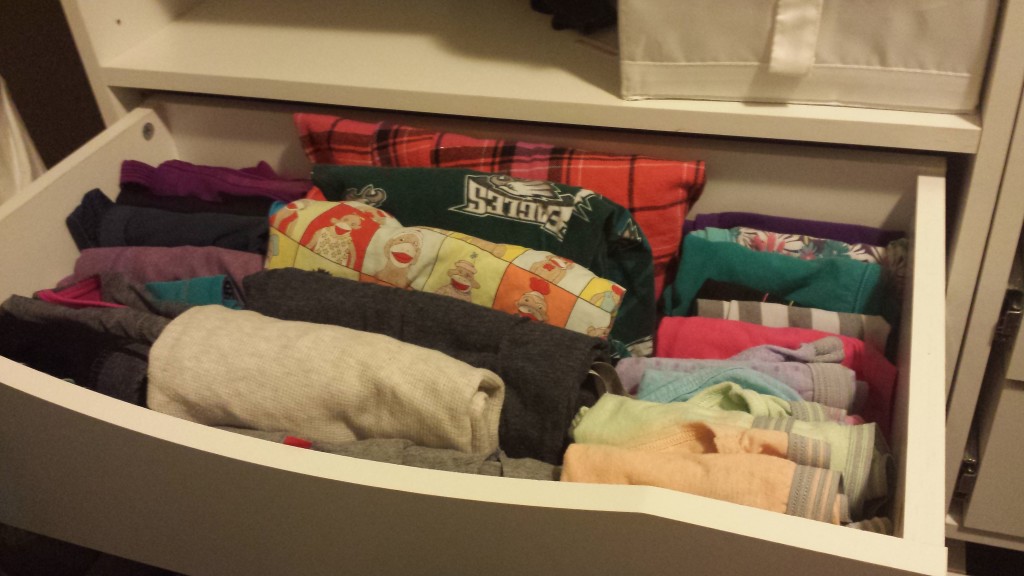
Organized tank topsSports bras, pajamas, and undies
After socks I moved on to underwear and tank tops. Next is T-shirts. Nice tops, jeans, and dresses will have to wait until I’m done being pregnant and my body returns to normal. It’s hard to consider purging items when you know your body is about to do some major shape shifting. Lucky for me there is really no shortage of other things I can tidy.
A lot of people who haven’t read the book decry the idea of having to get rid of all the “nonessential” stuff in their lives. That’s not what Kondo is suggesting at all. I have a huge yarn collection, and I assure you it brings me joy (though I still plan to go through each skein and get rid of any I know I’ll never use). Ditto for my fabric collection. There’s nothing wrong with having collections of things. The problem is having collections of things that aren’t actually making you happy.
Kondo talks a lot about the emotional reasons we hold onto things. To some people it seems really cold hearted, getting rid of items that may have been a gift. But I think it’s important to acknowledge the emotional toll of stuff we hang onto just because it was a gift. If anything, keeping something we don’t really want just because we feel obligated to strains our relationship with that person. You shouldn’t be an asshole about it, but ultimately there’s a limit to how much stuff we can hang onto. Some of it has to go sometimes. It doesn’t mean we love our friends less, or don’t appreciate their gifts.
For the record, if I have given you a hand knit item, and it it no longer suits you, please do not feel obligated to hang onto it if it no longer brings you joy. The joy for me was in the knitting and the giving, and hopefully for you in knowing I liked you enough to make you something. Whether you choose to use it going forward is really up to you.
Slowly, painfully, I’m learning to let go of stuff I’m keeping because I “might” use it. I have never, ever remembered to take a travel pillow with me to the airport; I definitely don’t need three. I am never actually going to read that book on Renaissance artwork, I don’t actually like Renaissance artwork. I don’t need to own any clothing that is too gross and old to wear outside the house. I need exactly one pair of painting pants and two painting shirts (I know from experience that after two days I will be sick of painting and go do something else). I will never actually turn those old T-shirts into a cool hipster crochet rug.
I am letting go of the ghosts of people I thought I wanted to be (but don’t) in order to make room for the person I actually want to be (someone who can see the top of her desk on more than a semi-annual basis). I’ve joined the cult, and even if this experiment is a total bust and my sock drawer is back to being a warzone in a week at least I managed to get rid of some baggage in the process.
The other day we stopped by The Container Store to shop for trash cans.
Yes, I have reached the point of my life where I think a trash can is something you shop for.
While there I saw they are having a 25% off Elfa sale. We’re having another baby and I totally want to Elfa up another closet. It was a little tough to acknowledge that I’m already well over my home furnishings budget for the year. This is in fact A Year No Closets Will Be Organized. In previous years I did my office closet and the toddler’s closet.
If I’m being honest with myself, it’s not the closet that’s the problem. My office closet is in desperate need of purging crap. The toddler’s closet is in better shape but it still needs some attention. No amount of objects from The Container Store will save me from the fact that I am indeed a slob.
This Liz Lemon quote from 30 Rock spoke to me:
“I went to the new flagship Compartment Store on 5th Avenue and I’m going to get my life in order. There’s a stacking thing to separate your junk mail from your humidifier catalogs, a thing you stick on your laptop that hold your keys, a round plastic deal that holds your shoes with a pocket for a photograph of what shoes are in there. I’m going to become wonderful. It’s a new beginning, like a phoenix rising…”
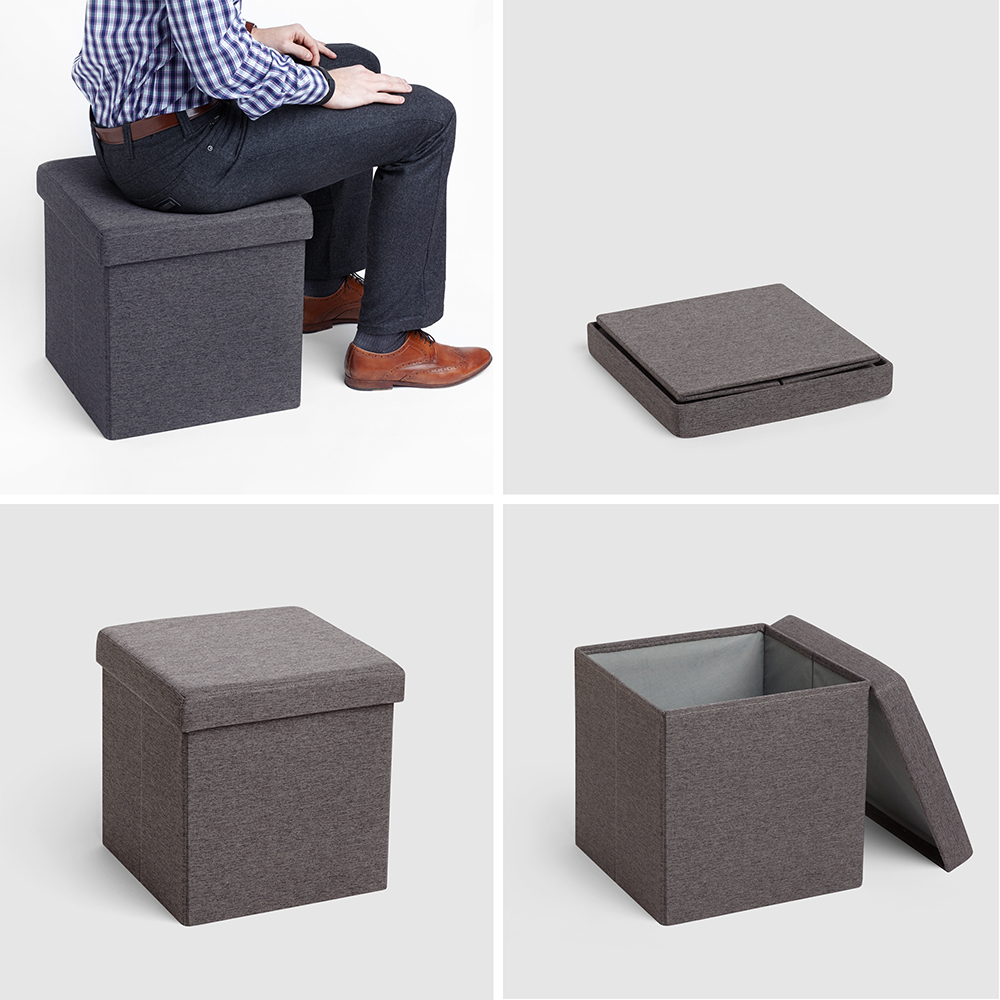
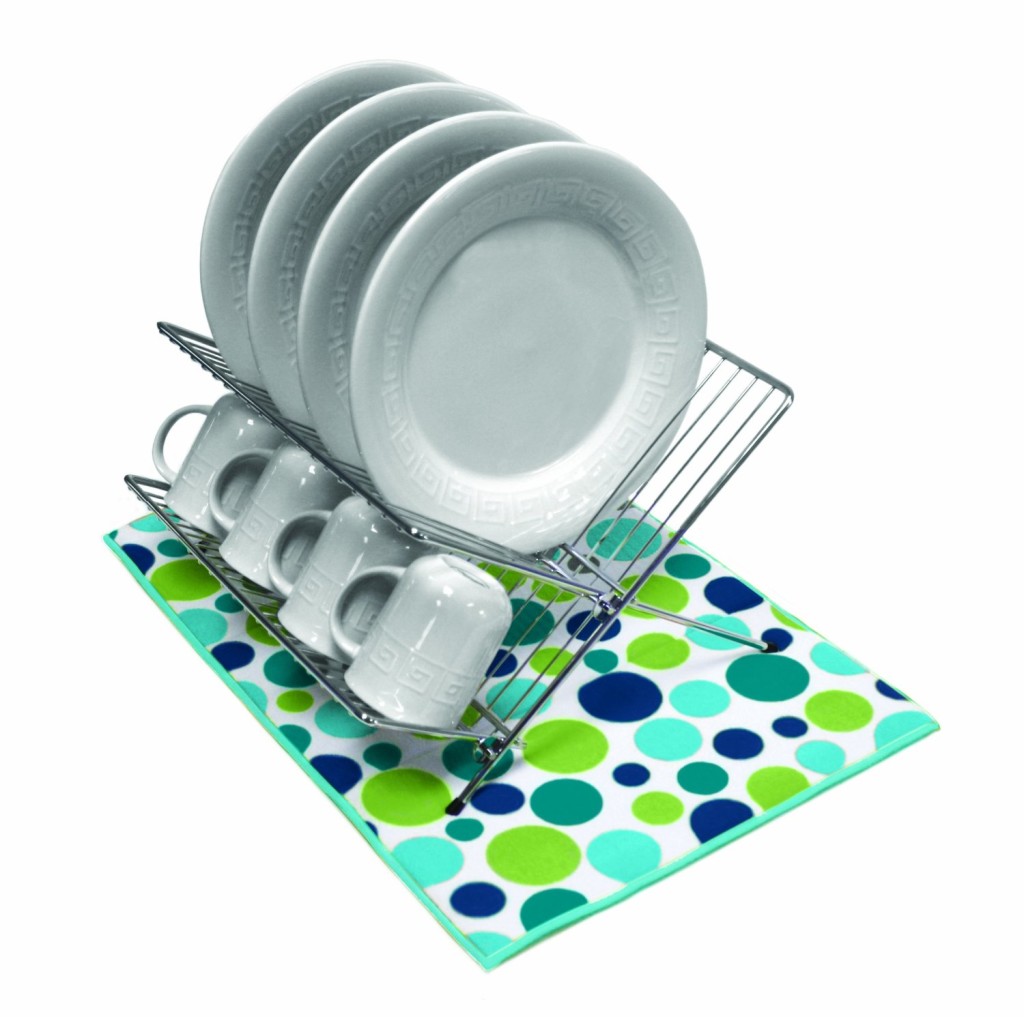
While shopping for a trash can I saw a variety of Other Objects that promised to make me less of a miserable disorganized slob. I am so disorganized I lost my to-do lists. That’s right. The first item on my new to-do list is to find my old ones. It was tempting to buy into the world of color coordinated stacking boxes. But I resisted. I looked at trash cans, didn’t see any I liked, and limited my purchases to a dish rack, laundry basket, and a festive collapsible ottoman. Ok so I went in for a trash can and came out with $150 worth of totally unrelated other things, which is definitely not winning. BUT AT LEAST I DIDN’T BUY A CLOSET, RIGHT? Also did you know that SimpleHuman makes an $80 dish rack? We went with the cheap bamboo one, but the SimpleHuman dish rack has 337 reviews and 4.5 stars. I’m curious what dish rack bliss feels like, but not $80 curious.
Oh like you could resist this.
Anyway, I didn’t find a trash can I liked. I wanted one that had recycling and trash together, but all the ones that looked nice took special liners I’m not willing to pay for. So we got a normal step trashcan and I’m just gonna stick a blue bin in the laundry room.
And while we’re on the topic of mundane stuff, these are hands down the best dish mats:
You can find them on Amazon in a variety of patterns, and they’re super great.
After a lot of trips where nothing at the house changed much (and a few where they looked considerably worse), we finally had a weekend where it felt like things were moving again.
We went down Friday after work and I made a plywood cutting jig, following the instructions in this youtube video (hat tip to my dad for sending me the video).
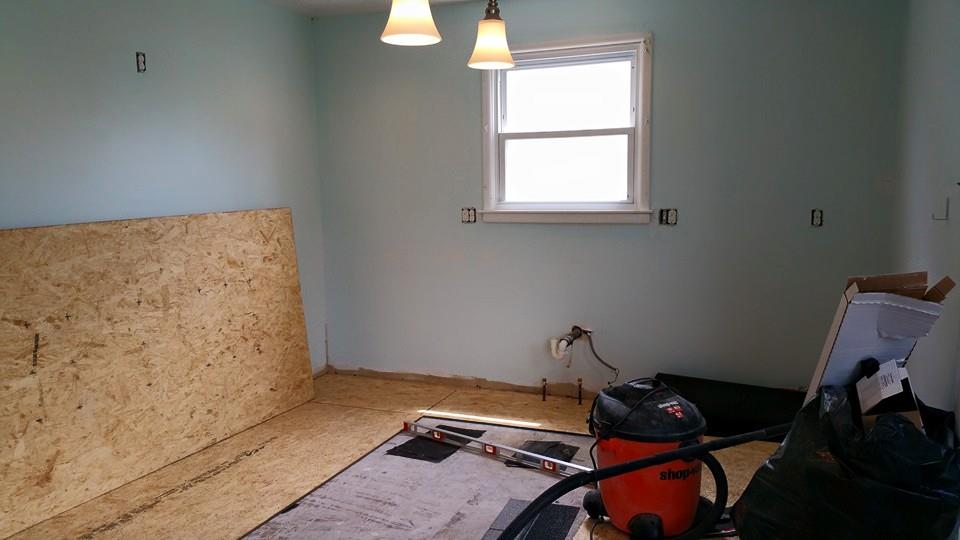
Then we ate pizza and passed out. In the morning four of us got to work on the house while my in-laws watched the kids (my daughter and nephew). Bedroom trim was sanded, laundry room walls were primed, and I began fitting sheets of plywood to cover the old uneven subfloor. All of this went really well, and because things were visually changing it was really satisfying. After a trip to Lowes to pick out paint and trim (btw, not recommended on the Saturday before Memorial Day weekend) things were progressing at a good clip. Two more friends came to help after lunch and we were off to the races with paint and carpentry.
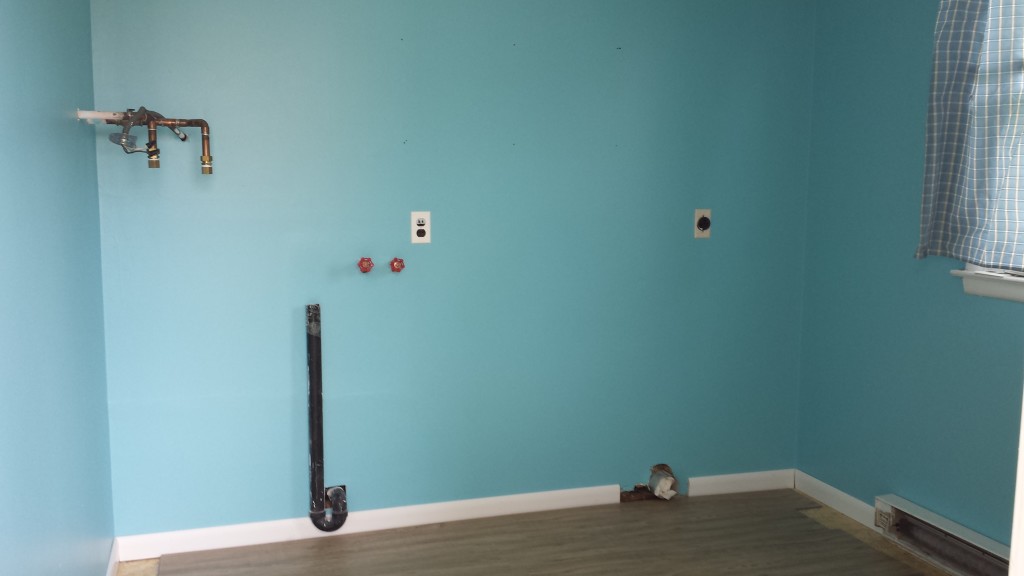
Laundry Room!
Laying the plywood (ok technically OSB) in the laundry room went really well. In the kitchen I hit some snags. I needed to trim the carpeting about 5″ since we removed a partial wall. My utility knife is missing in action. I ended up going to the hardware store to buy a carpet cutting knife, and learned first hand how much cutting carpet sucks (also you should wear gloves because I have a blister from it now). In order to get the plywood over the plumbing I had to trim and cap off the plumbing that goes to the sink, and then drill appropriately spaced holes in the plywood.
Kitchen mid-flooring leveling.
I could not. for the life of me. get the plumbing caps to stop weeping. I re-taped the threads no less than 4 times. I have done this before without problems, but apparently no longer. Yes dad, I am wrapping the threads in the correct direction. I ended up just shutting off the water, I’ll deal with it later when I’m less irritated by it.
I’m really grateful we had so many friends helping out this weekend, the flooring took up all of my time/energy and it was amazing to see progress happening in other parts of the house.
My sister-in-law, sanding trim forever.
We called it a day on Saturday evening with the first coat of color on the walls in 3 upstairs rooms, laundry room color finished, and all the plywood flooring cut to size.
On Sunday morning I started working on leveling the flooring. Per some suggestions online that seemed legit I am using roofing felt to fill low spots in the floor. You can see the level in the picture of the kitchen above, and some felt in low areas. The floor doesn’t need to be perfectly level but it does need to be smooth and flat. Unfortunately I found a couple really nasty high spots that will have to be sanded down with a power sander before the floors can be nailed into place.
As part of Operation Remove Unused Crap we took out two old smoke detectors (all new ones are going in), a telephone junction plate covering absolutely nothing, and some wires that used to go to the old security system but are now completely unused. Someday the house will no longer be covered in tumors from things people stopped using and never felt like removing or fixing. However, as part of Operation Don’t Go Finding Any More Problems we decided to ignore the hole in the ceiling that has been “patched” with a chunk of painted OSB screwed over it. The hole is directly under a toilet and I’m afraid to find out what problems are located behind it.
Team Bedroom Painting finished up the second coat of paint upstairs (minus one bedroom which needs some drywall repairs first) and I am really excited that we will probably be able to sleep there next weekend.
It’s not so obvious in the photos, but bringing the color up the slanted wall made a huge difference in that room. Compared to the unpainted slant-wall room it looks much deeper and taller.
I was hoping we could get the vinyl flooring installed in the laundry room, but I realized I have to totally finish the kitchen first since there are some rows of flooring that will extend between the two. I’m a little sad we weren’t able to get the washer/dryer out of the living room and back where they belong, but overall incredibly happy with the progress we made this weekend. I can’t believe we’re so closed to having a room that is totally finished!
Oh god I am so not even remotely ready to think about decor items like window treatments. But it’s coming. Boy is it coming.
So planning a kitchen is exciting stuff, which is good because dealing with structural problems is pretty boring (but also expensive). But today I’m taking a break from the real world of home improvement and diving into insane(ly cool) stuff. Because I need a break from researching gas installation and hot water heaters. Here’s 3 things we’ll probably never actually do to the house, but would be pretty cool.
Idea 1: Dormers
The house has a very steep roof in order to accommodate the 2nd floor. It makes the upstairs bedrooms feel a little claustrophobic.
This bed is not for all people
One way to open the room up would be to add dormers to the roof. Check out the difference it made in another cape cod style house with a similar roof:
The downside is that adding dormers is crazy expensive and it can be tough to do without making the outside of the house look completely stupid. We’d probably need to hire an architect to design something I don’t hate, and the permits could be a pain. Permits are always a pain.
Idea 2: Pub Shed
We’re about to have a huge back yard, which is totally new territory for us (no pun intended I swear). In addition to the decent sized yard the house comes with, we’re removing the fence between us and the house next door. For the time being it will just be a nice large area for my in-laws’ dogs to run around, but I won’t lie: a bar shed is a mighty enticing idea:
I like the idea of a pub shed because it gets parties out of the kitchen and into the back yard. There’s already a shed on the property, converting it probably wouldn’t be TOO hard… but I’d want a fridge out there and then it suddenly becomes a much more complicated project. Also, flood zone.
Idea 3: A sweet deck and maybe a pool
I thought the idea of having a pool at a shore house was completely absurd and redundant. Then I visited my coworker’s beach house with a pool and completely changed my mind. I mean the ocean is cool and all, but you can’t stand in the ocean with a refreshing alcoholic beverage. Or at least you really shouldn’t.
The back of the house. It wants a deck.
An in-ground pool isn’t practical on the island but above ground pools are really ugly. The best solution I’ve seen is to build a deck around the pool. With this idea we could even incorporate the bar shed in a way that has it elevated out of the flood danger zone! Or put the shed on the ground for a swim-up bar. The possibilities!
In reality I don’t really want a pool badly enough to deal with the maintenance, but we’ll probably put a deck in eventually.
With my home improvement palette refreshed I now have the energy to return to more mundane real world decisions. And deal with the utility companies. And the contractors. It’s shaping up to be a very busy spring.
Inspection was last week. Man, 40 year old houses sure to have a lot of shit wrong with them. This is really the first time I’ve had to deal with most of this stuff. The places I lived in college were post-civil-war era shit holes slowly collapsing into the earth, but I was renting so I didn’t care.
Aside from the usual working/parenting thing, my spring will be spent coordinating or DIYing a whole bunch of household stuff. I can’t tell you how AMAZEBALLS it will be to have access to the place next door (my in-laws’) so I can retreat to the peace and quiet of somewhere that is not a construction zone.
In some ways it feels completely ridiculous to even start listing this stuff given that we haven’t closed yet. But I’d really like to get the major stuff done in time to enjoy the house this summer. So we’re getting quotes now in order to hit the ground running at closing. We close in 3 weeks and that feels forever away but is actually super fast given that we just put the offer in at the beginning of this month. Part of me is still thinking I’m jumping the gun, all “don’t count your chickens before they hatch,” but I don’t think “bracing for what could be thousands of dollars in repairs” is the same as chicken-counting.
Hello kitchen. I can’t wait to destroy you.
First, contractor stuff. I.e. stuff I am nowhere near insane enough to even think of trying to do myself
New heat pump. We could theoretically get the old one fixed maybe, but I can’t imagine any situation in which it’s worth it to fix a 15 year old heat pump. The energy savings alone make a new more efficient one worth the money.
Exterior grading. The slope of the land is towards the house, which is kind of awful if it rains.
Engineered flood vents. These will help keep the underside of the house from rotting, which seems like a good thing.
Replacing an oversized circuit breaker. Easy but not something I want to DIY.
New countertops in the kitchen. Goodbye laminate.
Second, DIY stuff. Little things I can do myself. Or big things I can foolishly do myself.
New kitchen/laundry room floors. I want to do wood but vinyl plank is probably more practical.
New kitchen cabinets
Next, Stuff I’m on the fence about. Aka stuff I could do but don’t want to.
Painting. Painting sucks, y’all. It really really sucks.
Replacing the not-grounded outlets with GFIs. I can do this myself easily, but we might spring to actually have the outlets grounded.
Carpet cleaning. I mean I can rent a steam cleaner from the grocery store but I feel like a pro would do a better job?
Last, stuff that will have to be done in the not so distant future. This stuff isn’t on the agenda for omgrightnow, but it was all earmarked as “aging, budget for a replacement” by the inspector.
Roof replacement. Yeah, that’s gonna suck. Here’s hoping the current roof hangs on a few more years. But at this point we need to at least have someone come eyeball it once a year. I don’t want to find out the hard way when the roof fails.
Water heater replacement. Now accepting arguments for/against tankless water heaters.
We’ve got until Saturday to decide how to approach this with the seller. Obviously a lot of this stuff is “nice to have” and therefore not something we’d bring up with them. But the structural stuff, grading, and flood vents are definitely things that need to be done sooner rather than later. Fingers crossed the negotiations go OK and we can get a credit towards fixing it.
Let me start by saying that I never really wanted a beach house. I’ve been in enough hurricanes that the idea of owning property near the beach is more terrifying than alluring. Super Storm Sandy ravaged the New Jersey coast in 2013, bringing flood waters near or above what FEMA defines as the “100 year flood” level. While many businesses have bounced back, condemned houses and drawn-out reconstruction efforts still dot the neighborhoods along the Jersey shore.
So naturally, that’s where we’re buying a vacation house.
Our family vacations at the Jersey shore each summer and as we’ve grown the sleeping arrangements have become increasingly cramped. On weekends we pile six adults, two toddlers, and two dogs into my father-in-law’s 1,000 square foot house. When the next door neighbor’s house came on the market last year we joked about buying. The longer it sat on the market the more we eyed it up. In January the sellers dropped the price considerably, and we decided it was time to think about it more seriously.
Won’t You Be My Neighbor
The house got through Sandy mostly unscathed, and after checking it out we decided to put in an offer. We had the inspection this week and while there’s some stuff we need to follow up on, nothing was too horrible. That said, it’s a 40 year old house. It has a bunch of stuff that’s at the end of its lifespan, including the roof. But it’s all in decent shape right now, so we can spread the costs out over the next few years.
The flood risk is a non-trivial consideration in all of this. The house is built below “base flood elevation” or BFE. BFE is the “hundred year flood” level, or the expected flood level in the “one percent chance” flood. I don’t really like the term “hundred year flood” because it falsely implies that such a flood only happens every hundred years or so. But the distribution is not necessarily even. Every year there’s a 1% chance of such a flood, regardless of what happened the year before. This means that over a 30 year period (the length of most mortgages) there’s about a 26% chance of having a “hundred year flood.” Never mind any effects climate change might have on flood / sea levels. But I digress.
I mean, it’s not the worst.
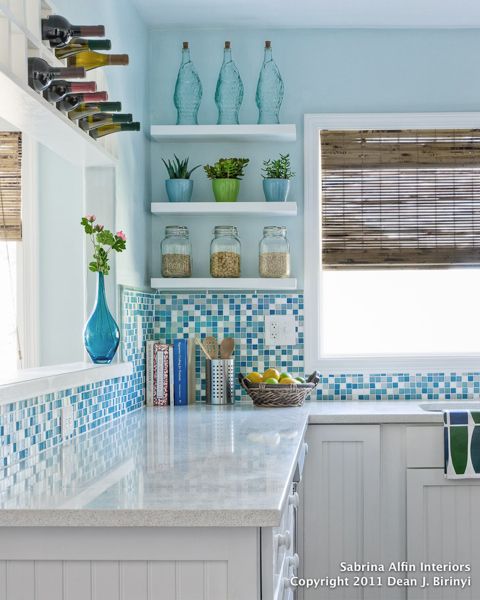
One thing I am VERY excited about with the house is the chance to put in a new kitchen. The one that’s there now is original to the house, and it’s pretty sad. A fresh coat of paint made it look tolerable for the real estate photos, but in person it is a very tired kitchen. IKEA just released a new line of cabinets sooooooooo… yeah. This is happening. I’m going to DIY as much as I can, like assembling the cabinets and putting down a wood floor, and hire professionals for things like the electrical (duh) and maybe painting (I fucking hate painting).
This is the direction I’m heading in
At this point we’re getting a few more estimates from contractors. There’s some foundation cracking that could be nothing or could be significant and we need to find out which (and get a credit from the seller if it needs fixing). I’m filling up a Pinterest board with kitchen photos, and doing boring things like getting insurance quotes, but other than that we’re just waiting for closing. If all goes to plan we’ll get the keys in mid March, get contractors in there this spring to fix the big stuff, and maaaaaaaaaaaybe have the kitchen done by summer. Maybe. We’ll see.
For the past few months I’ve been waking up in a cold sweat freaking out about things I forgot to take care of. A lot of it is little, like forgetting to schedule a hair appointment until after they’ve closed for the day. Some of it is bigger, like the Kickstarter I did a few years ago that fizzled out (more on that in another post) and a few things are huge, like the fact that I completely bungled my corporate tax filings for the last 3 years.
With some nudging from my therapist and support from my husband I finally managed to get on top of things. My to-do list has gone from “deal with 3 years of back taxes” to more mundane stuff like “clean up the dried paint in the bathroom.” I used a handful of different strategies to gain control, which I’ll detail in a sec, but the biggest key to staying motivated has been to turn it into something like an art project.
Step 1: I wrote down everything I was putting off
AKA I made a to-do list, but with some very specific guidelines.
First, everything on the list had to be something I’d been putting off for a while. None of my normal daily/weekly chores got put on there. Although I hate going to the grocery store, hunger will eventually lead me there so I don’t need to put it on my list of terrible to-dos.
Second, if it was a big task (like “unfuck my accounting”) I wrote down only the first step in the process. Whatever was on the list had to be eminently doable (if sucky). So instead of unfuck my accounting I wrote call accountant. Luckily I had the name of a good accountant already. If I hadn’t, I would have written find an accountant.
And most importantly, I limited the list to what would fit on a post-it note. I’m not rattling off every task I could possibly hope to accomplish in the next month, just the stuff I really need to get around to.
Step 2: I dedicated an hour a day to working on my list
This was my therapist’s idea and at first I balked. An hour? Where am I going to find an extra hour? And then I thought what do I even do in a day? Because I work from home, freelance, my work and my meta-work and my home life and my hobbies sometimes start to blend together. In order to find that extra hour I had to tease them apart and work more efficiently.
Once I committed myself to the hour I could no longer engage in productive procrastination to avoid my terrible tasks. I set a timer and sat down with my list. During the hour I only worked on things that appeared on that list. After a week the list was dwindling. Two weeks in I’ve cleared out everything on the original list – some of which had been there for years.
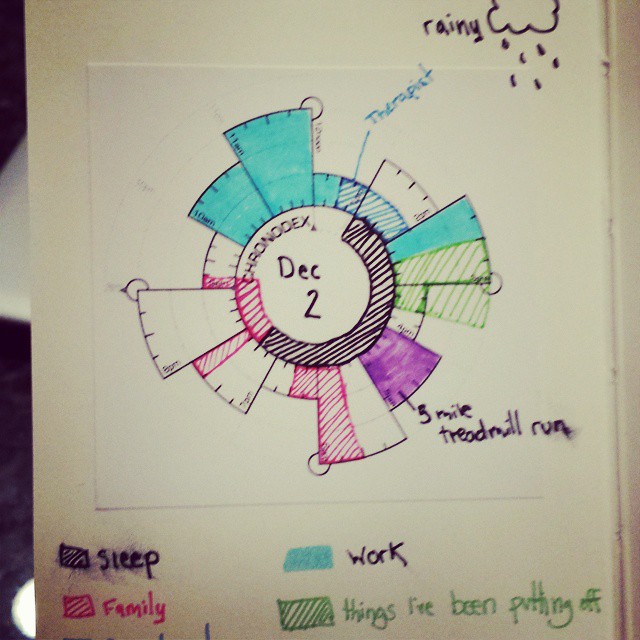
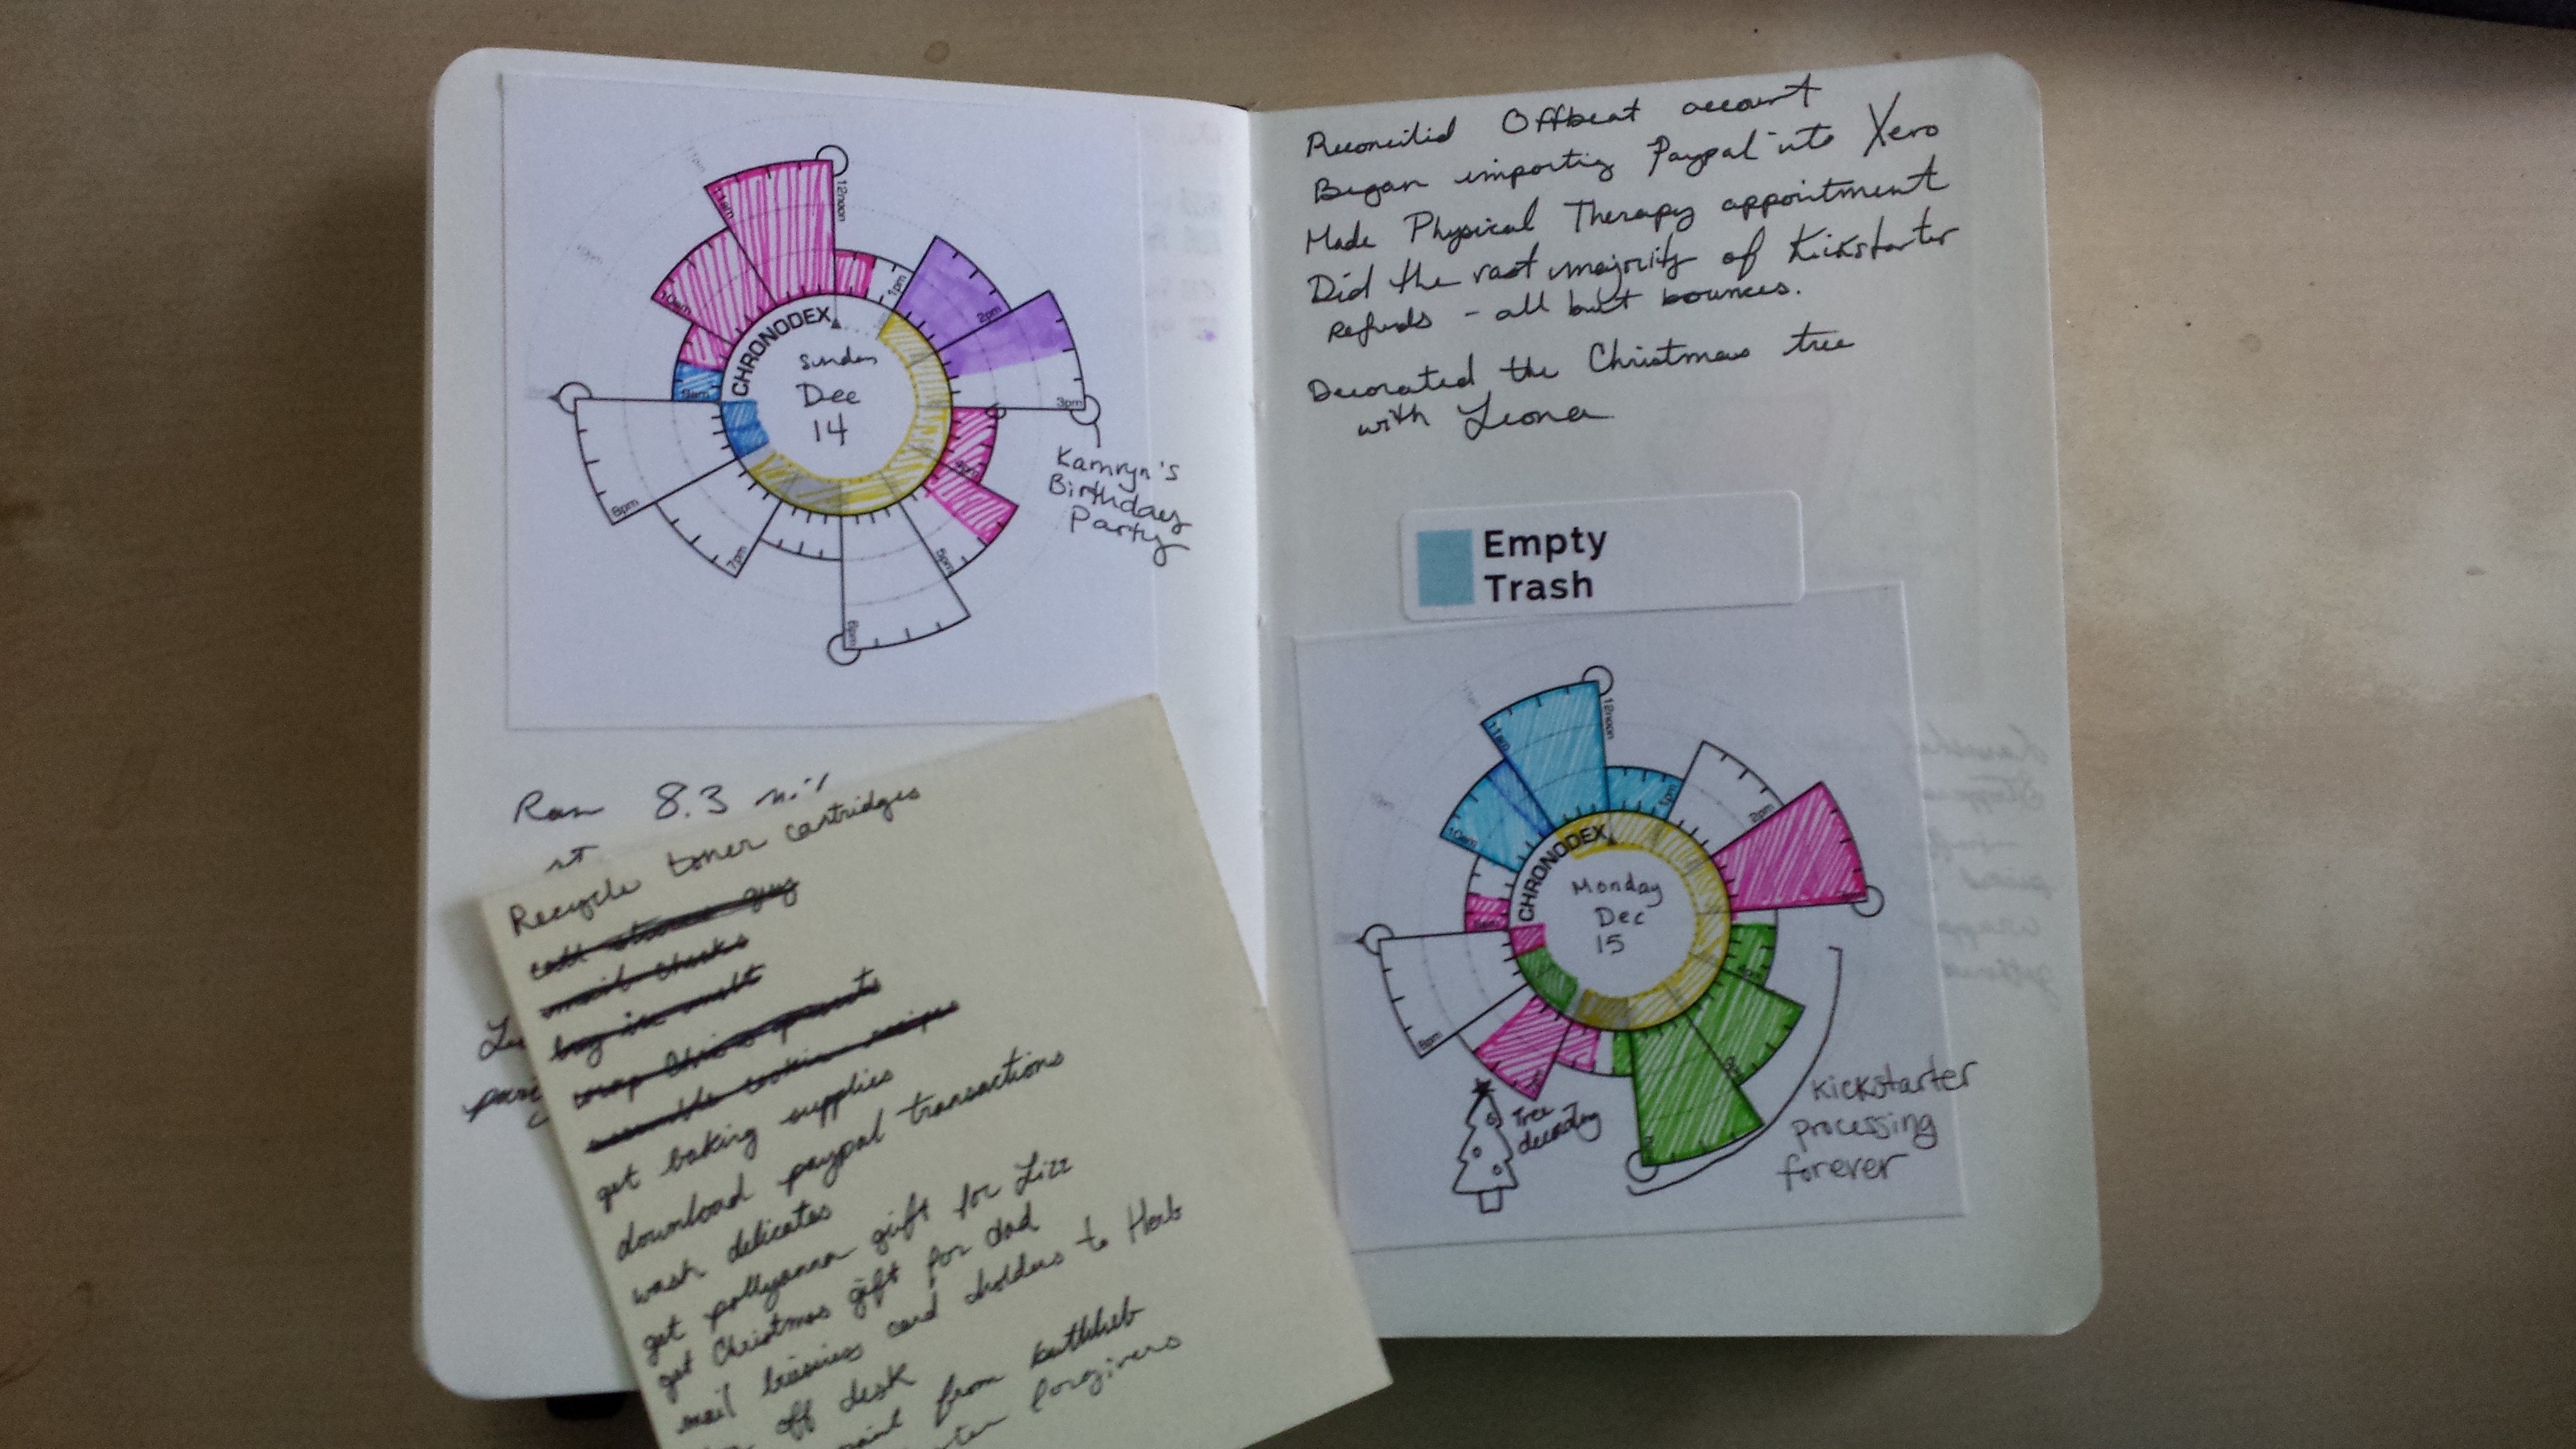
Step 3: I started logging what I was doing with Chronodex
This is where the wacky circle thing comes in.
Chronodex was designed as a paper planner. The circle represents a clock, and each wedge is an hour. The different sizes of the wedges just make it easier to differentiate them. It’s meant for folks who primarily care about 9am to 9pm, as midnight to 9am are on the interior of the circle and 9pm to midnight are sort of ghosted around the exterior. If you shade in your various appointments and responsibilities you have a nice visualization of your day.
I have google calendar for appointments, but I use Chronodex to record what I’ve done in a day. Rather than print out an entire 6 months of dated pages I printed a bunch of blank Chronodex cores on sticker paper and slap one in my Moleskine notebook each day. This allows me the flexibility to take up more/less space as needed on any given day. I use different colored pens to shade in what I did: billable work, meta-work, family time, exercise, sleep, terrible to-do time.
My first day’s Chronodex. I have since given up on logging the weather despite loving to draw clouds.
If you look through the gallery of how people use Chronodex, everyone uses it a little differently. There’s no right or wrong way to shade in the wedges, that’s where the art project comes in.
Once I started accounting for my time, some really important things happened. I started to feel better about myself because I was acknowledging the things I accomplished in a day. I started thinking about my time in 15 minute blocks which has helped me focus a lot on the task at hand. I am better at stopping myself from jumping between work, home, and play because I’ve internalized that I’m “in a work block” or “in a family block.” When I take a break I take a full 15 or 30 minute break instead of just shoving food in my face while sitting at my keyboard. My reward for being productive is that I get to shade in that time on my Chronodex afterwards.
Step 4: I started having time for chores
Now that I’ve been dedicating all this time to my terrible to-dos, I don’t actually need the full daily hour to do them anymore. It’s tempting to us that time for goofing off, but instead I’ve started adding some routine chores into my schedule. This is the stuff I should be doing but often don’t and then either a) it gets gross or b) my husband takes care of it and pretends not to secretly resent what a slob I am.
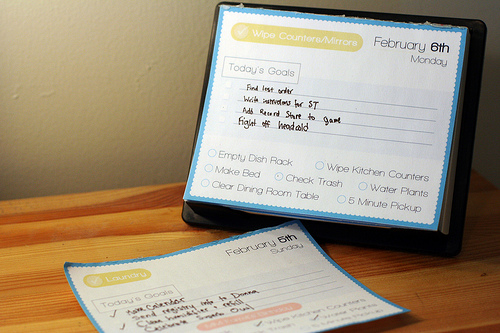
This is not the first time I have tackled chores with an overly complicated art project. Behold:
Oh yeah, I remember you now
That project served me very well. It fell by the wayside when we moved and I had a bigger house with WAY MORE THINGS that needed doing. Also I reinstalled windows and no longer have a python environment handy to generate the pages.
The biggest problem I have with a pre-printed list of chores though is that it becomes your tyrant instead of a tool. If you fall behind you have this paper trail of failure plus the question of “do I just skip those chores or is my entire day now going to be nothing but cleaning?”
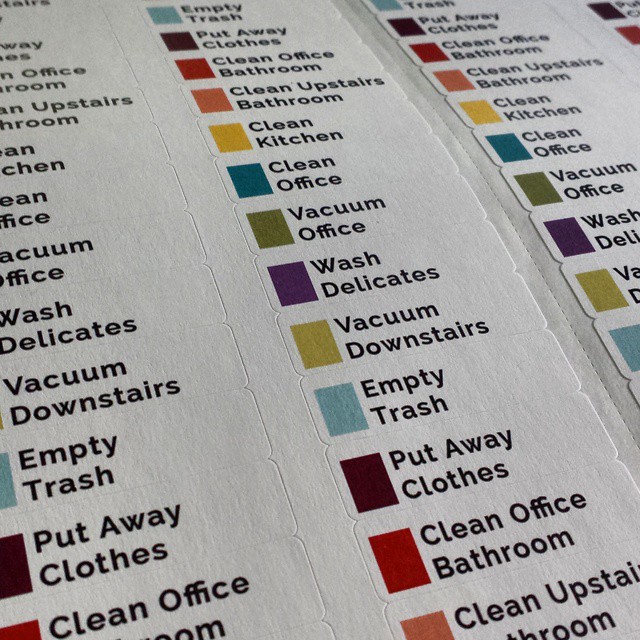
For this iteration I printed out a bunch of common chores onto some return address labels. Apparently you all have a boner for labels, because this was one of my most liked items on Facebook this week.
If there is one thing you all love it is colorful labels.
I cut them into sets of 8 or so and keep a sheet of them alongside my to-do list in my notebook (which I use as a bookmark). When I do a chore, I put that sticker on the page. The colors mean nothing; I just like colorful things. This is basically a more boring version of what you might use for a 7 year old. The stickers behave sort of like a repeating to-do list. I limit these chores to things I can do in 15 minutes or less.
Step 5: Profit
Actually I think the only people profiting here are the label companies. But I sleep better at night now that I no longer have a list of years-old to-do items hanging over my head.
My biggest takeaway from this is that I do better with accountability than expectation. Which is to say, when I plan my chores or tasks for the week out in advance I never seem to live up to the standard I’m setting. But if I hold myself accountable to what I’ve accomplished each day – regardless of what it is – I can get a lot done.
I love the flexibility stickers offer me. I can skip a day or do something different tomorrow and it’s not this weird scar in my notebook. On weekends I don’t usually need to be such a taskmaster, so unless I’ve got a lot going on I don’t bother.
And most importantly, this works because I am highly motivated by charts and graphs. Seriously. I cleaned my office bathroom yesterday expressly so I could get a sticker. I focus on work instead of checking Facebook just so I can shade that 15 minute wedge in blue. If the idea of sitting down with a pack of multicolored pens doesn’t fill you with excited anticipation, this won’t help you at all.
Speaking of pens, these are my very favorite. They don’t bleed through the pages and make a nice smooth line.
Frequently Asked Questions
Doesn’t this take kind of a while?
Yes. I spend about 15 minutes a day updating my stupid Chronodex. But I consider it time well spent because I’m actually getting things done the rest of the day instead of checking Facebook 500 times.
What about free/leisure time?
I experimented with shading in those things too after the fact and it was just too much for my taste. I like the visual effect the space has when I don’t have a scheduled task.
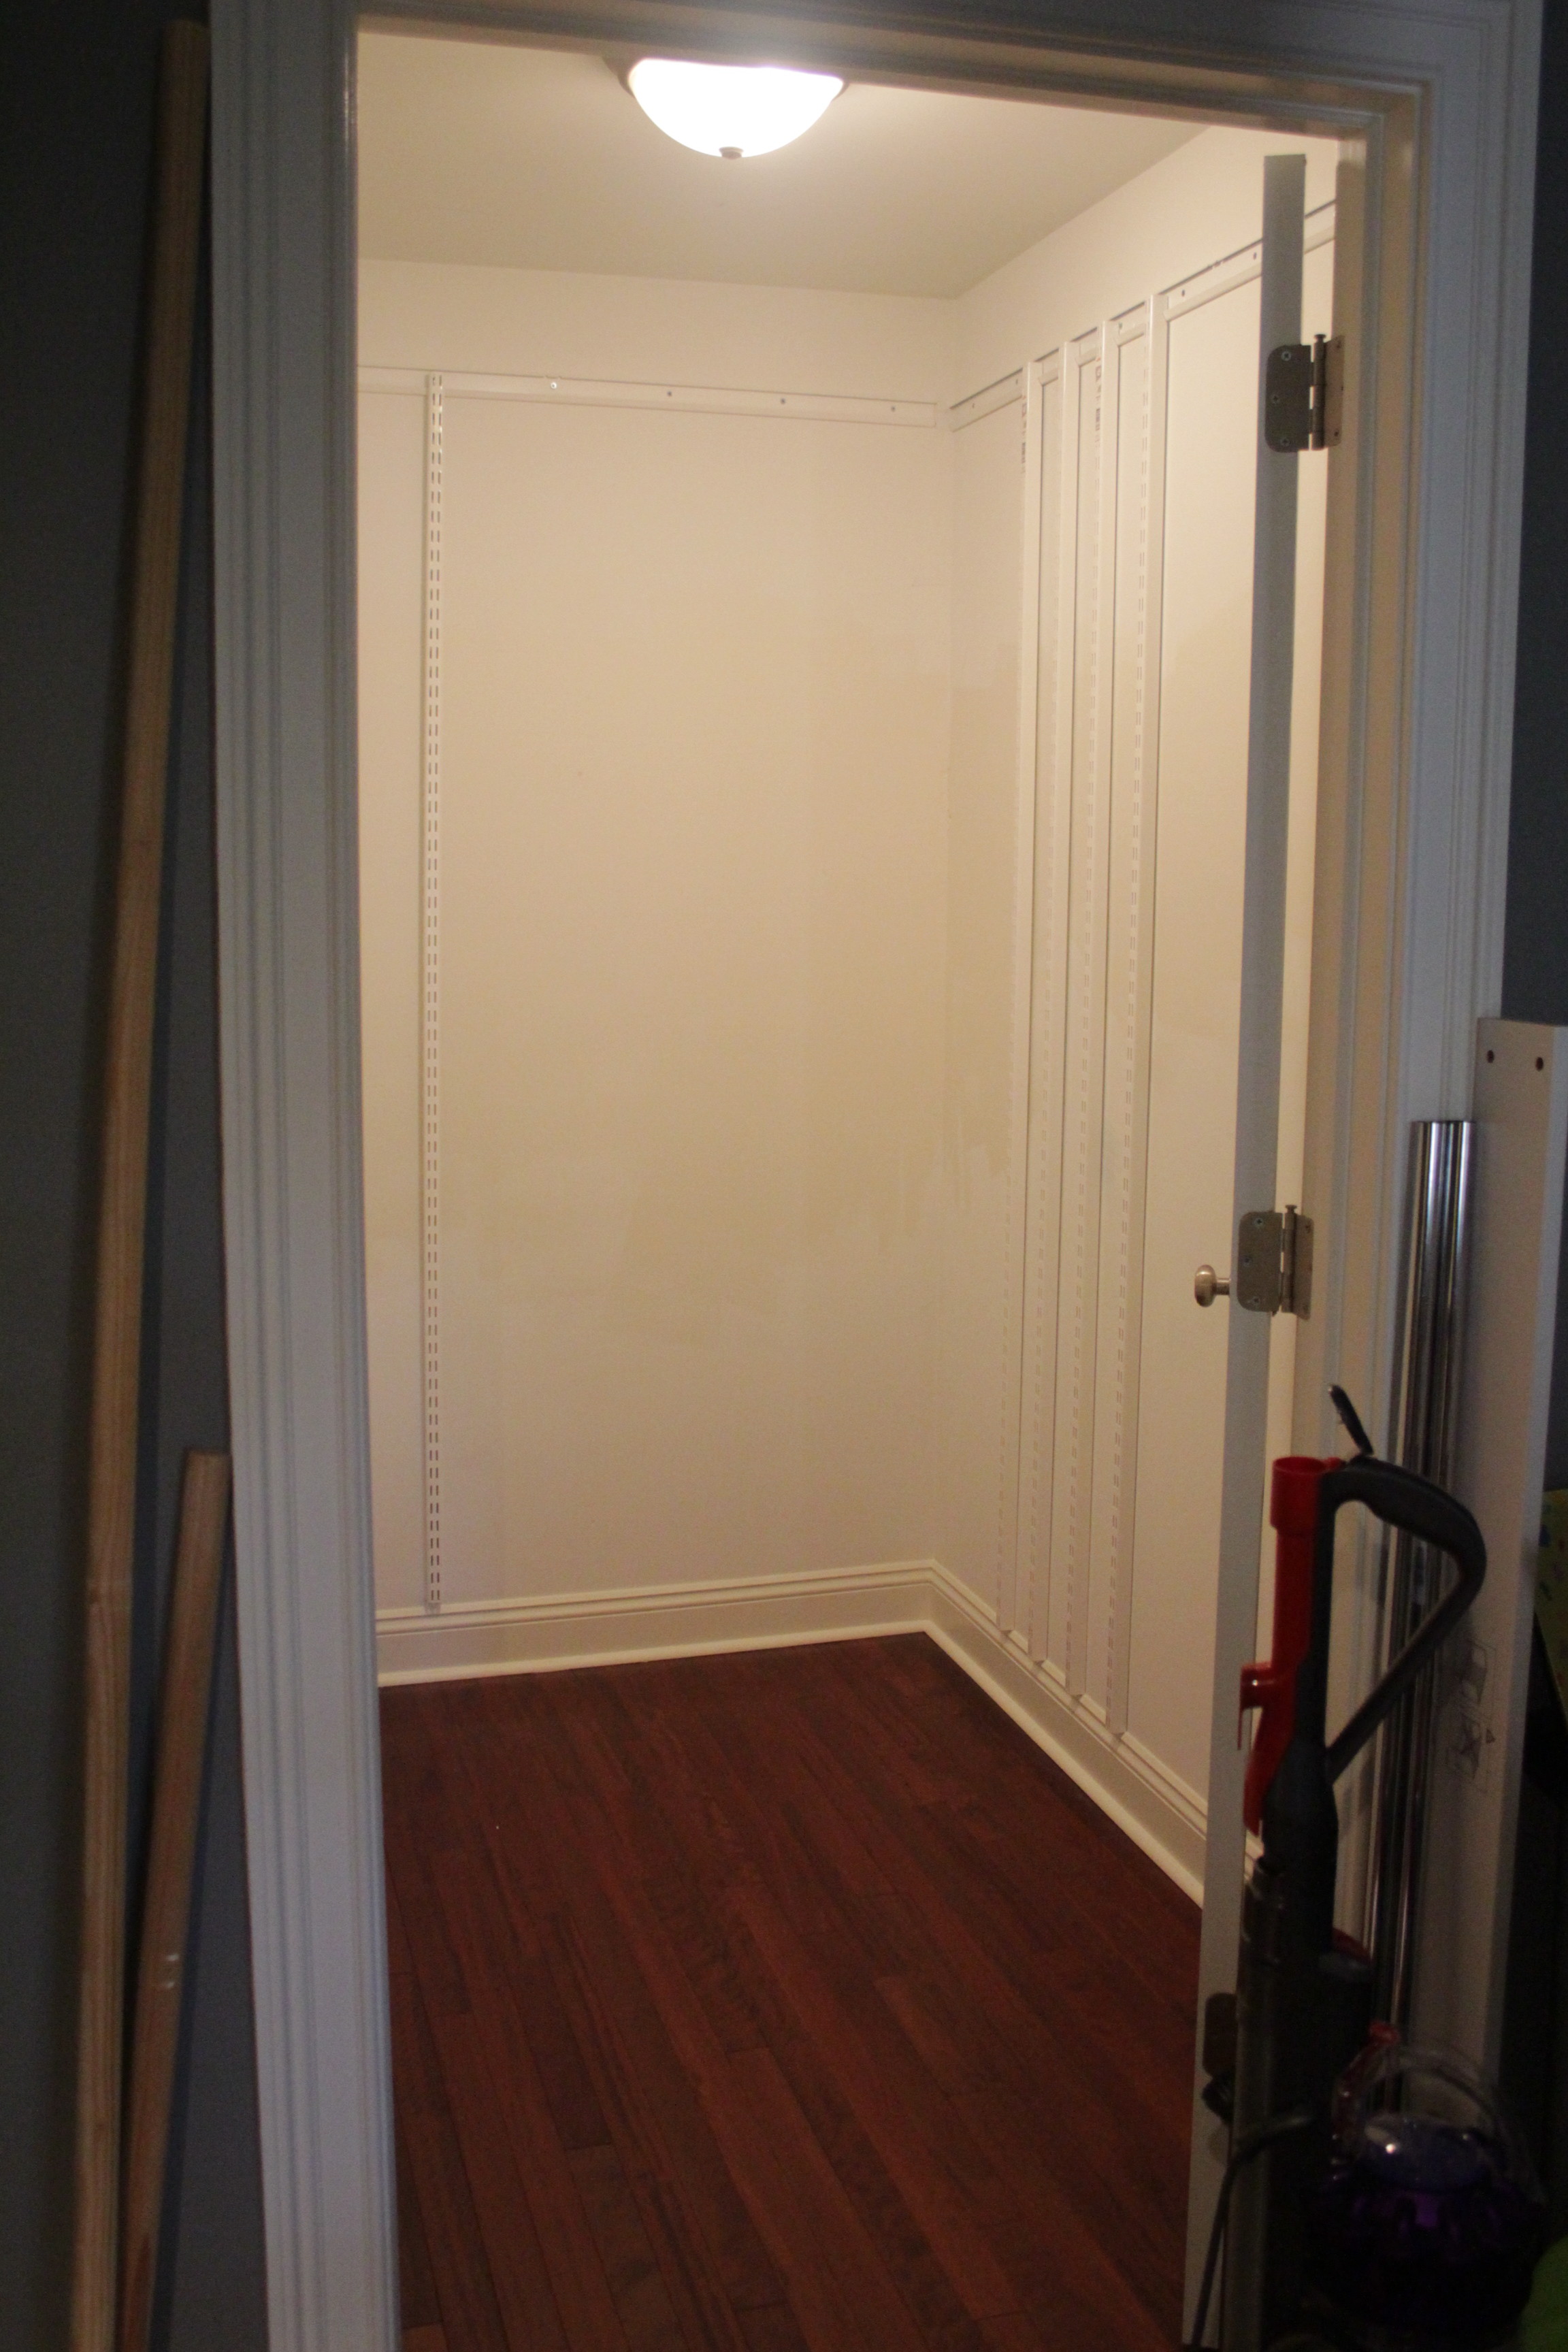
It’s my favorite time of year… time for the Container Store elfa sale. This year the closet in my daughter’s room got a makeover. Her closet consisted of hanging organizers from Ikea which were the source of much cursing due to their poor design and awkward center of balance. I have been planning this closet for months waiting for a sale. The day before the sale started I sprung into action, preparing the closet for Operation Shelving 2.0
The closet suffered many of the maladies that my office closet did, namely shelving that was glued to the walls. Thankfully this time there was a little less glue so I was able to get away with just one day of sanding/spackling. I also was a little less picky about them this time around.
Walls patched and awaiting paint
It was at this point that my daughter looked into her empty closet and said “you broke my room. Fix it.” This time I opted to just paint over the patches rather than redo the whole room. Unfortunately I managed to pick the wrong shade of white from our pile of leftover paint. I decided I didn’t care and just left it. If you notice it, you can kindly keep your mouth shut.
Walls painted. You almost can’t tell I used the wrong white!
I love the way the elfa system is organized. The whole thing comes in these nice organized bags. The little one has all the mounting hardware, the big one has various smaller elements for the closet and a separate side pocket containing customized instructions for installing the whole thing.
It’s like Christmas for closets
Feeling like an elfa pro after doing my office closet, I happily set to work on the toddler closet. Unfortunately I got a little too confident, and did not measure the height for the top tracks correctly. As a result the hanging standards (vertical bits) overlapped my baseboard molding by about half an inch. Tragedy. I spent a couple hours cursing myself, wringing my hands, and contemplating my two options: rip out the top track (drywall studs and all) and reinstall it higher up, or cut an inch off the bottom of the vertical standards. Since I lack the tools to cut them myself option 2 required a trip out to the suburbs to have them cut. Both options sort of sucked.
After a quick phone call to The Container Store I went with option 2. Thank you to the staff at the Container Store in King of Prussia, who cut the standards for free (despite it being my mistake) and had me in and out of the store in about 10 minutes. I managed to get the standards installed just in time for toddler bedtime.
Day 3 of Operation Closet was spent putting up the shelving and deciding on the spacing I wanted. For this closet I splurged on some of the “nice to have” finishing touches like bracket covers and shelf fascia. Stuff that’s not functional but makes the closet look nice. I didn’t bother with those for my own closet, but they do make things look cleaner and nicer.
As I put everything back in the closet I started culling stuff that was too small. I am a bit ashamed to admit that some of the stuff hanging up had been in the 9-12 month sizes (she’s two and a half now). When all was said and done she had about half as many hanging clothes and an entire additional storage bin full of too small stuff.
See the nice wood fronts on the shelves?
Drawers!
Hanging space!
Since the door blocks this part (thanks, builders) we’re storing outgrown clothes and baby stuff here
So now the toddler’s room is “fixed” and I can now easily find socks that fit her. So ends another fruitful elfa sale. Look out, master bedroom closet. You’re next.
I was browsing Pinterest for work (yes that is an actual thing) and saw a pin on how to whiten your pillows. It links to a “magic whitening formula,” most of which is probably just OH MY GOD DID EVERYONE ELSE KNOW PILLOWS WERE WASHABLE?
Somewhat skeptical, I went to the Closet of Old Gross Pillows (aka the guest closet) and read the tags. Lo and behold, they all say they’re machine washable. By George, I’ll try it!
Since I have a high efficiency front loader, the recipe in the article won’t work for me. But with a little improvising I came up with something that worked really well.
1 tbsp powdered laundry detergent
1 tbsp borax
1 tbsp dish detergent
bleach to the “max” line in my machine’s bleach dispenser
For the love of god, defer to the instructions on your machine if you decide to try this. I use a very low-suds detergent, and did not have any issues in my machine, but please use common sense and err on the side of caution.
My machine has a pretty good soak setting, but for the grosser pillows I stopped it during the rinse cycle and ran them through again. Then I chucked them in the dryer. Martha says to make some felted dryer balls to fluff them up, but aint nobody got time for that. They dried just fine on their own.
So how’d they come out?
When I pulled them out of the dryer I thought “meh, they still look kinda dingy.” And then I set them down next to the ones that hadn’t been washed yet.
Prior to washing, the left and right pillows were the same color. Gross!
I think most of the credit goes to simply washing the pillows, rather than the “magic” whitening solution, but I’m happy either way.


 This was my therapist’s idea and at first I balked. An hour? Where am I going to find an extra hour? And then I thought what do I even do in a day? Because I work from home, freelance, my work and my meta-work and my home life and my hobbies sometimes start to blend together. In order to find that extra hour I had to tease them apart and work more efficiently.