DIY Aeroponics

Gardening Gets Underway

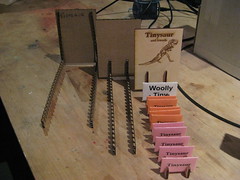
Today I started collecting things for my DIY Aerogarden, and testing out spray set ups. Here’s what I found:
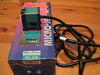
Aquarium Pump106 GPH pump

I started my search at a local aquarium store, New World Aquarium at 38th and 3rd. It cost a little more than it would have online, but the salesperson actually knew things about it and could answer questions, so it was worth it.  It’s about two inches tall and has variable output between around 45 and 106 GPH. It seems to push water through the tubing/misters nicely.
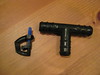
Bits of tubing Various hose bits

I stopped at the local hydroponics store to get some T joints for my hosing, and some sprayers as well. The sprayers attach to 1/2 hose pretty easily, just cut a small hole in the hose and push the sprayers in.

Food! 
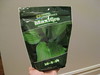
I also picked up some rockwool and plant nutrients, so make my own “seed pods.” The bag of nutrients was $18 for more than 2 pounds of dry mix, which gets mixed with water at about 1 tsp per gallon. My garden will probably hold about a quart. So it should last me quite a while. The rockwool is $7.50/48 cubes, and I’d need a max of 1 cube per planting (tho I plan on using half, they’re big cubes).

Hosing with misters

Hosing with spray barbs 
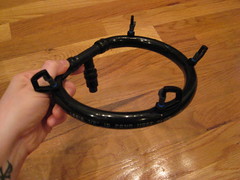
I ended up using a circle of 1/2″ hosing about 6″ in diameter. The four misters are placed relatively evenly around it. The bottom of the T joint goes to the pump.

The misters I got are a little more like sprayers than misters, the water coming out isn’t very fine. I’m not sure if this is a function of water pressure or the type of misters I got, I think the latter.

I ordered some different misters from Drip Depot which are supposed to produce a “very fine mist” so we’ll see what difference that makes. Luckily all this stuff is really cheap, the hosing I can get at the pet store down the street, and the misters/connectors are all under a dollar each.

Pump in vase 
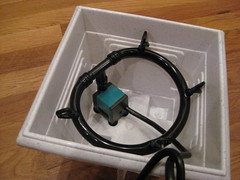
Here’s my pump/hose setup in the planter I got from the dollar store. There are two problems. One, it’s not tall enough. The planter has these “feet” which make it look taller than it actually is. I want at least 2″ from the top of the sprayers to the top of the bucket. The hose connectors add a substantial amount of height to the whole thing.

I ordered some L connectors which would allow me to put the pump on its side, but I think that would give me an extra 1/2″ at best.

But the real problem with this planter is that it leaks. Sure, it *looks* sturdy and without holes, but there are thin spots in the plastic near the bottom where water started eeking out. No good.

So tomorrow I’ll go in search of a more appropriately sized leak proof bucket. Once I have that I can start working on the top part to hold the plants and deal with lighting.

DIY Aeroponics

New Project: DIY Aero Garden

I’ve always been amused by / interested in Aero Gardens, an aeroponic tabletop indoor growing system for herbs and small plants. But $200 seems like a lot to spend on a wannabe space-age novelty item. So I started looking into what exactly they’re doing. And decided I want to attempt to make my own.

Aeroponics is the science behind growing plants in air (very very damp air). Like Hydroponics it uses no soil, and apparently this makes things grow faster. There’s a fair amout of chatter about it on the internet, mostly pertaining to the growing of illicit substances.

The plants sit in a nice sterile looking tray and the roots of the plant are suspended over a vat of water, which is either constantly or occasionally (I couldn’t tell which) spraying mist on them. Some sort of UV light gives the plants what they need to photosynthesize, and everyone lives happily ever after.

There are only a handful of basic things I need:

  • Some sort of base container for the water, preferably plastic so I can put holes in it as needed. Roughly the dimensions of this Rubbermaid container.
  • A water pump. I found a Micro Jet 450 for $16 on Amazon which is tiny and 120 GPH (gallons per hour) which *might* be enough.
  • Tubing and spray nozzles to hook up to said pump. Tubing I’ve got. Not sure where I’m going to find tiny spray nozzles to poke into it. These are apparently rated for 3 GPH.
  • Something to hold the plants. I plan on laser cutting this.
  • A light fixture and a light which plants will grow under

Looking at my parts list, this thing will probably be quite ugly, which is probably why Aero Garden gets away with being so expensive. Because it looks space age, and not like something you’d use to grow illicit plants. I’m starting my hunt for components, and will update as I find things and do more research.

Hacking

Canon Camera Hacking With CHDK

This short and somewhat boring clip is the result of playing around with CHDK (Canon Hack Development Kit). I’m working on a stop-motion animation for Tinysaur, but sadly neither of my cameras (a Canon Digital Rebel XT and a Canon SD1100IS Point and Shoot) had a built in timer that would shoot over and over indefinitely. Using the CHDK Ultra Intervalometer script I set my camera to take a shot every .5 seconds. Although it didn’t quite go that fast… I’ll get to that in a bit.

CHDK is a firmware add-on for Canon point and shoot cameras that lets you control absolutely every aspect of the shot. It loads from your SD card at boot, so it’s non-permanent (although you can set it to auto load). It gives you access to a plethora of fine tuning options and display monitors, and also lets you run scripts to take pictures based on time, motion detection, etc. But the most exciting thing I found is that there’s a script which will let you trigger the camera with a hacked USB cord with a switch.

img_0149
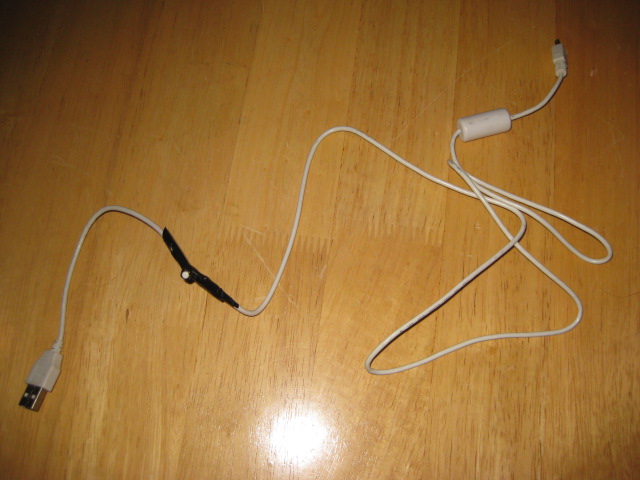
Mine is shown on the left, it’s not very pretty. I spliced a reset switch into the +5v (red) wire. It uses a USB port for power, which makes it a little silly, although ok for my uses. Ideally you’d rig up a power supply along with the switch. I would have but I only had AA battery holders and it needs between 3.5V and 5V of juice. There are some neat hacks listed on the CHDK wiki for making remote cables out of old joysticks and flashlights and whatnot.

There’s a ton of documentation, but it’s a bit scattered around the CHDK wiki. Here’s what I did to get the Ultra Intervalometer script up and running. The instructions are almost identical for the USB remote script:

Getting CHDK going:

  • Grab a spare SD card and format it. If it’s >2 gig and you think you’ll want to auto boot CHDK, format it as FAT16 (‘format X: /fs:fat’ from the comand line). Leave it in your machine’s SD reader (which, by the way, you need for this).
  • Make sure you have a CHDK compatible camera. My SD1100 works well with it (and without it, for that matter), apparently the latest version of that camera (SD1200) doesn’t yet have a version of CHDK for it. CHDK isn’t available for SLR cameras.
  • Check your camera’s firmware version. Create a blank file called ver.req on the SD card. Put the card in your camera. Make sure the camera is set to playback mode and turn it on. Press “Func Set” and “Disp” at the same time. A screen with the firmware version should pop up.
  • Download the appropriate version of CHDK. Unzip it onto your SD card.
  • While not necessary to get CHDK running, now is a good time to stick the Ultra Intervalometer script on the card, so you don’t have to take it out to do it later. Copy the script code and save it as something like ‘ult_interval.bas’ in the SCRIPTS subdirectory on the SD card.
  • Pop the SD card in your camera.
  • Make sure your camera is set to playback and turn it on. Hit ‘Menu’ and scroll down, you should see an option to update the firmware. Do it!
  • When you update the firmware, the ‘print’ button will blink for a bit, strange things will happen, and you should see the CHDK splash screen. Hooray!

Now you can use the ‘print’ button to switch between the normal boring Canon menus / normal shooting and “<ALT>” mode, which brings up a totally different list of options when you press the Menu button, and triggers a script when you press the shutter release rather than taking a picture.

Using Ultra Intervalometer

  • Make sure you’re in <ALT> mode
  • Press Menu and scroll down to Script Parameters
  • Select “Load script from file” and select ultra_interval.bas or whatever you called the script.
  • Set the script parameters (those under the heading Ultra Intervalometer) to your whim. Use left/right to increase or decrease parameter values.
    • Delay 1st Shot (mins) – this is the time between when you start the script and the first shot, in minutes
    • Delay 1st Shot (secs) – As above, but seconds
    • Number of Shots – how many to take
    • Interval (minutes) – number of minutes between shots
    • Interval (seconds) – number of seconds between shots
    • Inerval (10th seconds) – as above, with 10ths of seconds
  • Exit out of the menu (by hitting menu)
  • Press the shutter to start the script. The camera will fire at the interval you chose, hooray! Press the shutter again if you want to stop the script before it finishes.

When I set the interval to 1 second I noticed that the camera wasn’t actually shooting that often. The ‘review’ period, where it shows you waht you just took, seemed to be getting in the way. I exited out of <ALT> mode and was able to set the review time to 0 seconds in the camera’s normal menu. I also turned off AF-Zoom. It still takes a little bit of time to auto focus between each shot,  I haven’t dug through enough of the CHDK documentation to find out how to only focus at the start of the sequence.

Here’s a short (ok, still boring) clip of my walk from NYC Resistor down the street, in search of some tacos:

Katamari

Life-Size Katamari Lives

A long time ago, in a galaxy identical to this one, I wanted to make a life-sized Katamari, and use it to play Katamary Damacy on PS2. My friend Eric Skiff shot a video, and while it’s not quite a polished project, I decided it’s time to share it with the world.

My very technical schematic
It uses an optical mouse to track the ball. I gathered up some cheap PS2 controllers, ripped out the potentiometers on the analog sticks, and replaced it with a digital potentiometer and an arduino. The arduino takes signals from two PS/2 mice (one for each analog stick) and adjusts the potentiometer accordingly.

Ribbon cables soldered to where the joysticks used to be
It’s the first circuit I’ve ever designed, so obviously it has a lot of room for improvement. The biggest one being that there are two separate power sources, one for the Arduino and one for the PS2. We’ve discussed lots of different ways to run the whole thing off the PS2’s power, but all of them require a little more studying on my part to fully understand. I started this project with almost no knowledge of physical computing. I got the “electricity is like a river” talk from my fellow Resistors, and a lot of pointers along the way.

katamari0.5

Here’s the wiring schematic. I realize it doesn’t make a lot of sense. Basically the each mouse (one for each joystick) is wired up to the Arduino, and there’s a handy PS/2 library for Arduino which makes it easy to work with. It was also the first Arduino program I wrote after “make an LED blink.”

I used an AD5206 digital potentiometer chip, although the 5204 would work as you only need four channels (left x, left y, right x, right y). It’s a pretty simple circuit, and maybe when I have some time I’ll redo it to use an AVR and a single power source. It was a fun first electronics project.

Originally I wanted to use one of those giant yoga balls, to really get the scale. But it turns out those don’t roll very well on ball bearings. Luckily Adam had one of those mirror balls folks put in their gardens. Or at least I assume they do, no one I know has a big enough yard to put lawn ornaments in. While somewhat smaller and less impressive, it rolls much more easily.

This project wouldn’t have been vaguely possible without help from the fine folks at NYC Resistor, who very patiently explained things like “why do I need a pull up resistor?” Extra thanks to Eric who documented my work (something I forget to do) and Adam who helped me with EAGLE. Sadly I never did get around to properly etching a board for it (but I did have a lot of incorrectly etched boards).

You can find the music from the video at http://glitchnyc.com/music/


Exercise, Hacking

Weight Hacking

I was dismayed recently to find my WiiFit calling me fat. Yes, it actually said (in its squeaky little voice) “that’s overweight.” While I’m not in the habit of letting an $80 plastic washboard dictate my lifestyle, my pants agreed. They said “lose 5 pounds or buy new pants.” Since I’m self-employed and like designer jeans I have no choice but to go with option one.

Let me start by saying that I will do anything for points. It doesn’t matter what the points are for, I want them. When I was saving up for video games as a kid I drew little thermometers and filled them up as I saved my money, just like your college alumni drive does. I play Xbox Live games more than others because there are points and a leaderboard and achievements and the achievements get you points and I want them all. And lucky for me, WeightWatchers is all about points.

On WeightWatchers you get a certain number of points per day, and all food has a set value of points (based on the fat/calories/fiber in it). And you can eat whatever the heck you want… as long as you don’t go over the points. You can also earn extra points by exercising, and get a bank of 35 spare points per week so you can eat normal people food and not blow your whole diet. Although tedious to some people, I find this to be an entertaining numbers game. And a challenge to hack my diet to maximum delicousness.

For example: a Chipotle Burrito with cheese and guacamole is 22 points. By comparison, my daily target is 20. Obviously the cheese and guac are big contributors here, and I’m sad to see them go. But all in the name of progress (and not having to buy new pants) I forgo the cheese/guac. Now we’re down to 15. In theory I could just eat half the burrito and save the rest for tomorrow and thus not totally blow my points for the day. But that’s not much fun now is it?

What’s interesting is that according to this handy-dandy calculator (which gets its values from Chipotle’s nutrition facts) the tortilla used to wrap the burrito is also a huge contributor. Nixing the tortilla and opting for the “burrito bowl” brings me down to 9 points. And it is a rather lot of food, so I eat 3/4 of it and save the rest for lunch tomorrow. So now I’m at 7 points, and honestly I didn’t miss the cheese/guac. That much.

You can figure out the points values with some simple math or another handy-dandy calculator and the printed nutrition facts. For stuff you cook at home you can guesstimate using the ingredients list and google… there are a handful of points charts floating around that tell you the value of things like eggs, broccoli, etc. For folks who like beer there’s a nice points values for beers list. It’s by no means comprehensive, but gives me a rough idea. Most of the beers I like are around 4 points.

Having to add up my points for everything has cut out a lot of my snacking, or at least made me switch to healthier options (bananas instead of chocolate). By skipping the cheese/guac on my burrito I freed up 7 points. An ice cream cone is about 5 points. I would much rather have ice cream than cheese on my burrito.

It’ll take about a month before I can tell if it’s actually helping, but in the short term WiiFit has stopped calling me fat. Now it says I’m just festively plump. In addition to the WeightWatchers I’ve been biking more and getting pretty darn good at WiiFii hula hooping, but I think not eating candy constantly will go a long way towards staying in my current pant size.

lased, SDXF Documentation

Tinysaur Display

Tinysaur Kit Display

I’m helping my friend Sara at the Squidfire Holiday Market in Baltimore, Maryland on Sunday. She suggested I bring some Tinysaurs, and so I made a display to neatly hold the Tinysaur kits.

I generated the pattern with a python script I wrote, using the sdxf library.

If you’d like to make your own, the DXF files are up on Thingiverse, or you can grab the python scripts and make one to your own dimensions. I cut it on the laser, but there’s no reason it couldn’t be cut on a scroll saw.

first, second, success

Here you can see my first attempt, second attempt, and final. The first two were in cardboard, fantastic for prototyping.

Once all this craft show stuff is over I will probably make a few available in my Etsy shop in case folks who do craft shows are interested in one.

Programming

Adam Mayer explains pointers to art students

I don’t have a background in CS. In fact I got my degree in Crafts. Yes, you can get a degree in Crafts. And I have one.

Most of my programming skills are self-taught, which is fine most of the time but occasionally gets me into trouble. Recently I learned about pointers the hard way, and to help clarify things my friend Adam broke it down into art school terms for me. It was so hilarious (and helpful) that I’m reposting it here.

You’re telling me you went through art school without once discussing referers and referents? WHAT KIND OF PUNK-ASS ART SCHOOL DID YOU GO TO? Let me break it down to you in art-school terms, then:

In python, you can think of all variables as pointers. All they do is point to objects. When you say:
>> constructivism = 6
You can think of this as creating an “integer object” with a value of 6. Constructivism is not itself 6 (which is to say, constructivism is not “6” in the way that brutalist materialism might be “6”). Instead, constructivism is a variable which points to this newly created
integer object with a value of 6. If you were to say:
>> constructivism = []
or
>> constructivism = Socket()
then you’ll be creating an new empty list object, or a new socket object, and then constructivism will point to that instead.

That’s all pretty simple. Then there’s this:
>> futurism = constructivism
Now, constructivism is already a pointer to something else. Futurism, however, will not point to constructivism itself: instead it will point to whatever constructivism points too, much like in 1991 Saatchi did not point at Damien Hirst, but whatever Damien Hirst was pointing at at the time; in this instance a dead shark. Note that while Damien Hirst went on to point at other things, Saatchi is still pointing at the dead shark. So:
>> hirst = Shark( dead=True )
Hirst is now pointing at a dead shark.
>> saatchi = hirst
Saatchi is now pointing at the same dead shark. Now,
>> hirst = Skull( bling=True )
Hirst is now pointing at a blinged-out skull, but Saatchi is still stuck on the shark.

When two variables are pointing at the same thing, they both see any changes made to that thing over time. So, for example, look at the following code:

>> # note that hirst does not make the shark himself, but calls a constructor
>> hirst = Shark( dead=True )
>> saatchi = hirst
>> print hirst.living
False

Both Hirst and Saatchi are referring to the same dead shark. But, later:

>> # Saatchi uses his money to bring the shark back to life
>> saatchi.ressurect()
>> print saatchi.living
True
>> print hirst.living
True

However, let’s move on:
>> hirst = Skull() # Hirst has moved on to other dumb shit
>> # What doth life?
>> print hirst.living
AttributeError: Skull has no attribute 'living'

… because hirst now points to a skull, and not the shark.

I could go on, but I’m impatient to see what google ads start popping up for this thread.

-a
(Actually, you probably really need to hear about scoping, but I’ll do that in terms of objectification and the male gaze.)

Programming, SDXF Documentation

Python library for generating DXF files

I’ve gotten a little frustrated with the limitations of using Processing to generate PDFs for laser cutting. Primarily, there’s no support for “hairline” thickness lines, which add an extra step to getting things ready to lase, and there’s no way to separate lines into different layers so it can be hard to work with the file later if you want to raster etch some lines and vector cut others.

Adam suggested looking into a DXF library someone had written for Python. Indeed, there is a very nice library. Unfortunately the original documentation for it seems to have gone missing.

I’ve started documenting the library, it’s called SDXF and is pretty thorough. I don’t know Python, or DXF, but so I’m picking up both as I go along.

Programming

Mysql_Awesome_Query

Hm it’s been a while since I’ve posted, been busy with a lot of boring, non-hacking stuff. Travesty! But here’s something vaguely interesting:

Often when I’m writing a bunch of PHP I want to be able to see the MySQL queries its generating. Usually I just comment out the mysql_query() and replace it with an echo. But sometimes that’s annoying, or I want to check multiple queries at once and don’t feel like switching them back and forth all the time.

I wrote a quick function called mysql_awesome_query(), which will either execute or echo a query depending on whether it’s a SELECT, INSERT, UPDATE, or DELETE/DROP.

//1 is run, 0 is echo sql
$flags = array(
'S'=>1,
'I'=>1,
'U'=>1,
'D'=>1
);


function mysql_awesome_query($sql){
$flags = $GLOBALS['flags'];

if($flags[$sql[0]]==1){
$result = mysql_query($sql);
if(mysql_error()){
return mysql_error();
} else {
return $result;
}
} else {
echo $sql;
return false;
}
}

The $flags global variable is an array of settings for which types of queries to execute, based on the first letter of the query string. MySQL conveniently doesn't have a lot of overlap there.
When mysql_awesome_query() is executed it checks the first letter of the query and if the corresponding array value is 1, it executes it and returns either a result or a mysql error. If it's 0, it simply echos the query so you can review it.

I'm sure there are more elegant ways to do this, but this was quick and dirty and works for my purposes.