Hacking

Thermal Printer Success!

 Success! I’ve managed to print to the thermal printer by sending commands over my homemade connector cable in HyperTerminal.

Picture 027

 There were a few breakthroughs which helped me get to this point. On the off chance they might answer, I asked the manufacturer for the pinout information for the serial port on the PD-22. Not only did they send me a pin diagram, viagra in the uk they also included a schematic for the cable.

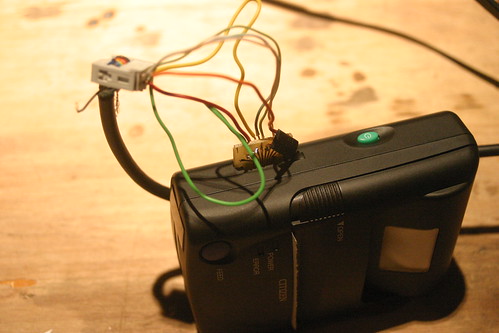
Pins 1-8 are straightforward and what you’d expect to find on RS232. I was originally thrown off because 9 looked like signal ground. Pins 9 and 10 are tied to each other, and go to signal ground internally. I think this is used to indicate that the cable is present, as the printer defaults to IrDA otherwise. I’ve updated the Eagle schematic to tie 9 and 10 together and removed the traces which aren’t connected to anything.

I didn’t have a chance to etch the new board yet, but really wanted to try things out so I made do with the old one by just putting a blob of solder between pins 9 and 10. It’s not very pretty, but it works!

Picture 026

The next step is getting this contraption working with the Arduino instead of running off a USB serial port on my laptop. I have to read up on the SoftwareSerial library, as I haven’t really done anything with it before. I also need to read the command sheet more carefully, I’ve figured out how to print, and turn the thing off via serial, but haven’t got it to feed the paper after printing. Right now I just press the feed button.

But it works!

Hacking

Thermal Printer Hacking

 As part of my knucklebuster hacking project, samples of viagra I’ve been working with a portable thermal receipt printer. I picked up a Citizen PD-22 on eBay at a very attractive price, but later realized why it was so attractive: the printer uses a proprietary RS232 cable, and replacements are hard to come by at any price, much less a reasonable one.

Mysterious Port

Aside from that hitch, the printer itself is great. I found a full list of the control codes on the manufacturer’s website, and got it to spit out some configuration information. It runs on 4 AA batteries, which fits the bill of "portable electricity" for our show. 

The printer also has an IrDA port, but after poking at it for a day and talking to a friend about it, I’m abandoning hopes of getting the Arduino to interface with it. I have a bunch of IR LEDs, but the IrDA protocol is apparently a big pain.

Poking around on DigiKey didn’t bring up any connectors which fit the bill, so at the suggestion of someone on the NYCR Microcontroller Study Group list I set about building my own by etching a tiny PCB with appropriately spaced traces.

A pair of calipers measured the traces at 0.8mm, so I came up with a board in Eagle, shown at left. It’s super simple, just 10 wires and 10 holes. I plan on using a Makerbot to make a nice little housing for the board, after I trim it down some. 

Note that the traces fan out at the end simply because I am not very good at soldering in small spaces, and i wanted plenty of room for error since I was using the toner transfer method of making the PCB. 

The board was actually a bit too thick, and while someone more patient might have ordered thinner copper-clad board, I am nothing if not impatient so I took it to the belt sander to remove a little bit of material from the back.

 After some trimming I got something which appears to work! I’ve located power and ground on the pins, but not much else. None of the other pins seem to be saying anything, which is surprising.

Still left to do is drilling out the holes for the wires and soldering them up. Then I’ll cut/file the excess board away and build a little housing for it on a Makerbot. I may decide to re-etch the board with slightly longer traces, right now there’s *just* enough room to clear the printer housing. That and one of the traces didn’t come out quite right (although it’s still serviceable as-is).

Admittedly, I did end up ordering an official cable for the princely sum of $35. I figure I can use it as a control, and to double check that I’ve figured out the pins. So far I haven’t located TX/RX. I would have expected RX to be floating, but my cheap RadioShack multimeter shows no signs of life on the other pins.


Hacking

New Project: Digital Knucklebuster

 I’ve been doing more craft shows recently, and if there’s one thing I really, really hate about them it’s dealing with a knucklebuster. For the uninitiated, a knucklebuster is the little manual credit card imprinter you use when you don’t have access to an electronic terminal. They use pfizer viagra cheap carbonless paper to make a physical imprint of the raised numbers on the card. They’re tedious to use and I hate them.

There are a number of products commercially available which use cell phone service to provide a modern mag-strip reader and processor. The problem with these is that they’re pretty expensive for someone who only does a handful of shows a year. The hardware costs around $1000 and there’s an associated monthly fee. Sometimes there’s even a gateway fee on top of that, so by the time you add in your credit card processor you’re looking at a 6-10% discount plus about $50 a month in fees. Gross.

The plan is to build a digital knucklebuster. Something which makes the credit card swiping process a little less painful. There are two main requirements: it must be battery powered as electricity is generally an expensive add-on at shows (if available at all) and it must not require cell phone or internet signal. I have a knack for doing shows in buildings with no reception. I’ll still have to take the receipts home and process them, but hopefully it will be less tedious.

The two main components to the project are a magstripe reader and a thermal receipt printer. I found the magstripe reader at allelectronics and a cheap battery powered thermal receipt printer on eBay. I plan to run the whole thing off an Arduino and put it in a nice looking enclosure. No one wants to run their credit card on something that looks like a hacker made it.

I’ve also picked up a numeric keypad and small LCD display for entering in the transaction amount and any other important information. I’m on the fence as to whether I want to program in my products / prices and have the line items on the credit card slip. If not, I’ll have to write one for my records.

I haven’t done much work with serial devices, but I’ve found a couple good posts which should help me figure things out.
Tom Taylor wrote an Arduino sketch which takes web data and prints it on a thermal printer. I found a great tutorial for reading a magstripe reader with a Sanguino, so I’ll either adapt the code for Arudino use or just use a Sanguino. I haven’t figured out if I need the extra beefiness of the Sanguino.

For duplicity, I plan on storing the credit card number on an SD card, as well as printing it in a QR code on my copy of the receipt (the one they sign). While I’m not super-stoked about the level of security here, I feel it’s comparable to how I’m doing things now: carrying around a pouch full of credit card slips, each with the information imprinted on it.

There are a couple problems this project doesn’t address, plain old credit card fraud being the first of them. Just like with a knucklebuster, we’re not running the cards at the time of sale, so it’s entirely possible someone’s card could be declined when we run it later. There’s also something the knucklebuster provides which I’m not sure if this will: proof the card was present. Visa/Mastercard accept a knucklebuster receipt as proof of the card being present. They also consider a swiped card proof (but not a keyed one), but I’m not sure if that’s due to some of the data collected, or some other mystical check performed on auth. While chargebacks at craft shows are rare, they do happen.

I’ve started working with the printer, but haven’t gotten very far, so I’ll save that for the next post.

DIY Aeroponics

Gardening at 1 Month

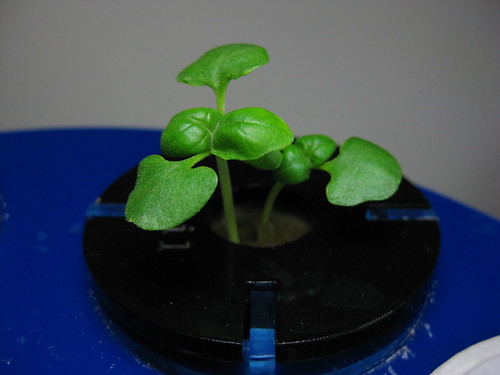
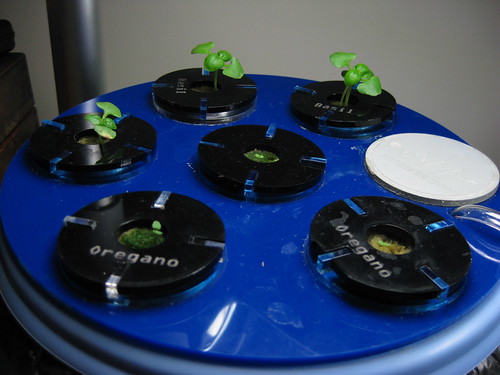
My home aeroponics project continues to grow. The basil is really taking off, the rest of it… hopefully it’ll get there?

IMG_0292

Setup #2, the one with the water pump and tubing, is way over watered. Everything is soggy, even cutting back the hours from before. I think it really wants more like 5 minutes every hour, not 10 hours a day. I could set up a relay with an Ardunio… but then there are all sorts of power supply and housing issues I don’t really feel like dealing with. So instead I think I’ll just get separate AC timer for the pump. Overall setup #2 is more expensive, more fiddly, and generally not doing well. Its only advantage over setup #1 is that it is substantially quieter.

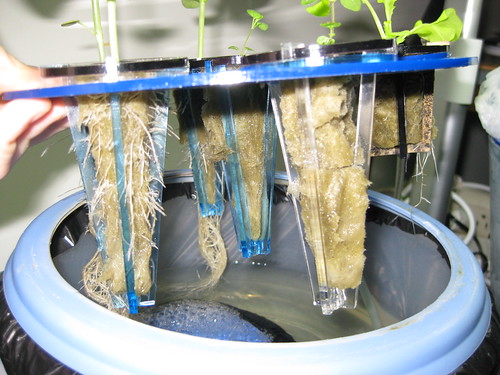
The most impressive thing about setup #1 is the root systems. They’re crazy:
Roots!

Notice the one short pod, a lettuce pod I swapped over to see if it would be happier in this setup. At this point I don’t think there’s any real need for the long pods at all. With the pump running all day you don’t really need the wicking action they provide, and at this point all the big plants have roots touching the water anyway (they don’t seem to mind).

Hacking

When Will eBook Readers Stop Sucking?

I’m starting to get interested in eBook readers, ones that use E Ink technology. I have a handful of books (technical books, not fiction) that I’d like to slog through to brush up on some rather boring topics, but reading them on a backlit screen is giving me headaches.

Amazon’s Kindle 2 has lost the delorian-inspired styling of its predecessor, but it does about a dozen things that I don’t want. First, the QWERTY keyboard takes up entirely too much real estate for something I don’t need. I already have a laptop, a netbook, and a smartphone, I don’t need to browse the web on my ebook reader. I also don’t need it to read to me, I don’t imagine that code samples read aloud are particularly useful. And I really don’t need Amazon’s DRM.

The Sony 505 looks a little more rational, with a better size-to-screen ratio, but at $300 it’s still more than I want to spend on a gadget which will be laughably obsolete in 6 months.

A seemingly unknown company makes the COOL-ER reader, which comes in a candy assortment of colors. Despite the stupid name, which is difficult to search for on many sites thanks to the dash, it seems to have a more reasonable take on eBook readers. It’s light, it doesn’t bother with a keyboard or wifi, it stole its styling directly from the iPod Mini, and it’s almost reasonably priced ($250). But reviews indicate that it has cheap construction and a painful UI, and it just doesn’t seem to stack up when the Sony 505 is only $50 more.

I’m waiting for the “perfect” ebook reader to come out, one without a ton of bells and whistles at a low price. It’s probably good there isn’t one right now since I already have a ton of gadgets and not a ton of extra cash to spend on things that fall farther towards “want” than “need.” So for the time being I’ll put the fun money I might have spent on an ebook reader towards a vacation with Chris this summer and wait for someone to come out with an ebook reader I actually want to purchase.

Programming

Android: Hello Circle

Note: This article is really old. It is here for posterity only. You should really find a more current tutorial.

I’ve been a little frustrated by the lack of Android tutorials. I got a Hello world going, and found that most of the few tutorials I could find were WAY more complicated than what I want to start with. GPS, map overlays, to-do lists, etc, which is great and all but I want to start simple and work up from that. So I set out to build “Hello Circle,” a program which drew a dot on the screen wherever you touched it. After about 12 hours of beating my head against Eclipse, the Android SDK, and the frequently incorrect Android documentation I got it working. So here’s a tutorial.

Setting up the environment I’m going to assume you already successfully completed the Hello World tutorial. Which means you’ve got yourself an IDE (probably Eclipse), the Android SDK, and the ADK (Android Development Kit) which is a plugin for Eclipse to help keep things in order. If  you haven’t done that yet follow these instructions and pray everything works as planned. I’ll see you in a few hours. Create a project just like you did for Hello World. Creating the ViewGroup In order for anything to display on the screen you need to create a view. In the Hello World tutorial you created a TextView. We’re going to use the XML setup for creating our view, and rather than creating a TextView we’re going to use a FrameLayout, which is acutlaly a view group. Open up /res/layout/main.xml and plop in this fine code (obliterating anything that may be there):


This, when it’s called in our code, will create a FrameLayout view with an id of “main view,” a width/height that fills the screen, and a neon green background. The hex color code for the background includes the alpha channel (the first to FFs). Setting the contentView to our XML Head over to your main class and call setContentView on your layout. Your code should look something vaguely like this:

import android.app.Activity;
import android.os.Bundle;

public class RoboTown extends Activity {
    /** Called when the activity is first created. */
    @Override
    public void onCreate(Bundle savedInstanceState) {
        super.onCreate(savedInstanceState);
        setContentView(R.layout.main);
}

If you run your code at this point you should get a big green background which does nothing. Hooray! Creating the Ball class Now we want to create a circle. Actually we want to create a lot of circles. So the first step is to create a new class called Ball. Right click on your project’s main class in the Package Explorer (on the left) and click New > Class. Give it the name Ball and click Finish. Our ball is actually going to be another view. What? Yeah. It’s a view. All of our Ball views will eventually go into our FrameLayout, but we’ll worry about that later. So first, modify your Ball class so that it extends View, since it’s a new type of View, and while you’re at it go ahead and import some of the things we’ll need for drawing:

import android.content.Context;
import android.graphics.Canvas;
import android.graphics.Paint;
import android.view.View;

public class Ball extends View {

}

In order to draw a ball we need a handful of things: a Canvas to draw them on, x and y coordinates to place the center of the ball, the radius, and Paint to give it color. So we’ll start by establishing those (I hid the imports for the sake of clarity, you should leave yours there):

public class Ball extends View {
    private final float x;
    private final float y;
    private final int r;
    private final Paint mPaint = new Paint(Paint.ANTI_ALIAS_FLAG);
}

In the last line we create a new Paint object, creatively called mPaint. A Paint contains information like colors, text sizes, etc, which affect the appearance of the drawing. So far we haven’t assigned any of those things to the Paint, we’ve just created it. Now we need to write the Ball constructor, which is the method to be called whenever we create a new ball:

    private final int r;
    private final Paint mPaint = new    Paint(Paint.ANTI_ALIAS_FLAG);

    public Ball(Context context, float x, float y, int r) {
        super(context);
        mPaint.setColor(0xFFFF0000);
        this.x = x;
        this.y = y;
        this.r = r;
    }
}

Our constructor takes a Context, x, y, and radius r. We pass these arguments in when we instantiate the object and assign them to the object properties. And lastly, the method which actually draws the circle, onDraw:

public Ball(Context context, float x, float y, int r) {
    super(context);
    mPaint.setColor(0xFFFF0000);
    this.x = x;
    this.y = y;
    this.r = r;
}

 @Override
protected void onDraw(Canvas canvas) {
    super.onDraw(canvas);
    canvas.drawCircle(x, y, r, mPaint);
}

Ok, our Ball class is done. Save it and head back over to the main class. Drawing a Ball on the screen At this point we haven’t actually drawn anything. We’ve just created Ball which we *could* draw if we so desired. In order to draw it on the screen we first have to get a hold of our FrameLayout. Since we created it via XML we’ll need to find it again using findViewById():

  setContentView(R.layout.main);

   FrameLayout main = (FrameLayout) findViewById(R.id.main_view);

Now we can use the addView method to attach a new Ball to our main view:

    FrameLayout main = (FrameLayout) findViewById(R.id.main_view);
    main.addView(new Ball(this,50,50,25));

Run your code now and, if all goes well, you’ll have a circle with a radius of 25 pixels in the upper left corner of the screen. Yay! Take some time to play around with Paint options, positioning, etc with the various methods outlined in the documentation. Now all we have to do is add a touch listener to react when the screen is touched. Which is thankfully pretty easy. We’re going to create a new touch listener and attach it to our main view all in one fell swoop:

main.addView(new Ball(this,50,50,25));

main.setOnTouchListener(new View.OnTouchListener() {
    public boolean onTouch(View v, MotionEvent e) {

    }
});

The onTouch() method is a callback function which will be hit whenever you touch the screen. Android will send it a View (v) and a MotionEvent (e). We already know what a view is, and a MotionEvent is an object containing information about the touch. All we care about are the X and Y coordinates, which are accessible via the getX() and getY() methods.

main.addView(new Ball(this,50,50,25));

main.setOnTouchListener(new View.OnTouchListener() {
    public boolean onTouch(View v, MotionEvent e) {
        float x = e.getX();
	float y = e.getY();
    }
});

The last thing we have to do before we can start drawing is to cast the view we were sent as a FrameLayout, so we can use the addView() method with it. Then we can instantiate a new Ball at the coordinates sent in the Motion Event:

main.addView(new Ball(this,50,50,25));

main.setOnTouchListener(new View.OnTouchListener() {
    public boolean onTouch(View v, MotionEvent e) {
        float x = e.getX();
	float y = e.getY();
        FrameLayout flView = (FrameLayout) v;
	flView.addView(new Ball(getParent(), x,y,25));
    }
});

The getParent() call sets the context for the Ball to the main Activity. I only vaguely understand why it has to be done this way. So now, the moment of truth! You should have all the code you need to run the app in your emulator or even on a real phone. Touching the screen will place a dot where you touched. Amazing! Hopefully you now have enough of an idea of how all this stuff plays together that you can forge your way to making something vaguely useful (which this isn’t).

DIY Aeroponics

Garden at Two Weeks

IMG_0248

It’s been two weeks since I planted my garden, and the basil is starting to have actual leaves!
The oregano is… well, it died. And so I planted more. It’s sprouted, and these sprouts look more lively than the previous ones. I strongly suspect that the culprit was over watering. Why do I suspect this?

IMG_0249Oh I don’t know, maybe it’s the algae that’s growing on a few of the pots. That’s right, algae. On top of my growing medium (rockwool). I’m gonna take that as a sure sign that the whole thing is just a bit too soggy. So I’ve moved the pump onto the same timer strip as the lights, meaning it will now be on for about 16 hours a day instead of 24. Hopefully this will give things enough time to dry out.

Three of the 5 lettuce pods have popped up, but they aren’t doing much, so I think they may be suffering from overwatering as well. We’ll see if a little less saturation helps them perk up.
IMG_0245

DIY Aeroponics

Garden #1 Hits Day 7

Garden #1 Day 7 My first garden, the airstone powered one, is now a week old! The basil seems to be pretty happy, all three pods sprouted (and 5 of the 6 seeds came up). I’ll thin them to one plant per pod once they get a little taller.

The oregano on the other hand is not happy. I think things are too soggy. The bottom of the rockwool is touching the water, and I think that plus the airstone is just saturating things too much. I turned the pump off for the day, and man that thing is noisy.

Garden #2 hasn’t sprouted yet, but it’s only been a few days. I figured out that a lot of the dripping water sound was coming from a loose connection to one of the spray heads, and now that it’s fixed garden #2 is actually pretty quiet. Especially compared to the air setup. I still don’t like how tall the whole thing has to be though, it looks a little silly.

The light I ordered came in on Monday. After looking around at DIY options I decided it would cost me about the same to build a much uglier adjustable height lamp, so I got this one off Amazon for $25 (free shipping!). It takes standard bulbs, unlike the other grow lights I could find, and isn’t hideously unattractive. The side flaps are a little under engineered, I had to stick something in the hinge to get them to stay up.

It casts a nice unappealing blueish tint, which is supposedly what plants like for promoting vegetable growth. I like the lamp enough that I ordered a second one for garden #2.

New Lamp

DIY Aeroponics

Sowing Garden #2

Today I sowed the seeds in garden #2, which is the first one I started on. It uses an aquarium water pump, 1/2″ tubing, and spray nozzels.

I’m not really happy with it. I managed to order the wrong spray nozzels (again), and the ones I got spray a fine mist, but straight out instead of in a 360 degree circle. This would be great if I had a big outdoor garden, but doesn’t really work for my little planter. I also don’t like how tall the whole thing has to be for the plants to clear the spray nozzles, since the tubing sits about an inch taller than the pump, which itself is an inch and a half tall. And it’s noisy. You can hear the sound of trickling water when it’s on, although I’m hoping that will be resolved by eventually getting the correct nozzles.

Garden #2

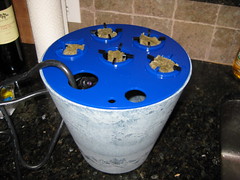
I also realized I had a design flaw. The power cord, which is supposed to go through the small hole in the front, won’t fit. Because unlike airline tubing, which can be detached and reattached easily, the water pump power cord doesn’t come off. So it has to go through a hole big enough for the 3 prong plug to fit in. Unfortunately the only hole big enough was one of the plant holes, so until I order more acrylic to cut a new top it’s just a 5 plant unit.

Overall I’m feeling a little cranky about this planter. I think this design would be well suited for something larger. Home Depot had some fun looking 12″ diameter plastic planters, and if I had anything resembling a basement I’d build something nice and big and grow tomatos in it. But I don’t, and this design just isn’t working so great on a smaller scale.
Garden #2
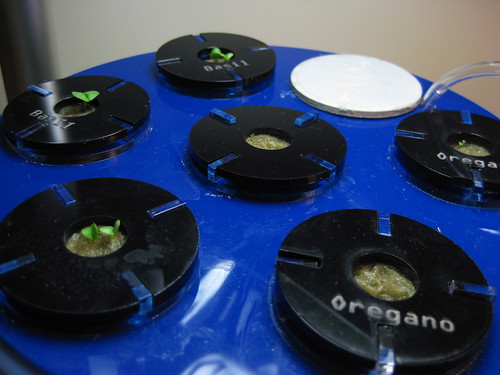
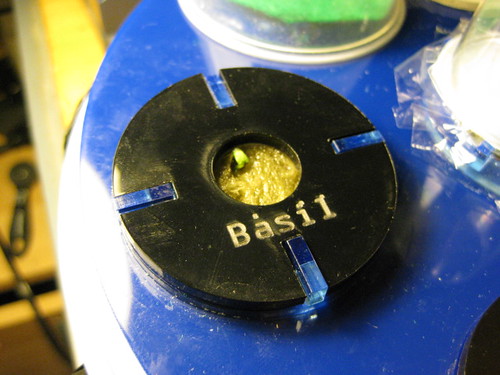
On the plus side I cut black caps to replace the felt ones I was using before and etched the plant names into them. And they look pretty sweet. They give the whole thing a sweet sci-fi look. I stuffed a plastic bag into the open holes (one for adding water, one which is the failed power cord hole, and one which is a plant hole with a power cord sticking out). It’s very technical.

It’ll probably be a week or two before I get more acrylic in, so this one will have do until then. I’m holding off on ordering different spray heads until I get a better feel for exactly what I need, because it’s annoying to spend more on shipping then you do the actual item.

Over at planter #1, things are starting to grow. One very eager basil seed is starting to sprout, and another one looks like it may come up tomorrow. The oregano is still in hiding, probably won’t see that until next week.
A sprout is sprouting!

DIY Aeroponics

First Planting!

I’m still waiting for some parts to come in for the garden I was working on in my last post. But in my research I found another, much simpler way to set up an aeroponic garden. Since I already had most of the necessary parts, I decided to try it out.

caps!

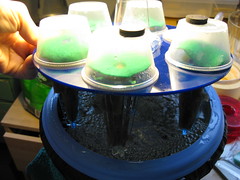
Rather than use a water pump and sprayers to mist water around, this setup uses an air pump (outside the water chamber) and an airstone in shallow water. Airstones and pumps can be found at any aquarium store.  I got a $10 pump (anything suitable for 10 gallons will be fine) and I had this airstone lying around. They’re about $5 new.

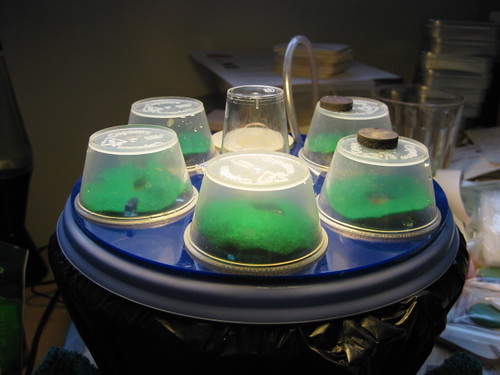
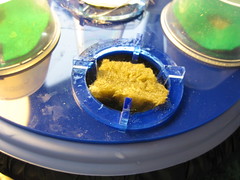
Lid out I’m using a tupperware container for a vessel, with a laser cut top and seed pods. I wish I hadn’t been totally sleep deprived and forgotten to photograph them, the seed pods are pretty neat. They’re made from 3 pieces of acrylic plastic, held together by gravity, and hold a plug of rockwool nicely. I’ll need to make some for the water pump version of the garden, and will be sure to get a good shot then. You can sort of see the bottoms of them, hanging from the blue top. Plans for the top and seed pods are both up on Thingiverse.

A quick note about working with rockwoool – it’s kind of like fiberglass, so you need to wear a mask when you’re working with it dry. Depending on how sensitive your skin is you may also want to wear latex gloves. It needs to be soaked for 24 hours before use, for pH reasons I only vaguely understand. I did not soak mine, because I did not read that until after I had already painstakingly embedded seeds into the plugs. By the way, oregano seeds are very hard to pick up one at a time with tweezers.

Rockwool soakingHere’s a shot of a seed pod, it rests in the hole in the top. Each seed pod needs some sort of opaque collar to keep excess light from getting into the root chamber. I used felt because it’s easy to cut and I had some on hand, but I plan on making acrylic plastic collars for them with the name of the herb engraved. The collars stay on even after the plant has sprouted. The plastic domes on the other hand are temporary, and just there to keep all the water from escaping before the seeds germinate. Once things pop up I’ll take them off.

The total cost for this setup, not including lighting, was about $30, although if you don’t have access to a laser cutter it would be a little more to have them cut by a service like Ponoko. You could also just buy the AeroGarden seed kits, which are about $20 and include 6 plastic pods, and use your tupperware container’s original lid by just drilling a bunch of holes in it. But I have a laser cutter, so I wanted to get fancy.

We’ll see in a few things whether this thing actually grows anything. I’m slightly dubious. It’s also hella ugly. Partly because of the little domes (which will hopefully be off in a few days)  and partly because of the black plastic bag I’m using to keep light out of my otherwise clear tupperware bin. I’m debating between making a nice fabric enclosure for it and just grabbing a can of rustoleum and spraying the outside. Maybe I’ll do both.