New Construction Townhome, Organization

Toddler Closet Organization

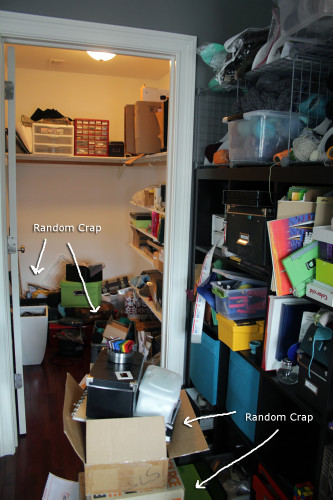
It’s my favorite time of year… time for the Container Store elfa sale. This year the closet in my daughter’s room got a makeover. Her closet consisted of hanging organizers from Ikea which were the source of much cursing due  to their poor design and awkward center of balance. I have been planning this closet for months waiting for a sale. The day before the sale started I sprung into action, preparing the closet for Operation Shelving 2.0

The closet suffered many of the maladies that my office closet did, namely shelving that was glued to the walls. Thankfully this time there was a little less glue so I was able to get away with just one day of sanding/spackling. I also was a little less picky about them this time around.

2014-08-26 11.12.55
Walls patched and awaiting paint

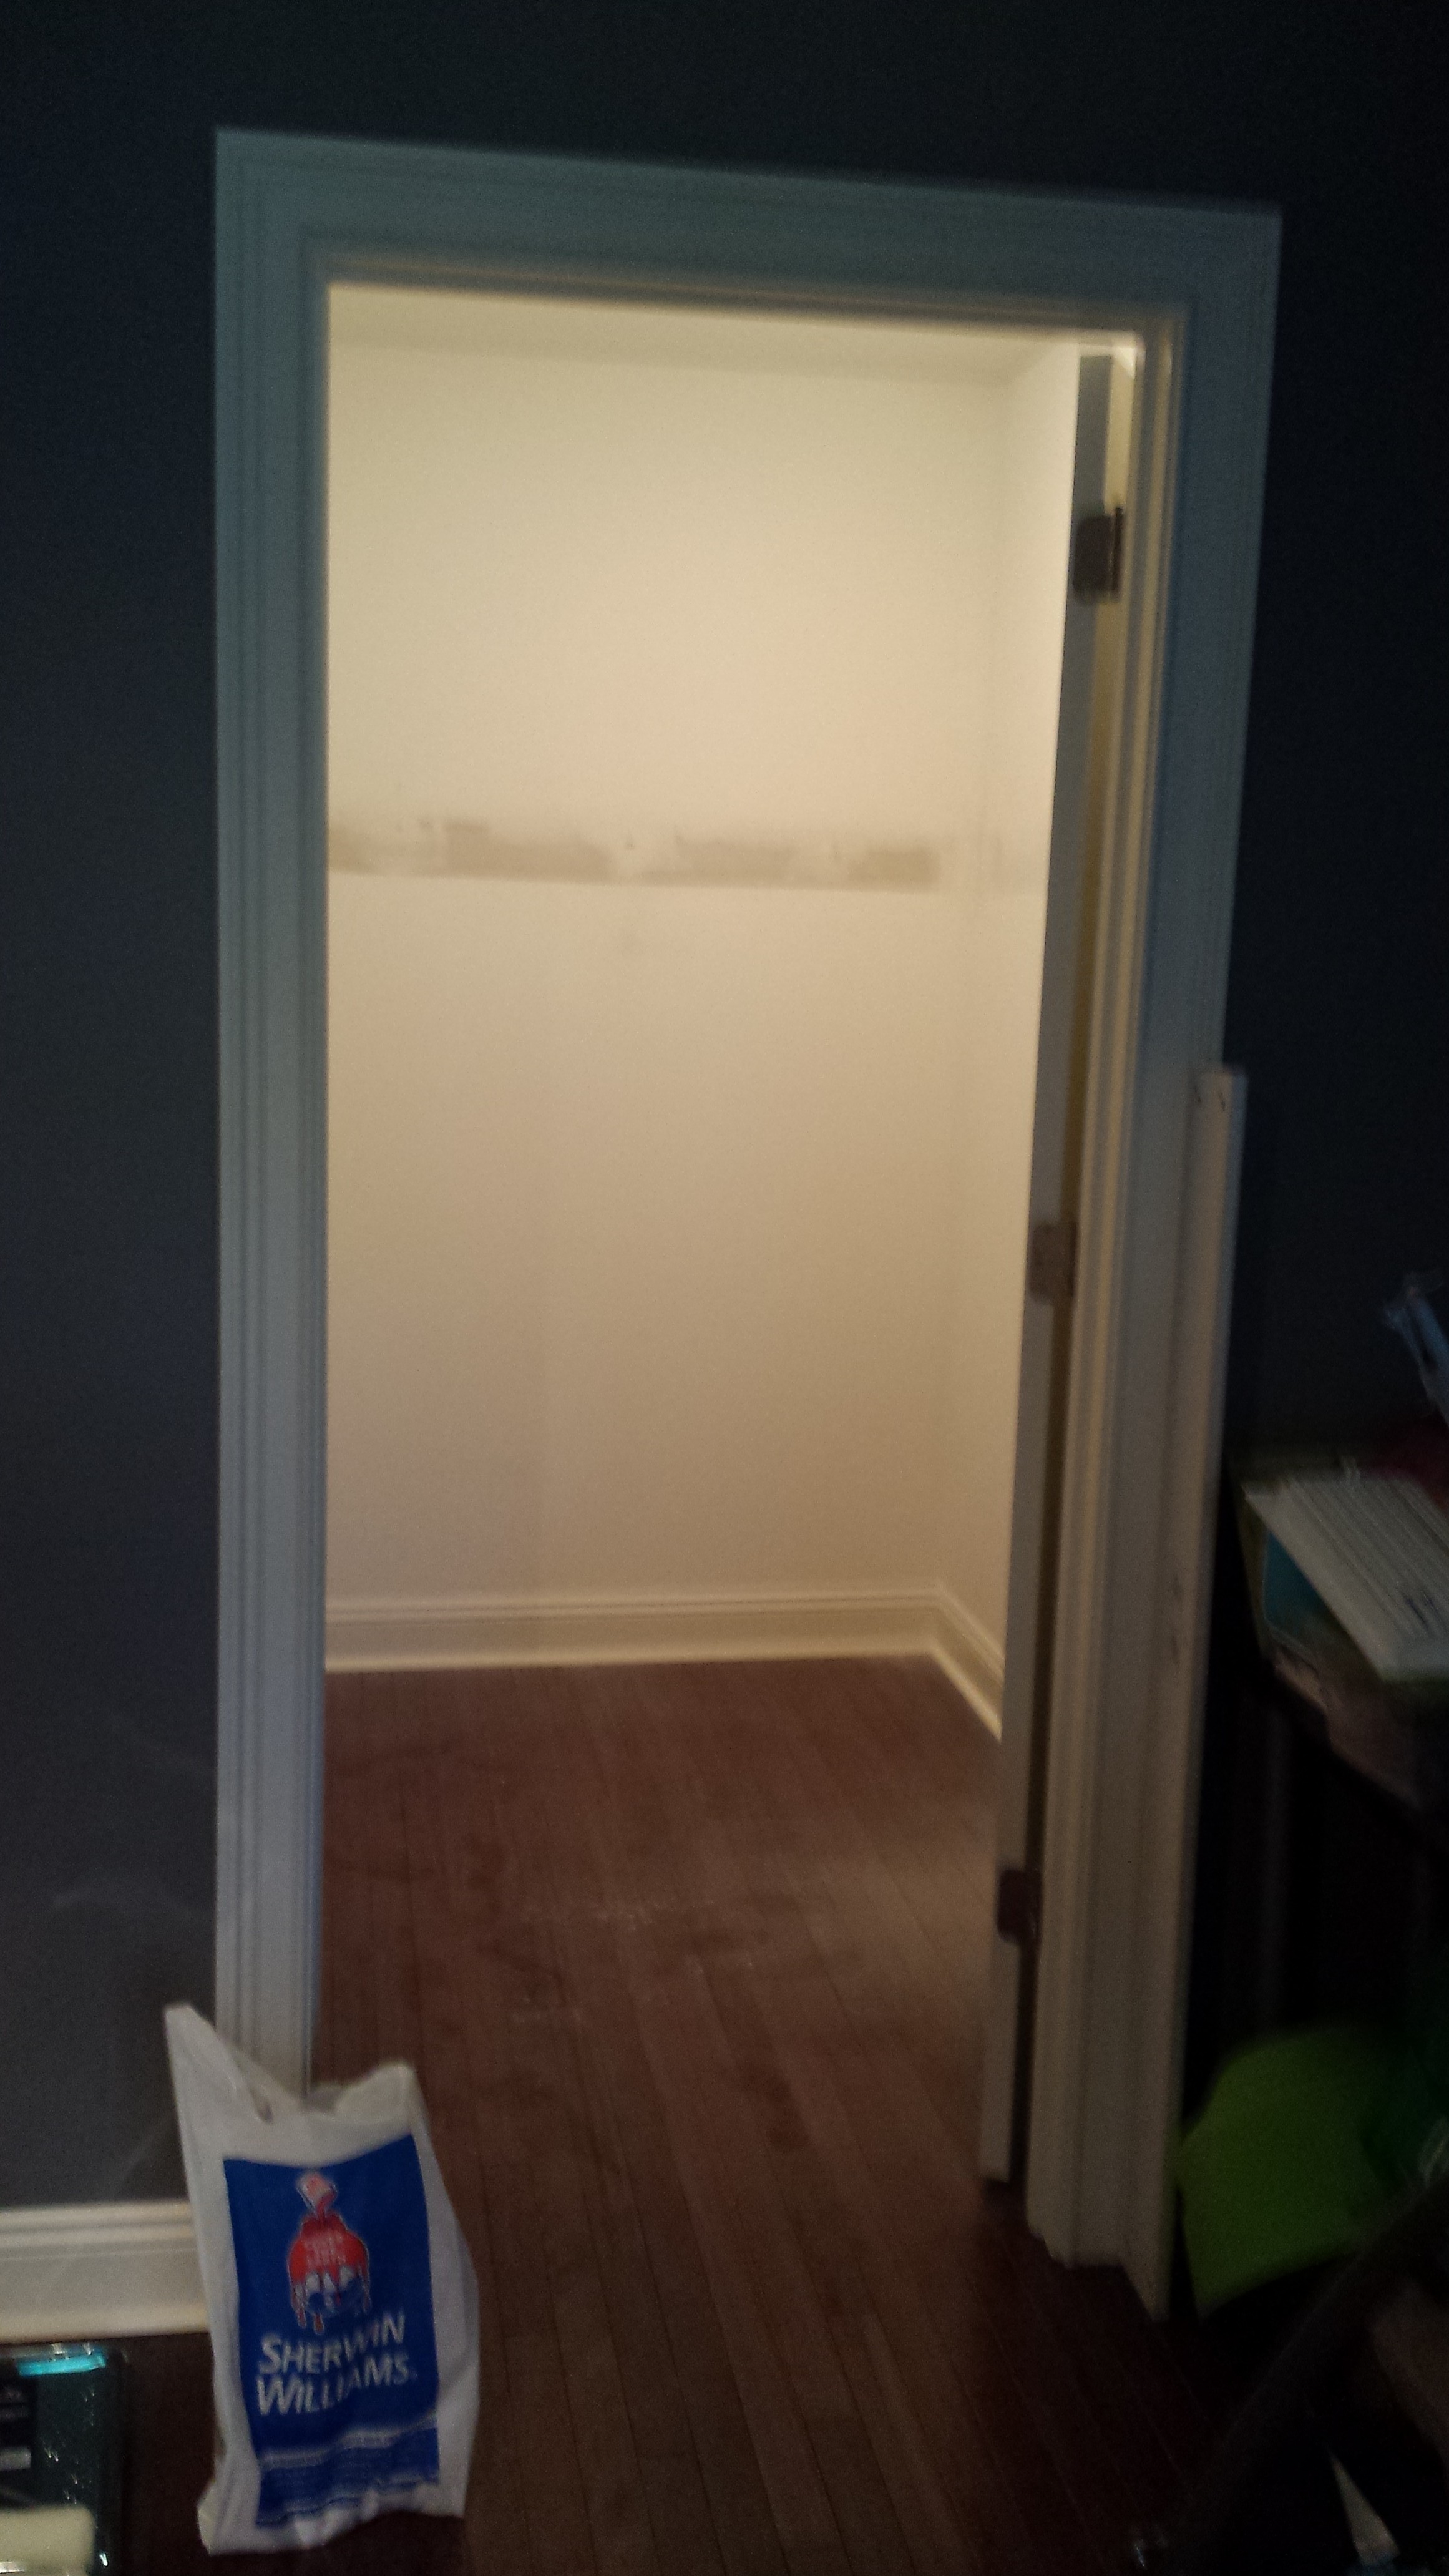
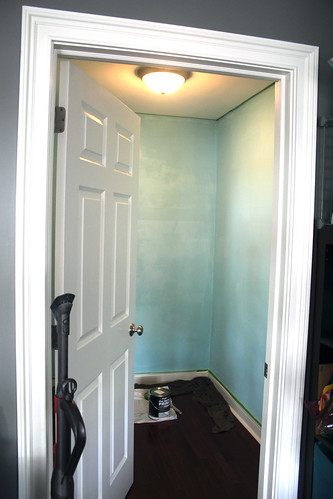
It was at this point that my daughter looked into her empty closet and said “you broke my room. Fix it.” This time I opted to just paint over the patches rather than redo the whole room. Unfortunately I managed to pick the wrong shade of white from our pile of leftover paint. I decided I didn’t care and just left it. If you notice it, you can kindly keep your mouth shut.

IMG_1730
Walls painted. You almost can’t tell I used the wrong white!

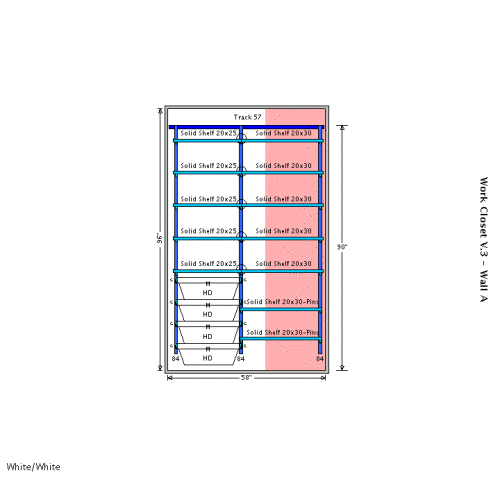
I love the way the elfa system is organized. The whole thing comes in these nice organized bags. The little one has all the mounting hardware, the big one has various smaller elements for the closet and a separate side pocket containing customized instructions for installing the whole thing.

It's like Christmas for closets
It’s like Christmas for closets

Feeling like an elfa pro after doing my office closet, I happily set to work on the toddler closet. Unfortunately I got a little too confident, and did not measure the height for the top tracks correctly. As a result the hanging standards (vertical bits) overlapped my baseboard molding by about half an inch. Tragedy. I spent a couple hours cursing myself, wringing my hands, and contemplating my two options: rip out the top track (drywall studs and all) and reinstall it higher up, or cut an inch off the bottom of the vertical standards. Since I lack the tools to cut them myself option 2 required a trip out to the suburbs to have them cut. Both options sort of sucked.

After a quick phone call to The Container Store I went with option 2. Thank you to the staff at the Container Store in King of Prussia, who cut the standards for free (despite it being my mistake) and had me in and out of the store in about 10 minutes. I managed to get the standards installed just in time for toddler bedtime.

IMG_1733

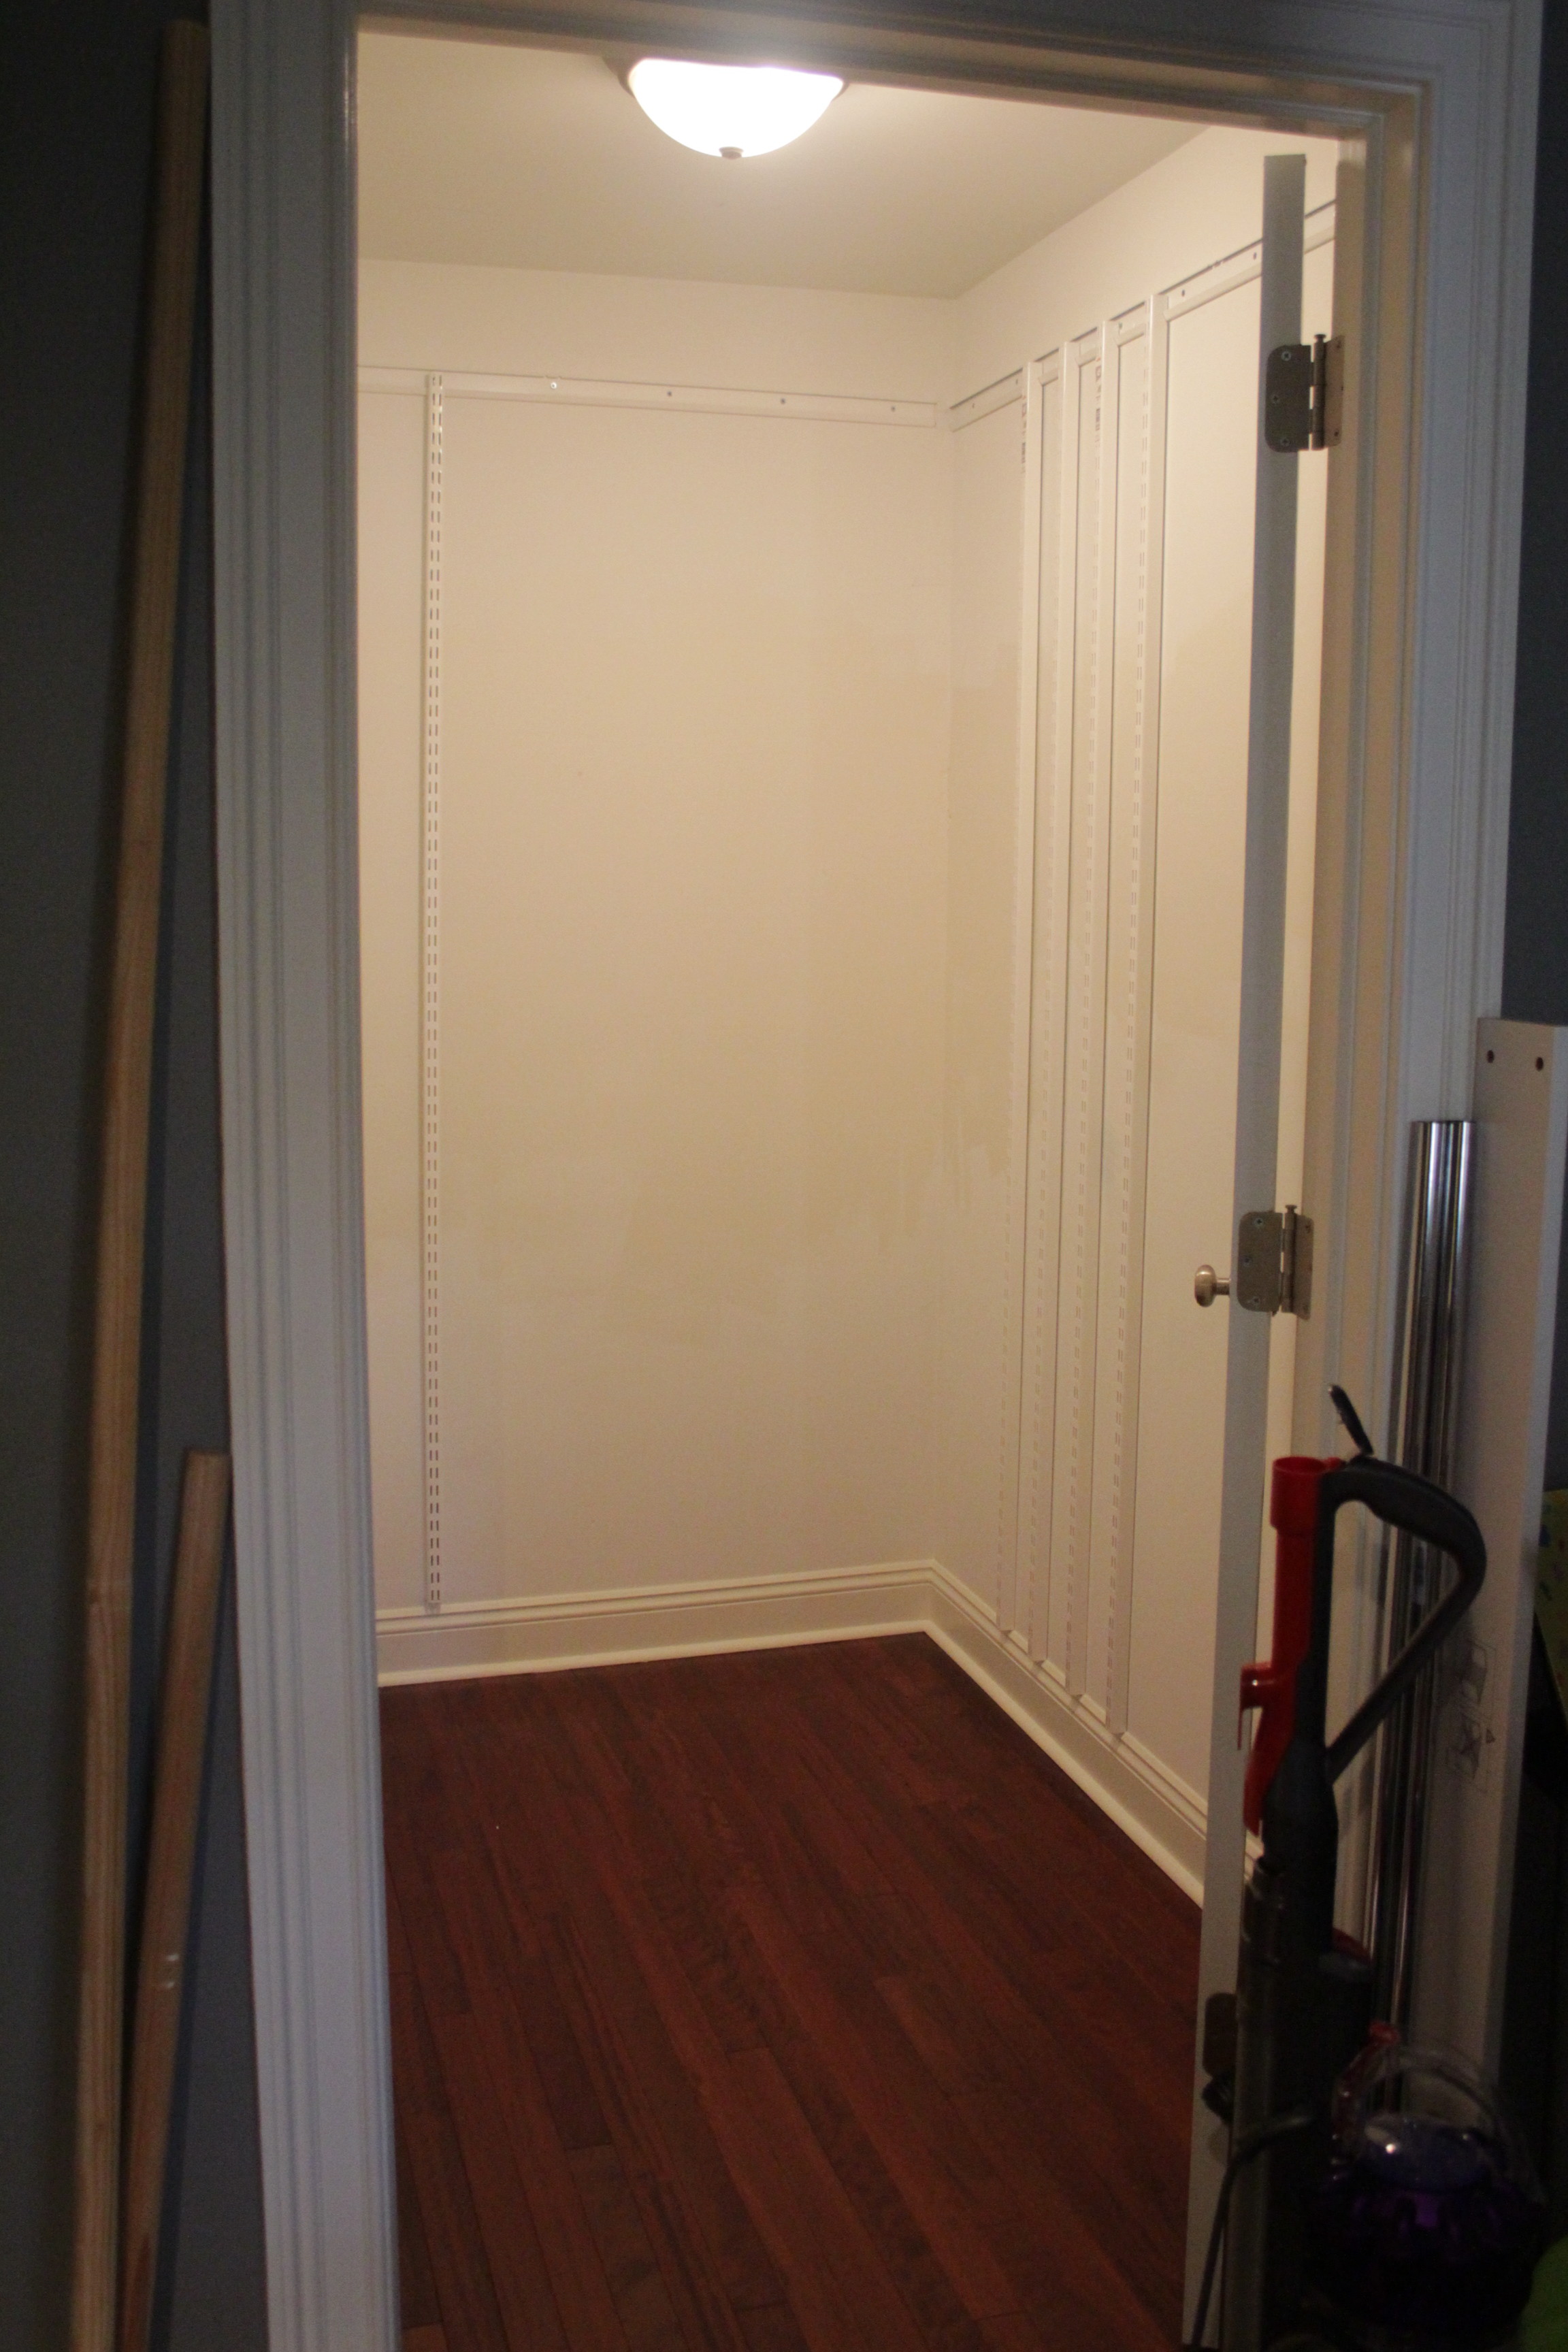
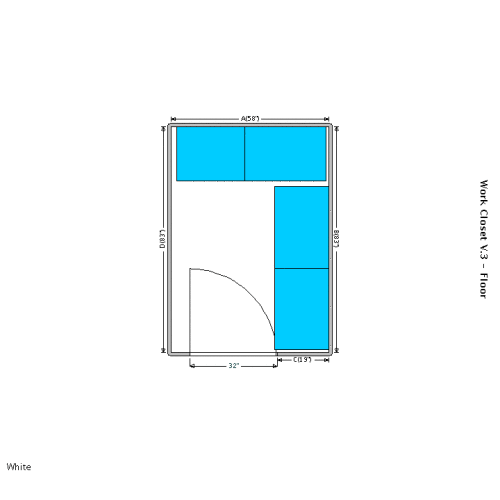
Day 3 of Operation Closet was spent putting up the shelving and deciding on the spacing I wanted. For this closet I splurged on some of the “nice to have” finishing touches like bracket covers and shelf fascia. Stuff that’s not functional but makes the closet look nice. I didn’t bother with those for my own closet, but they do make things look cleaner and nicer.

As I put everything back in the closet I started culling stuff that was too small. I am a bit ashamed to admit that some of the stuff hanging up had been in the 9-12 month sizes (she’s two and a half now). When all was said and done she had about half as many hanging clothes and an entire additional storage bin full of too small stuff.

So now the toddler’s room is “fixed” and I can now easily find socks that fit her. So ends another fruitful elfa sale. Look out, master bedroom closet. You’re next.

New Construction Townhome, Organization

It turns out you can wash pillows

I was browsing Pinterest for work (yes that is an actual thing) and saw a pin on how to whiten your pillows. It links to a “magic whitening formula,” most of which is probably just OH MY GOD DID EVERYONE ELSE KNOW PILLOWS WERE WASHABLE?

Somewhat skeptical, I went to the Closet of Old Gross Pillows (aka the guest closet) and read the tags. Lo and behold, they all say they’re machine washable. By George, I’ll try it!

Since I have a high efficiency front loader, the recipe in the article won’t work for me. But with a little improvising I came up with something that worked really well.

  • 1 tbsp powdered laundry detergent
  • 1 tbsp borax
  • 1 tbsp dish detergent
  • bleach to the “max” line in my machine’s bleach dispenser

For the love of god, defer to the instructions on your machine if you decide to try this. I use a very low-suds detergent, and did not have any issues in my machine, but please use common sense and err on the side of caution.

My machine has a pretty good soak setting, but for the grosser pillows I stopped it during the rinse cycle and ran them through again. Then I chucked them in the dryer. Martha says to make some felted dryer balls to fluff them up, but aint nobody got time for that. They dried just fine on their own.

So how’d they come out?

When I pulled them out of the dryer I thought “meh, they still look kinda dingy.” And then I set them down next to the ones that hadn’t been washed yet.

Whiten old pillows

Prior to washing, the left and right pillows were the same color. Gross!

I think most of the credit goes to simply washing the pillows, rather than the “magic” whitening solution, but I’m happy either way.

New Construction Townhome, Organization

Putting it all back

The shelving is up (pictures forthcoming), and I’m now replacing the contents of the closet. For the most part it was easy; the huge pile of stuff has dwindled to just a few errant boxes of flotsam and jetsam. But this last little bit is taking forever. Almost like zeno’s paradox, each box I sort through seems to take twice as long as the last.

Behold: boxes of junk. Junk I suddenly desperately need.

Some of these boxes haven’t been touched since I moved in. After the exhaustion of moving, I punted on the boxes labeled “random crap” and shoved them in the closet “for later.” More than a year after moving, it is taking all of my willpower not to do the same now. In fact, I’m pretty sure there’s one box that hasn’t been touched since I moved out of my apartment in Brooklyn, long before RD and I got married.

Going through each box is exhausting. Each one contains various relics I’ve completely forgotten about until the moment I open it; at which point I can’t imagine parting with. Some things are easy: old bank statements can safely be shredded and discarded now that the information is available online. Others are tougher: college artwork  (some good, some not so good), trinkets given to me by good friends, and various objects that might be useful someday.

Triage on this stuff takes a lot out of me. I part with a lot of small items, rationalizing with myself that although this pin / pencil / whatever meant a lot to me at age 15, it’s just a piece of plastic crap now. The friendship it symbolizes is the enduring thing I should keep. As a result, I’m unable to part with the items from friends I’ve lost touch with. It goes in a bankers box marked “memorabilia,” full of old papers and photos that I plan to scan into the computer “someday.”

Some of it is neat, and doesn’t take up much room, but I’ve got no idea where to put it. Included in this are MRI photos of my brain and neck; the former from a medical study I participated when I was unemployed, the latter from a neck injury sustained while washing my hair. During the brain scan, the MRI tech complimented me on how still I held my head, and asked if I would be willing to participate in other studies. I got my head scanned a bunch that year.

I’ve whittled it down to two bags full of papers “to be filed,” a stack of papers I’ve already sorted but have no idea where to file, and one 8 x 10 box of “random crap” still to contend with. With each trash bag I fear I’m throwing out something I desperately need. Something I’ll curse myself looking for down the line. But given how long I’ve managed to live without while it languished in a box, I suppose that’s pretty unlikely.


New Construction Townhome, Organization

Closet Saga, now with primer!

I’ve got the first coat of primer on the closet wall. It’s tinted to match the paint. I’ll let it dry for the rest of the afternoon, and possibly overnight since I have plans this evening.

Primed Closet

So, before I ripped out huge chunks of drywall from my closet, I did a lot of planning. Ultimately I would like all the things to fit inside my closet, so I can get rid of the huge Ikea bookcase in here. And for that to happen I needed serious shelving. Floor to ceiling, fit-to-my-belongings shelving.

Dear god why do I own all this?

The Container Store’s Elfa is the gold standard in modular shelving, and it’s gotten a lot better looking over the years. Elfa is a standards and brackets system with a mind boggling array of shelves accessories. It’s well made and has stayed fairly consistent over the years – the cart I got freshman year of college is still compatible with what they’re selling now.

The downside of Elfa is the price. Most of the kits on the Container Store website are north of $1000. Ikea, Rubbermaid, and ClosetMaid all offer similar systems. So I sat down and priced them all out (except ClosetMaid which had mostly negative reviews).

Top view of my closet, sort of to scale

I knew I wanted shelves along the back and side wall. Because the door swings in, I decided to leave that wall empty save for maybe a few coat hooks. I tried to price out designs that were as close to identical as possible, so I went for 5 rows of shelving all the way around in an L shape.

Elfa was by far the easiest, because they offer free design planning. I called them up and spent about 20 minutes going over my options with their rep. You can see the designs online as you’re working on them, and when you’re done you get a full parts list and instructions. You can also buy the whole kit with one click. Total quoted price: $950. Ouch.

The option I liked most from The Container store, with white melamine shelves.

With Elfa as the high water mark I moved on to Rubbermaid HomeFree. Rubbermaid provides an online design planner, but I found it irritating to use and ended up just doing it by hand. The HomeFree system features parts that overlap to fit your space, rather than having to get them cut to size. Unfortunately the shelves are only available in 12″ deep, which is shallower than what I need for my stuff. It came in the cheapest at $475, but ultimately wasn’t the solution I needed.

Next I priced out Rubbermaid FastTrack. FastTrack is a much more industrial looking solution, with all wire shelves. You can cut the shelving yourself with a bolt cutter, or have it cut for you in the store. A layout very similar to the Elfa layout (but with wire shelves) came out to $650.

From there I went back to look at the Elfa configuration. I really like how extensible it is. I’m not entirely sure what my storage needs are, so the rep helped me design my system so that it would be easy to add drawers later if I decided I needed them. Most of the individual components seemed about the same price as Rubbermaid’s, why was it so much more expensive? I pulled up the parts list and compared.

It turns out, the Elfa shelves include a lot of “vanity” parts to help things look nicer. Bracket covers, rail covers, etc. Things that help class up the setup but aren’t needed for structural integrity. By dumping all those parts I got the price down to about $800. With a 25% coupon I found online, it came down to $600.

It’s still a lot of money to spend on a closet. I’d love to get the drawers now, but at $65 each for the drawer, gliders, and brackets it’ll have to wait. In the mean time, some extra shelves will go into the ‘someday’ spot for the drawers.

imageContent

In all honesty, even if I’d paid full price for the Elfa, the design service makes it worth the extra $150. I’ve spent the better part of a week planning, pricing, and trying to negotiate the various shelving systems. The phone call with the Elfa designer was so painless I’d do it again in a heartbeat. Of course, we’ll see if I’m still singing their praises after I install the damned stuff.


New Construction Townhome, Organization

Coming Clean

Commenter Tim asked how I keep the house so clean, especially in light of having a baby.

I’ll tell you: I cheat. I almost always do a quick pick-up of a room before taking a photo, and usually only even think to do a house-related post when the house is in a semi-presentable state. In my most recent weekend-update, I’d just vacuumed the room because installing the window blinds left a fine layer of dust and metal shavings everywhere.

Here’s a more honest picture of our media room, where the baby spends most of her time:

I’m proud of the fact that it’s still not too terrible, and our overall level of house cleanliness is decent. Keeping the house in order takes a lot of work, but is crucial to keeping our overall stress level down.

I’m a slob by nature, and RD has worked very hard to try and break me of some terrible habits. This includes:

  • Have a place for everything, and don’t buy anything you don’t know where you’ll put it. I’m a sucker for kitchen gadgets, an affinity RD does not understand, but I’m allowed to buy whatever stupid kitchen items I want provided I can find a place to put them away.
  • Open sink policy – meaning no dirty dishes are left in the sink ever for any reason. Every now and then I backslide on this, but it works pretty well. Dirty dishes are washed immediately and set on the drying rack. We do have a dishwasher but we only use it when we have company over or I want to sterilize the baby bottles.
  • Daily chores. Cleaning a little each day is SO much easier than letting things pile up and then having to set aside an entire afternoon to dig out your living room floor. I had a page-a-day cleaning calendar at the old place, and need to update it for the new place.

The last secret is that I have help. RD’s aunt comes for a few hours each day so I can work (I do freelance WordPress development), but the truth is about half that time gets spent on household chores. I can get some done while Bitmap naps, but having someone occupy her for a couple hours so I can take care of things is amazing. When people ask if I miss living in New York, I think about all the extra help I get by living near so many family members and the answer is unequivocally no. I might miss a few aspects of it, particularly my friends, but I am so very glad we moved down here when I got pregnant. My own parents didn’t get their first night out sans-baby until I was 5 months old. Bitmap is 3 months now and I’ve lost count of the number of dates we’ve had thanks to my in-laws. Family FTW.


Gardening

Peas!

I almost didn’t see them, but this morning I noticed there are two peas hanging from my dwarf sugar pea plant in the windowfarm. Soon I’ll have delicious peas to eat!

First Peas

I’ve made a little headway on my yellowing leaves issue, with the help of my giant hydroponics textbook. It may actually be a nutrient deficiency, specifically nitrogen. I’ve been running a rather dilute nutrient solution because so many of my plants were young, but the peas took off quickly and I think they needed more sooner than I gave it to them. The nice thing about having totally separate reservoirs for each column is that I can give the sugar peas a different mix than what I’m putting on my herbs, though they’re starting to look like mature plants now too.

Gardening

Building a Better Reservoir

I noticed one of my windowfarm columns was going through a lot more water than the others, and realized that it had a slow leak. I’ve been using Deer Park 1.5 liter water bottles, upside down with a hose mounted in the cap, but the plastic is so thin that every time I touch them they get more deformed and “crunched” looking. So today I set out to build a better reservoir.

I used 1 liter soda bottles, which are considerably thicker plastic than the Deer Park bottles and will hopefully stand up a little longer. They’re also shorter, so they fit into the orchid pot (essential for keeping leaks off my floor) much better. I’ve had a few questions about how everything is set up, so here’s a more detailed build.

IMG_6057

Drill a hole in the bottle cap slightly smaller than the outer diameter of your water-line tubing”

IMG_6059
IMG_6060

Push the end of the tubing through and secure with a barb (I cut mine from a t-joint connector I wasn’t using).

IMG_6061

Drill two holes in the bottom of the bottle: one the same size as the cap hole, to serve as the water return, and a smaller one to allow air in/out of the bottle. Without the smaller hole, water won’t be able to flow into the bottle due to the air pressure build-up.

To make it easier to connect / disconnect the water return lines, I made a coupling using a short piece of flexible tubing (pushed through the hole in the bottle) and some smaller diameter rigid tubing (from the aquarium store). To connect the water return line, I just slide it over the piece of rigid tubing.

IMG_6063

I’ve tried to get a good photograph of the set-up in action that explains the placement of the reservoirs and t-joints, but I think a diagram would be better. I’ve got 3 1L soda bottle reservoirs, one aquarium pump (Tetra Whisper 40), a 4-way gang valve, and each reservoir is connected to a T-joint via 5′ of 1/4″ diameter flexible tubing. The lift tube for each column is 5 feet of black landscaping tubing, which claims to be 1/4″ but is considerably thicker than the water supply tubing. The water return line is the same clear 1/4″ tubing I used for the water supply. The whole setup is contained in a tall orchid pot I got from Target. A Rubbermaid bin would work just as well, but the orchid pot looks better.

Black vs clear tubing is a personal preference thing. The clear is considerably easier to debug, but you need to be fairly vigilant about cleaning it or you’ll get algae build-up.

For the sake of my crude illustration skills, I’ve only drawn one reservoir and left out the gang valve.

So far nothing is leaking, but we’ll see how things look in the morning. If nothing else, the water tubes have gotten a thorough cleaning over the last two days.


Gardening

Windowfarm Update

I haven’t had a lot of time to dedicate to the windowfarm, between finishing up work projects and getting ready for the baby’s imminent arrival. But I did manage to do some basic upkeep today, and take a few photos.

Three Columns
As you can see, I need to clean the windows

I added a third column, using the same design as column #2. I vastly prefer it to the water bottle columns, as it’s easy to lift up the net cups (yogurt containers) and clean the cups if need be. It also makes it easy to move plants between columns.

Thyme
Tiny Thyme Plants

So far in column number 3 I have thyme, lettuce, basil, and some cherry tomatoes. The cherry tomatoes were started earlier this week, so they’re just tiny seedlings right now.

One of my reservoir bottles needed to be replaced, it was crunchy and sad looking, so I took the opportunity to disassemble the reservoirs and give them and the water lines a good cleaning. I refilled the system with plain water (no nutrients) to give everything a good flushing out, just for good measure.

Lettuce
Droopy, sad lettuce

The pump system is still working well. Occasionally air backflows into the reservoirs, but the problem is self-correcting. After a few noisy minutes the water in the lift tube drains and then everything starts working smoothly again.

The lettuce isn’t doing very well, but I’m actually surprised it germinated at all. The seeds were really old, and I didn’t have very high expectations. It’s growing, but the leaves are kind of rubbery rather than crisp and lettuce-like.

Parsley and basil are both doing well, though the basil isn’t growing as quickly as it did when I tried the aeroponic / deep water culture system a few years ago. I’m not sure if that means it wants more water, more nutrients, more light, or it’s just because I’m using a different strain of basil this time. Next time I do this, I’ll be sure to be a little more scientific about things.

Parsley, with the black lift tube visible

By far the most prolific grower is the dwarf sugar peas. They’ve climbed up the window and are now taller than the top of the windowfarm column. Unfortunately one of the plants is still experiencing yellowing leaves, and I think another one (on a different column) is starting to go the same route. I got some really good suggestions and information for debugging things (thanks!) but unfortunately haven’t had the time to really sit down with it and figure out what’s going on.

Peas
Dwarf Sugar Peas are taking over my window

I’m not really sure at which point I should switch from “vegetation” nutrients to “flowering” nutrients. So far the peas seem quite content to climb up the window. How do you know when your plants are ready to start flowering?

Obviously there’s a lot of variables to consider, and when I set up column #4 I’ll be better about tracking them all. In the mean time I think it’s going pretty well for a somewhat haphazard project, and I’m happy with it.

Basil
Little basil plants


Gardening

Mysterious Sick Plant

IMG_6042
Thriving bean plants

Things are generally going well for my windowfarm. The herbs are starting to look like real plants, and the dwarf sugar peas are going nuts taking over the window. Unfortuantely, one plant isn’t doing so well and I haven’t yet figured out why.

Sick wiltling leaves

The lower leaves have turned yellow and withered. At first I thought it was simply because they were stuck under the felt and not getting enough light, but now the outer edges of some of the other leaves are joining them.

Cursory research suggests that the plant may not be getting enough water, but if that were the case I would expect other plants in the system to have problems too since they’re all on the same watering schedule. The roots of the sick plant look healthy and have access to plenty of oxygen.

I did notice some suspicious build-up on the clay pellets near the sick plant. It’s possible that some sort of bacterial or fungal infection has managed to get a hold of the plant. If I can find a local source for food-grade hydrogen peroxide I may try flushing the system with a dilute solution of it. In retrospect, I should have sterilized my seeds before placing them in the root plugs for germination. Sterilizing the root plugs in the pressure cooker would have been smart as well.

IMG_6045
Is the white crusty stuff simply dried nutrient build-up, or something more sinister?

I’m also trying to decide if it makes more sense to simply remove the troubled pot from the system to prevent the others from becoming contaminated. To do so would mean losing those two plants but I’d rather lose two than the whole column.

Gardening

Adding a second column to my windowfarm

Yesterday my windowfarm got a second column of plants. Once I understood the basic mechanics of how a windowfarm works, I set out to make column #2 more attractive. Honestly, I’m not sure I succeeded. The second column looks different though, that much is true.

2column
Perhaps one of these days I'll learn to photograph this better.

Instead of plastic water bottles I used white plastic cups, and instead of string I used ribbon to hang it. Unfortunately the plastic cups are too wide to work well with the 3″ net cups I have. Conveniently, Chobani greek yogurt cups fit almost perfectly. More conveniently, I eat a fair amount of Chobani yogurt (unlike bottled water, which I try to avoid).

ChobaniCup
Cutting the holes is tedious, but not too bad with a fresh, sharp blade.

Like the other column, each cup was given a cotton wick to help discourage splashing. The cups are attached to the ribbon with small metal brads. I confess I’m a little dubious as to how well they’ll hold up once the plants start getting heavier, so each cup got two on each side. The black lift tube was sewn into place along the ribbon.

You can see the two silver brads on the right, connecting the cup to the ribbon.

I realized much too late that the thinner cup plastic won’t allow me to easily attach a hose to the bottom, so I grabbed the bottom of a soda bottle that was lying around and improvised a water collector to sit at the bottom of the stack. The soda bottle bottom is considerably thicker than the rest of the bottle, and I actually had to use a 1/4″ drill bit to get a hole into it.

watercup
The cup is covered in paper to discourage algae growth.

Each column has its own reservoir, which makes water pressure debugging easier. It also may help cut down on contamination if one of the plants gets a fungal or bacterial infection.

reservoir
The reservoir bin is still incredibly ugly.

I’m feeling sort of “meh” about the new column. It’s got some pros and cons, and I think it’s sort of a wash versus the first one.

Advantages:

  • Doesn’t look like water bottles hanging in your window
  • Much easier to remove net cups for cleaning
  • Fairly easy to remove cups from ribbon, should one become damaged or need changing
  • Shorter height means shorter lift tube, making it easier to get water up
  • Inexpensive compared to purchasing water bottles. 50 plastic cups came to under $10.
  • Vaguely better looking

Disadvantages:

  • Looks like disposable cups hanging in your window
  • Not nearly as rigid as the water bottle set up, making it feel more flimsy
  • Cups are made of thinner plastic and more prone to splitting than water bottles
  • Shape of cups makes them more percussive, so dripping water sounds considerably louder
  • Because the bottom is flat, some water collects around the edges which may lead to contamination / algae problems down the line
  • The cup’s brittle plastic means a separate water collector must be used on the bottom to funnel water back into the reservoir
  • Lack of a “top” on each cup means water evaporates more quickly, so the pump may need to run more frequently

In terms of looks, I actually rather like the water collector cup (covered in paper). If it doesn’t look totally soggy and sad in a few weeks, I may make column #3 out of 1 liter soda bottles and scrapbooking paper.

I’ve also noticed that column #2 has a considerably higher water flow rate than column #1. I think this is due to a combination of a shorter lift tube, larger reservoir bottle, and minor differences in the airflow from the pump.