After purchasing a fresh sponge bar for the Toyota K747 I started to put it through its paces. It knits stockinette beautifully, so I started working through the tuck stitches.
At first I couldn’t get the I and II buttons to stay in place at all. After some disassembly and a lot of oil, we got things moving again and it works great. But I quickly noticed that the 3rd needle selector wasn’t working. So I started to disassemble the machine to figure out why.

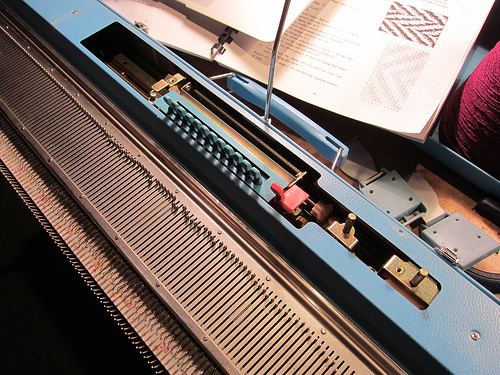
With the top cover off you can see some of the neat mechanisms in there. The zigzag gear (right) physically moves the needle selector up or down the needle bed. This means if you have a simple shifting pattern like a zigzag or checkerboard, you don’t need a punch card at all. You can just move the zigzag back and forth with each row.
Each of the blue needle selector levers rotates down to catch a small lever on the bottom of the machine. When these levers are caught, they cause the corresponding shafts (anyone know what these are really called?) to raise, which then push the needle butts forward. The small red lever releases the needle selectors.
Getting into the machine was a little tricky, you have to remove the card and zigzag knobs to access all the screws. Thankfully there’s a useful diagram in the K747 service manual. With the knobs removed, you can see the discoloration of the plastic over the years.

I had to fully remove the needle bed from the machine casing to get at the needle selector levers. Unfortunately by that time my hands were absolutely covered in grease so I couldn’t take many pictures. But once I got it out, I could flip it over and see the problem part:

The two little tangs on the bottom of the 3rd needle selector have somehow broken off, though I’m really not sure how. Unfortunately disassembly/repair of that part of the machine isn’t covered in the service manual. I see two options going forward: 1) I can carefully disassemble the needle selector mechanism, 3D print a replacement lever, and pray to God that I can get it all back together again, or 2) Fashion some replacement tangs with Sugru and hope they stay in place.
Since option 2 doesn’t require completely disassembling the machine, I’m going to try that first. There are a lot of little springs and I’m not sure I have the dexterity to get them all back in place again. I’d also like to better document the machine teardown, so sometime in the new year I’ll recruit an assistant and take apart / photograph the whole thing.
In the meantime the machine works great, and I can come up with plenty of patterns that avoid the 3rd needle selector.
Could you post some pics of the end product? I am fascinated by what the yarn/cloth that is outputted will look like. (I don’t have a history with textiles.)
🙂
Sure, I’ll photograph and post some of my swatches this evening.
A third option may be to file back the damaged tines and 3D print a U-shaped replacement that can be screwed into the remaining blue plastic.
Sugru by itself may not be rigid enough to replace the tines.
I was worried that might be the case. Unfortunately because of how old/brittle the plastic is, as well as how thin it is, I’m not sure I could safely screw into it. But I think you’re onto something with the file-and-print method. If Sugru fails I’ll see if I can get a strong enough bond to a makerbotted U piece with glue.
What I really want to know is how the thing broke in the first place, it’s not a part that should get much stress, and it’s buried in the bottom of the machine so it shouldn’t be easy to break.
If they are physically connected to those top needle selection paddles, all it could have taken was a misplaced bump by something or someone.
Good thing iterating over 3D printed replacements is easy and cheap!
It’s a little tough to photograph, but the needle paddles / tangs have a tab on the top (what you press with your finger), a hole in the middle for threading them onto a rod, and then two tangs on the bottom. The movement of the lever mechanism is limited by the rod, and the tangs don’t actually touch anything except when moving the needle selector bar. The needle selector bar provides very little resistance.
When I opened up the needle bed, a long rectangular nut that was missing from another part of the machine fell out. I wonder if it worked its way back there and then caused something to jam. If the selector rod was jammed well enough and you brute-forced it back into place, I could see breaking off the lever tangs.
I have a Toyota 747, ordered a new spong bar and took all needles out and cleaned. I replaced the needels and new spong bar, cannot get the needles to A position to knit. What have I done wrong?
Thanks
Hi Kelbot- I found your site as I was researching knitting machines. I would like to buy a machine to make big chunky organic-ey looking throws or ponchos. I am guessing that htey type of machine you have does not do that sort of thing but is for more delicate items. Have you had experince with any other machines and done any big projects? You have a great site (and darling babybot)
Hi Patty,
What you’re looking for is a bulky weight knitting machine. They’re functionally the same as any other knitting machine, but the needles are spaced farther apart (usually 9mm) to accomodate larger yarn.
The machine I have can go up to a DK weight yarn. I do know of some folks who knit heavier yarns using every other needle. The Machine Knitting group on Ravelry might be a good place to start.
Happy to found your explanations to dismantle the machine but I have the same problem as Charlene Bishop has, most of the needles won’t go back in A-position. Haven’t used the machine for years so now I have done a new sponge into the retaining bar but the needles are looking partly black (could it be that I have to replace all old needles?
Thanks in advance
The black is most likely oxidation. If it’s just a thin layer it shouldn’t affect much. Did the needles go back into A before you replaced the sponge bar? If so it may not be loaded in correctly.
Thanks for your quick response. No, the needles didn’t go back before the sponge replacement. Not all of them are standing out when I push them back to A position and these are going back just when I push them from heads. Another problem is when I choose the blue needle selector 1,3,5 etc. and pull the selection lever those needles come out in the ready for knitting position, if I choose 5 and 10 the needles come in different positions which means each 5th should be in knitting position and 4 in B position but there are some with 6 in B position and each 7th in knitting position. That’s really a big problem especially when I use the punch cards: the pattern are looking awful.
Hope I haven’t confused you with these explanations as I’m German and living in England my English is good but not perfect.
I had the same problem of not being able to push my needles all the way back to ‘A’ position. I found that pressing the ends of the needles downwards while simultaneously pushing them back does the trick.
Hi there,
I have ‘rescued’ a 747 from my parents shed – Mum says the last time she used it was when I was a baby (I’m 36) so it’s been there a while. The manuals were a little moth eaten so thanks for them – it’s much easier to read.
I have a lot of work to do before I can even begin to learn about how to use it and I don’t think I have your technical gifts. I’ve ordered a new sponge kit from the UK as I couldn’t find anywhere in Australia that had anything suitable. However I will start by trying to get it open and remembering not to lose any of the screws etc. and see if I can clean it! Your photos give me hope that I won’t ruin it by pulling apart and the screws hidden under the knowbs is good to know.
Hello Kelbot,
a few days ago I bought an awfully cheap (about 5 €) Toyota K747 with ribber here in Sweden. Also this machine knits stockinette beautifully although I had no time yet to replace the sponge bar. But the needle selector does´nt work at all and I think I have to do the same as you did and teardown the knitter.
So I want to thank you very much for the bright photos you posted and that you made the Service Manual available.
Best wishes
maliz
Wonderful site. Have a new ( to me )Toyota 787 & replacing needles I have managed to get five of them really stuck.
Can I assume that the 747 dismantling video that you have will be ( almost ) the same as the 787 ?
Please say yes as I really can’t get 5 of the perishers out & don’t know what else to do
It should be pretty similar. Most of the time when needles get super stuck it’s because they ended up on the wrong side of the sponge bar, did you already take the sponge bar out?
Yes I did, but the needles really do seem to be caught on something, so I think I’ll have to dismantle & investigate what is catching them.
Thanks for the speedy reply
I just acquired a Toyota K747 and am having difficulties with the lace carriage, as it keeps jamming. There are two blue wheels at the front of carriage. One wheel moves freely and the other one doesn’t move at all. Not sure if that’s the problem or if it’s something else. I’m not having any issues knitting stockinette. Have you had any experience with the lace carriage, if so, any suggestions?
Hi, we’re having the same issue. The Toyota K747 machine knits well but I’m having problems with the Lace Carriage jamming and twisting the needles if it’s “forced”. Any hints/tips/recommendations other than throwing the whole thing through the window???
I have recently purchased a 747. I need to replace a few needles but when I tried to put the new needles in they will not go in all the way. They slide in the slot but do not move back into position. Is there a trick that I am missing. I have never had problems like this with any of my other machines.
Hi, it’s long time since I use it, mine , TOYOTA, model K747, I can’t feed wool into carriage, should go behind springs (but I’ve try dozens of times. 20 years ago I could use it , I’m 74 now I’m not so good , please tell what I’m doing wrong it won’t cased on stitch’s , I got book, thanks everyone,🙏🌈😇