lased

Test Tube Spice Rack

A friend of mine had all her spices stolen appropriated when her old roommate moved out. So I made her this spice rack for Christmas:

Spice Rack

It holds up to 18 test tubes of spices, pre-filled with 12 and each labeled with a suitably scientific sounding abbreviation.

Each glass tube holds about 1 ounce of spice. The rack is made from 1/4″ acrylic. I can put the plans up on thingaverse if anyone is interested, but it’s pretty self-explanatory.

The idea was unabashedly yanked from Dean and DeLuca, but I like my version better. Theirs is more steampunk, mine is more “cooking class 2120.”

Programming, Software

LEGO plans, now with better rendering

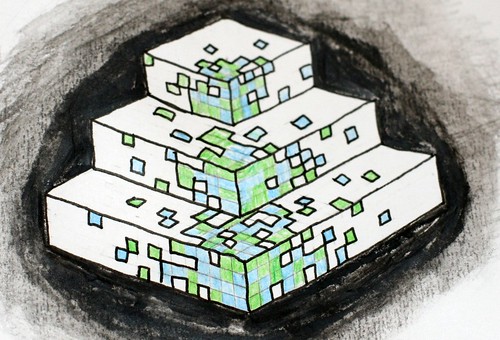
You may remember the “Legoizer” script I’ve been working on for Blender. It uses an existing script and one I’ve created to generate “layers” of LEGO patterns for building.

I got a lot of great suggestions on my last entry for how to automate the process of taking a screenshot, but sadly when it came down to implementing them things didn’t go so well. Luckily Angelo from Abandon Hope Games was kind enough to take the time to help me get the environmentals in Blender set up just right for rendering a “pattern slice.”

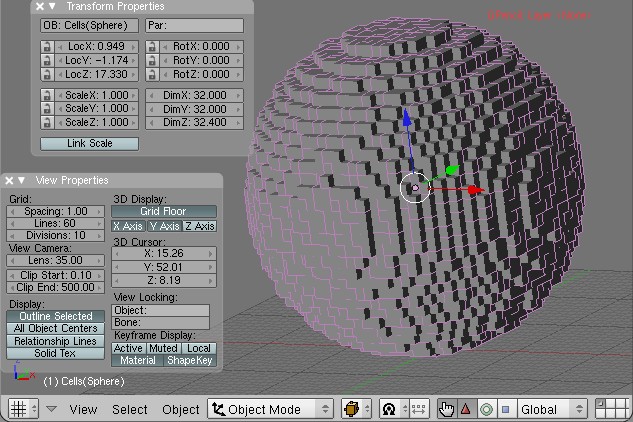
Step 0: Start with an object made of objects
The AddCells script uses DupliVerts to create an object made of references to another object. We’ll get to that in a minute, but first, let’s assume you have an object:

Step 1: Set up the camera
We want the camera to be facing down and rendering orthographic(all lines parallel) rather than perspective.

Make sure you’re in Object Mode and select the camera.
Press Alt+G and then Alt+R (confirming the dialogs) to return it to the origin.
Hit F9 to get into the Editing panel
Click the button labeled Orthographic in the Camera tab

Press 1 on your number pad to get a side view of the scene. Click the blue transform handle of your camera and move it up along the Z axis so it is well above your object.
Press 0 on your number pad and you should see a rectangular bounding box around your object (or perhaps around nothing) which represents the are which the camera sees.
Scroll the “lens” option right above the Orthographic button to zoom in/out so your

If you do a test render now with F12, you’ll probably see a badly lit (perhaps almost all black) render of your object from the top down.

Step 2: Set up the lighting

Select the existing light in your scene and press x on your keyboard to delete it.
Press space bar to bring up a dialog, and go to Add > Lamp > Sun
It doesn’t matter where the lamp is, as long as it’s facing down (which it is by default).

Step 3: Configure your materials

I mentioned earlier that our object was made up of DupliVerts.
These aren’t “real” objects, which is why I had such trouble applying materials to them. You need to apply the material to the reference object, which is generally somewhere in the middle of it. I usually do this by switching to the Outliner menu and finding the source cube manually.

Once we have our source object selected, hit F5 to bring up the Shading panel and click Add New under Links and Pipeline.
Pick a new color for your object. This will be the color of the lines in your final rendered image, so pick something that contrasts with your background color (which defaults to blue).
Click the Wire button under Links and Pipeline

Your object in the viewport should take on the color you’ve selected. If if doesn’t, you probably didn’t select the correct source object.

Hit F12 to render. Viola!

Now that we have our environment set up the way we want, rendering via script is easy. I’ve updated the script source (now on gist) to call Render when it’s done slicing and save the file to my hard drive.

This all works great, but of course there’s a new problem. Since we want to iterate over the entire object, I need to “reset” it back to being whole again. While I’ve saved an undo point I don’t think you can call that point via the API. In the current iteration of the script I save the vectors of each vertex before deleting it and then call verts.extend to add them back. This works great except…

The vectors for the verticies are transformed to be in the selected object’s local space, which is necessary for “layer 1” to be the first layer of the object and so forth. Unfortunately I haven’t yet figured out how to transform those verticies back. So when I run the script it dutifully reassembles my sphere originating from the center of the object. So there’s still some work to be done there.

Yaaaay... oh.

Programming, Software

Faking Blog Integration With XMLRPC and Ruby

I’m rebuilding indiecraftshows.com in RoR, but the blog will stay on WordPress. The rails app will be hosted on Heroku, and the blog will stay where it is at NearlyFreeSpeech.net. There’s one catch: I want the latest blog post to appear on the home page, which is part of the rails app.

To do this I’m using ruby’s included XMLRPC library to grab the latest post from WordPress and shove it into a YAML file named with the date and post ID. This happens in a cron job run daily. Since I only care about showing the most recent post, I don’t bother to check to see if there are other posts I don’t have.

I created a really simple object called (creatively) BlogPost, and chucked it in with the rest of my models in app/models. Note that BlogPost doesn’t inherit from ActiveRecord.

require 'xmlrpc/client'

class BlogPost
  def self.latest
    Dir.chdir(Rails.root.join('blog'))
    post_files = Dir["*.yaml"]
    most_recent_file = post_files.sort.last
    YAML::load(File.open(most_recent_file))
  end

  def self.fetch
    server = XMLRPC::Client.new2('http://www.kellbot.com/xmlrpc.php')

    blog_post = result = server.call("metaWeblog.getRecentPosts",1,YOUR USERNAME HERE,YOUR PASSWORD HERE,1)
    File.open(Rails.root.join('blog',"#{blog_post[0]["dateCreated"].to_time.to_i}-#{blog_post[0]["postid"]}.yaml"),'w') do |io|
      #we only want the published ones
      YAML.dump(blog_post[0], io) if blog_post[0]["post_status"] == "publish"
    end
  end
end

When the home page is called, the controller grabs the most recent yaml file (by name, not by time of creation, since WordPress allows you to lie about time). I just use the XMLRPC object as-is, but if I wanted to I could get fancy and do some post-processing to make it a little more friendly.

Business

When Free is Bad

Everyone likes free stuff. And some of the best technology and services I use are also conveniently free. But today I got a thorough lesson on the perils of free, and when you should pony up some cash for services.

Like many other people, I use Gmail for everything. Email for my various domains (10 last I counted) all ends up in Gmail. In short, Gmail contains my internet life.

I’m sure you can see where this is headed.

Earlier this afternoon, as I hit ‘send’ on an email to my dad, I was informed by Gmail that my session had expired. So I logged out, logged back in, and was then informed that my account was suspended for “unusual activity,” and that generally speaking, these things are resolved within 24 hours. There was no way to get in touch with anyone at Google, and no more information about why I’d been locked out.

As I generic cialis online was seething with rage and trying to figure out how to get in touch with all my business contacts to let them know that I wasn’t ignoring them, I realized that while Gmail kind of sucks, I also had unrealistic expectations of the service they were providing. For free.

Because Gmail is free, they have absolutely no obligation to me or my mail. There’s no obligation to provide anything resembling customer support. Customer support is expensive. So for a whopping total of free dollars, it’s not surprising I’m not getting any.

That’s the problem with free. As a customer you have no leverage. Telling a company I’m going to pack up and take my $0 elsewhere is hardly a compelling reason to do anything.

I use email for business all the time. And while I cursed all things Google and waited for the Gmail fairy to restore access to my mail, I signed up for an account at pobox. At $50 per year it’s not free, but as a business expense it’s pretty cheap. And then I set it up for use with my own domain. That way in the future if I’m not happy with my mail hosting, I can change without having to send out the “hey my email address is changing” message I’m writing right now.

My new email address will be @kellbot.com, but I can’t decide what. kellbot@kellbot.com seems redundant. kelly@kellbot.com does too. Maybe I’ll just set up a catch-all and make up my email addresses as I go along. Suggestions?

Uncategorized

Hackers The Movie 15th Anniversary

It’s hard to imagine that 15 years have passed since Hackers came out. It seems like only yesterday we were grimacing through the bad acting and worse “technology” references that Hackers brought to life.

Whether you love or hate the movie, everyone can agree that the 15th Anniversary Party is the perfect excuse to dress up in ridiculous looking retro clothing and drink with a bunch of other wannabe cyberpunks. In other words, it will be a typical night in Williamsburg.

More information on the party Kickstarter Page

Uncategorized

Dead Nook

Up until this weekend, I loved my Barnes and Noble Nook. Sure, the B&N digital download store doesn’t have the selection that Amazon does, and the software is slow and bloated, but I love the hardware. It has the potential to be a really nice device.

But Barnes and Noble keeps screwing it up.

First, if the paperback version of a book is $16, and the hardcover is $24, charging $19 for the digital version is not a good deal. Stop trying to pretend like it is guys. Especially when Amazon offers the same book in digital format for $10.

But more importantly, and this goes for all companies: stop designing hardware for “optimal” use patterns. Design them for realistic ones.

This weekend I was irritated to find my nook crashed/froze while I was transferring some documents to it. I reseated the battery per the instructions on the website and all was well. Then, after only a few hours of reading, my nook was at  “critical battery level.” When I got home I promptly plugged it in, but noticed the charging light wasn’t on. After a few hours it was clear it wasn’t charging. I went through a myriad of troubleshooting tips from the B&N forums, but the thing is totally dead.

When I finally broke down and called tech support, I was told that charging my nook overnight, or more than 4 hours, is bad for the battery.  So is letting the battery dip below 20 or 30%. Apparently by using my nook the way I use every other portable electronic device I destroyed the battery.

It’s completely unreasonable to expect consumers not to charge devices overnight. It’s likewise unreasonable to expect them to never let  a battery run down.

So now I’m waiting on a replacement battery, and if that doesn’t work a replacement nook. I’m not happy about it. I read my nook almost every day on the subway. Not having it at the beach this weekend was frustrating. Going a week without it while B&N replaces it part by part isn’t making me any happier about it. Thankfully my friends with their dead tree books were kind enough to refrain from saying “hahaha my book never crashes” as I stared at the lifeless corpse of my nook.

The Kindle is looking pretty attractive right about now.

PS: Why on earth is B&N making me wait a week with a broken device when they carry the battery at one of their stores half a block away from me? I’d go down and just buy another battery, but right now I’m not in the mood to give B&N any more of my money. Unfortunately the Kindle 3 is sold out right now.

Update: While the rep on the phone said to expect my battery Monday, it actually showed up today. Later this evening we’ll know if it’s the battery or the nook.

Update #2: As expected, the battery is not the problem. The battery that I got did have cialis generic enough charge on it to boot, and the nook is just not charging it. They’re sending out a new nook, which I should have  Thursday or Friday of next week. I still fail to understand why it can’t be replaced at a B&N store, but at least they’re taking care of it.

Startup Life

Pivotal Tracker

I just finished up my third week at SkillSlate. For anyone who missed my last post about it, it’s a directory of handymen, personal trainers, and other service providers. Right now it’s just in New York City, but that will change soon.

SkillSlate uses Pivotal Tracker for task management. At this point I have used just about every task management tool under the sun. Bugzilla, Eventum, Trac, various offerings from 37 Signals… I even rolled my own using WordPress once. So far I can’t say that any one of them is my favorite. They each have their advantages and drawbacks.

Pivotal is interesting because it uses a model for estimating deadlines and organizing workloads that I haven’t seen elsewhere. You assign points to each task corresponding to how long you think it will take. The points are relative to each other, not time. So if you decide that changing the colors in the header is a one point task, you might decide that adding some validation to a form is a two point task, and totally rewriting the login system is a five point task.

Then, rather than assign tasks to releases or milestones, you create releases and arrange your various tasks as needing to happen either before or after said release. As you work and close out tasks Pivotal calculates how fast you work. Based on how fast you’re working and how much needs to be done, Pivotal will estimate when you’ll be finished (and whether you’ll hit your deadline if you’ve set one).

It’s an imperfect system, sure. First and foremost, every member of the team needs to be on the same page with their point estimations. Second, the UI is completely non-intuitive. I had to actually watch the help videos to understand what was going on. Each team likely has multiple projects, but switching between projects is a clunky process. And the various reports and charts seem scattered and hard to find.

After getting over the UI though, I love Pivotal Tracker. As someone who has an “amazing and somewhat alarming thirst for points” (Chris’s words), seeing my workload broken down visually is very handy. If you turn on the “charts” view you’ll get a graph of how many work units you need to plow through to release on time versus your current rate of work. It helps turn a mountain of endless tickets into something more organized and paced.

I’ll be interested to see how well the time estimates work. In order to provide useful estimates it needs at least a month worth of history, so it will be a little while before we get a really accurate reading for our team.

Organization

100 Things

Minimalism is gaining popularity on the internet.  There are blogs dedicated to living with as few items as possible, and a trend of narrowing down your possessions to 100 things. This is an achievable reality thanks to a few things (books, plates) not being counted as “things.”

I will never be a minimalist. I come from a strong pack rat heritage (though my mother has made leaps and bounds in the past 5 years at unearthing the basement). But reading these lists has made me think perhaps I could stand to pare it down a little.

Rather than cut down to 100 things, I have decided to get rid of 100 things. Given the amount of stuff I have crammed into our 1000 square foot condo it’s unlikely that ditching 100 items would actually make a noticeable dent. But I feel it’s a worthy challenge.

I found the following items in my immediate vicinity which I really don’t need to hang on to:

  1. A stuffed kiwi key chain (my keys are on a bottle opener that says “die in a fire” on it)
  2. A miniature plastic “book” containing a notepad and tiny pen
  3. A stuffed GIR key chain (don’t panic, I have another one)
  4. A board game I have played only once
  5. Three VHS cassettes (I contend these each count as one item) which are readily available on DVD. I haven’t owned a VHS player in years.
  6. A bread machine
  7. An extra kitchen timer
  8. A TV-B-Gone (fun as it is, I don’t really go places with TVs I wish to turn off)
  9. An envelope moistener I have never used
  10. A pair of Chuck Taylors I bought in 2000. They are full of holes and uncomfortable to wear.
  11. A pair of pants I have never worn which don’t fit. I lost the receipt, but they were only $5 so it’s not a big loss.
  12. A pair of pants which have never fit me well. Also $5
  13. A size 6 pair of jeans. I caved and rescued them. They’re expensive jeans!
  14. Six books (four paperback, two hardcover). I thought about listing them on PaperBackSwap, but with my Nook I really have no desire for printed books. The books are Freakonomics, The Five People You Meet in Heaven, Stranger in a Strange Land, Job: A Comedy of Justice, Anansi Boys and Zen and the Art of Motorcycle Maintenance.

With the exception of the chucks, which I threw in the trash with just a bit of a dramatic pout, everything else is headed to Goodwill (or NYC Resistor where appropriate).

20 items down, 80 to go.

bento

Back to Bento

Now that I’m working full-time at an awesome startup downtown I’ve been packing bento lunches again. In addition to being better for me, it’s substantially cheaper than buying lunch in midtown. A wrap or salad at the “usual” place ends up being about $9. Even considering the fact that Chris works from home a few days a week it adds up fast, to about $300 per month. A bento lunch generally comes in under $3.

Today’s lunch consists of a baby spinach salad with peppers, carrots, and mushrooms, and a chicken sandwich with pepperoni. I use fat free cream cheese instead of mayonaise. Fat free cream cheese completely fails as anything I’d want to put on a bagel, but does well in sandwiches. I used “low carb” bread. Low carb bread has a weird spongy texture I really don’t recommend. Stick with the real thing.

Gaming

No Starcraft Until Midnight

As is often the case when one pre-orders games, I got my hands on Starcraft a little early.

Unfortunately, Blizzard would have none of it:

blizzard hate

On the plus side, at midnight when the game does go live, I’ll be playing Starcraft II instead of waiting in line at Gamestop.
Curiously, SCII comes with two “guest passes” for the game. Interested to find out the logistics of how those work.

Edit: or, I could just read the back of the card, duh. The “Guest Pass” is valid for 7 hours or 14 days, whichever comes first. This seems less useful than the “spawn” installations available with SCI, but since everyone I know has a copy of SCI, we never needed it anyway.