New Construction Townhome, Software

Interior Design Planning

One of the nice things about buying a home that had been built recently is that the original builder’s plans were still available, leftover from when they were trying to sell the development. We got them from the seller and I immediately started modeling the house in Google SketchUp.

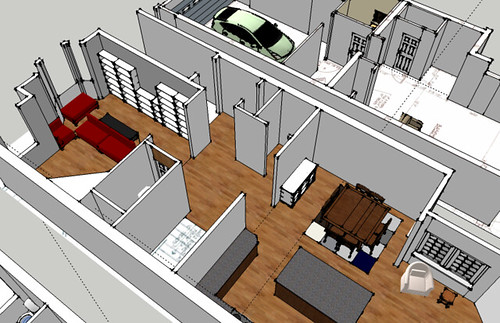
I followed the technique in this video to build the house from the plans. Things won’t match inch for inch, but it gives me a pretty good idea of the layout and I can always correct the measurements later after checking them with a tape measure.

For the time being my house has no ceilings, and each floor is laid out side by side. Google SketchUp has a wide variety of furniture in their 3D Warehouse, and with a little practice I’ve started to be able to model my own furniture.

Sketchup

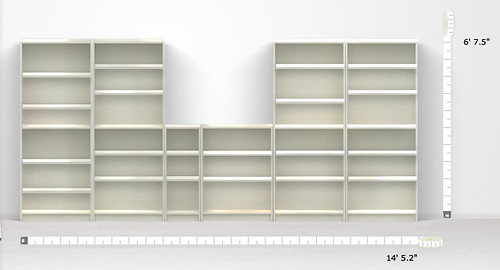
Ever since seeing this Billy bookcase hack on Pinterest, I’ve been kind of obsessed with creating a built-in shelving wall. Ikea has some pretty good planning tools, so I was able to design something I thought would work in the space.

BillyPlan

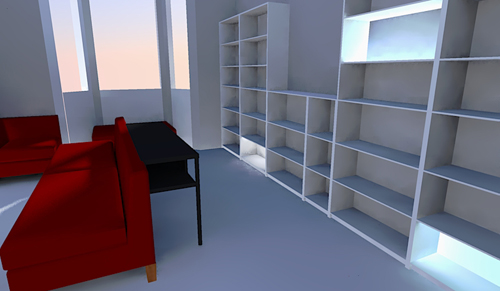
Then I grabbed the Billy set from the SketchUp 3D Warehouse and started modeling it in the room. SketchUp’s rendering tools leave a lot to be desired so I started playing around with a demo of Twilight, a rendering plugin. Aside from some odd lighting issues, I think it gives you a better feel for a space than SketchUp’s line drawings.

billyRender

One other SketchUp plugin that has been invaluable is Fredo6’s Round Corners. I used it when modeling the couches to make them look more couch like.

CornerChairComparison

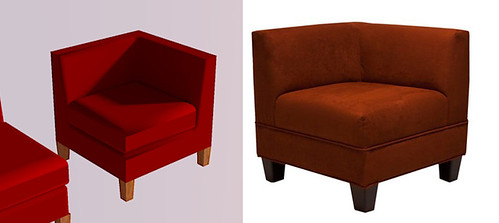
Clearly my 3D modeling skills still leave a little to be desired, but you get the general idea of the piece. It’s a Makenzie corner chair from Target, part of a sectional we’re considering getting for our TV room.

Thankfully we have some time before we have to start seriously thinking about furniture, since the carpets need to be replaced and we’ll want to put up a fresh coat of paint. The next few weeks will be spent coordinating various contractors (long distance), trying to get the house in shape for move-in well before the baby decides to show up.

Gaming, Software

Getting XBMC to work with our Xbox 360 Wireless Controller

This is part two of our home theater PC adventure. If you’ve just arrived you may want to start with part 1, Hello Xbox 360 Wireless Gaming Receiver.

Hooray, Windows can finally see the controller. We fire up the control panel tool for gaming devices and confirm that all buttons and axes work. We’re just about there! XBMC even helpfully includes keymappings for the xbox controller by default! We should be pretty much plug-and-play from here! I open up XBMC and…. nothing. The controller does nothing. I smash all the buttons, and still nothing.

The first step in debugging is to open up the log file and see what’s going on. The log file starts fresh every time you boot XBMC, and if you’re lucky you’ll see a line like this shoved in there:

19:00:17 T:2904 M:876916736 NOTICE: Enabled Joystick: Controller (XBOX 360 For Windows)

This means that XBMC can see the controller. It also tells us that it thinks the controller is named “Controller (XBOX 360 For Windows)” and depending on your OS and a few other seemingly random factors, it may be named something different.

This name is critically important, because it’s how XBMC knows which keymapping profile to pick up. When I went into the XBMC system/keymappings folder and looked at the existing 360 controller profiles, none of them was an exact name match. So I copied one of them and pasted it into the user keymappings folder.

The next step is to go into our copy and replace with or whatever your system thinks it’s called. That node pops up a bunch so you’ll probably want to use find+replace rather than manually copying and pasting all the time.

I’m not sure exactly what happened, at some point while I was messing around with all of this I managed to un-pair the controller from the PC without realizing it. After much cursing and whining, “why doesn’t it woooooork,” I realized what had happened and rebooted things.
Once I had renamed the joystick and it was actually communicating with the PC, I fired up XBMC and something magical happened: both the A and B buttons were functioning as Select and Back, respectively. Hooray! And the right analog stick was working as a volume control (though the axis was inverted). Not much else seemed to do anything, but IT WAS WORKING. Hooray!

The next task was getting the D-pad to work for navigating menus. Let me take this time to say that like most people who grew up with Nintendo controllers, the d-pad on the Xbox 360 controller is a source of scorn and hatred. But I wasn’t quite ready to tackle the analog stick, so the d-pad would have to do.

At this point I turned on debugging in XBMC and then proceeded to methodically press every button on the controller (and swivel each stick axis) exactly once. This worked great for the buttons but none of the axis data showed up in the debugger at all. Great. The keymap xml file I copied incorrectly identified the d-pad as “buttons” when it is in fact a “hat” according to Windows, so once I replaced the “button” nodes with “hat” nodes I was able to map the directions on the d-pad to Up/Down/Left/Right commands.

I should mention that I spent a lot of time googling about my problem, and mostly found forum threads where one person said “my xbox controller doesn’t work” and another person said “use xpadder,” or someone says “the d-pad doesn’t seem to work” and again the reply is “use xpadder.” After reading that response in about 20 threads, I was really starting to think the whole system was just too bugged to be viable. But in reality, people on the xbmc forums just aren’t willing to get their hands dirty.

Only in the process of writing up this post did I find someone who had actually taken the time to map out which buttons, hats, and axes where which. I wish I had found that post last night, it would have saved me about two hours.

I’m still deciding what the analog sticks should do, and trying to figure out how to get the controller to turn off when I’m done, but we got things to the point where it was good enough to navigate around to Dexter, and that was enough for one night. And I will say, navigating with the Xbox controller feels nice, much nicer than breaking out the clunky keyboard.

Hacking

Controlling our Home Theater PC with a wireless 360 Controller

We recently set up Xbox Media Center (XBMC) on the computer that’s attached to the TV. XBMC actually has nothing to do with xbox – it was a homebrew media center application for the original xbox that has since been ported to Windows/Linux/Mac/iOS.

We’re pretty close to what we feel is the “perfect” setup, but getting here was a headache and a half so I’m putting up a series of posts documenting our journey.

Part 1:  Hello Xbox 360 Wireless Gaming Receiver
Part 2: Getting XBMC to work with our Xbox 360 Wireless Controller

Hello Xbox 360 Wireless Gaming Receiver

We’re currently using a wireless keyboard/mouse combo with our media PC, which is clunky and sort of a pain to use. I started looking into media center remotes. We also have a collection of wireless 360 controllers, and only very rarely use all four at once. And so my mission began.

Microsoft did at one point make a wireless 360 controller receiver for the PC, a little white dongle that plugs in to a USB port. Unfortunately, they discontinued it some time ago. You can still find the receiver bundled with a controller some places, but I had a hard time finding an OEM standalone receiver.

Fortunately, the Chinese knock-offs on eBay are still readily available. I got one for $13 including shipping, it’s a little white wireless dongle with a USB cable. Unsurprisingly, it did not include a driver disk. Equally unsurprisingly, Windows had no idea what it was when we plugged it in.

We downloaded the official Microsoft drivers for the official dongle. You can find them here: http://www.microsoft.com/hardware/en-us/downloads , click under the gaming heading.

Our media PC is running Windows XP. Everyone else seemed to have a perfectly fine time installing the drivers by hand. I guess we’re just unlucky, but the damned thing just wouldn’t install.

Turns out, we had the same problem this guy had: the dongle wasn’t identifying itself correctly, and thus Windows didn’t recognize that it belonged to the driver.

The fix involves editing the driver’s .ini file, which sounds a lot scarier than it is. Here are the steps I took:

Step 1: Find your errant dongle in the hardware manager.

  1. Go to your Control Panel
  2. Click on Hardware and Sound
  3. Click on Device Manager under Devices and Printers
  4. Scroll down the list to Other devices
  5. Double-click the Unknown device. If you have multiple unknown devices, you may need to use the process of elimination to figure out which one it is.

Step 2: Find out your device’s PID

  1. Click on the Details tab
  2. Look for something like this USB\VID_045E&PID_0291&REV_0107
  3. The bit you’re looking for is PID_0291, or whatever number is in the place of 0291
  4. If the number you see is 0719, you have a different problem than I did. Sorry.

Step 3: Edit the driver .ini file to reflect the actual PID

  1. Figure out where the driver installed itself (probably somewhere within c:/program files) and open that folder
  2. Open up Xusb21.inf in Notepad or your favorite text editor
  3. Find and replace any instances of ‘Pid_0719’ with ‘Pid_0291’ or whatever your device’s number is
  4. Save the file

Now if you’re lucky, you can run through the update driver dialog, point it at the folder containing xusb21.ini, and Windows will recognize the device as a Wireless Xbox 360 Receiver. Hooray! You are now halfway to tv-controller bliss.

On to the next part, getting the stupid thing to work with XBMC.

Hacking

Livescribe Gives Developers Huge F-You

I got an email today from Livescribe announcing the closing of their developer program:

As of July 29th, Livescribe will close its third-party developer program.

With cloud technology and mobile information access becoming increasingly important to our customers, Livescribe is realigning its focus and resources on cloud access, storage and services. Our recent introduction of Livescribe Connect, which enables customers to easily send notes and audio, as a pencast PDF, to people or destinations of their choice like Google Docs, Evernote, email, and Facebook, is an important step in this direction.

Applications in our online store will remain available for download and purchase pending compatibility with future Livescribe software updates.

We will continue to accept applications submitted for publishing in our online store, as well as pattern credit requests through July 22nd. At this time, the SDKs and developer website will no longer be available.

Effective immediately, their forums are read-only and will be taken offline completely in a little over a week. They’re removing the ability for developers to create custom applications and taking away the SDK. Particularly disappointing is the loss of the custom paper penlets, which allow developers to create and print their own custom printed paper and forms.

It’s upsetting to see a technology company close its doors to creative developers. It’s insulting to see them to do so overnight, not only shuttering the program but silencing the forums immediately. It’s clear the company doesn’t value its developer community at all, and that’s a damned shame.

As a consumer and developer, I feel duped. Part of why I purchased the Livescribe was specifically because of the ability to extend it. Developer communities bring niche functionality to products – they add features that are too esoteric for the company to bother with. Killing off your developer community sends a clear message that your product is for mainstream users and mainstream users only: everyone else can go home.

So, well done Livescribe. In the span of just a few hours you’ve turned me from one of the biggest evangelizers of Livescribe to someone who wishes  she still had the receipt and packaging for her Echo so she could return it.

Business, Hacking

Where are the women in tech?

Where are the women in tech? Oh, apparently we’re all out shoe shopping.

Google sent out invites to Gilt Groupe*’s early bird sale of Chromebook laptops. I found it difficult to get excited about a $500 laptop boasting nearly the same specs as a netbook I bought for the same price 2 years ago, but I’m also not the target market for a “fashion laptop.”

What is curious though is Gilt Groupe’s decision on how to categorize the laptop, which I only noticed when copy/pasting the URL to a friend:
http://www.gilt.com/sale/men/google-chromebook

Oh, right, it’s a men’s item. Never mind the fact that they have a perfectly serviceable Home category, for items which are presumably neither worn nor gendered.

This is, on the scale of sexist things I’ve witnessed, pretty trivial. Minor. Unimportant. But come on people. Is this really where we are still? Girls like shoes and boys like computers?

Come on folks, we can do better than this.

* Don’t even get me started on the superfluous E

Hacking

Unbloating my Macbook Air

I got a Macbook Air a few months back. I have a herniated disc in my neck, and needed a laptop I could both carry to work every day and do development on without further destroying my sad spine. While the Asus EEE line is adorable, they’re a little underpowered for doing real work on, and frankly, the Apple Tax is still cheaper than spine surgery.

Anyway, while the 64 mb drive was twice the size of the 32 drive in my EEE that I never filled, I recently started getting warnings that my drive was full (< 1 gig of space… remember when that was huge?). So I took some time this morning to answer the question: Where the hell did all my space go?

Dropbox, though it has saved me from countless headaches, was unsurprisingly a huge culprit. Giant raw video files for projects were chucked in there on beefier systems, and then the little macbook air cried as it tried to figure out what to do with 24 takes of Katherine and I attempting a mid-air high-five.

Mercifully, Dropbox now has a feature called “selective sync” which allows you to choose which folders are downloaded. You can further tailor things in the advanced settings, cherry picking subfolders to sync. By unchecking a few bloaty files I don’t need on the road, I freed up about a gig of space.

Starcraft II. This is probably an obvious one. I figured SCII was taking up a few gig, but upon inspection it was more like 10. I removed it for the time being, and will reinstall it later on my adorable external hard drive.

Extra Languages. I like to pretend I’ll someday learn another language, but by the time I do we’ll probably all be traveling by hovercraft. I used Monolingual to remove the languages I don’t need, freeing up 1.5 gig.

Now I’m back up to 13 gigs free, hooray! There are some more drastic measures I could do, like uninstalling printer drivers I don’t think I’ll need, or removing applications like Garage Band (which takes up a gig), but for now this is enough space.

Hacking

New Flattr Buttons

Diane from Crafty Pod has spent a lot of time talking about the cost of producing free content, and how we can cultivate a supportive environment for it.

I’ve seen Flattr buttons all over lately, and never really took the time to look into it. I assumed it was yet another micropayment system, and frankly I’m kind of tired of micropayment systems. And while Flattr IS indeed a micropayment system, I think it’s kind of cool.

Instead of randomly deciding to pay for content/things, you decide how much per month total, across all sites you’re willing to spend supporting free content. Then you can go around Flattring things with reckless abandon. At the end of the month, your bounty is split among all the sites you’ve Flattr’d.

I’ve set myself up with it, and it honestly feels pretty nice to use. I can show my support for as much or as little as I like, and not feel like it’s slowly draining all of my savings.

If you think you get $2 / month or more worth of value from all of the free content on the internet, consider signing up for a Flattr account! I’ve added Flattr buttons to my blog; while only a handful of posts are what could be generously considered useful content, there are a few that I know folks have found quite handy. So go forth, and make the internet a more sustainable place for free information!

Crafting, Hacking

Hooked on 'botting

This week I makerbotted for the first time! I know, I know… I should have done this much much sooner. Everything Tiny and Makerbot were actually founded in the same room, the old NYC Resistor location, and it's been really exciting to see things take off for them. But until recently, partly due to the success of Everything Tiny, I never really had time to sit down and get personally aquanited with the wide world of 3D printing.

Part of my probelm was that I always had ideas which were large and complicated, and I never finished the designs. So in an effort to actually produce something, I set myself to a very simple first project: a plastic organizer insert for a mint tin.

Subdivided mint tin

I'm using it to organize my miniature pompom collection. Because I have one of those.

Overall the printing process was pretty easy. Adam, Matt, and Pax were nice enough to help me get over the few problems I ran into. Matt, who is the developer in charge of ReplicatorG (Makerbot's printing software), gave helpful instructions like "now click the picture of the potato with an arrow coming out of it." He then asked if I knew any UI designers looking for work.

Here are the issues I ran into on my maiden print:

The model didn't adhere to the bed.  Because my design is pretty thin, it didn't stick very well to the bed of the makerbot, even with the heated build platform. This was easy enough to fix, we turned on the raft (a layer of plastic which goes down evenly before you start the real print, and is removable later).

The plastic was coming out goopy. The main issue with my first two attempts was that the plastic was coming out much too thick, and kind of lumpy/grainy. This caused two problems: first, it looked terrible, with little lumpy bits everywhere. But more importantly, the lumpy goopy bits would build up and then harden. Then when the extruder head came by again, it would hit these plastic lumps and move the model, throwing off the registration.

There were two suggested fixes here: first was to increase the speed, so that the build platform would move faster (allowing for less material to build up). This was met with a certain degree of success, but Adam suggested cheap cialis online that the plastic we were using, which had been sitting out at Resistor for quite some time, had absorbed too much water from the air to really be useful. The moral of the story here is to store your plastics in airtight containers with some desiccant. In the end, we switched plastics.

My machine wouldn't talk to the Makerbot. This ended up being an issue with my machine, a somewhat unhappy eeePC. When I switched to my mac, all was happy again. Also, the eee is way too underpowered to really be generating gcode for prints. I was able to cold-boot my mac, install RepG, install the drivers, and generate the print's gcode from scratch in the time it took my eee to get halfway done generating the same gcode.

The build platform wouldn't heat. This one took us the longest to debug. One of the connectors was visibly damaged (names were named but I won't reprint them here), but it worked just often enough to make us think something else was the problem. After some thorough testing with the  multimeter, and some careful coaxing of the connections, power was restored to the build platform.

Here's the source model, which I've uploaded to Thingiverse. Note that this is meant to fit mint tins that I purchase wholesale, and as such may not fit the Altoids tins. I created the object in Google SketchUp and then exported it to STL for use with RepG. GoogleSketchUp is OK for doing things quickly, but there are a lot of things I wanted to do with the design that I couldn't convince SketchUp to let me do. Particularly, I wanted nice rounded edges on the top of my model.

I'm happy with the final print, and really stoked about Makerbotting more models in the future!

Hacking

Becoming a Licensed Ham

We have a number of licensed hams at NYC Resistor, but until recently I never quite understood the draw of ham radio. Honestly, I didn’t see what was so exciting about contacting a random person and telling them their signal strength, maybe along with the weather if you had a good signal. And in a world of email, broadband internet it can be hard to understand the appeal of amateur radio.

Admittedly part of my interest is just for the sheer nerd value. We refer to hams as “beardos,” due to the fact that almost everyone using a ham radio sounds like they are a middle aged man with an intense beard.  But lately I’ve been thinking about how our incredibly powerful network of internet and phone lines is also incredibly fragile. Like how an errant backhoe in Massachusetts can kill my connection for hours. Or how my husband and I managed to lose each other, despite being only a few blocks away, when cell phone service was out for an hour. In light of some of the recent natural and man-made disasters, the ability to send a message 1000 miles per watt of power seems a lot less silly.

I’m studying to take the Technician exam, which involves learning a small amount of radio science on top of the basic electricity I already know. By far the hardest part is navigating all the acronyms. Hams love acronyms. Everything written about it is so full of acronyms and jargon it’s pretty much impossible to read without prior study, which can make it a little difficult to get started.
While I usually find the for dummies series painfully oversimplified, I actually found Ham Radio For Dummies to be pretty handy. It’s by no means comprehensive, and a little out of date, but it got me to a point where I could at least navigate the ARRL website.

I’m still not quite passing the practice tests, so I have a little more studying to do, but hopefully I’ll have my ham license in hand by the beginning of next month!

Software

Got a new pen. Installed Zork on it.

This past week, I picked up a Livescribe pen. I think it’s the most impressive gadget I’ve seen in a long while, though every now and then I have to stop to consider the fact that I carry around a 1 gigahertz computer complete with keyboard and touch interface in my pocket. I remember long ago seeing an ad for a machine for a 400 hz machine and thinking it was a typo – nothing could possibly be that fast.

Anyway, so, pen. The nickel tour is that it records whatever you write* and can also record voice. I had a microcassette recorder in college. I used it to tape a handful of lectures, and never listened to the tapes ever again. So the voice recording capabilities weren’t really a huge selling point.

What’s cool about the Livescribe is that it indexes the audio to your writing. So I can tap on a bulleted list, and hear the full conversation from thath point. Which is much more useful than having to search an entire conversation for the 10 second clip I care about.

It syncs with Evertnote, though not particularly elegantly. With a paid evernote account, you can search your notes (using OCR), and since I didn’t feel like paying for the Livescribe OCR add-on, that’s a win. Evernote’s OCR does an OK job of translating my half-cursive-half-print writing.

Evernote tries to find the word "game" in my writing


But, let’s get to the most important thing about this pen: it plays Zork.

Zork is a free application for the pen. It’s a direct port of the Zork we all know and love, and it uses the pen’s LCD window to scroll text (e.g. “You are west of a house”). You write your actions on the page, it reads them in, and then spits out the appropriate snarky Zork response.

The handwriting recognition is generally very good, but I had some odd trouble getting it to read the phrase “open mailbox.” If you look at the command list, you can see where I forgot to save and had to start over after turning off the pen. Modern autosave has spoiled me.

Saving/restoring is pretty cool, you draw a little picture (the circled 1 and 2) and tap it twice. Then you tap the one you want to restore when you go to load a game. Neat trick.

Overall the pen is a neat bit of technology. Maybe not a critical one, but definitely neat.


*provided you write it on special paper. You can print your own special paper if you have a nice enough printer, and even design your own special paper if you really want to hack around with their SDK.